
Popular categories
Looking for a yarn?


Comments / Questions (30)
![]() Lea wrote:
Lea wrote:
Hallo, Ich bin gerade an der rechten Vorderseite und verstehe nicht so recht was "gegen den Hals abketten" bedeutet. Soll ich einfach die (bei mir) 22 äußeren Maschen abketten? Oder ist das anders gemeint. Vielen Dank für ihre Hilfe LG Lea
19.01.2021 - 21:36DROPS Design answered:
Liebe Lea, ja genau, beim linken Vorderteil ketten Sie die ersten 22 M am Anfang einer Rückreihe ab und beim rechten Vorderteil werden die ersten 22 M am Anfang einer Hinreihe abgekettet, diese Maschen sind für den Hals. Viel Spaß beim stricken!
20.01.2021 - 07:38
![]() Gry Normann wrote:
Gry Normann wrote:
Hva menes med å strikke 1 m Rille mot slutten av forstykkene og bakstykkket på jakken?
19.09.2020 - 21:08DROPS Design answered:
Hei Gry, Det betyr at den siste masken er strikket rett på alle rad (som er definisjonen av rille). God fornøyelse!
21.09.2020 - 07:01
![]() Kathleen wrote:
Kathleen wrote:
Answered my own question! Thanks!
25.05.2020 - 03:21
![]() Kathleen wrote:
Kathleen wrote:
With 42 st on either end (including band) and 73 st (odd number) in back how do I Rib K/P without affecting band?
25.05.2020 - 03:04DROPS Design answered:
Hi Kathleen, The bands are worked in rib too, so the body begins and ends with K1 (on the first row) and the last band follows on with P1, K1, P1, K1 and P1. Happy knitting!
25.05.2020 - 07:31
![]() Kathleen wrote:
Kathleen wrote:
Thank you for earlier response! I have’nt started knitting yet but would like you to start me off on “like left front piece BUT MIRRORED”.
15.04.2020 - 17:15DROPS Design answered:
Dear Kathleen, this means that everything that were done at the beg of row from RS on left front piece (= armhole for example) will be worked at the beg of row from WS on right front piece and neck will be now worked at the beg of row from RS instead of at the beg of WS row on left front piece; Happy knitting!
16.04.2020 - 09:38
![]() Tina wrote:
Tina wrote:
Vielen Dank für die Antwort. Ich habe jetzt die elf Maschen als Schulter an das Rückenteil gesteckt. Vorne bildet sich somit ein V-Ausschnitt, der ja auf dem einen Foto von Ihnen nicht zu sehen ist. Dort ist es eine gerade Kante. Leider kann ich hier keine Bilder hochladen, sonst hätte ich Ihnen das mal zeigen können ... Die Kante mit den 17 Maschen... wohin gehört die denn? Irgendwie sieht das alles komisch verzerrt aus aus. Ich bin echt ratlos. 😢
19.09.2019 - 11:05DROPS Design answered:
Liebe Tina, die 17 abgekettene Maschen sind Halsausschnitt, und dann stricken Sie 4 cm über die restlichen 11 Maschen für den Schulter. Viel Spaß beim stricken!
01.10.2019 - 10:35
![]() Tina wrote:
Tina wrote:
Hallo, Ich wüsste gern wofür die 4 cm gegen die Mitte nach dem Halsausschnitt noch gestrickt werden. Unter Zusammennähen steht ja leider nur "Die Schulternaht zusammennähen." Aber was mach ich mit diesen 4 cm? Und wird der Hals nicht mit einem Bündchen versehen? Oder einem Kragen? Danke schon mal für die Antwort.
19.09.2019 - 07:05DROPS Design answered:
Liebe Tina, wenn die Arbeit 26-28-31 (35-39) cm ketten Sie die 17-20-21 (22-24) Maschen gegen der Mitte für den Halsausschnitt ab, es sind nur noch 11-13-17 (20-23) Maschen auf der Nadel, stricken Sie jetzt wie zuvor bis Arbeit misst 30-32-36 (41-45) (= Schulter) und die Maschen abketten. Man strickt hier keine weitere Halsblende (die Maschen werden schon im Rippenmuster gestrickt), Sie können aber gerne eine kleine Halskante dazu stricken/häkeln wenn Sie es so lieber haben. Viel Spaß beim stricken!
19.09.2019 - 09:55
![]() Ann-Christin wrote:
Ann-Christin wrote:
Hej! Jag förstår inte hur ärmen på koftan skall stickas efter det att jag har avmaskat 6 maskor under ärmen till ärmhålet. Det står att man ska avmaska 2 maskor i var sida på varje varv tills arbetet mäter 21 cm. Min frågan är, hur många gånger ska det avmaskas 2 maskor i varje sida? Tack för er hjälp!
09.06.2019 - 19:06DROPS Design answered:
Hej Ann-Christin. När arbetet mäter 21 cm maskar du av 6 m i varje sida för ärmhål. Efter det stickas varje del färdig för sig. På bakstycket maskar du av 2 m i början på varje varv 3-3-2 (2-2) ggr (beroende på vilken storlek du stickar) och sedan 1 m i början av varje varv 0-0-1 (1-1) ggr (beroende på storlek). Lycka till!
10.06.2019 - 14:07
![]() Dolina Von Raedern wrote:
Dolina Von Raedern wrote:
Hallo, ich wüsste gerne wie der Ärmel zu Ende gestrickt wird nach dem Abketten der 6 Maschen. Soll jetzt für die Armkugel abgenommen werden und wenn ja, wie? Schon mal danke für die Antwort.
29.10.2014 - 10:34DROPS Design answered:
Ja genau, Sie beginnen nach dem Abketten der 6 M direkt mit dem Abketten für die Armkugel. Sie stricken ja nun im Rippenmuster in Hin- und Rück-R weiter und ketten beidseitig, d.h. am Anfang jeder R (also am Anfang der Hin- und der Rück-R) je 2-3-3 (4-4) M ab, so lange, bis der Ärmel eine Gesamtlänge von 21-22-24 (29-33) cm hat. Danach ketten Sie beidseitig, d.h. am Anfang jeder R, je 3 M ab, dann ketten Sie die restlichen M mustergemäß ab.
29.10.2014 - 14:16
![]() Jindřiška wrote:
Jindřiška wrote:
Dobrý den. U kabátku jste zapomněli napsat, že po pletení lícovým žerzejem se rovnoměrně nahodí oka. Protože potom nevychází počet ok při tvoření průramků.
05.03.2014 - 09:17
|
|
DROPS Baby 20-8 |
|
 |
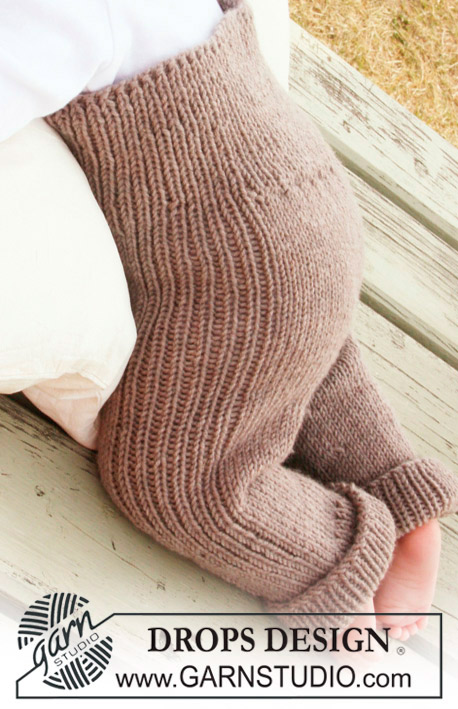 |
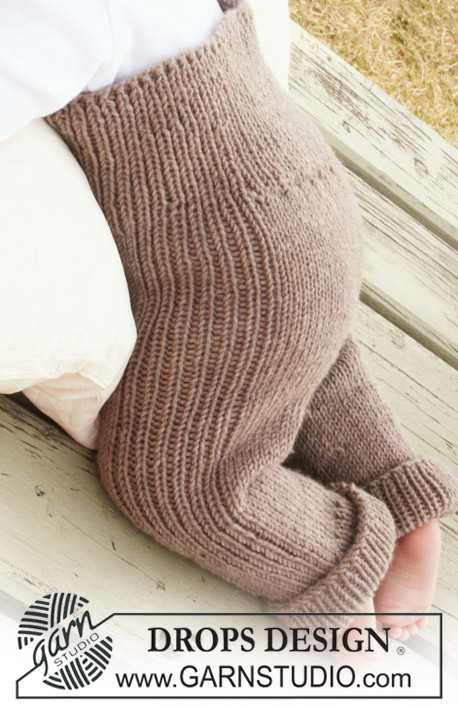
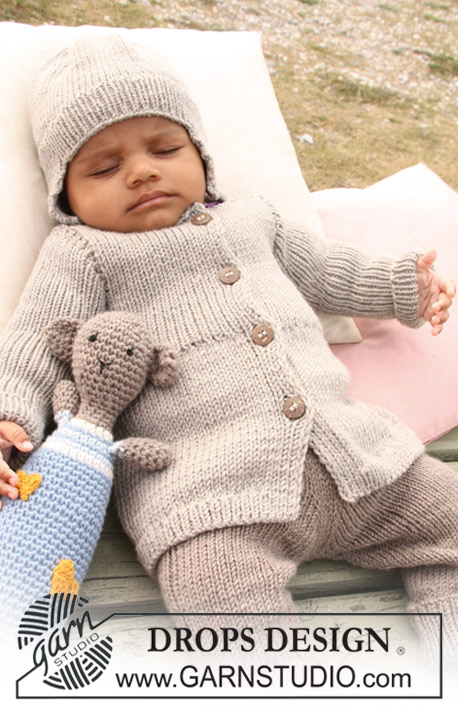
Set of knitted jacket, pants and hat for baby and children with rib and crochet teddy bear in DROPS Merino Extra Fine
DROPS Baby 20-8 |
|
|
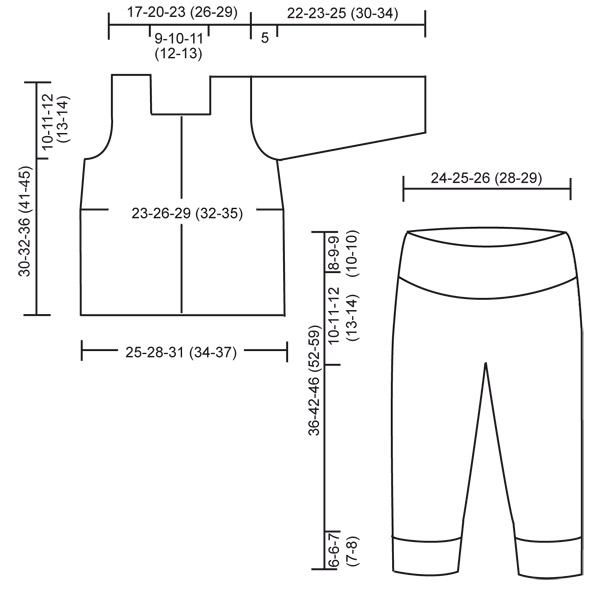
JACKET: INCREASING TIP: Inc 1 st by making 1 YO. On next row work YO into back of loop to avoid a hole. BUTTONHOLES: Make buttonholes on right front band. 1 BUTTONHOLE = bind off 4th front band st from mid front and cast on 1 new st on return row. Make buttonholes when piece measures: SIZE 1/3 MONTHS: 6, 12, 18 and 24 cm / 2⅜", 4¾", 7" and 9½". SIZE 6/9 MONTHS: 8, 14, 20 and 26 cm / 3⅛", 5½", 8" and 10¼". SIZE 12/18 MONTHS: 5, 11, 17, 23 and 29 cm / 2", 4⅜", 6¾", 9" and 11⅜". SIZE 2 YEARS: 5, 12, 19, 26 and 33 cm / 2", 4¾", 7½", 10¼" and 13". SIZE 3/4 YEARS: 9, 16, 23, 30 and 37 cm / 3½", 6¼", 9", 11¾" and 14½". -------------------------------------------------------- JACKET: Worked back and forth on circular needle. With Merino Extra Fine and circular needle size 3.5 mm / US 4 cast on 151-167-185 (201-219) sts. Work rib K1/P1. When rib measures 2-2-2 (3-3) cm / ¾"-¾"-¾" (1⅛"-1⅛") change to circular needle size 4.5 mm / US 7. Work next row from RS as follows: Rib K1/P1 on the first 6 sts, stockinette st on the next 139-155-173 (189-207) sts, AT THE SAME TIME dec 40-44-50 (54-60) sts evenly, finish with rib P1/K1 on the last 6 sts = 111-123-135 (147-159) sts. 6 sts each side = front bands, front bands worked in rib throughout. NOTE! Remember BUTTONHOLES - see above! Continue in stockinette st with 6 front band sts each side. REMEMBER THE GAUGE! When piece measures 14-15-18 (22-25) cm / 5½"-6"-7" (8¾"-9¾") (adjust to a row from WS) P 1 row from WS (front bands as before) AT THE SAME TIME inc 28-34-38 (42-48) sts evenly (do not inc on front bands) – see INCREASING TIP! = 139-157-173 (189-207) sts. Insert a marker 37-42-46 (50-55) sts in from each side (back piece = 65-73-81 (89-97) sts). Change to circular needle size 3.5 mm / US 4 and continue in rib K1/P1 on all sts. When piece measures 20-21-24 (28-31) cm / 8"-8¼"-9½" (11"-12¼") bind off 6 sts each side for armhole (i.e. 3 sts each side of marker - bind off with K over K and P over P) and complete each piece separately. BACK PIECE: = 59-67-75 (83-91) sts. bind off to shape the armhole at beg of every row each side: 2 sts 3-3-2 (2-2) times and 1 st 0-0-1 (1-1) times = 47-55-65 (73-81) sts. When piece measures 28-30-34 (39-43) cm / 11"-11¾"-13⅜" (15¼"-17") bind off the middle 25-29-31 (33-35) sts for neck (bind off with K over K and P over P) and complete each shoulder separately = 11-13-17 (20-23) sts. Continue in rib as before with 1 garter st towards neck. Bind off with K over K and P over P when piece measures 30-32-36 (41-45) cm / 11¾"-12½"-14¼" (16⅛"-17¾"). LEFT FRONT PIECE: = 34-39-43 (47-52) sts. Bind off for armhole at the side as described for back piece = 28-33-38 (42-47) sts. When piece measures 26-28-31 (35-39) cm / 10¼"-11"-12¼" (13¾"-15¼") bind off 17-20-21 (22-24) sts towards mid front for neck (bind off with K over K and P over P) = 11-13-17 (20-23) sts left on shoulder. Continue in rib as before with 1 garter st towards neck. Bind off with K over K and P over P when piece measures 30-32-36 (41-45) cm / 11¾"-12½"-14¼" (16⅛"-17¾"). RIGHT FRONT PIECE: = 34-39-43 (47-52) sts. Like left front piece but mirrored. SLEEVE: Worked in the round. With double pointed needles size 3.5 mm / US 4 cast on 42-44-44 (48-48) sts on. Insert a marker at beg of round. Work rib K1/P1 until finished measurements. AT THE SAME TIME when piece measures 4 cm / 1½" inc 1 st each side of marker – incorporate inc sts in rib as you go along. Repeat the inc on every 3-2-1.5 (2-2) cm / 1⅛"-¾"-½" (¾"-¾") a total of 4-6-9 (10-12) times = 50-56-62 (68-72) sts. When piece measures 17-18-20 (25-29) cm / 6¾"-7"-8" (9¾"-11⅜") bind off 6 sts under sleeve for armhole (i.e. 3 sts each side of marker) and complete piece back and forth on needle. Bind off for sleeve cap at beg of every row each side: 2-3-3 (4-4) sts until piece measures 21-22-24 (29-33) cm / 8¼"-8¾"-9½" (11⅜"-13"), now bind off 3 sts each side and bind off remaining sts with K over K and P over P. ASSEMBLY: Sew shoulder seams. Set in sleeves and sew on buttons. --------------------------------------------------------- PANTS: DECREASING TIP: Dec as follows before marker: K2 tog. Dec as follows after marker: slip 1 st as if to K, K1, psso. --------------------------------------------------------- PANTS: Worked in the round on needle from waist down. Cast on 110-114-118 (130-134) sts on circular needle size 3.5 mm / US 4 with light brown mix. Work rib, K1/P1 for 8-9-9 (10-10) cm / 3⅛"-3½"-3½" (4"-4"). Change to circular needle size 4.5 mm / US 7 and work next round as follows: * K1, P1 *, repeat from *-* a total of 4 times, work stockinette st on the next 39-41-43 (49-51) sts AT THE SAME TIME dec 6-6-6 (8-8) sts evenly = 33-35-37 (41-43) sts stockinette st, * P1, K1 *, repeat from *-* a total of 7 times, P1, stockinette st on the next 41-43-45 (51-53) sts AT THE SAME TIME dec 8-8-8 (10-10) sts evenly = 33-35-37 (41-43) sts stockinette st, * P1, K1 *, repeat from *-* a total of 3 times and finish with P1. There are now 96-100-104 (112-116) sts on needle. Insert 1 marker in the middle st at front and 1 marker in the middle st at back (= 47-49-51 (55-57) sts between sts with markers). Continue in the round in stockinette st and 15 sts in rib each side. REMEMBER THE GAUGE! When piece measures 11-13-14 (16-17) cm / 4⅜"-5⅛"-5½" (6¼"-6¾") inc 1 st each side of the 3 middle sts at front - inc by picking up st from previous round and K this. Repeat the inc on every other round a total of 9-9-9 (10-10) times = 114-118-122 (132-136) sts. On next round bind off the 3 middle sts at front and the 3 middle sts at back (i.e. st with marker and 1 st each side of this st) and work each leg separately. Piece measures approx 18-20-21 (23-24) cm / 7"-8"-8¼" (9"-9½"). Slip the 54-56-58 (63-65) sts for one leg on a stitch holder and the 54-56-58 (63-65) sts for the other leg on double pointed needles size 4.5 mm / US 7. LEG: Continue in stockinette st in the round with 15 sts rib on the outside of leg as before – insert a marker at beg of round = inside of leg. When leg measures 2-2-2 (3-3) cm / ¾"-¾"-¾" (1⅛"-1⅛") dec 1 st on each side of marker – SEE DECREASING TIP! Repeat the dec on every 2-3-3.5 (4-5.5) cm / ¾"-1⅛"-1¼" (1½"-2¼") a total of 5 times = 44-46-48 (53-55) sts. When leg measures 12-16-18 (22-27) cm / 4¾"-6¼"-7" (8¾"-10⅝") change to double pointed needles size 3.5 mm / US 4. Work 1 round stockinette st, AT THE SAME TIME inc 4-4-6 (5-5) sts evenly – NOTE! Do not inc on rib sts at the side = 48-50-54 (58-60) sts. Continue in rib, K1/P1 in the round on all sts (make sure rib fits rib at the side). When leg measures 18-22-25 (29-35) cm / 7"-8¾"-9¾" (11⅜"-13¾") (pants measure a total of 36-42-46 (52-59) cm / 14¼"-16½"-18" (20½"-23¼") from the waist) bind off LOOSELY with K over K and P over P. Work the other leg in the same way. ASSEMBLY: Sew opening between legs. ---------------------------------------------------------- HAT: INCREASING TIP: Inc 1 st by making a YO. K YO into back of loop on return row to avoid a hole. ---------------------------------------------------------- HAT: Worked in the round, from top down. Cast on 8-10-13 (15-18) sts on double pointed needles size 4 mm / US 6 (leave a thread end to use when tightening the top tog afterwards). Work 1 round stockinette st, AT THE SAME TIME inc 7-10-12 (15-17) sts evenly – see INCREASING TIP! = 15-20-25 (30-35) sts. Insert 5 markers in piece with 3-4-5 (6-7) sts between each. Continue in stockinette st, AT THE SAME TIME on second round inc 1 st each side of all markers. Repeat the inc on every other round a total of 6 times = 75-80-85 (90-95) sts. Change to circular needle size 4 mm / US 6. REMEMBER THE GAUGE! Continue in stockinette st. When piece measures 11-12-13 (14-15) cm / 4⅜"-4¾"-5⅛" (5½"-6") inc 25-26-29 (30-31) sts evenly (inc between approx every 3rd and 4th st) = 100-106-114 (120-126) sts. Change to circular needle size 3.5 mm / US 4 and continue in rib K1/P1 on all sts. When rib measures 3 cm / 1⅛" bind off as follows - NOTE! Round beg 10-10-8 (8-7) sts before mid back: bind off 21-21-17 (17-15) sts with K over K and P over P (= mid back), slip the next 25-27-33 (35-39) sts on a stitch holder for earflap, bind off the next 29-31-31 (33-33) sts (= forehead). Now work earflap back and forth on the last 25-27-33 (35-39) sts as follows: continue in rib K1/P1, AT THE SAME TIME dec 1 st at beg of every row a total of 9-10-13 (14-16) times each side = 7 sts. On next row bind off remaining sts with K over K and P over P. Earflap measures approx 5-6-8 (8.5-10) cm / 2"-2⅜"-3⅛" (3¼"-4"). Work the other earflap in the same way. Tighten the top of hat tog and fasten thread. TIE STRINGS: Cut 2 strands measuring 75 cm / 30" each and twist them hard. Pull string through bottom of earflap and fold it double to let it twist again. Tie a knot at the end of string. Repeat at the other earflap. --------------------------------------------------------- BEAR: CROCHET INFO: Replace first sc on round with ch 1 and finish each round with 1 sl st in first sc from beg of round. CROCHET SC TOG: Crochet 2 sc tog to 1 sc as follows: Insert hook in first st, pick up thread, insert hook in next st, pick up thread, make 1 YO and pull thread through all 3 sts on hook. --------------------------------------------------------- HEAD AND BODY: Beg at the top of head and after the head crochet the body. Then crochet ears, arms, and the hearts, which are sewn on afterwards. HEAD: SEE CROCHET INFO! Ch 4 with hook size 4 mm / G/6 with light brown mix and form a ring with 1 sl st in first ch. ROUND 1: Crochet 6 sc in ring. ROUND 2: 2 sc in each sc = 12 sc. ROUND 3: * 1 sc in first sc, 2 sc in next sc *, repeat from *-* = 18 sc. ROUND 4: * 1 sc in each of the first 2 sc, 2 sc in next sc *, repeat from *-* = 24 sc. ROUND 5: * 1 sc in each of the first 3 sc, 2 sc in next sc *, repeat from *-* = 30 sc. ROUND 6-11: 1 sc in each sc = 30 sc. ROUND 12: * 1 sc in each of the first 3 sc, then crochet the next 2 sc tog (see above) *, repeat from *-* = 24 sc. ROUND 13: 1 sc in each sc = 24 sc. ROUND 14: * 1 sc in each of the first 2 sc, then crochet the next 2 sc tog *, repeat from *-* = 18 sc. ROUND 15: * 1 sc in first sc, then crochet the next 2 sc tog *, repeat from *-* = 12 sc. Now fill the head with poly stuffing and continue in the round for body without cutting the thread. ROUND 16-18: 1 sc in each sc = 12 sc. ROUND 19: * 1 sc in each of the first 2 sc, 2 sc in next sc *, repeat from *-* = 16 sc. Change to off-white. ROUND 20: * 1 sc in each of the first 3 sc, 2 sc in next sc *, repeat from *-* = 20 sc. Change to light gray/blue. ROUND 21: 1 sc in each sc = 20 sc. Change to light gray/green. ROUND 22: * 1 sc in each of the first 4 sc, 2 sc in next sc *, repeat from *-* = 24 sc. Change to light gray/blue. ROUND 23: 1 sc in each sc = 24 sc. Change to light gray/green. ROUND 24: * 1 sc in each of the first 3 sc, 2 sc in next sc *, repeat from *-* = 30 sc. Change to off-white. ROUND 25: 1 sc in each sc = 30 sc. Change to light gray blue and crochet the rest of the body as follows: ROUND 26-29: 1 sc in each sc = 30 sc. ROUND 30: * 1 sc in each of the first 9 sc, 2 sc in next sc *, repeat from *-* = 33 sc. ROUND 31-39: 1 sc in each sc = 33 sc. ROUND 40: * 1 sc in each of the first 10 sc, 2 sc in next sc *, repeat from *-* = 36 sc. ROUND 41-46: Crochet 1 sc in each sc = 36 sc. ROUND 47: * 1 sc in each of the first 10 sc, then crochet the next 2 sc tog *, repeat from *-* = 33 sc. ROUND 48: 1 sc in each sc = 33 sc. ROUND 49: * 1 sc in each of the first 9 sc, then crochet the next 2 sc tog *, repeat from *-* = 30 sc. ROUND 50: * 1 sc in each of the first 3 sc, then crochet the next 2 sc tog *, repeat from *-* = 24 sc. ROUND 51: 1 sc in each sc = 24 sc. ROUND 52: * 1 sc in each of the first 2 sc, then crochet the next 2 sc tog *, repeat from *-* = 18 sc. ROUND 53: 1 sc in each sc = 18 sc. ROUND 54: * 1 sc in first sc, then crochet the next 2 sc tog *, repeat from *-* = 12 sc. ROUND 55: Crochet 2 sc tog all the way round = 6 sc. Fill the body with poly stuffing, cut the thread, pull thread through remaining sts, tighten and fasten. LEGS: Ch 4 with hook size 4 mm / G/6 with light brown mix and form a ring with 1 sl st in first ch. ROUND 1: Crochet 8 sc in ring. ROUND 2: * 1 sc in first sc, 2 sc in next sc *, repeat from *-*= 12 sc. ROUND 3: 1 sc in each sc = 12 sc – NOTE: Crochet in back loop of st. ROUND 4: 1 sc in each sc = 12 sc – NOTE: Crochet through both loops again. ROUND 5: 1 sc in each sc, at the same time crochet 2 sc tog at the beg and at the end of round = 10 sc. ROUND 6: 1 sc in each sc, at the same time crochet tog 5th and 6th sc and crochet tog 7th and 8th sc on round = 8 sc. Cut the thread. Crochet 1 more leg in the same way. Fill the legs with poly stuffing and sew the legs to bottom of body. ARMS: Ch 4 with hook size 4 mm / G/6 with light brown mix and form a ring with 1 sl st in first ch. ROUND 1: Crochet 4 sc in ring. ROUND 2: 2 sc in each sc = 8 sc. ROUND 3-6: 1 sc in each sc = 8 sc. Change to light gray/green. ROUND 7: 1 sc in each sc = 8 sc. Fill the arm with poly stuffing, place piece flat and crochet 1 sc in each sc through both layers = 4 sc. Cut the thread. Crochet 1 more arm in the same way and sew arms to the side of body at the top. EARS: Ch 4 with hook size 4 mm / G/6 with light brown mix and form a ring with 1 sl st in first ch. ROUND 1: Crochet 6 sc in ring. ROUND 2: * 1 sc in first sc, 2 sc in next sc *, repeat from *-* = 9 sc. ROUND 3: * 1 sc in each of the first 2 sc, 2 sc in next sc *, repeat from *-* = 12 sc. ROUND 4-6: 1 sc in each sc = 12 sc. Place piece flat and crochet 1 sc in each sc through both layers = 6 sc, turn piece and crochet 2 sc tog across the row = 3 sc. Cut the thread and sew ear to the top of head to the side. Crochet 1 more ear and attach to the opposite side of head. SMALL HEART: Ch 2 with hook size 3 mm / C with guacamole (try to find a yellow section of the yarn) and crochet 3 sc in first ch, turn piece. Ch 1, then 1 sc in each st = 5 sc (includes ch at beg and end of row), turn piece. Crochet ch 3, 1 dc in first ch, 1 sc in middle of heart, ch 3, 1 dc in first ch, 1 sl st in ch from beg of previous row. Cut the thread and sew the heart to the front of bear. LARGE HEART: Ch 2 with hook size 3 mm / C with guacamole (try to find a yellow section of the yarn) and crochet 3 sc in first ch, turn piece. Ch 1, then 1 sc in each st = 5 sc (includes ch at beg and end of row), turn piece. Ch 1, then 1 sc in each st = 6 sc (includes ch at beg of row), turn piece. Ch 4, 1 dc in first ch, 1 sc in the middle of heart, ch 4,1 dc in first ch, 1 sl st in ch from beg of previous row. Cut the thread and sew the heart to the front of bear. Crochet 1 more heart and sew to the back of bear. SCARF: Ch 4 with hook size 3 mm / C with guacamole, crochet 1 sc in second ch from hook and 1 sc in each of the next 2 ch = 3 sc + ch 1, turn piece. Now crochet 4 sc back and forth until scarf measures approx 25-30 cm / 9¾"-11¾". Cut the thread and fasten. Embroider eyes and mouth at the front of bear with black. |
|
 |
|
Have you finished this pattern?Tag your pictures with #dropspattern or submit them to the #dropsfan gallery. Do you need help with this pattern?You'll find 23 tutorial videos, a Comments/Questions area and more by visiting the pattern on garnstudio.com. © 1982-2026 DROPS Design A/S. We reserve all rights. This document, including all its sub-sections, has copyrights. Read more about what you can do with our patterns at the bottom of each pattern on our site. |
|


With over 40 years in knitting and crochet design, DROPS Design offers one of the most extensive collections of free patterns on the internet - translated to 17 languages. As of today we count 324 catalogs and 12290 patterns - 12280 of which are translated into English (US/in).
We work hard to bring you the best knitting and crochet have to offer, inspiration and advice as well as great quality yarns at incredible prices! Would you like to use our patterns for other than personal use? You can read what you are allowed to do in the Copyright text at the bottom of all our patterns. Happy crafting!
Post a comment to pattern DROPS Baby 20-8
We would love to hear what you have to say about this pattern!
If you want to leave a question, please make sure you select the correct category in the form below, to speed up the answering process. Required fields are marked *.