
Popular categories
Looking for a yarn?


Comments / Questions (28)
![]() Roni Sherman Ramos wrote:
Roni Sherman Ramos wrote:
The website only has the instructions for the hat not the sweater. Can you send me the sweater instructions?
20.02.2012 - 00:06DROPS Design answered:
Dear Roni. You can find the sweater pattern under BabyDROPS 20-1
23.02.2012 - 11:04
![]() DROPS Deutsch wrote:
DROPS Deutsch wrote:
Hier wurde leider der Tipp zum Abnehmen falsch übersetzt. Ist jetzt angepasst.
19.01.2012 - 09:17
![]() Babsi wrote:
Babsi wrote:
Auch ich komme mit den Abnahmen nicht klar... Die Masche VOR der markierten rechts abheben, die markierte Masche rechts stricken, dann die abgehobene über die gestrickte ziehen. - Muss ich jetzt neu beginnen wenn ich jeweils eine Masche früher, bzw. später mit den Abnahmen begonnen habe? (Die markierte wurde immer normal rechts gestrickt).
19.01.2012 - 00:59
![]() DROPS Design wrote:
DROPS Design wrote:
Carlota, haremos la consulta a nuestro equipo de Diseño ref a los aum y dism en cada 4a. vta...asimismo, para sustituir "antes y después" por "antes o después. Gracias por el resto de tus aportes.
26.09.2011 - 02:37
![]() Carlota wrote:
Carlota wrote:
OTRO ERROR en el patrón: DICE:Dism 1 pt antes de M-7 en vtas alternas. DEBE DECIR (segun los otros idiomas y la lógica):Aum 1 pt antes de M-7 en vtas alternas.
25.09.2011 - 20:53
![]() Carlota wrote:
Carlota wrote:
Post nuevo 4 He estado leyendo los patrones en francés, inglés y alem´´an (menos mal que una...) aunque no me aclara mucho si me ha permitido ver un error en el patrón. Falta la disminución del marcador 6
25.09.2011 - 20:34
![]() Carlota wrote:
Carlota wrote:
Pos nuevo 3 ¿Cómo lo hago? Respecto de la ayuda en la tienda, es que además de estar lejos, tampoco le puedo mandar un email porque la dueña es noruega y habla mal el castellano
25.09.2011 - 20:14
![]() Carlota wrote:
Carlota wrote:
POST nuevo 2 Otro problema que tengo es en siguiente: Cuando se explican los aumentos y disminuciones, se dice que se hacen por el lado DERECHO. Perfecto, para los aumentos en vueltas alternas eso significa por lo tanto que se aumenta y disminuye en las vueltas 1, 3, 5, .... Luego dice: Aum 1 pt después de M-3 en cada 4ª vta. Dism 1 pt de cada lado de M-4 en cada 4ª vta. ESTO ES UNA CONTRADICCION porque la 4ª v está en el revés NO en el dcho de la labor. Por lo tanto, no puede quedar bien.
25.09.2011 - 20:11Carlota wrote:
POST NUEVO 1 La tienda no me puede ayudar porque he comprado online en una tienda a más de 700 km. Respecto de los TIPs de aumentoy disminución, ya lo había deducido, pero creo que quedaría más claro si en el TIPS de aumento se dijera, en ver de "antes y después", "antes o después". Sigo en otro post
25.09.2011 - 19:59
![]() DROPS Design wrote:
DROPS Design wrote:
Carlota, los TIPS te indican el método a utilizar para hacer los aum y dism cuando las instrucciones lo pidan. Es decir, los aum se hacen antes o después de los MP, y las dism se hacen de cada lado de los MP (según te lo pida). Si necesitas más ayuda, la tienda donde has comprado tus lanas DROPS estarán prestos a brindarte toda la ayuda necesaria. Saludos afectuosos!
25.09.2011 - 06:07
|
|
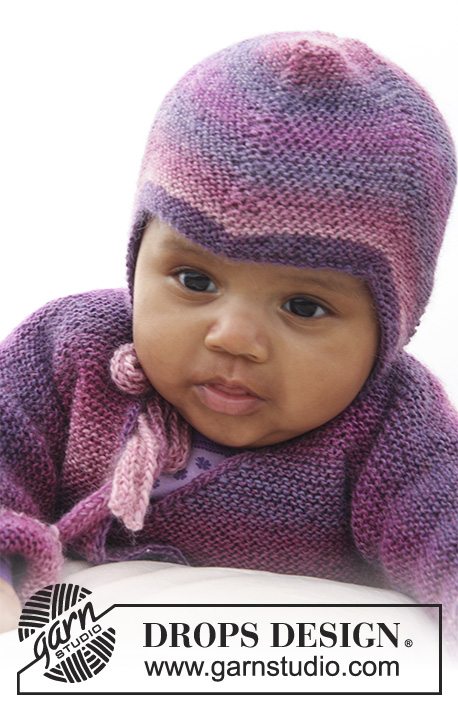
Sweet Evelina Hat#sweetevelinahat |
|
 |
 |
Knitted hat in garter st for baby and children in DROPS Delight
DROPS Baby 20-2 |
|
|
INCREASE TIP: All inc are done from RS. Inc 1 st before and after st with marker by making 1 YO. On next round knit YO twisted (i.e knit in the back loop of YO instead of front) to avoid holes. DECREASE TIP: All dec are done from RS. Dec 1 st on each side of st with marker. Beg 1 st before st with marker. Put 1 st on a cable needle behind the piece, slip 1 st (= st with marker), K next st and st on cable needle tog, psso. ---------------------------------------------------------- HAT: Worked back and forth on needle – K all rows (= garter st). Cast on 119-127-135 (139-145) sts on needle size 2.5 mm / US 1or 2 with Delight. K 6 rows (1st row = RS). Insert 7 markers in the piece as follows (from RS): 1st marker in the 1st st on needle, 2nd marker in the 22nd-24th-26st (28th-31st) st, 3rd marker in the 43rd-47th-51st (55th-61st) st, 4th marker in the 60th-64th-68th (70th-73rd) st, 5th marker in the 77th-81st-85th (85th-85th) st, 6th marker in the 98th-104th-110th (112th-115th) st and 7th marker in the last st on the needle. Continue to K – AT THE SAME TIME on 1st row, beg to inc and dec – SEE INCREASE TIP AND DECREASE TIP! Inc 1 st after 1st marker on every other row. Dec 1 st on each side of the 2nd marker every other row. Inc 1 st before 3rd marker on every other row. Inc 1 st after 3rd marker on every 4th row. Dec 1 st on each side of the 4th marker every 4th row. Inc 1 st before 5th marker on every 4th row. Inc 1 st after 5th marker on every other row. Dec 1 st on each side of the 6th marker every other row. Inc 1 st before 7th marker on every other row. When piece measures 13-15-16 (18-19) cm / 5⅛"-6"-6¼" (7"-8") (measured from bottom tip at 2nd and 6th marker) work next row from RS as follows: * K1, K2 tog *, repeat from *-* WHILE binding off. ASSEMBLY: Back of hat = bind off edge, i.e. 2 whole tips and 2 half tips. The 2nd of the 3 whole tips in the opposite side of the piece = cast on edge, goes down to the forehead at the front. Sew the hat tog edge to edge with 1 stitch in each st along the bind off edge as follows: Sew first half tip tog with first half of first whole tip. Continue to sew second half of first whole tip tog with first half of second whole tip. Then sew the other half of the second whole tip tog with the last half tip. Finish by sewing the hat tog mid back – make sure to sew edge to edge to avoid chunky seams. TIES: Cast on 4 sts on needle size 2.5 mm / US 1 with Delight. Knit as follows: * K1, place yarn in front of piece (towards you), slip 1 st as if to P, place yarn behind piece (from you) *, repeat from *-* the rest of row and on all rows. This becomes a tie worked in the round. bind off when the tie measures approx. 20-22-24 (26-28) cm / 8"-8¾"-9½" (10¼"-11"). Knit one more tie. Sew one tie at the bottom of each tip on each side. |
|
Have you finished this pattern?Tag your pictures with #dropspattern #sweetevelinahat or submit them to the #dropsfan gallery. Do you need help with this pattern?You'll find 7 tutorial videos, a Comments/Questions area and more by visiting the pattern on garnstudio.com. © 1982-2026 DROPS Design A/S. We reserve all rights. This document, including all its sub-sections, has copyrights. Read more about what you can do with our patterns at the bottom of each pattern on our site. |
|


With over 40 years in knitting and crochet design, DROPS Design offers one of the most extensive collections of free patterns on the internet - translated to 17 languages. As of today we count 325 catalogs and 12298 patterns - 12288 of which are translated into English (US/in).
We work hard to bring you the best knitting and crochet have to offer, inspiration and advice as well as great quality yarns at incredible prices! Would you like to use our patterns for other than personal use? You can read what you are allowed to do in the Copyright text at the bottom of all our patterns. Happy crafting!
Post a comment to pattern DROPS Baby 20-2
We would love to hear what you have to say about this pattern!
If you want to leave a question, please make sure you select the correct category in the form below, to speed up the answering process. Required fields are marked *.