
Popular categories
Looking for a yarn?


Comments / Questions (47)
![]() Pernille øemig Nielsen wrote:
Pernille øemig Nielsen wrote:
I opskriften står der at man skal tage ind i ret partierne, men på ryggen står der i vr partierne. I indtagning tips står der også på ret partierne. Så hvad skal jeg gøre?
05.11.2016 - 17:54DROPS Design answered:
Hej Pernille. Det er en lille skrivefejl i den danske opskrift. Det skal naturligvis vaere i retpartiet. Vi retter. Tak!
07.11.2016 - 12:31Frida wrote:
18+4(21)+7=109
17.12.2013 - 18:53
![]() Jennifer wrote:
Jennifer wrote:
Anfangs hat man 109 M in Größe S, und man soll stricken: 1 Randm in Krausrippe, 17 re., *10 Krausrippe., 11 re.*, von *-* wiederholen und die letzten 7 M. 6 re. und 1 Randm in Krausrippe. So komme ich aber nur auf 89 M und nicht auf 109 M. Fehlt da nicht noch eine Krausrippe?
17.12.2013 - 14:09DROPS Design answered:
Liebe Jeniffer, die Anleitung stimmt: 1 +17 M = 18 M, dazu 4 x 21 M (von *-*) = 102 M, dann die letzten 7 M wie beschrieben = 109 M.
18.12.2013 - 10:11
![]() Iviva wrote:
Iviva wrote:
Pourquoi séparer la bordure mousse au moment du jacquard ? Le gilet en souffrira si je ne le fais pas ? Je n'aime pas beaucoup l'idée d'une couture au milieu devant . Merci à vous
09.11.2013 - 18:37DROPS Design answered:
Bonjour Iviva, la bordure devant se tricote séparément des devants car le point mousse et le jersey ne nécessite pas le même nombre de rangs en hauteur et la bordure pourrait "tirer" les devants si elle était tricotée ensemble. Si vous voulez la tricoter en même temps, il vous faudra tricoter, à intervalles réguliers, des rangs raccourcis sur les mailles de bordure seulement. Bon tricot!
11.11.2013 - 10:08
![]() Kirsten wrote:
Kirsten wrote:
Ik heb een vraag; in het patroon staat ribbelsteek, dat begrijp ik. Maar dat staat er dat ik verder moet gaan met recht boven recht en ribbel boven ribbel. Ik neem maar aan dat recht boven recht, averecht boven recht moet zijn. Anders blijft het allemaal ribbels. Verkeerde vertaling misschien?
31.10.2013 - 19:47DROPS Design answered:
Hoi Kirsten. Je breit ribbels over de ribbelst en tricotst (recht op de goede kant) over de recht steken. Ik zal tricotst toevoegen tussen haakjes in het patroon.
01.11.2013 - 09:18
![]() Shirley Johnson wrote:
Shirley Johnson wrote:
Please can you explain what the sizes mean e.g Is size L similar to a UK size 16?
07.05.2013 - 22:55DROPS Design answered:
Dear Mrs Johnson, to figure out which size to make, measure a garment you already have and like the size of and then compare with the chart at the end of the pattern (measures are in cm). Happy knitting!
08.05.2013 - 08:05
![]() NICOD wrote:
NICOD wrote:
Impossible de commencer ce modèle. Les explications doivent être mal traduites, je ne comprends rien et suis pourtant une tricoteuse expérimentée.
09.04.2013 - 23:20DROPS Design answered:
Bonjour Madame Nicod, si vous avez besoin d'une aide particulière pour ce modèle, je vous recommande de vous adresser à votre magasin DROPS ou de vous inscrire sur le forum DROPS où vous pourrez recevoir de l'aide. Bon tricot!
10.04.2013 - 09:03Nilda wrote:
I'm knitting this sweater, and almost finishing it but I'cant understand the last instructions for the sleves. What´s K3 tog on the middle? I search in the dictionary but couldn't find it. I´dont know how to finish it, so please help me.
14.12.2012 - 01:57DROPS Design answered:
Dear Nilda, on the mid 42-54 sts (see size) on the top of the sleeve, you will work the sts 3 by 3, as to dec 2 sts at the samem time, work 3 sts together knitwise (as K2 tog for a single dec, but here with 3 sts, so K3 tog). Happy knitting !
14.12.2012 - 09:55
![]() Karin wrote:
Karin wrote:
Rigtig flot trøje, har strikket den i mørkgrå/naturhvid, men har lidt problemer med at sy pufærmerne i, nok fordi jeg ikke har prøvet det før.
18.04.2012 - 09:25DROPS Design answered:
Du kan prøve at ri ærmet løst i først inden du syr. God fornøjelse!
20.04.2012 - 15:32
![]() Muriel wrote:
Muriel wrote:
Pour ma part, je le fais avec 5 cms plus long, car je trouve qu'il est un peu court.
01.08.2011 - 11:25
|
|||||||
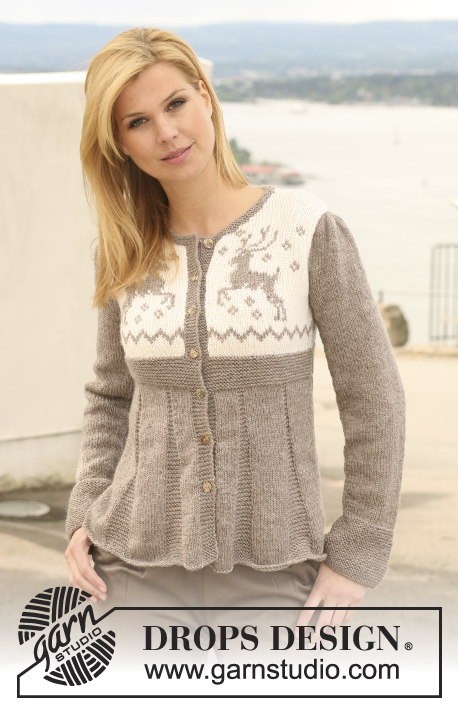
Oh Deer!#ohdeercardigan |
|||||||
 |
 |
||||||
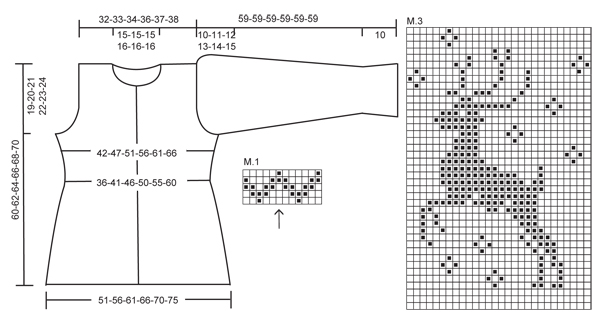
Knitted DROPS jacket in ”Karisma” with puff sleeves and reindeer pattern on yoke. Size S to XXXL.
DROPS 122-10 |
|||||||
|
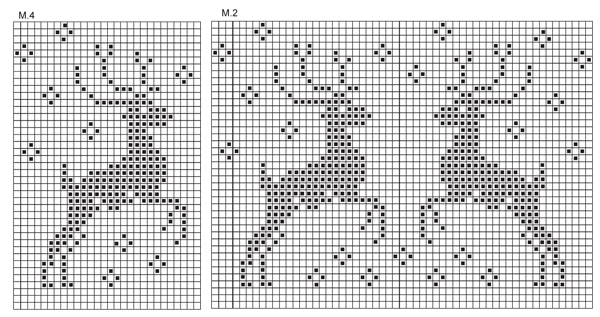
PATTERN: See diagrams M.1 to M.4 – all diagrams worked in stockinette st. GARTER ST (back and forth on needle): K all rows. BUTTONHOLES: Make buttonholes on front band on right front piece. 1 BUTTONHOLE = K tog third and fourth st from mid front and make 1 YO. Make buttonholes when piece measures: SIZE S: 12, 19, 26, 33, 40 and 47 cm / 4¾",7½",10¼",13",15¾" and 18½". SIZE M: 13, 20, 27, 34, 41 and 48 cm / 5⅛",8",10⅝",13⅜",16⅛" and 19". SIZE L: 14, 21, 28, 35, 42 and 49 cm / 5½",8¼",11",13¾",16½" and 19¼". SIZE XL: 14, 21, 29, 36, 44 and 51 cm / 5½",8¼",11⅜",14¼",17¼" and 20". SIZE XXL: 14, 22, 30, 37, 45 and 52 cm / 5½",8¾",11¾",14½",17¾" and 20½". SIZE XXXL: 14, 22, 30, 38, 46 and 54 cm / 5½",8¾",11¾",15",18" and 21¼". The last buttonhole is made on neckline. DECREASING TIP (applies to body piece): Make all dec from RS. Dec at the beg and at the end of all garter st sections alternately by K2 tog (i.e. for first dec K tog the first 2 sts and for second dec K tog the last 2 sts, etc). -------------------------------------------------------- BACK PIECE: Worked back and forth on needle. Cast on 109-119-129-139-149-159 sts (includes 1 edge st each side) on needle size 4 mm / US 6 with light beige brown. K 1 row from WS and work next row as follows from RS: 1 edge st in GARTER ST – see above, K 17-19-21-23-25-27, * 10 garter sts, K 11-13-15-17-19-21 *, repeat from *-* until 7 sts remain, K6 and 1 edge st in garter st. Continue with K over K and garter st over garter st. REMEMBER THE GAUGE! When piece measures 5 cm / 2" dec 1 st in each of the 4 garter st-sections (from RS) – SEE DECREASING TIP - repeat the dec on every 8th row a total of 8 times = 77-87-97-107-117-127 sts. There are now 2 sts left in all garter st-sections. Continue until piece measures 28 cm / 11" for all sizes. Change to needle size 3.5 mm / US 4, work 4 cm / 1½" garter st on all sts. Change to needle size 4 mm / US 6 and off-white. Work 6-6-8-8-10-10 rows stockinette st – AT THE SAME TIME on row 1 inc 12 sts evenly (inc by making a YO and work YO into back of loop on next row to avoid a hole) = 89-99-109-119-129-139 sts. Continue with M.1 – make sure to have st marked with arrow mid back. After M.1 continue in M.2 on the middle 57 sts (work remaining sts in off-white stockinette st). AT THE SAME TIME when piece measures 41-42-43-44-45-46 cm / 16⅛"-16½"-17"-17¼"-17¾"-18" bind off for armhole at the beg of every row each side: 4 sts 1 time, 3 sts 0-1-2-2-3-4 times, 2 sts 2-2-3-4-4-5 times and 1 st 3-4-3-4-5-4 times = 67-69-71-75-77-79 sts left on needle. After M.2 complete piece in off-white stockinette st. When piece measures 58-60-62-64-66-68 cm / 22¾"-23⅝"-24⅜"-25¼"-26"-26¾" bind off the middle 27-27-27-29-29-29 sts for neck and complete each shoulder separately. Bind off 2 sts on neckline on next row = 18-19-20-21-22-23 sts left on shoulder. Bind off when piece measures 60-62-64-66-68-70 cm / 23⅝"-24⅜"-25¼"-26"-26¾"-27½". LEFT FRONT PIECE: Worked back and forth on needle. Cast on 61-66-71-76-81-86 sts (includes 6 front band sts towards front edge and 1 edge st at the side) on needle size 4 mm / US 6 with light beige brown. K 1 row from WS. Work next row as follows (from RS): 1 edge st in garter st, K 17-19-21-23-25-27, 10 garter sts, K 11-13-15-17-19-21, 10 garter sts, K 6-7-8-9-10-11 and 6 front band sts in garter st. Continue with K over K, garter st over garter st and front band and edge st in garter st. When piece measures 5 cm / 2" dec 1 st in each of the 2 garter st-sections (from RS) – SEE DECREASING TIP – repeat the dec on every 8th row a total of 8 times = 45-50-55-60-65-70 sts. When piece measures 28 cm / 11" change to needle size 3.5 mm / US 4 and work 4 cm / 1½" garter st on all sts. Now slip the 6 front band sts on a stitch holder = 39-44-49-54-59-64 sts on needle. Change to off-white and needle size 4 mm / US 6, work 6 rows stockinette st, AT THE SAME TIME on first row cast on 1 new st towards front edge and inc 6 sts evenly = 46-51-56-61-66-71 sts. READ ALL OF THE FOLLOWING SECTION BEFORE CONTINUING! PATTERN: After 6-6-8-8-10-10 rows continue in M.1 – adjust so that pattern fits pattern on back piece at the side. After M.1 continue as follows (from RS): 16-21-26-31-36-41 sts off-white, M.3 (= 28 sts) and 2 sts off-white. After M.3 complete piece in off-white stockinette st on all sts. ARMHOLE: When piece measures 41-42-43-44-45-46 cm / 16⅛"-16½"-17"-17¼"-17¾"-18" bind off for armhole at the side as described for back piece = 35-36-37-39-40-41 sts. NECKLINE: When piece measures 53-55-56-58-59-61 cm / 21"-21⅝"-22"-22¾"-23¼"-24" slip 7-7-7-8-8-8 sts towards front edge on a stitch holder for neck and bind off to shape the neckline at the beg of every row from mid front: 3 sts 1 time, 2 sts 2 times and 1 st 3 times = 18-19-20-21-22-23 sts left on shoulder. Bind off when piece measures 60-62-64-66-68-70 cm / 23⅝"-24⅜"-25¼"-26"-26¾"-27½". FRONT BAND: Slip the 6 sts on stitch holder back on needle size 3.5 mm / US 4. Work garter st back and forth on needle with light beige brown until front band measures nearly the same as front piece up to neckline – slip sts back on stitch holder. Sew front band to front piece – stretch front band slightly. RIGHT FRONT PIECE: Cast on and work like left front piece but mirrored. Instead of M.3 work M.4 on yoke. When piece measures 12-13-14-14-14-14 cm / 4¾"-5⅛"-5½"-5½"-5½"-5½" make BUTTONHOLES – see above! SLEEVE: Worked back and forth on needle. Cast on 56-58-60-64-66-68 sts (includes 1 edge st each side) on needle size 3.5 mm / US 4 with light beige brown. Work garter st. When piece measures 4 cm / 1½" dec 6 sts evenly, and repeat the dec when piece measures 9 cm / 3½" = 44-46-48-52-54-56 sts. When piece measures 10 cm / 4" change to needle size 4 mm / US 6 and complete piece in stockinette st. AT THE SAME TIME when piece measures 12-14-12-12-14-14 cm / 4¾"-5½"-4¾"-4¾"-5½"-5½" inc 1 st each side. Repeat the inc on every 2.5-2-2-2-1.5-1.5 cm / ⅞"-¾"-¾"-¾"-½"-½" a total of 15-16-17-17-18-19 times = 74-78-82-86-90-94 sts. When piece measures 49-48-47-46-45-44 cm / 19¼"-19"-18½"-18"-17¾"-17¼" (less for the larger sizes because of longer sleeve cap and wider shoulder) bind off for sleeve cap at the beg of every row each side: 3 sts 1 time, 2 sts 1 time and 1 st 2 times. Continue until piece measures 57 cm / 22½", now bind off 2 sts 2 times each side = 52-56-60-64-68-72 sts. On next row K3 tog on the middle 42-42-48-48-54-54 sts (for puff at top of sleeve) = 24-28-28-32-32-36 sts. Bind off remaining sts. Sleeve measures approx 59 cm / 23¼" for all sizes. ASSEMBLY: Sew shoulder seams. NECKLINE: Pick up approx 80 to 100 sts (includes sts on stitch holders) on needle size 3.5 mm / US 4 with light beige brown. K 5 rows back and forth on needle, AT THE SAME TIME on row 2 make 1 buttonhole in line with the others on front band. After 5 rows bind off with K sts from RS. Set in sleeves, sew sleeve and side seams inside 1 edge st. Sew on buttons. |
|||||||
Diagram explanations |
|||||||
|
|||||||
 |
|||||||
 |
|||||||
Have you finished this pattern?Tag your pictures with #dropspattern #ohdeercardigan or submit them to the #dropsfan gallery. Do you need help with this pattern?You'll find 24 tutorial videos, a Comments/Questions area and more by visiting the pattern on garnstudio.com. © 1982-2026 DROPS Design A/S. We reserve all rights. This document, including all its sub-sections, has copyrights. Read more about what you can do with our patterns at the bottom of each pattern on our site. |
|||||||


With over 40 years in knitting and crochet design, DROPS Design offers one of the most extensive collections of free patterns on the internet - translated to 17 languages. As of today we count 325 catalogs and 12298 patterns - 12288 of which are translated into English (US/in).
We work hard to bring you the best knitting and crochet have to offer, inspiration and advice as well as great quality yarns at incredible prices! Would you like to use our patterns for other than personal use? You can read what you are allowed to do in the Copyright text at the bottom of all our patterns. Happy crafting!
Post a comment to pattern DROPS 122-10
We would love to hear what you have to say about this pattern!
If you want to leave a question, please make sure you select the correct category in the form below, to speed up the answering process. Required fields are marked *.