
Popular categories
Looking for a yarn?






























Comments / Questions (627)
 Katy wrote:
When it says cast off to shape armhole each side at beginning of every row (2 stitches) does it mean to cast of two stitches at the beginning of each row or the first AND last two stitches (so 4 total?
29.10.2026 - 19:31DROPS Design answered:
Hi Katy, You can either cast off 2 stitches at the beginning and end of one row = 4 stitches, or at the beginning of 2 rows = 4 stitches. Regards, Drops Team.
30.10.2026 - 05:21
 Tania wrote:
Hi, if I cut the yarn, how do I reattach the yarn to continue working back and forth? Thank you!
28.10.2026 - 03:58DROPS Design answered:
Hi Tania, You leave a strand end when working the first stitch on the row, which is then fastened on the wrong side in the same way as when starting a new skein of wool or casting on. Regards, Drops Team.
28.10.2026 - 06:21
Tania wrote:
Hi, On the "bind off 6 sts for armhole each side" round, when casting off the first 3 stitches, I think I need to knit two stitches and then pass the first one over, right? And then knit one and pass that one over, and finally knit one and pass this third one over? Next, I continue around to the 2nd marker and do 6 cast offs in the same way. If I have this correct so far, how do you cast off the final three stitches left before the 1st marker (the final 3 stitches on the round? Thank you!
27.10.2026 - 01:33DROPS Design answered:
Hi Tania, The way you describe the casting off is correct and you use the same method for 2 of the last 3 stitches, leaving you with 1 stitch on the needle. Cut the strand and thread it through this last stitch. Regards, Drops Team.
27.10.2026 - 05:47
 Matthias wrote:
Hallo, hat jemand die Strickanleitung für einen Herrenpullover wie oben nur mit dem Strickmuster wie oben im Bauch.Brustbereich? Dieses Muster im gesamten Pullover inkl. den Ärmeln? U.U. von oben nach unten zu stricken? Oder wo diese Strickanleitung zu bekommen ist? Ich danke schon 'mal! Matthias
25.10.2026 - 16:40DROPS Design answered:
Lieber Matthias, hier finden Sie alle unsere Anleitungen für Pullover, die von oben nach unten gestrickt sind, vielleicht kann das Ihnen helfen. Viel Spaß beim Stricken!
26.10.2026 - 10:51
Heike wrote:
Vielen Dank, liebes DropsTeam! Das hat sehr gut geklappt und schaut sehr sauber aus. Aber ich habe noch eine Frage, bitte: Sind beim Vorderteil nach der Abkettreihe für den Hals die zwei Maschen Abnahme pro Schulter gedacht, also jeweils links und rechts zwei Abnahmen? Oder links und rechts jeweils eine Abnahme? Vielen Dank für eure Mühen! Schöne Grüße Heike
24.10.2026 - 21:36DROPS Design answered:
Liebe Heike, schön dass Ihr Ergebnis gut geworden ist! Die 2 Maschen sind pro Schulter gedacht. Viel Spaß beim Weiterstricken!
25.10.2026 - 12:13
Tania wrote:
Hi, Do I need to put front piece stitches on a holder at any point?
24.10.2026 - 17:12DROPS Design answered:
Dear Tania, after you cast off for the armholes you will finish the back piece and front piece separately. At this point, you can leave the front piece stitches on a stitch holder as you work the back piece. Happy knitting!
25.10.2026 - 20:41
Heike wrote:
Liebes DropsTeam, wenn es beim Rückenteil heißt "die nächste Reihe ist die 7. Reihe", bedeutet das bitte, dass die 7. Reihe die Abkettreihe ist? Vielen Dank im Voraus für die Hilfe! Schöne Grüße aus Bayern Heike
23.10.2026 - 22:58DROPS Design answered:
Liebe Heike, ja genau, beim Stricken der 7. Reihe wird abgekettet, dabei wird gleichzeitig abgenommen, wie im TIPP ZUM ABKETTEN beschrieben. Viel Spaß beim Stricken!
24.10.2026 - 09:04
Tania wrote:
Hi, Would it also work if I bind off the 6 sts for armhole on Chart Row 3 or 7? This is my first sweater and I’m trying to visualize how this works. If Row 3 or 7 would not work, please explain why. Thank you so much.
22.10.2026 - 13:33DROPS Design answered:
See answer below, if it doesn't help just feel free to tell us more on where you are stuck. Thanks for your comprehension.
23.10.2026 - 06:30
 Tania wrote:
Hi, Would it also work if I bind off the 6 sts for armhole on Chart Row 3 or 7? This is my first sweater and I’m trying to visualize how this works. If Row 3 or 7 would not work, please explain why. Thank you so much.
22.10.2026 - 06:00DROPS Design answered:
Dear Tania, you can bind off the 6 sts for armholes on a row 3 or on a row 7 but just make sure the next row is worked from WS when you start back piece and front piece separately so that cables will still be worked from RS. Happy knitting!
23.10.2026 - 05:52
Tania wrote:
Hi, Which chart row number should the “cast off 6 sts for each armhole each side” be on so that I will be set up to stay in pattern and be on the Right Side when I need to do a cable row?
21.10.2026 - 23:43DROPS Design answered:
Hi Tania, You need to bind off while working row 1 or 5 in the charts, so you work subsequent cables from the right side. Regards, Drops Team.
22.10.2026 - 05:35
|
|||||||||||||||||||
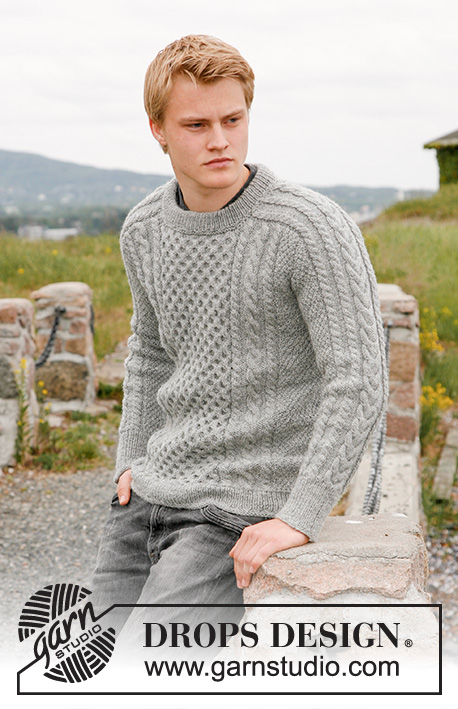
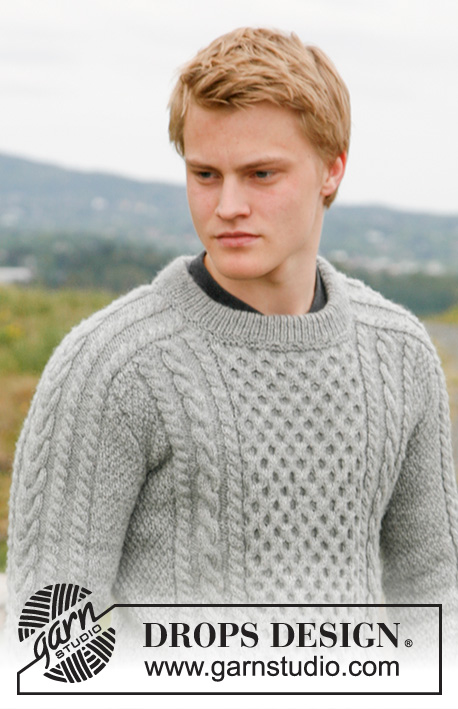
Dreams of Aran#dreamsofaransweater |
|||||||||||||||||||
 |
 |
||||||||||||||||||
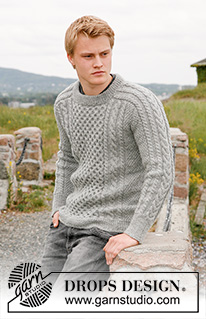
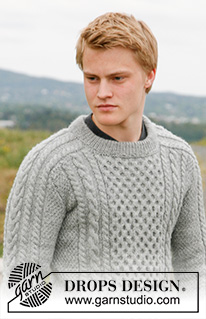
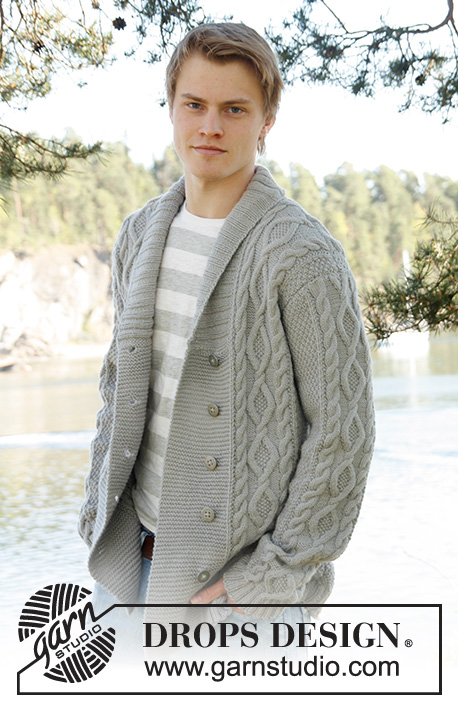
Men's knitted sweater with cables in DROPS Karisma, DROPS Puna or DROPS Merino Extra Fine. Size 13/14 years - XXXL.
DROPS 135-3 |
|||||||||||||||||||
|
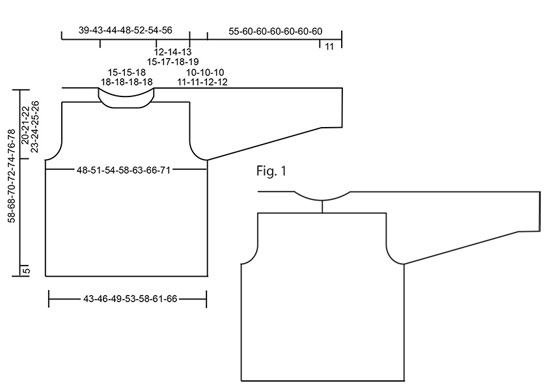
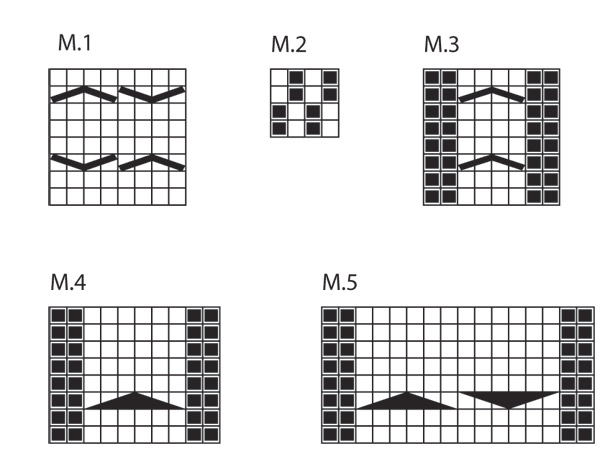
SWEATER– SHORT OVERVIEW OF THE PIECE: The sleeve is worked upwards, continued onto the shoulder and along the neck, top back. The neck-stitches at the top of the sleeve are decreased towards the front piece and a small section of the sleeve is continued along the top of the back piece and later sewn together mid-back, so the neck is higher at the back than at the front – see Fig.1. GARTER ST (in the round): K 1 round, P 1 round. PATTERN: See diagram M.1 – M.5. Diagrams show the pattern from RS. DECREASING TIP: Work 1 st as in diagram, work 2 sts tog, pass over the first st on needle = 2 dec sts. Dec as follows in the different diagrams M.1 (= 44-44-52-52-52-52-52 sts): 10-10-12-12-12-12-12 sts. M.3 (= 8 sts): 2 sts. M.4 (= 10 sts): 3 sts. M.5 (= 16 sts): 6 sts. -------------------------------------------------------- -------------------------------------------------------- BODY PIECE: Worked in the round. Cast on 208-230-250-270-290-310-330 sts on circular needle size 3.5 mm / US 4 with Karisma. Work 4 rounds GARTER ST – see above – and continue in rib K1/P1. When piece measures 5 cm / 2" work 2 rounds garter st, AT THE SAME TIME inc 20-10-6-6-22-18-18 sts evenly on last round = 228-240-256-276-312-328-348 sts. Insert 2 markers in piece, 1 at beg of round and 1 after 114-120-128-138-156-164-174 sts (= each side). Change to circular needle size 4 mm / US 6 and work PATTERN as follows – see above: Size 13/14 – L: M.2 on the first 9-12-12-17 sts, M.3, M.4, M.3, M.1 on the next 44-44-52-52 sts, M.3, M.4, M.3, M.2 on the next 18-24-24-34 sts, M.3, M.4, M.3, M.1 on the next 44-44-52-52 sts, M.3, M.4, M.3, M.2 on the last 9-12-12-17 sts. Size XL-XXXL: M.2 on the first 8-12-17 sts, M.3, M.4, M.3, M.4, M.3, M.1 on the next 52-52-52 sts, M.3, M.4, M.3, M.4, M.3, M.2 on the next 16-24-34 sts, M.3, M.4, M.3, M.4, M.3, M.1 on the next 52-52-52 sts, M.3, M.4, M.3, M.4, M.3, M.2 on the last 8-12-17 sts. REMEMBER THE GAUGE! Continue in pattern like this. AT THE SAME TIME when piece measures 9 cm / 3½" inc 1 st each side of both markers (work inc sts into M.2 as you go along). Repeat the inc on every 6-8-8-9-9-9-10 cm / 2⅜"-3⅛"-3⅛"-3½"-3½"-3½"-4" a total of 5 times = 248-260-276-296-332-348-368 sts. When piece measures 38-47-48-49-50-51-52 cm / 15"-18½"-19"-19¼"-19¾"-20"-20½" bind off 6 sts for armhole each side (= 3 sts each side of marker) and complete each piece separately (make sure cable rows are from RS after dividing piece). BACK PIECE: = 118-124-132-142-160-168-178 sts. Continue back and forth on circular needle. Bind off to shape the armhole each side at beg of every row: 2 sts 2-2-2-2-2-3-4 times and 1 st 1-1-2-3-4-4-5 times = 108-114-120-128-144-148-152 sts. Continue in pattern. When piece measures 49-59-61-63-65-67-69 cm / 19¼"-23¼"-24"-24¾"-25½"-26⅜"-27⅛" (adjust so that next row is row 7 in diagram M.1, M.3 and M.4) bind off, AT THE SAME TIME dec 24-24-26-26-36-36-36 sts in diagram on binding off row – see DECREASING TIP! FRONT PIECE: = 118-124-132-142-160-168-178 sts. Bind off for armhole as described for back piece. When piece measures 46-56-58-60-62-64-66 cm / 18"-22"-22¾"-23⅝"-24⅜"-25¼"-26" (adjust so that next row is first or 5th row in M.1) bind off the middle 40-40-48-48-48-48-48 sts for neck, AT THE SAME TIME dec 10-10-12-12-12-12-12 sts evenly on the 40-40-48-48-48-48-48 sts on bind off row. Now complete each shoulder separately. Bind off 2 sts on neckline on next row. When piece measures 49-59-61-63-65-67-69 cm / 19¼"-23¼"-24"-24¾"-25½"-26⅜"-27⅛" (adjust to back piece) bind off, AT THE SAME TIME dec 7-7-7-7-12-12-12 sts in diagram on bind off row. RIGHT SLEEVE: Worked in the round. Cast on 56-58-60-62-64-66-68 sts on double pointed needles size 3.5 mm / US 4 with Karisma. Work 4 rounds garter st and continue in rib K1/P1 until piece measures 10 cm / 4". Work 2 rounds garter st, AT THE SAME TIME inc 2 sts evenly on last round = 58-60-62-64-66-68-70 sts. Insert a marker at beg of round. Change to double pointed needles size 4 mm / US 6 and continue in pattern on next round as follows: M.2 on the first 5-6-7-8-9-10-11 sts, M.3 2 times, M.5, M.3 2 times, M.2 on the last 5-6-7-8-9-10-11 sts. Continue in pattern like this. AT THE SAME TIME when piece measures 13-12-13-12-12-14-13 cm / 5⅛"-4¾"-5⅛"-4¾"-4¾"-5½"-5⅛" inc 1 st each side of marker. Work inc sts into M.2 as you go along. Repeat the inc on every 2-2.5-2-2-2-1.5-1.5 cm / ¾"-⅞"-¾"-¾"-¾"-½"-½" a total of 14-15-16-17-18-19-20 times = 86-90-94-98-102-106-110 sts. When piece measures 45-50-50-49-49-48-48 cm / 17¾"-19¾"-19¾"-19¼"-19¼"-19"-19" bind off 6 sts mid under sleeve (= 3 sts each side of marker) and complete piece back and forth on needle (make sure to have cable row from RS after dividing piece). Bind off for sleeve cap each side at the beg of every row: 2 sts 2-4-6-7-9-10-12 times and 1 st 12-10-8-8-6-6-4 times = 48 sts left on needle for all sizes. Piece measures 55-60-60-60-60-60-60 cm / 21⅝"-23⅝"-23⅝"-23⅝"-23⅝"-23⅝"-23⅝". Now measure piece from here! Continue in pattern on remaining sts until piece measures 12-14-13-15-17-18-19 cm / 4¾"-5½"-5⅛"-6"-6¾"-7"-7½". Now bind off on right side of piece, at the beg of every row from RS as follows: 24 sts 1 time ((AT THE SAME TIME as 14 of these 24 sts K2 tog before they are bound off),), 3 sts 2 times. Work 3 rows without dec. Bind off 1 st on next row = 17 sts left for all sizes. Continue until piece measures 19-21-22-24-26-27-28 cm / 7½"-8¼"-8¾"-9½"-10¼"-10⅝"-11". Bind off, AT THE SAME TIME dec 4 sts evenly in diagram on bind off row. The whole sleeve now measures approx 74-81-82-84-86-87-88 cm / 29⅛"-32"-32¼"-33"-33⅞"-34¼"-34⅝". LEFT SLEEVE: Like right sleeve, but bind off at the top at the opposite side, i.e. at the beg of every row from WS. ASSEMBLY: Set in sleeves. Sew shoulder sts from body piece to M.3 each side of sleeve (in outer loops of sts). Sew the top of sleeves tog mid back and sew to back piece. NECKLINE: Pick up 94-94-108-108-108-108-108 sts round neckline on small circular needle size 3.5 mm / US 4 with Karisma. Work 4 rounds garter st, AT THE SAME TIME on last row inc 22-22-26-26-26-26-26 sts evenly = 116-116-134-134-134-134-134 sts. Continue in rib K1/P1. When rib measures 8 cm / 3" work 2 rounds garter st and bind off. Fold neck double towards WS and fasten, garter st to garter st. |
|||||||||||||||||||
Diagram explanations |
|||||||||||||||||||
|
|||||||||||||||||||
 |
|||||||||||||||||||
 |
|||||||||||||||||||
Have you finished this pattern?Tag your pictures with #dropspattern #dreamsofaransweater or submit them to the #dropsfan gallery. Do you need help with this pattern?You'll find 13 tutorial videos, a Comments/Questions area and more by visiting the pattern on garnstudio.com. © 1982-2026 DROPS Design A/S. We reserve all rights. This document, including all its sub-sections, has copyrights. Read more about what you can do with our patterns at the bottom of each pattern on our site. |
|||||||||||||||||||






With over 40 years in knitting and crochet design, DROPS Design offers one of the most extensive collections of free patterns on the internet - translated to 17 languages. As of today we count 333 catalogs and 12525 patterns - 12515 of which are translated into English (US/in).
We work hard to bring you the best knitting and crochet have to offer, inspiration and advice as well as great quality yarns at incredible prices! Would you like to use our patterns for other than personal use? You can read what you are allowed to do in the Copyright text at the bottom of all our patterns. Happy crafting!
Post a comment to pattern DROPS 135-3
We would love to hear what you have to say about this pattern!
If you want to leave a question, please make sure you select the correct category in the form below, to speed up the answering process. Required fields are marked *.