
Popular categories
Looking for a yarn?


Comments / Questions (34)
![]() Ulla wrote:
Ulla wrote:
Men hvorfor skal der kun være 5 masker i den først skonning og 6 i den anden.
01.03.2026 - 20:58DROPS Design answered:
Hei Ulla. Tenker du på diagram M.1A og M.2A som starter med 5 masker, men som på 4. pinne øker med 1 maske pr gang diagrammene strikkes? Snonningene trekker arbeidet sammen og for at det skal bli en pen overgang mellom snoningene og glattstrikk, må det økes noen masker. M. A diagrammene strikkes bare 1 gang i høyden, mens M.B diagrammene gjentas i høyden. mvh DROPS Design
03.03.2026 - 13:04
![]() Ulla wrote:
Ulla wrote:
Hvor mange masker skal der være imellem hver snoning??
29.12.2025 - 19:43DROPS Design answered:
Hei Ulla. Kommer an på hvilken str. du strikker. Det er enten 2 eller 3 masker. 1 kantm, * 3(S)-2(M)-2(L)-3(XL)-2(XXL)-2(XXXL) m ret fra vrangen/vrang fra retten, M.1A (= 5 m) *, gjenta fra *-* totalt 6-8-8-8-10-10 ganger, avslutt med 3(S)-2(M)-2(L)-3(XL)-2(XXL)-2(XXXL) m ret fra vrangen/vrang fra retten, 1 kantm. mvh DROPS Design
12.01.2026 - 12:53
![]() Sharon Hunt wrote:
Sharon Hunt wrote:
I would like to make this two inches larger than the pattern calls for. Would adding 12 sts. and following the pattern as written make up my sts deficit. Am trying for the easiest and pain free way to make this a bit larger. Thank you.
11.10.2024 - 21:27DROPS Design answered:
Dear Sharon, we don't make custom patterns. When you add up stitches, you will be modifying the pattern in the row as well, so you need to take that into account when you modify the pattern. The piece is worked from the bottom up so, to lengthen the pattern, the easiest way is to add more cm in stocking stitch before the decreases or to spread the decreases apart slightly, so that you can add more cm to the piece while working the same number of decreases as required. To widen the piece, you need to make a rule of three; you can see an example on how to calculate this here: https://www.garnstudio.com/lesson.php?id=25&cid=19. Happy knitting!
13.10.2024 - 20:57
![]() Gillian Hendry wrote:
Gillian Hendry wrote:
Am I right in thinking that at the beginning of the cable panel, worked from WS, that it should be knit 3/2 between each cable not purl?
30.08.2019 - 20:08DROPS Design answered:
Dear Mrs Hendry, you are right, the stitches between cables should be P from RS and K from WS. Happy knitting!
09.09.2019 - 12:45
![]() Susan wrote:
Susan wrote:
Got another one for you - once you do add the YO where ever it goes the stitch count increases from 60 to 68 per the instructions. However where do the extra stitches go? The instuction calls for only P2 (med size) before the pattern starts, which would leave the extra 8 at the end of the row, which pushes the cable pattern way off on the next row.
18.03.2018 - 23:04DROPS Design answered:
Dear Susan, the number of sts will increased due to the inc in M.1A, ie: Continue in pattern and inc in cables acc to diagram (= 59-68-68-77-84-84 sts ..., you are working M.1A a total of 8 times in width = 8 sts will be increased on row 4 in M.1A = 68 sts in size M. Happy knitting!
19.03.2018 - 11:13
![]() Susan wrote:
Susan wrote:
I have knitted cables before but I am totally mystified by the description of M1.A where is the YO made, in the front of the 3 on the needle, in the middle, at the end. Is the YO on the same row or before it, after? I have tested a small piece for two days now, I don't understand what is happening.
18.03.2018 - 21:33DROPS Design answered:
Dear Susan, the Yo in M.1A is made on 4th row, ie K2, YO, K3 ( = there are now 6 sts in M.1A). On next row, P YO twisted to avoid a hole. On 6th row work the cable as explained under diagram. Happy knitting!
19.03.2018 - 11:10
![]() Dagmar wrote:
Dagmar wrote:
Ich würde mir manchmal etwas einfachere Anleitungen wünschen, wie sie in den strickheften stehen, bin KEINE Anfängern, aber mit euren Anleitungen manchmal sehr verwirrt..es ist eine Anregung, und ich spreche damit vielen meiner Freunde aus der Seele.Danke von einer begeisterten Strickerin😃
19.02.2016 - 17:10
![]() Dagmar wrote:
Dagmar wrote:
HILFE 😌 bitte, Wie lese ich das Diagramm richtig? man sieht es nur von der Vorderseite, der MS besteht aus 10glatten Reihen, das würde bedeuten, eine linke reihe ist gleichzeitig meine nächste Rechte Reihe, ODER werden die linken Reihen NICHT mitgezählt, dann würde aber der MS doppelt so lang??? Bin sehr verwirrt.bitte um baldige Antwort.danke😃
19.02.2016 - 17:04DROPS Design answered:
Die Diagramme zeigen stets alle Reihen, also Hin- und Rück-R. Sie fangen unten rechts an zu lesen und lesen nach links, das ist die Hin-R, dann lesen Sie die Rück-R von rechts nach links usw.
24.02.2016 - 19:47
![]() Annelie Sörslätt wrote:
Annelie Sörslätt wrote:
Nu vill jag veta hur jag ska börja vad menas med3-2-2-3-2-2am,M,1A(=5m)*_*
15.12.2012 - 17:40
![]() Margretha wrote:
Margretha wrote:
Dank voor de reactie. Maar ik snap eigenlijk nog steeds niet hoe ik voor het linker voorpand aan de goede kant vanaf de schouder richting de hals steken af moet kanten. Dit kan toch niet? En wordt de kraag in tricotsteek gebreid?
09.10.2012 - 10:17DROPS Design answered:
Dit staat er in het patroon: Kant in de volgende nld aan de goede kant 18-21-21-26-28-28 st af vanaf de schouder richting de hals. De goede kant van het linker voorpand begint bij het armsgat richting middenvoor. De kraag wordt in ribbelst gebreid net zoals de rand middenvoor.
09.10.2012 - 20:44
|
|||||||||||||
Manifesting Winter#manifestingwinterjacket |
|||||||||||||
|
|
|||||||||||||
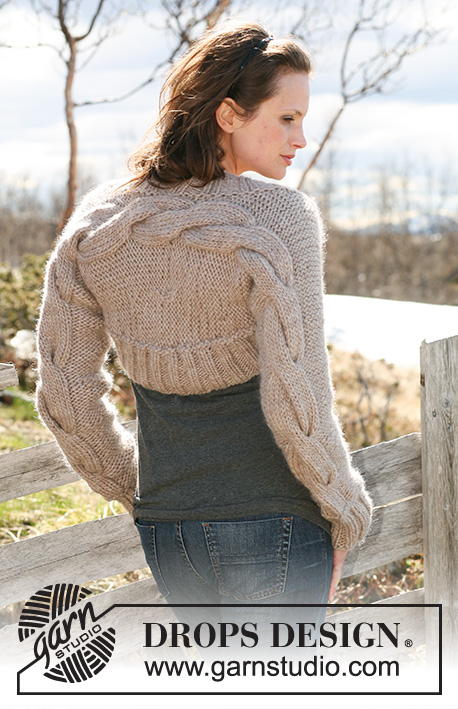
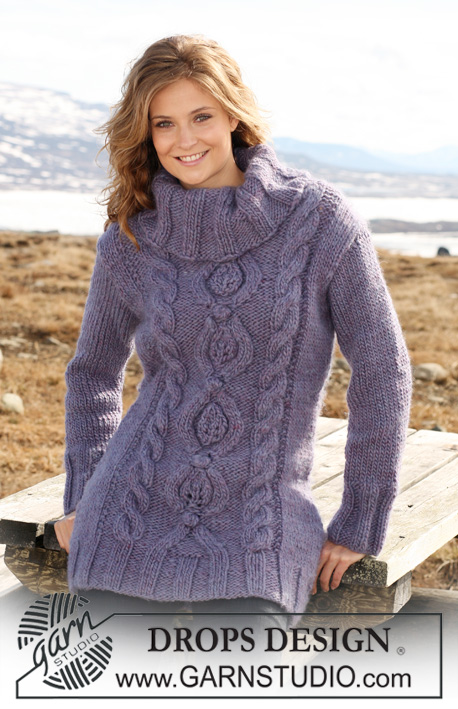
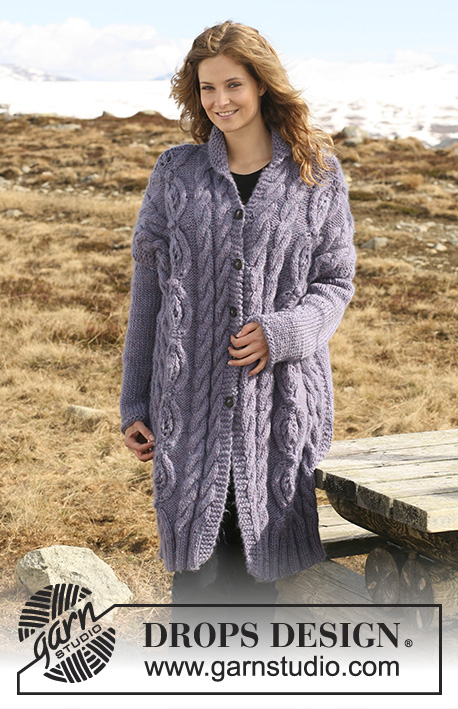
Knitted DROPS jacket with cables in ”Snow”. Size S-XXXL.
DROPS 117-22 |
|||||||||||||
|
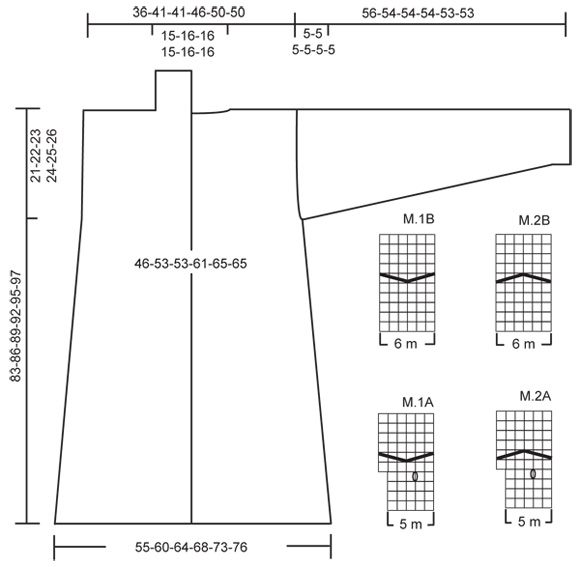
GARTER ST (back and forth on needle): K all rows. MEASUREMENT TIP: Because of the weight of the yarn all measurements should be made whilst the garment is hanging, otherwise it will be too long when worn. PATTERN: See M.1A, M.1B, M.2A and M.2B. Diagram shows the pattern from RS. BUTTONHOLES: Make buttonholes on right front band. 1 buttonhole = bind off 4th st from mid front and make 1 YO. Make buttonholes when piece measures: Size S: 28, 36, 44, 52, 60 and 68 cm / 11", 14¼", 17¼", 20½", 23⅝". Size M: 30, 38, 46, 54, 62 and 70 cm / 11¾", 15", 18", 21¼", 24⅜", 27½". Size L: 32, 40, 48, 56, 64 and 72 cm / 12½", 15¾", 19", 22", 25¼", 28⅜". Size XL: 34, 42, 50, 58, 66 and 74 cm / 13⅜", 16½", 19¾", 22¾", 26", 29⅛". Size XXL: 28, 36, 44, 52, 60, 68 and 76 cm / 11", 14¼", 17¼", 20½", 23⅝", 26¾", 30". Size XXXL: 30, 38, 46, 54, 62, 70, 78 cm / 11¾", 15", 18", 21¼", 24⅜", 27½", 30¾". -------------------------------------------------------- -------------------------------------------------------- BACK PIECE: Worked back and forth on circular needle. Cast on 63-68-72-77-82-86 sts (includes 1 edge st each side) on circular needle size 8 mm / US 11 with Snow. Work 10 rows GARTER ST – see above, 2 rows stockinette st, and then 2 rows garter st. Now continue in stockinette st. When piece measures 12 cm / 4¾" dec 1 st each side. Repeat the dec on every 8-12-8-12-12-8 cm / 3⅛"-4¾"-3⅛"-4¾"-4¾"-3⅛" a total of 5-4-6-4-4-6 times = 53-60-60-69-74-74 sts. REMEMBER THE GAUGE! See MEASUREMENT TIP! When piece measures 46-49-52-48-51-53 cm / 18"-19¼"-20½"-19"-20"-21" work PATTERN on next row from WS as follows – see above: 1 edge st, * K3-2-2-3-2-2 (purl from RS), M.1A (= 5 sts) *, repeat from *-* a total of 6-8-8-8-10-10 times, finish with K3-2-2-3-2-2 (purl from RS), 1 edge st. Continue in pattern and inc in cables acc to diagram (= 59-68-68-77-84-84 sts – K sts from WS which are P from RS). After 1 vertical repeat of M.1A continue in M.1B with remaining sts as before. Work a total of 4-4-4-5-5-5 vertical repeats of M.1B. AT THE SAME TIME after the cable row in the last repeat dec 1 st from WS in each cable = 53-60-60-69-74-74 sts. Piece now measures approx 79-82-85-88-91-93 cm / 31"-32¼"-33½"-34⅝"-35¾"-36⅝". Work 2 rows garter st on all sts. AT THE SAME TIME when piece measures 81-84-87-90-93-95 cm / 32"-33"-34¼"-35"-36⅝"-37⅜" bind off the middle 15-16-16-15-16-16 sts for neck and complete each side separately. Bind off 1 st on neckline on next row = 18-21-21-26-28-28 sts left on shoulder. Continue in stockinette st until piece measures 83-86-89-92-95-97 cm / 32¾"-33⅞"-35"-36¼"-37⅜"-38 ¼". Bind off. LEFT FRONT PIECE: Cast on 39-41-45-45-48-52 sts (includes 1 edge st at the side) on circular needle size 8 mm. Work 10 rows garter st, 2 rows stockinette st with 2 garter sts towards mid front, and 2 rows garter st. Now continue in stockinette st with 2 garter sts towards mid front. When piece measures 12 cm / 4¾" dec 1 st at the side. Repeat the dec at the side and inside the 2 garter sts towards mid front alternately on every 4-6-4-6-6-4 cm / 1½"-1⅜"-1½"-1⅜"-1⅜"-1½" a total of 9-7-11-7-7-11 times = 30-34-34-38-41-41 sts. When piece measures 46-49-52-48-51-53 cm / 18"-19¼"-20½"-19"-20"-21" work pattern on next row from WS as follows: 1 edge st, * P3-2-2-3-2-2, M.1A (= 5 sts) *, repeat from *-* a total of 3-4-4-4-5-5 times, finish with P3 and 2 garter sts. Continue in pattern and inc in cables acc to diagram (= 33-38-38-42-46-46 sts). After 1 vertical repeat of M.1A continue in M.1B with remaining sts as before. Work a total of 4-4-4-5-5-5 vertical repeats of M.1B. AT THE SAME TIME after cable row in the last repeat dec 1 st from WS in each cable = 30-34-34-38-41-41 sts. Work 2 rows garter st on all sts, then continue in stockinette st with 2 garter sts towards mid front until piece measures 83-86-89-92-95-97 cm / 32¾"-33⅞"-35"-36¼"-37⅜"-38 ¼". On next row from RS bind off 18-21-21-26-28-28 sts from shoulder towards neckline = 12-13-13-12-13-13 sts left on needle for collar. On next row (from WS) work shortened rows, back and forth on needle, on collar as follows: * 2 rows on all sts, 2 rows on the 7 sts towards neck only *, repeat from *-*. Bind off when collar measures 8 cm / 3⅛" (measured on the shorter side) from shoulder. RIGHT FRONT PIECE: Like left front piece, but mirrored. NOTE! Work M.2A and M.2B instead of M.1A and M.1B. AT THE SAME TIME when piece measures 28-30-32-34-28-30 cm / 11"-11¾"-12½"-13⅜"-11"-11¾" make first BUTTONHOLE - see above! SLEEVE: Worked back and forth on circular needle. Cast on 30-31-32-33-34-35 sts (includes 1 edge st each side) on circular needle size 8 mm / US 11. Work 10 rows garter st, 2 rows stockinette st and 2 rows garter st. Now continue in stockinette st. When piece measures 8 cm / 3⅛" inc 1 st each side. Repeat the inc on every 8-6-5-5-4.5-4 cm / 3⅛"-2⅜"-2"-2"-1¾"-1½" a total of 6-7-8-8-9-10 times = 42-45-48-49-52-55 sts. When piece measures 51-49-49-49-48-48 cm / 20"-19¼"-19¼"-19¼"-19"-19" (less for the larger sizes because of longer sleeve cap and wider shoulder) bind off for sleeve cap each side at the beg of every row: 4 sts 1 time, then 2 sts each side until piece measures 55-53-53-53-52-52 cm / 21⅝"-21"-21"-21"-20½"-20½", now bind off 4 sts 1 time each side and bind off remaining sts. Piece measures approx 56-54-54-54-53-53 cm / 22"-21¼"-21¼"-21¼"-21"-21". ASSEMBLY: Sew shoulder seams. Sew collar tog mid back and sew to neckline. Sew side seams inside 1 edge st, but leave 21-22-23-24-25-26 cm / 8¼"-8¾"-9"-9½"-9¾"-10¼" at the top for armhole. Sew sleeve seams inside 1 edge st. Set in sleeves. Sew on buttons. If you want the front band slightly firmer, crochet a row of sc with crochet hook size 8 mm / L/11 along front band each side. |
|||||||||||||
Diagram explanations |
|||||||||||||
|
|||||||||||||
 |
|||||||||||||
Have you finished this pattern?Tag your pictures with #dropspattern #manifestingwinterjacket or submit them to the #dropsfan gallery. Do you need help with this pattern?You'll find 21 tutorial videos, a Comments/Questions area and more by visiting the pattern on garnstudio.com. © 1982-2026 DROPS Design A/S. We reserve all rights. This document, including all its sub-sections, has copyrights. Read more about what you can do with our patterns at the bottom of each pattern on our site. |
|||||||||||||


With over 40 years in knitting and crochet design, DROPS Design offers one of the most extensive collections of free patterns on the internet - translated to 17 languages. As of today we count 325 catalogs and 12298 patterns - 12288 of which are translated into English (US/in).
We work hard to bring you the best knitting and crochet have to offer, inspiration and advice as well as great quality yarns at incredible prices! Would you like to use our patterns for other than personal use? You can read what you are allowed to do in the Copyright text at the bottom of all our patterns. Happy crafting!
Post a comment to pattern DROPS 117-22
We would love to hear what you have to say about this pattern!
If you want to leave a question, please make sure you select the correct category in the form below, to speed up the answering process. Required fields are marked *.