
Popular categories
Looking for a yarn?


Comments / Questions (54)
![]() Amy wrote:
Amy wrote:
Hi again! I'm up to the sleeves and I'm not sure how you're supposed to bind off at both sides at the very end.. earlier on I've got past this because the pattern states to bind off on both sides every OTHER row so I've just bound off however many at the START of one row and the start of the next. But I don't know how to do it when it's every row and not every other! Thanks in advance :)
28.02.2015 - 08:29DROPS Design answered:
Dear Amy, when you bind off some sts every other row each side, you will bind off these sts at the beg of every row, ie from RS and from WS. Happy knitting!
28.02.2015 - 09:17Amy wrote:
Hi, I've got to the part where you split the row in 2 to do the neck, and I don't understand how you're supposed to cast on extra stitches in the middle.. I'm on the left side and my working yarn is on the outer side of the piece, so I can't figure out how to cast on extra stitches on the other end if you see what I mean?
30.01.2015 - 17:38DROPS Design answered:
Dear Amy, cut the yarn before working left side, first cast on 5 sts then work sts from the left side. Happy knitting!
02.02.2015 - 08:45
![]() Marie21 wrote:
Marie21 wrote:
Bonjour tous vos modèles sont superbes ,mais je ne trouve de tableau des tailles pour pouvoir choisir la bonne merci
13.10.2014 - 08:32DROPS Design answered:
Bonjour Marie21, vous trouverez tout en bas de la page un schéma avec toutes les mesures pour chaque taille, prises à plat, d'un côté à l'autre. Comparez ces mesures à un vêtement analogue qui va à l'intéressé pour trouver la taille adéquate. Bon tricot!
13.10.2014 - 10:46
![]() Ladebeck Christine wrote:
Ladebeck Christine wrote:
Grüezi..Sehe ich das richtig,auf dem Bild sieht man einen V-Ausschnitt,aber im Strickmuster stricke ich eine geraden Ausschnitt,ohne Abnehmen? Herzlichen Dank für Ihre Bemühung und mit freundlichen Grüessli,Christine Ladebeck.
09.03.2014 - 17:03DROPS Design answered:
Hallo Christine, der Pullver hat keinen V-Ausschnitt, sondern in der vorderen Mitte einen Schlitz.
10.03.2014 - 07:53
![]() Anne Hove Sunnarvik wrote:
Anne Hove Sunnarvik wrote:
Mitt barnebarn på 12 år ønsker seg en hettegenser, og denne ser veldig grei ut. Men det ser ut til å være tykt garn. Finnes det oppskrift(er) på liknende modell med hette i tynnere ganr?
22.11.2013 - 07:56DROPS Design answered:
Hej Anne. Der er desvaerre ikke andre hettegensere som denne i vores database. Du kan evt pröve at konvertere mönstret med hjaelp af strikkefastheden (antal m/p per 10 cm). Du kan ogsaa spörge i din DROPS butik.
22.11.2013 - 11:17
![]() Anja Van Leeuwen wrote:
Anja Van Leeuwen wrote:
Is nu de binnenkant van de capuchon met v tjes en de buitenkant de averechtse kant of anderom. Ik zie het niet goed terugkomen in het voorbeeld
04.10.2013 - 17:38DROPS Design answered:
Hoi Anja. De capuchon is gebreid in tricotsteek, dus recht op de goede kant (buitenkant) en averecht op de verkeerde kant (binnenkant) met 5 ribbelst aan beide zijkanten (zie beschrijving).
07.10.2013 - 21:13
![]() Jenny wrote:
Jenny wrote:
Hi, I am knitting a size S/M. I am following increase 1 each side every 12 cms three times, but I get to the arm hole decrease at 41 cm before I have completed the third increase. Is this correct?
16.08.2013 - 00:21DROPS Design answered:
Dear Jenny, you inc 3 times, ie : when piece measures 11 cm (1st time), then when it measures 23 cm (2nd time) and last time when it measures 35 cm (3rd time). Happy knitting!
16.08.2013 - 08:26
![]() Maggie wrote:
Maggie wrote:
Hi. Can you help the rib is k1 p2 on the first row . So on next row is it k2p1 to keep a rib or is it a broken rib like a moss stitch? Thanks for answering this very basic question.
25.04.2013 - 22:42DROPS Design answered:
Dear Maggie, ribs are K1,P2 seen from RS, ie from WS you will work P1, K2 to keep ribbing. Happy knitting!
26.04.2013 - 08:36
![]() Anne wrote:
Anne wrote:
Je ne comprends pas l'explication de l'encolure qui me semble est croisée et cela ne correspond pas à la vidéo conseillée. Pouvez vous m'aider.Merci
07.04.2013 - 00:11DROPS Design answered:
Bonjour Anne, pour l'encolure, vous mettez en attente les 5 m centrales + la moitié droite des mailles et continuez sur les mailles du côté gauche en montant 5 m côté encolure. Vous continuez en jersey avec les 5 m de la fente d'encolure au point mousse. Bon tricot !
08.04.2013 - 09:21
![]() RABU wrote:
RABU wrote:
Facile et rapide,mon fils a adoré !
08.03.2013 - 23:52
|
|
Theodor |
|
|
|
|
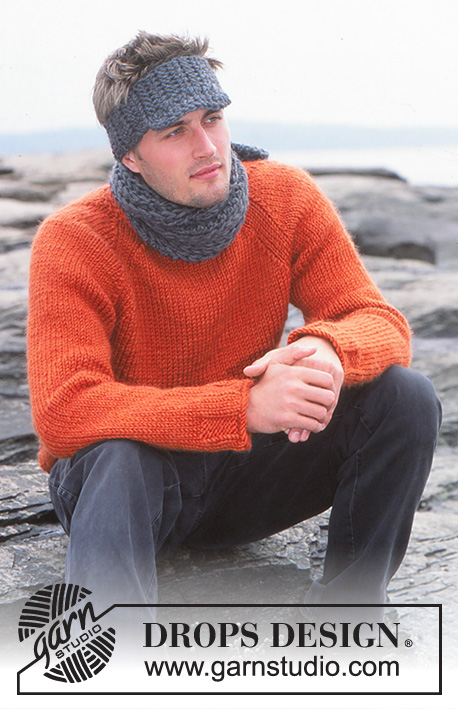
Men's pullover with hood, v-neck and stripes in DROPS Snow
DROPS 85-1 |
|
|
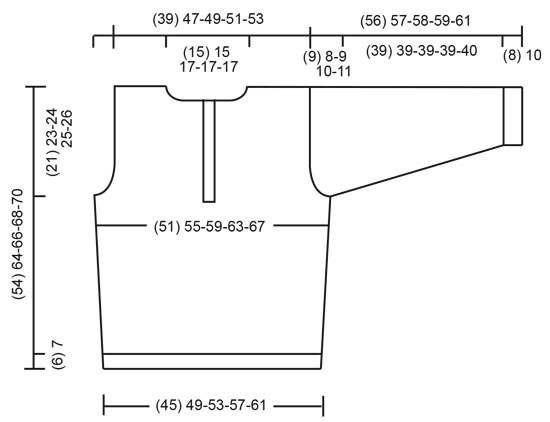
Gauge: 10 sts x 14 rows on larger needles in stockinette st = 10 x 10 cm. Rib: *K 1, P 2*, repeat from *-*. Front: Cast on 47-53-56-59-65 sts (includes 1 edge st each side) on smaller needles with charcoal grey and knit rib for 6-7-7-7-7 cm. Change to larger needles and knit 2 rows garter st, adjusting (dec or inc) on the 1st row to 47-51-55-59-63 sts. Change to stockinette st. Read the entire section before knitting: When the piece measures 11 cm inc 1 st at each side every 8-12-12-12-12 cm a total of 3 times = 53-57-61-65-69 sts. When the piece measures 28-35-37-38-40 cm knit 3 rows black, 2 rows charcoal grey, 15 rows black, and then knit charcoal grey to finished measurements. When the piece measures 33-41-42-43-44 cm bind off for armhole at each side every other row: 3 sts 1 time, 2 sts 1-0-0-1-1 times and 1 st 2-2-3-2-3 times. When the piece measures approx. 38-46-47-49-50 cm (adjust so that there are the same number of sts bound off for armholes at both sides), divide for the neck opening as follows: put the center 5 sts + remaining sts on right side on a st holder (there will be 5 sts more on st holder than on needle). Left side (sts on needles): Cast on 5 new sts at neck opening for placket. Continue with stockinette st, keeping 5 placket sts in garter st. When the piece measures 54-64-66-68-70 cm bind off the outermost 12-16-16-17-18 sts for shoulder. Put the remaining 10-10-11-11-11 sts on a st holder. Right side: Put sts from st holder back on needles and knit stockinette st, keeping 5 placket sts (at center front edge) in garter st. When the piece measures 54-64-66-68-70 cm bind off the outermost 12-16-16-17-18 sts for shoulder. Put the remaining 10-10-11-11-11 sts on a st holder. Back: Cast on and knit the same as the front. Bind off for armhole as on front. When the piece measures 52-62-64-66-68 cm put the center 13-13-15-15-15 sts on a st holder for the neck. On the next row dec 1 st at each neck edge = 12-16-16-17-18 sts remain on each shoulder. Bind off when the piece measures 54-64-66-68-70 cm. Sleeve: Cast on 26-26-26-29-29 sts on smaller needles with charcoal grey and knit rib for 8-10-10-10-10 cm. Change to larger needles and knit 2 rows garter st, adjusting (dec or inc) to 25-26-26-27-28 sts on the 1st row. Then knit stockinette st. When the piece measures 10-13-13-12-12 cm inc 1 st at each side every 5-4-3.5-3.5-3.5 cm a total of 8-9-10-11-11 times = 41-44-46-49-50 sts. When sleeve measures 47-49-49-49-50 cm bind off for sleeve cap at each side every other row: 3 sts 1 time, 2 sts 2 times and 1 st 1 time, then bind off 2 sts at each side until the piece measures 55-56-57-58-60 cm, then bind off 3 sts at each side 1 time. Bind off the remaining sts, the piece measures 56-57-58-59-61 cm. Assembly: Sew shoulder seams. Hood: Pick up approx. 35-45 sts (incl. sts on st holders) on larger circular needles with charcoal grey and knit back and forth as follows (round 1 = wrong side): K 1 row, P 1 row, then knit stockinette st keeping 5 sts at each edge in garter st (= continuing the placket sts). After 2 rows inc 10 sts evenly distributed = 45-55 sts. Continue until hood measures approx. 32-34-34-34-34 cm, divide sts onto 2 needles, fold hood in half and Kitchener st the top together. Sew cast-on edge on left placket behind right placket. Sew in sleeves. Sew sleeve and side seams using edge sts as a seam allowance. |
|
 |
|
Have you finished this pattern?Tag your pictures with #dropspattern or submit them to the #dropsfan gallery. Do you need help with this pattern?You'll find 20 tutorial videos, a Comments/Questions area and more by visiting the pattern on garnstudio.com. © 1982-2026 DROPS Design A/S. We reserve all rights. This document, including all its sub-sections, has copyrights. Read more about what you can do with our patterns at the bottom of each pattern on our site. |


With over 40 years in knitting and crochet design, DROPS Design offers one of the most extensive collections of free patterns on the internet - translated to 17 languages. As of today we count 324 catalogs and 12239 patterns - 12229 of which are translated into English (US/in).
We work hard to bring you the best knitting and crochet have to offer, inspiration and advice as well as great quality yarns at incredible prices! Would you like to use our patterns for other than personal use? You can read what you are allowed to do in the Copyright text at the bottom of all our patterns. Happy crafting!
Post a comment to pattern DROPS 85-1
We would love to hear what you have to say about this pattern!
If you want to leave a question, please make sure you select the correct category in the form below, to speed up the answering process. Required fields are marked *.