
Popular categories
Looking for a yarn?


Comments / Questions (77)
![]() Theresa Miller wrote:
Theresa Miller wrote:
I am so confused. When it comes to placing the markers, you give drections as follows. . Insert 8 markers in piece as follows: Marker-1 at beg of round and the next 7 markers with 29-31-34-36-39 sts between each Where is marker #7? #8? 1st-beg next #2- after 29 3-31 4-34 5-36 6-39 7-? 8-? Help?
24.05.2021 - 09:49DROPS Design answered:
Dear Theresa Miller! These numbers are for different sizes. Meaning for size L you have markers after every 34 stitches. Hope it helps! Happy knitting!
24.05.2021 - 14:14
![]() Evi wrote:
Evi wrote:
Hello. The pattern looks so pretty and I want to start knitting immediately!! But I am a bit confused. Do I have to begin increasing and decreasing simultaneously on the first round of the 4K rows and then continue every other and every 4th (in which case every 4th row the increase and decrease will both take place) or do I have to begin decreasing on the first row and increase on the 4th so that increase and decrease happen always in different rows? or does it not make any difference?
09.05.2020 - 06:28DROPS Design answered:
Dear Evi, you have to work 4 rounds K, on the first of these 4 rows you will decrease on 4 markers (2nd, 4th, 6th and 8th) and decrease on 4 markers (1st, 3rd, 5th and 7th). And repeat these decreases/increases every 4th round. After these 4 rounds K, you will K1 (= increase/decrease again), Purl 1 round, and continue in stocking stitch, ie continue then to increase and decrease on every 4th roudn until you worked 13-15 rounds (see size) with decreases/increases in total. Happy knitting!
11.05.2020 - 09:15
![]() Renée wrote:
Renée wrote:
Ik vind dit een prachtig patroon maar bijna al jullie patronen worden met een rondbreinaald gebreid. Is er een simpele manier om dit om te zetten naar gewone breinaalden? Groet, Renée
23.02.2019 - 22:46DROPS Design answered:
Dag Renée,
Veel patronen kun je inderdaad ook met rechte naalden breien. In deze les vind je meer informatie over hoe je een patroon omzet om met rechte naalden te breien.
26.02.2019 - 09:26
![]() Gabi wrote:
Gabi wrote:
Liebes Drops Team, was hinten und vorne 8 M aufnehmen welche Makierer sind gemeint? Nach 49 cm auf beiden Seiten der Makierungsfâden je 3 M ablegten. Welche Markierer sind gemeint. Lieben Dank im voraus Liebe Grüße Gabi
25.08.2018 - 17:44DROPS Design answered:
Antwort siehe unten! :-)
31.08.2018 - 11:58
![]() Gabi wrote:
Gabi wrote:
Liebes Drops - Team, was ist damit gemeint hinten und vorne 8M aufnehmen welche Markierer? Nach 49 cm auf beiden Seiten der Makierungsfâden je 3 M Abk. Welche Makierer sind gemeint? Lieben Dank im voraus Liebe Grüße Gabi
24.08.2018 - 12:37DROPS Design answered:
Liebe Gabi, die Zunahmen vorne und hinten machen Sie gleichmäßig verteilt, d.h. Sie nehmen am Vorderteil und am Rückenteil jeweils 8 M gleichmäßig verteilt zu. Die je 3 Maschen bei 49 cm ketten Sie an beiden Seiten des 1. und 5. Markierungsfadens ab, d.h. an den Seiten der Tunika, d.h. je 6 Maschen pro Seite werden für die Armausschnitte abgekettet. Weiterhin gutes Gelingen!
27.08.2018 - 10:32
![]() Gabriele Heling wrote:
Gabriele Heling wrote:
Liebes Drops - Team, nochmal muss ich nachfragen bei Gr XL 288 M und Gr XXL sind es 312 M, also 24 M mehr, dann kann es doch nicht stimmen das es auch 450 Gramm sind. Maschenprobe stimmt. Lieben Dank im voraus Liebe Grüße Gabi
16.08.2018 - 20:18DROPS Design answered:
Liebe Gabi, doch das kann passen - die Garnmengen sind ja nur auf 50 g genau berechnet, weil das die Menge eines Knäuels ist. Wenn Sie bei XL etwas mehr als 400 g benötigen, sind ebenfalls 450 g angegeben. Halten Sie auf jeden Fall die angegebenen Maße und die Maschenprobe ein, damit die Garnmenge reicht. Beachten Sie auch, dass Sie die Lauflänge im Auge haben müssen, wenn Sie ein Alternativgarn verwenden, Sie müssen also schauen, wie viele Meter Garn Sie insgesamt benötigen und das dann auf die Knäuel des alternativen Garns umrechnen - unser Garnumrechner hilft dabei.
27.08.2018 - 10:46
![]() Gabriele Heling wrote:
Gabriele Heling wrote:
Liebes Drops - Team, in jeder 2 ten R 1 M vor dem Markierer abnehmen. Also 1. R ohne Zu und Abn 2. R Abn und keine Zum. 3. R keine Zu und Abn. 4. R Zu und Abn.Richtig? Habe jetzt schon ein 2tes Knäuel angefangen und bin bei der 4. Abn.reichen doch nicht 450 Gramm? Was ist damit gemeint vorne und hinten 6 M aufnehmen? Stricke Gr. XL Lieben Dank im vorau
16.08.2018 - 19:35DROPS Design answered:
Liebe Frau Heling, also bei der 1. Rd nehmen Sie 4 M ab und nehmen Sie 4 M zu, bei der 2. Rd keine Zu- noch Abnahme. 3. Rd: 4 M abnehmen. 4. Rund: Keine 2u- noch Abnahme. Dann sollen Sie 6 M auf den Vorderteil und 6 M auf den Rückenteil gleichmässig verteilt zunehmen = 12 M werden bei dieser Runde zugenommen. Prüfen Sie mal, ob Ihre Maschenprobe in der Breite sowie in der Höhe stimmt. Viel Spaß beim stricken!
17.08.2018 - 10:08
![]() Margit wrote:
Margit wrote:
Liebes Drops-Team, ich würde gerne dieses Modell mit "Belle" stricken. Da Belle aber zu Garngruppe B gehört, bin ich mir unsicher, ob ich es von den Maßen hinbekomme. Oder wie rechne ich das auf meine Maschenprobe um? Danke für Eure Hilfe! LG Margit
12.03.2016 - 17:20DROPS Design answered:
Liebe Margrit, da dies keine ganz einfacher Schnitt ist, rate ich von einem Umrechnen ab. Versuchen Sie mit Belle die Maschenprobe zu erreichen und entscheiden Sie, ob Ihnen das Strickbild so locker verstrickt noch gefällt.
14.03.2016 - 08:36
![]() Celine Claus wrote:
Celine Claus wrote:
Hallo. Ich stricke dieses Modell gerade in Größe S. Es wird beschrieben, dass man im 4er Takt Auf- und Abnahmen macht, also in jeder zweiten Runde Abnahmen und in jeder vierten Runde Aufnahmen. Nun habe ich insgesamt 14 mal die Aufnahmen gestrickt, es fehlen ja aber noch die anderen 14 Abnahmen. Das Teil misst jedoch jetzt schon etwa 34 cm. In der Anleitung steht allerdings dass alle Auf-und Abnahmen nach 38 cm gestrickt sein sollten. Was hab ich falsch gemacht?
08.06.2015 - 20:30DROPS Design answered:
Die Zunahmen und Abnahmen müssten eigentlich ziemlich gleichzeitig enden, da Sie die Abnahmen in jeder 2. Rd machen und die Zunahmen in jeder 4. Rd, aber dafür doppelt so viele Abnahmen wie Zunahmen machen. Sie nehmen also in jeder 2. Rd nur ab und in jeder 4. Rd ab UND zu.
15.06.2015 - 21:02Berit wrote:
Wie immer: am Diagramm unten!
04.09.2014 - 19:11
|
|
Merry Morning#merrymorningtunic |
|
|
|
|
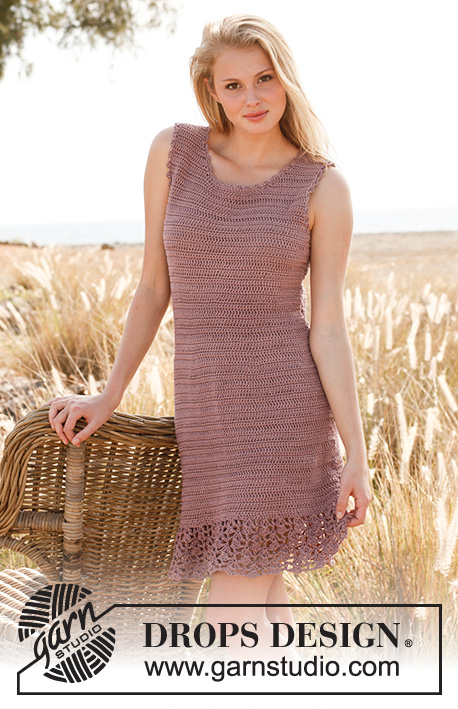
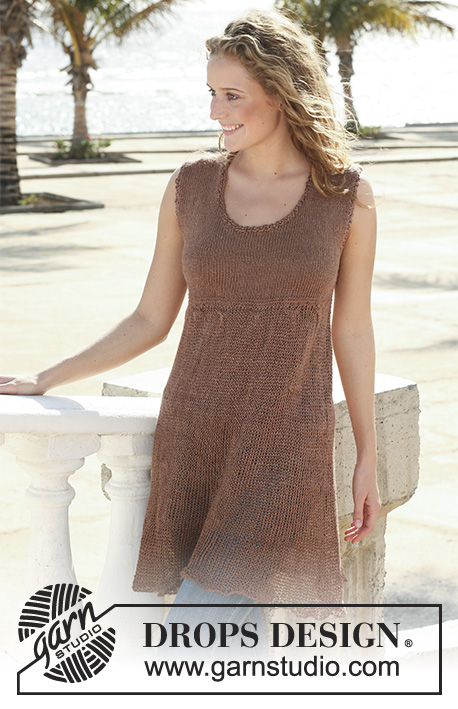
Wide DROPS top in ”Bomull-Lin”. Size S - XXL.
DROPS 113-7 |
|
|
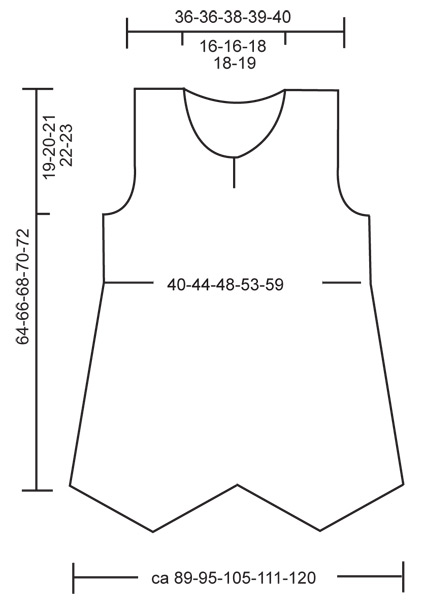
MEASUREMENT TIP: Because of the weight of the yarn make all measurements when the garment is hanging, otherwise it will be too long when worn. DECREASING TIP: Dec as follows before marker: K2 tog. Dec as follows after marker: slip 1 st as if to K, K1, psso. INCREASING TIP: Inc 1 st by making 1 YO before the stich before the marker and 1 YO after the stitch after the marker. Work YO into back of loop on return row to avoid a hole. GARTER ST (in the round): K 1 round, P 1 round. GARTER ST (back and forth on needle): K all rows. -------------------------------------------------------- BODY PIECE: Worked in the round on circular needle. Loosely cast on 232-248-272-288-312 sts on circular needle size 8 mm / US 11 with Bomull-Lin. Insert 8 markers in piece as follows: Marker-1 at beg of round and the next 7 markers with 29-31-34-36-39 sts between each. K 1 round, P 1 round, K 1 round and P 1 round. Now K 4 rounds, AT THE SAME TIME begin dec 1 st on each side of Marker-2., -4, -6, and -8 on every other round a total of 27-27-29-29-31 times and AT THE SAME TIME begin inc 1 st on each side of Marker-1, -3, -5 and -7 on every 4th round a total of 13-13-14-14-15 times – SEE INCREASING and DECREASING TIP. After the 4 K rounds, P 1 round and now continue in stockinette st. When piece measures approx 38-39-40-41-42 cm / 15"-15¼"-15¾"-16⅛"-16½" – measured where shortest, SEE MEASUREMENT TIP – the dec and inc are complete = 120-136-152-168-184 sts on round. Keep Marker-1 and Marker-5 in piece (= the sides), change to needles size 5 mm / US 8 and continue in garter st – see above - AT THE SAME TIME inc 8-6-6-6-8 sts evenly on front and back piece = 136-148-164-180-200 sts (68-74-82-90-100 sts on each piece). When piece measures 45-46-47-48-49 cm / 17¾"-18"-18½"-19"-19¼" bind off 3 sts on each side of both markers for armhole and complete each piece separately. BACK PIECE: = 62-68-76-84-94 sts. Continue in garter st, AT THE SAME TIME bind off for armhole each side at the beg of every row: 2 sts 0-1-2-3-4 times and 1 st 0-1-2-3-5 times = 62-62-64-66-68 sts. When piece measures 62-64-66-68-70 cm / 24⅜"-25¼"-26"-26¾"-27½" bind off the middle 26-26-28-28-30 sts for neck and bind off 1 st on neckline on next row = 17-17-17-18-18 sts left on each shoulder. Bind off when piece measures 64-66-68-70-72 cm / 25¼"-26"-26¾"-27½"-28⅜". FRONT PIECE: = 62-68-76-84-94 sts. Continue and bind off for armhole each side as described for back piece. AT THE SAME TIME when piece measures 48-50-52-54-56 cm / 19"-19¾"-20½"-21¼"-22" divide piece in 2 mid front and complete each side separately. When piece measures 54-56-58-60-62 cm / 21¼"-22"-22¾"-23⅝"-24⅜" bind off to shape the neckline at the beg of every row from mid front: 5-5-6-6-7 sts 1 time, 2 sts 2 times, and 1 st 5 times. When all dec are complete there are 17-17-17-18-18 sts left on shoulder. Bind off when piece measures 64-66-68-70-72 cm / 25¼"-26"-26¾"-27½"-28⅜". ASSEMBLY: Sew shoulder seams. CROCHET BORDER: Crochet a border round armholes with crochet hook size 4.5 mm/US 7 as follows: 1 sc, * 2 ch, skip approx 1 cm / ⅜", 1 sc *, repeat from *-* and finish with 1 sl st in first sc. Crochet a similar border round neckline and along split. At the top of split on the right side crochet a buttonhole loop as follows: 1 sc in corner, 10 ch, 1 sl st in sc in corner. Sew on button at the top of left split. |
|
 |
|
Have you finished this pattern?Tag your pictures with #dropspattern #merrymorningtunic or submit them to the #dropsfan gallery. Do you need help with this pattern?You'll find 19 tutorial videos, a Comments/Questions area and more by visiting the pattern on garnstudio.com. © 1982-2026 DROPS Design A/S. We reserve all rights. This document, including all its sub-sections, has copyrights. Read more about what you can do with our patterns at the bottom of each pattern on our site. |


With over 40 years in knitting and crochet design, DROPS Design offers one of the most extensive collections of free patterns on the internet - translated to 17 languages. As of today we count 324 catalogs and 12290 patterns - 12280 of which are translated into English (US/in).
We work hard to bring you the best knitting and crochet have to offer, inspiration and advice as well as great quality yarns at incredible prices! Would you like to use our patterns for other than personal use? You can read what you are allowed to do in the Copyright text at the bottom of all our patterns. Happy crafting!
Post a comment to pattern DROPS 113-7
We would love to hear what you have to say about this pattern!
If you want to leave a question, please make sure you select the correct category in the form below, to speed up the answering process. Required fields are marked *.