
Popular categories
Looking for a yarn?


Comments / Questions (28)
![]() Magda wrote:
Magda wrote:
K čemu je rozdělení nohavice (bez knoflíků) ve výšce 18 cm. A jak je sešít? Těmi volnými konci levou a pravou k sobě?
16.01.2026 - 08:31DROPS Design answered:
Dobrý den, Magdo, obě nohavice spojíme a pleteme nad nimi v kruhových řadách sed a tělo overalu. Po dokončení pak volným kocem příze (který nám zůstal u jedné nohavice) sešijeme jen otvor v rozkroku. Hodně zdaru! Hana
23.02.2026 - 05:43
![]() Kathi wrote:
Kathi wrote:
Guten Tag, mir kommen 62/68cm für 6-9 Monate recht knapp vor. Meine Maschenprobe fällt auch kleiner aus, also ich benötige eher mehr Maschen um auf die Maße zu kommen. Wahrscheinlich wäre dann 74/80 die bessere Wahl, wenn meine Tochter im Winter Größe 68-74 hat? Vielen Dank!
27.08.2025 - 17:05DROPS Design answered:
Liebe Kathi, am besten versuchen Sie Ihre Maschenprobe mit grösseren Nadlen - oder waschen Sie Ihre Maschenprobe so wissen Sie, ob es danach klappt. Und so brauchen Sie auch nicht die Angaben zu prüfen, ob die grössere Größe mit Ihrer Maschenprobe passen würde. Viel Spaß beim Stricken!
28.08.2025 - 19:05
![]() Georgia wrote:
Georgia wrote:
12-18 month right leg. 80 sts on needle. Just transferred to size 7 needle and P 1 round. the directions that after "continue as follows" do not make sense. 8 stockinette sts, M.1 does not equal 21 sts. If I follow the directions for the rest of the row, I will only have knitted on 38 sts but I have 80 on my needle. What am I missing?
14.03.2025 - 19:25DROPS Design answered:
Dear Georgia, M.1, M.2 and M.3 are the charts, which you can find below the pattern instructions. M.1 and M.2 have 21 stitches each, while M.3 is a 2-stitch rib pattern (but shown twice, so that the chart isn't too small). For size 12-18 you work: 8 sts in stocking st, 21 stitches of chart M.1, 2 sts in stocking st, 18 stitches according to chart M.3, 2 sts in stocking st, 21 stitches of chart M.2 and 8 sts in stocking st. You work the first round of each of the charts in this round. So you have: 8+21+2+18+2+21+8 = 80 sts. Happy knitting!
16.03.2025 - 18:55
![]() Erika Tschepp wrote:
Erika Tschepp wrote:
Kein leider nichts runterladen da ich von fast überall die Passwörter vergessen habe hat mir mein Schwiegersohn aufgesetzt und Passwörter gegeben er sagte sie mir und ich habe sie vergessen jetzt kann ich nirgends rein auch bei Pinterest die haben so schöne Sacheb für Babys zum häckeln. lg. Erika
27.05.2022 - 20:29
![]() Liv Erichsen wrote:
Liv Erichsen wrote:
Tusen takk for hjelpen, kjekt at dere er så kjapp å svare 😊
20.09.2018 - 19:11
![]() Liv Erichsen wrote:
Liv Erichsen wrote:
Hei, jeg skal begynne å strikke bakstykket - ferdig med forstykket og skuldrene. Det står at jeg skal felle som for forstykket, men det står ikke noe om riller i siden slik som det er på forstykket. Ble litt usikker, veldig fin bukse 😃
19.09.2018 - 15:48DROPS Design answered:
Hej Liv, jo det stemmer, du strikker også rillerne på bagstykket. Ja er de ikke søde :) God fornøjelse!
20.09.2018 - 10:27
![]() Liv Erichsen wrote:
Liv Erichsen wrote:
Hei er det riktig at det ikke skal være riller på bakstykket ?
18.09.2018 - 22:02DROPS Design answered:
Hej Liv, hvor er du i opskriften, så skal vi se på det :)
19.09.2018 - 15:17
![]() Joan Mangiulli wrote:
Joan Mangiulli wrote:
When making the legs on round needle do I read the chart as if all stitches were on the right side? Thanks. Joan
28.02.2018 - 21:51DROPS Design answered:
Dear Mrs Mangiulli, correct, when working in the round read diagrams starting from the bottom corner on the right side towards the left on every round. Happy knitting!
01.03.2018 - 08:50
![]() Theresa wrote:
Theresa wrote:
Danke!!
24.02.2017 - 10:37
![]() Theresa wrote:
Theresa wrote:
Leider ist es noch nicht ganz klar. Wenn die Rückr. mit 4,5 komplett re gestrickt wird, "sehe" ich auf der ersten Hinr. mit Muster nur li Maschen. Das heißt bei angekreuzten Kästchen muss ich in der Hinr. re und Rückr. li stricken, bei leeren Kästchen in der Hinr. li und in der Rückr. re? Was stricke ich bei "glatt"? Bitte entschuldigen Sie dass ich so auf dem Schlauch stehe. Vielen Dank!
23.02.2017 - 09:27DROPS Design answered:
Liebe Theresa, bei der 1. Reihe in M.1 stricken Sie so (= Hinreihe): 3 li, 3 re, 4 li, 6 re (Zopf), 5 li - bei der Rückreihe (= 2. Reihe) stricken Sie so 5 re, 6 li, 4 re, 3 li, 3 re, usw. Viel Spaß beim stricken!
23.02.2017 - 10:13
|
|||||||||||||||||||
Cream Dream#creamdreamset |
|||||||||||||||||||
|
|
|||||||||||||||||||
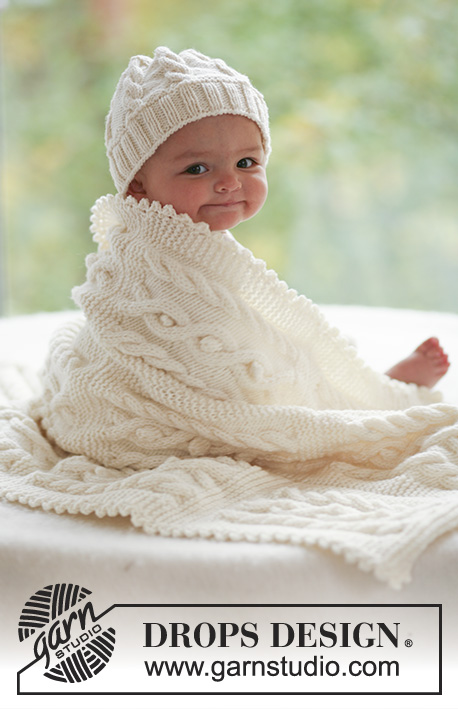
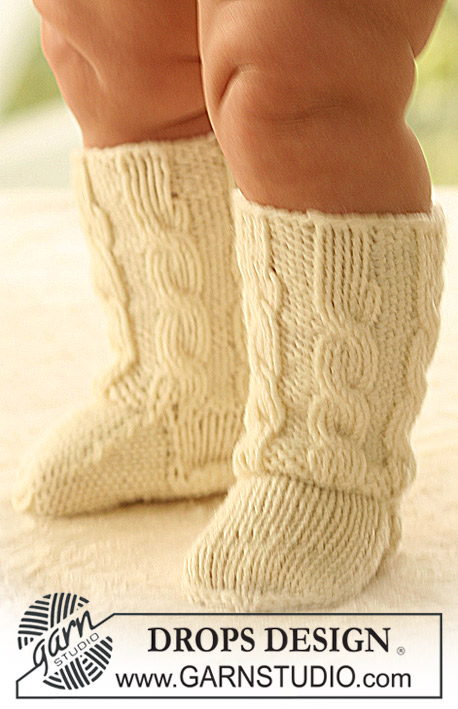
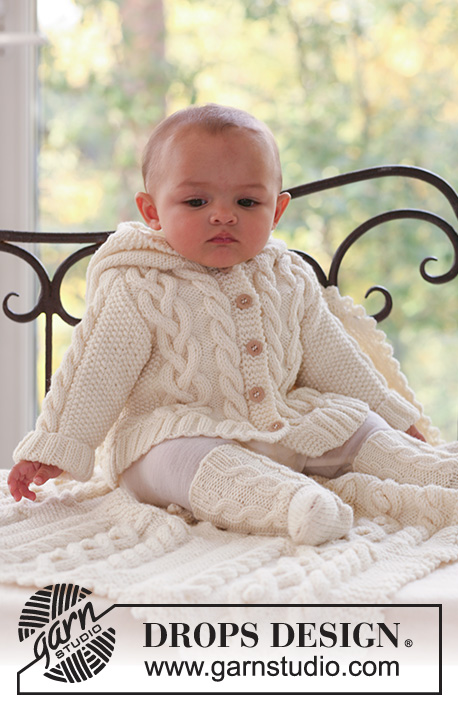
Set of knitted hat and baby onesie with or without buttons between the legs in DROPS Merino Extra Fine
DROPS Baby 17-3 |
|||||||||||||||||||
|
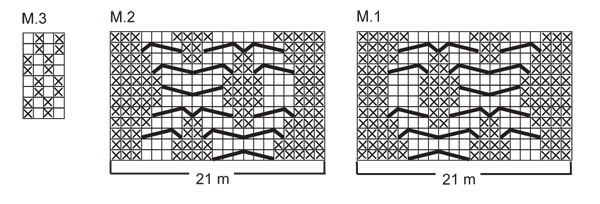
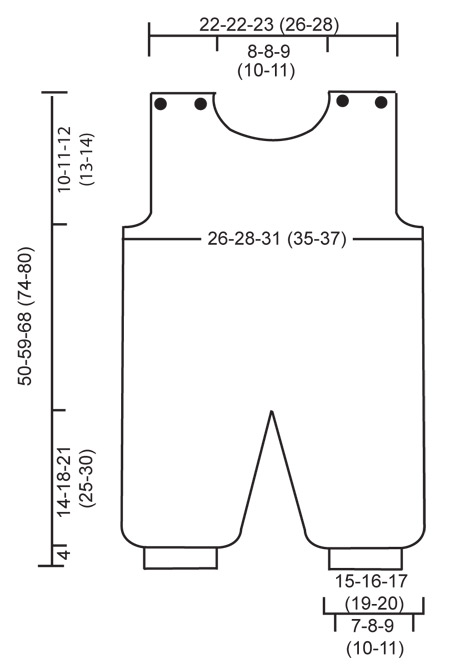
JUMPSUIT GARTER ST (back and forth on needle): K all rows. PATTERN: See diagram M.1 to M.3 – the diagrams show pattern from RS. BUTTONHOLES: Make buttonholes on buttonhole edge on front of leg. On right leg make buttonholes from RS and on left leg make buttonholes from WS. 1 buttonhole = K tog 2nd and 3rd st from edge and make 1 YO. Make buttonholes when leg measures: SIZE 1/3 months: 2, 5, 9, 12 and 16 cm [3/4", 2", 3½", 4¾", 6¼"]. SIZE 6/9 months: 2, 7, 12, 16 and 20 cm [3/4", 2¾", 4¾", 6¼", 8"]. SIZE 12/18 months: 2, 7, 12, 17 and 23 cm [3/4", 2¾", 4¾", 6¾", 9"]. SIZE 2 years: 2, 7, 12, 17, 22 and 27 cm [3/4", 2¾", 4¾", 6¾", 8¾", 10⅝"]. SIZE 3/4 years: 2, 8, 14, 20, 26 and 32 cm [3/4", 3⅛" 5½", 8", 10¼" 12½"] DECREASING TIP-1: Dec as follows before marker: K2 tog. Dec as follows after marker: Slip 1 st as if to K, K1, psso. DECREASING TIP-2: Make all dec from RS inside 3 garter sts by P2 tog. ---------------------------------------------------------- RIGHT LEG (without buttons between legs): Worked in the round on double pointed needles. Cast on 32-36-40 (44-48) sts on double pointed needles size 3.5 mm [US 4] with Merino Extra Fine. Work 4 cm [1½"] rib, K2/P2, AT THE SAME TIME inc all P2 to P3 on the last round = 40-45-50 (55-60) sts. Work 1 round K2/P3. Now K 1 round, AT THE SAME TIME inc 30-29-30 (33-32) sts evenly = 70-74-80 (88-92) sts. Change to needle size 4.5 mm [US 7] and insert 1 marker at beg of round = inside of leg. P 1 round and continue as follows: 7-7-8 (9-10) stockinette sts, M.1 (= 21 sts), 2 stockinette sts, M.3 on the next 10-14-18 (24-26) sts, 2 stockinette sts, M.2 (= 21 sts) and 7-7-8 (9-10) stockinette sts. REMEMBER THE KNITTING GAUGE! When piece measures 15-19-22 (26-31) cm [6-7½"-8¾" (10¼"-12¼")] divide piece by marker and continue back and forth on needle (to make it easier to slip both legs on the same circular needle afterwards). Cast on 1 new st each side for seam = 72-76-82 (90-94) sts. When piece measures 18-22-25 (29-34) cm [7"-8¾"-9¾" (11⅜"-13⅜")] bind off 1 st each side and put piece aside. LEFT LEG (without buttons between legs): Like right leg. RIGHT LEG (with buttons): Worked back and forth on circular needle. Cast on 38-42-46 (50-54) sts on circular needle size 3.5 mm [US 4] with Merino Extra Fine. Continue as follows from RS: 4 garter sts (= buttonhole edge), * K2, P2 *, repeat from *-*, and finish with K2 and 4 garter sts (= buttonhole edge). Continue in rib with 4 garter sts each side, AT THE SAME TIME when piece measures 2 cm [3/4"] make buttonhole – SEE ABOVE. REMEMBER THE KNITTING GAUGE! When piece measures 4 cm [1½"] inc all P2 to P3 from RS = 45-50-55 (60-65) sts. Work 1 row K2/P3. Now K 1 row, AT THE SAME TIME inc 33-32-33 (36-35) sts evenly (do not inc on the 4 garter sts each side) = 78-82-88 (96-100) sts. Change to needle size 4.5 mm [US 7] and K 1 row from WS on all sts. Continue as follows: 4 garter sts, 7-7-8 (9-10) stockinette sts, M.1 (= 21 sts), 2 stockinette sts, M.3 on the next 10-14-18 (24-26) sts, 2 stockinette sts, M.2 (= 21 sts), 7-7-8 (9-10) stockinette sts and 4 garter sts. When piece measures 18-22-25 (29-34) cm [7"-8¾"-9¾" (11⅜"-13⅜")] bind off the 4 garter sts each side = 70-74-80 (88-92) sts. Put piece aside. LEFT LEG (with buttons): Like right leg, but with buttonholes on the opposite side. BODY PIECE: Slip legs on the same circular needle size 4.5 mm [US 7] = 140-148-160 (176-184) sts and insert 1 marker mid front and 1 marker mid back. Round now beg mid back. Continue in pattern as before, AT THE SAME TIME dec 1 st on each side of marker mid front – SEE DECREASING TIP-1, and repeat the dec on every other round a total of 6 times = 128-136-148 (164-172) sts. Insert 1 marker each side = 32-34-37 (41-43) sts between all 4 markers. When piece measures 39-47-55 (60-65) cm [15¼"-18½"-21⅝" (23⅝"-25½")] P12 sts each side (= 6 sts on each side of markers at sides) with remaining sts as before. On next round K these 12 sts and on next round P these 12 sts. On next round bind off the middle 6 of the 12 P sts each side and complete front and back pieces separately. FRONT PIECE: = 58-62-68 (76-80) sts. Continue as before, but work 3 sts each side in garter st. AT THE SAME TIME bind off 1 st each side for armhole – SEE DECREASING TIP-2 – on every other row a total of 1-3-5 (6-6) times = 56-56-58 (64-68) sts. Continue in pattern with 3 garter sts each side. When piece measures 45-54-63 (68-74) cm [17¾"-21¼"-24¾" (26¾"-29⅛")] bind off the middle 8-8-10 (12-14) sts for neck and complete each shoulder separately. Bind off to shape the neckline at the beg of every row from mid front: 2 sts 1 time and 1 st 2 times = 20-20-20 (22-23) sts left on shoulder. When piece measures 49-58-67 (73-79) cm [19¼"-22¾"-26⅜" (28¾"-31")] dec 6 sts evenly = 14-14-14 (16-17) sts. Slip sts on a stitch holder. BACK PIECE: = 58-62-68 (76-80) sts. Continue in pattern and bind off for armhole each side as described for front piece = 56-56-58 (64-68) sts. (NOTE: there are more stockinette sts mid back than mid front, i.e. pattern will not be identical on front and back shoulders). When piece measures 48-57-66 (72-78) cm [19"-22½"-26" (28⅜"-30¾")] bind off the middle 16-16-18 (20-22) sts for neck = 20-20-20 (22-23) sts left on each shoulder, and complete each side separately. When piece measures 49-58-67 (73-79) cm [19¼"-22¾"-26⅜" (28¾"-31")] dec 6 sts evenly = 14-14-14 (16-17) sts. Slip sts on a stitch holder. ASSEMBLY: NECKLINE FRONT: Pick up approx 32 to 44 sts (divisible by 4) along neckline on front piece on circular needle size 3.5 mm [US 4] and K 1 row from WS. Work next row as follows from RS: 1 garter st, * K2, P2 *, repeat from *-*, and finish with K2 and 1 garter st. Continue in rib back and forth on needle and bind off when rib measures 2 cm [3/4"]. NECKLINE BACK: Pick up approx 28 to 36 sts (divisible by 4) along neckline on back piece on circular needle size 3.5 mm [US 4] and continue as described for front piece. SHOULDER FRONT: Slip sts from stitch holder on one shoulder on double pointed needles size 3.5 mm [US 4] and pick up 4 sts on neckline = 18-18-18 (20-21) sts. K 3 rows back and forth on needle. On next row make 2 buttonholes from RS as follows: K2, K2 tog, 1 YO, K 9-9-9 (11-12), K2 tog, 1 YO, K3. K 3 rows on all sts and bind off. Repeat on the other shoulder. SHOULDER BACK: Slip sts from stitch holder on one shoulder on double pointed needles size 3.5 mm [US 4] and pick up 4 sts on neckline = 18-18-18 (20-21) sts. K 7 rows back and forth on needle and bind off. Repeat on the other shoulder. ASSEMBLY (without buttons between legs): Sew legs tog at the top inside 1 edge st and sew opening between legs, front piece to back piece. Sew on shoulder buttons. ASSEMBLY (with buttons between legs): Sew tog buttonhole edges at the top of front of legs and sew tog buttonhole edges at the top of back of legs. Sew on buttons between legs and on shoulders ---------------------------------------------------------- ´ HAT: DECREASING TIP: Dec as follows before marker: K2 tog. Dec as follows after marker: Slip 1 st as if to K, K1, psso. ---------------------------------------------------------- HAT: Worked in the round on circular needle. Cast on 84-90-96 (102-108) sts on circular needle size 3.5 mm [US 4] with Merino Extra Fine. K 1 round and continue in rib, K3/P3. When rib measures 3 cm [1⅛"], K 1 round, AT THE SAME TIME dec 9-10-11 (12-13) sts evenly = 75-80-85 (90-95) sts. Change to needle size 4 mm [US 6], P 1 round, K 1 round and P 1 round. Now insert 5 markers in piece with 15-16-17 (18-19) sts between each marker. Continue in stockinette st. REMEMBER THE KNITTING GAUGE! When piece measures 10-11-12 (13-14) cm [4"-4⅜"-4¾" (5⅛"-5½")] dec 1 st on each side of all markers, and repeat the dec on every other round a total of 6-6-6 (7-7) times – SEE DECREASING TIP = 15-20-25 (20-25) sts. NOTE: change to double pointed needles when sts no longer fit circular needle. Now K2 tog all the way round, cut the thread, pull through remaining sts and fasten. Hat measures approx 14-15-16 (18-19) cm [5½"-6"-6¼" (7"-7½")]. |
|||||||||||||||||||
Diagram explanations |
|||||||||||||||||||
|
|||||||||||||||||||
 |
|||||||||||||||||||
 |
|||||||||||||||||||
Have you finished this pattern?Tag your pictures with #dropspattern #creamdreamset or submit them to the #dropsfan gallery. Do you need help with this pattern?You'll find 18 tutorial videos, a Comments/Questions area and more by visiting the pattern on garnstudio.com. © 1982-2026 DROPS Design A/S. We reserve all rights. This document, including all its sub-sections, has copyrights. Read more about what you can do with our patterns at the bottom of each pattern on our site. |
|||||||||||||||||||


With over 40 years in knitting and crochet design, DROPS Design offers one of the most extensive collections of free patterns on the internet - translated to 17 languages. As of today we count 324 catalogs and 12291 patterns - 12281 of which are translated into English (US/in).
We work hard to bring you the best knitting and crochet have to offer, inspiration and advice as well as great quality yarns at incredible prices! Would you like to use our patterns for other than personal use? You can read what you are allowed to do in the Copyright text at the bottom of all our patterns. Happy crafting!
Post a comment to pattern DROPS Baby 17-3
We would love to hear what you have to say about this pattern!
If you want to leave a question, please make sure you select the correct category in the form below, to speed up the answering process. Required fields are marked *.