
Popular categories
Looking for a yarn?


Comments / Questions (24)
![]() Karin H wrote:
Karin H wrote:
Började göra denna och kom ända till armarna, men jag tyckte den blev väldigt tung och klumpig. Rakade upp allt igen!
29.11.2008 - 18:01
![]() DROPS Design wrote:
DROPS Design wrote:
The lower part is knitted on needles size 15 mm and should have a gauge of 17 sts at 4", but the upper part that is knitted on needles 4 mm should have a gauge of 19 sts.
25.02.2008 - 23:03
![]() Yvonne Overton wrote:
Yvonne Overton wrote:
Is the gauge for this seater 17 sts. = 4" or 19 sts. = 4"? It lists both gauges for stockinette stitch, so i'm not sure which it is! Thank you!
25.02.2008 - 22:23
![]() DROPS Design wrote:
DROPS Design wrote:
Der findes ikke noget M1/bølgemønster. Nu ligger den opdaterede tekst uden bølgemønster.
18.02.2008 - 09:38
![]() Mie wrote:
Mie wrote:
Jeg mente selvfølgelig 105 - 18
15.02.2008 - 14:30
![]() Mie wrote:
Mie wrote:
Hej, Hvorfor er der ikke et mønsterdiagram på opskrift 106 - 18? Der står: Se diagram M1 for bølgemønster.Jeg har lige købt garnet og pind og troede at jeg skulle igang med denne i dag, da jeg opdager at diagrammet M1 mangler.
15.02.2008 - 14:28Nuran Ozbalci wrote:
It's very Good.
30.01.2008 - 16:57
![]() Mette wrote:
Mette wrote:
Superflot - den vil jeg strikke men i en farve og uden bindebåndet
23.01.2008 - 16:03
![]() Janet wrote:
Janet wrote:
Otrolikt vacker!!
23.01.2008 - 09:16
![]() Marie N wrote:
Marie N wrote:
Mycket söt! Speciellt med rosetten!
08.01.2008 - 21:25
|
|
DROPS 105-18 |
|
|
|
|
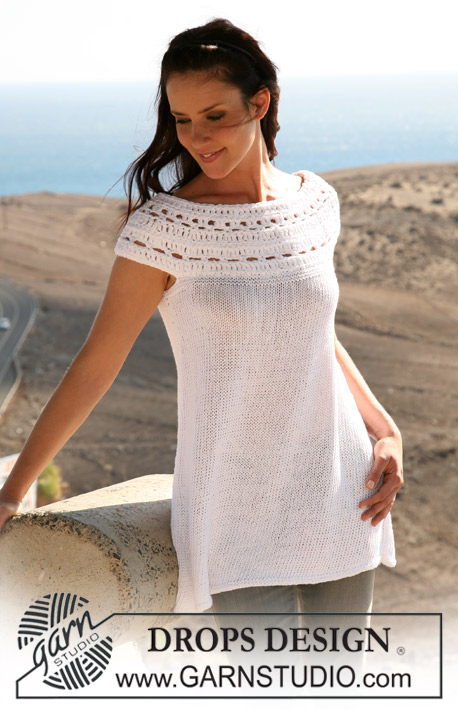
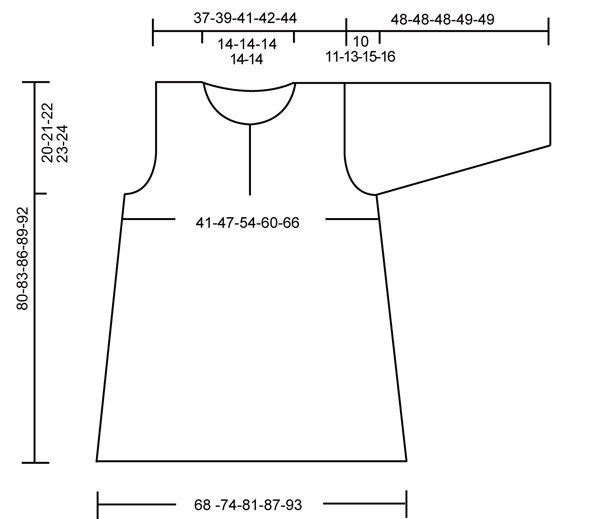
DROPS tunic with Rib border in “Alpaca” and “Cotton Viscose”. Size S – XXXL
DROPS 105-18 |
|
|
Measurement tip: Because of the weight of the yarn, all measurements should be made whilst the garment is hanging, otherwise it will be too long when worn. Garter st, in the round: K 1 round, P 1 round. Garter st, back and forth on needle: K all rows. Back and front piece: Worked in the round on circular needle. Cast on 230-252-276-296-316 sts on circular needle size 5 mm [US 8] with 1 thread of each quality. Work 3 rounds garter st – see above. Remember the knitting gauge. Insert 2 Marking Threads (MT) in piece, 1 at beg of round and 1 after 115-126-138-148-158 sts. Now continue in stockinette st. When piece measures 10 cm [4"] - see Measurement tip - dec 1 st on each side of both MT (4 dec per round) on every 1½ cm [½"] a total of 23 times = 138-160-184-204-224 sts. When piece measures 48-50-51-52-53 cm [19"-19.7"-20"-20½"-21"] work 10 rows garter st on all sts – see above – at the same time on last row inc 9-10-10-12-14 sts evenly on back piece and 9-10-10-12-14 sts evenly on front piece = 156-180-204-228-252 sts. Slip the first 34-40-46-52-58 sts on 1 thread (= left front piece) and slip the next 44-50-56-62-68 sts on another thread (= right front piece) and now complete back and front pieces separately. Back piece: = 78-90-102-114-126 sts. Continue as follows from the RS on needle size 4 mm [US 6]: Cast on 1 edge st, P2, *K2, P4*, repeat from *-* and finish with K2, P2 and cast on 1 edge st = 80-92-104-116-128 sts. P 1 row from WS and continue in Rib as above. When piece measures 60-62-64-66-68 cm [23.6"-24.4"-25.2"-26"-26.7"] dec to shape the armhole each side on every other row: 3 sts 0-1-1-2-2 times, 2 sts 2-2-3-4-5 times and 1 st 1-2-4-4-6 times = 70-74-78-80-84 sts. When piece measures 78-81-84-87-90 cm [30.7"-32"-33"-34.2"-35½"] bind off the middle 24 sts for neck and dec 1 st on neckline on next row = 22-24-26-27-29 sts left on each shoulder. Bind off when piece measures 80-83-86-89-92 cm [31½"-32.7"-33.9"-35"-36.2"]. Right front piece: Slip sts from thread back on needle size 4 mm [US 6] = 44-50-56-62-68 sts. Continue as follows from RS: 10 garter sts (= front band), *K2, P4*, repeat from *-* and finish with K2, P2 and cast on 1 edge st = 45-51-57-63-69 sts. P 1 row from WS (continue front band in garter st) and now continue in Rib as above with 10 garter sts towards mid front for front band. When piece measures 60-62-64-66-68 cm [23.6"-24.4"-25.2"-26"-26.7"] dec for armhole as described for back piece = 40-42-44-45-47 sts. When piece measures 68-71-74-75-78 cm [26.7"-28"-29.1"-29½"-30.7"] slip the 10 front band sts on a thread and dec to shape the neckline on every other row: 3 sts 1 time, 2 sts 2 times and 1 st 1 time = 22-24-26-27-29 sts left on shoulder. Bind off when piece measures 80-83-86-89-92 cm [31½"-32.7"-33.9"-35"-36.2"]. Left front piece: Slip sts from thread back on needle size 4 mm [US 6] = 34-40-46-52-58 sts. Continue as follows from RS: cast on 1 edge st, P2, K2, *P4, K2*, repeat from *-* and cast on 10 new sts for front band (worked in garter st) = 45-51-57-63-69 sts. Continue as described for right front piece. Sleeves: Worked back and forth on needle. Cast on 42-44-46-48-50 sts (includes 1 edge st each side) on needle size 5 mm [US 8] with 1 thread of each quality. Work 10 rows garter st – see above – and continue in stocking st. When piece measures 5 cm [2"] inc 1 st each side on every 3.5-3-2.5-2-2 cm [1.3"-1.1"-0.9"-0.7"-0.7"] a total of 9-10-12-13-14 times = 60-64-70-74-78 sts. When piece measures 38-37-35-34-33 cm [15"-14½"-13.7"-13.4"-13"] (less for the larger sizes because of longer sleeve cap and wider shoulder) dec to shape the sleeve cap each side on every other row: 2 sts 1 time, and 1 st each side until piece measures 47-47-47-48-48 cm [18½"-18½"-18½"-19"-19"]. Now work all sts tog 3 by 3. Note! on the left sleeve work sts tog into back of loop. bind off remaining sts, piece measures approx 48-48-48-49-49 cm [19"-19"-19"-19.2"-19.2"]. Assembly: Sew shoulder seams. Sew side seams. Sew sleeve seams and set in sleeves. Pick up approx 90 to 100 sts (includes sts on thread) on circular needle size 4 mm [US 6] with 1 thread of each quality round neckline and work 4 rows garter st back and forth on needle. Bind off. Sew left front band to front piece behind right front band. Thread the silk ribbon through row between garter st section and rib border and tie a bow at the front. |
|
 |
|
Have you finished this pattern?Tag your pictures with #dropspattern or submit them to the #dropsfan gallery. Do you need help with this pattern?You'll find 22 tutorial videos, a Comments/Questions area and more by visiting the pattern on garnstudio.com. © 1982-2026 DROPS Design A/S. We reserve all rights. This document, including all its sub-sections, has copyrights. Read more about what you can do with our patterns at the bottom of each pattern on our site. |


With over 40 years in knitting and crochet design, DROPS Design offers one of the most extensive collections of free patterns on the internet - translated to 17 languages. As of today we count 325 catalogs and 12298 patterns - 12288 of which are translated into English (US/in).
We work hard to bring you the best knitting and crochet have to offer, inspiration and advice as well as great quality yarns at incredible prices! Would you like to use our patterns for other than personal use? You can read what you are allowed to do in the Copyright text at the bottom of all our patterns. Happy crafting!
Post a comment to pattern DROPS 105-18
We would love to hear what you have to say about this pattern!
If you want to leave a question, please make sure you select the correct category in the form below, to speed up the answering process. Required fields are marked *.