
Popular categories
Looking for a yarn?


Comments / Questions (34)
![]() Popote wrote:
Popote wrote:
Ma première fois, encore une question à poser au sujet des diminutions encolure je travaille avec des aiguilles droite, si je comprends bien je diminue une fois 1 m tous les rangs 28 fois. Donc rang endroit je fais ma première diminution après 7 mailles je retourne mon ouvrage rang envers je tricote jusqu\'au bout, rang endroit je refais une diminution ainsi de suite est-ce bien cela? Je ne vois pas comment je fais avec les diminution sur l\'envers, côté emmanchure ? Merci
06.05.2026 - 15:59DROPS Design answered:
Bonjour Popote, les diminutions de l'encolure se font tous les rangs, autrement dit aussi bien sur l'endroit que sur l'envers. Vous allez ainsi diminuer pour le devant droit après les 7 mailles de bordure Diminutions (encolure) / Sur l'endroit, terminez le rang sur l'endroit, tournez, tricotez jusqu'à ce qu'il reste 9 m à la fin du rang suivant sur l'envers, diminuez 1 m cf Diminutions (encolure) / Sur l'envers et tricotez les 7 dernières mailles. Diminuez ainsi 28 fois tous les rangs, vos diminutions seront terminées après avoir tricoté 28 rangs. Bon tricot!
06.05.2026 - 17:16
![]() Popote wrote:
Popote wrote:
Sur le devant droit que veut dire tricoter ensuite le rang suivant à partir du milieu devant ainsi : 7 m de bordure au point mousse, point de riz sur les 34 m suivante, 1 m lisière. Je ne comprends pas où est ma maille lisière( en plein milieu du travail)?
02.05.2026 - 08:24DROPS Design answered:
Bonjour Popote, le milieu devant est le côté du devant qui se trouve au milieu quand on le porte, autrement dit pour le devant droit, on va commencer sur l'endroit par les mailles de la bordure devant que l'on tricote au point mousse, puis on tricote les mailles suivantes au point de riz et on termine par 1 maille lisière sur le côté (gauche vu sur l'endroit). Bon tricot!
04.05.2026 - 11:25
![]() Marzena wrote:
Marzena wrote:
Dziękuję bardzo!
19.02.2021 - 00:15
![]() Marzena wrote:
Marzena wrote:
Witam! Czy mogłabym prosić jeszcze o tłumaczenie tego modelu? Pozdrawiam Marzena
17.02.2021 - 17:23
![]() Carrie wrote:
Carrie wrote:
Perché usare i ferri circolari per le coste e per il resto quelli dritti? Grazie..
19.03.2015 - 00:20DROPS Design answered:
Buongiorno Carrie. Le coste vengono lavorate tutto intorno agli scalfi. Vengono suggeriti i ferri circolari, perché più comodi per riprendere le m quando la lavorazione è in tondo. Buon lavoro!
19.03.2015 - 10:02
![]() LANG wrote:
LANG wrote:
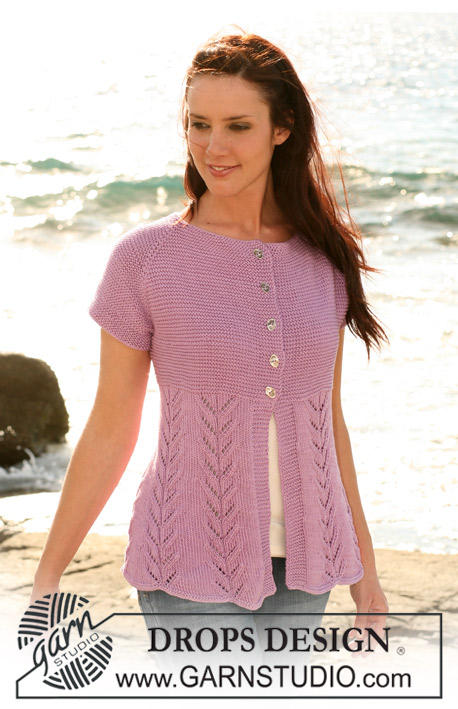
Bonsoir, Sauf erreur de ma part, il y un petit oubli. Pour la réalisation du dos pour la taille S : A 24 cm de hauteur total, augmenter 1 m de chaque côté 4 fois tous les 3 cm. Il manque le nombre de mailles après les augmentations à savoir 72 mailles. Par contre, je ne comprends pas pourquoi faut-il faire plusieurs ranger de point mousse sur toutes les mailles à 39 cm de hauteur pour le devant alors que sur la photo on ne voit pas la différence de point ? Merci
15.04.2013 - 23:36DROPS Design answered:
Bonjour Madame Lang, les 72 m de la taille S ont été rajoutées merci. On tricote au point mousse à partir de 50...60 cm (cf taille) sur les mailles du dos uniquement, pas pour le devant. Bon tricot !
16.04.2013 - 09:44
![]() Lisette wrote:
Lisette wrote:
Graag de hoeveelheid breigaren ik vind het een mooi vestje is dat ook verkrijgbaar in het zwart
12.02.2013 - 00:17DROPS Design answered:
De hoeveelheid staat in de kop van het patroon onder Materialen: DROPS Cotton Viscose. Je kan ook zwart kiezen. Kijk op de kleurenoverzicht van Cotton Viscose.
12.02.2013 - 11:32
![]() DROPS Design wrote:
DROPS Design wrote:
You have 8 sts rem on back and front piece. Yes, join these.
14.03.2008 - 19:38
![]() Brenda Kenny wrote:
Brenda Kenny wrote:
If anyone has knitted pattern 107-22 can you tell me if by 'joining shoulder seam' this means the shoulder stitches from the back to the 8 Rib stitches of each front? Pattern isn't clear on this
14.03.2008 - 13:58
![]() Loniy wrote:
Loniy wrote:
Super super sød
25.02.2008 - 02:21
|
|
DROPS 107-22 |
|
|
|
|
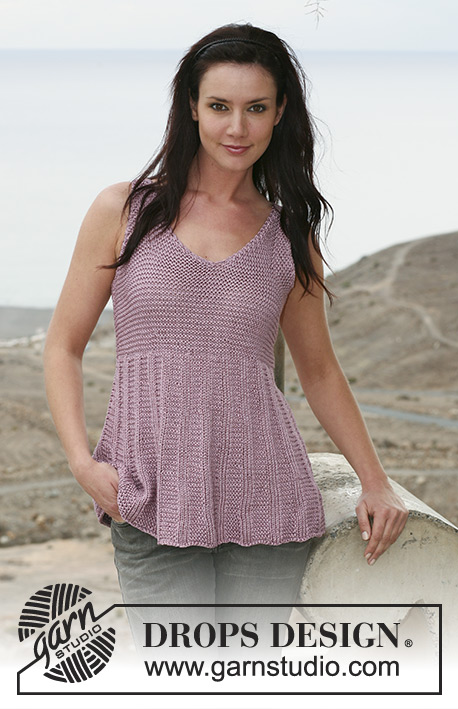
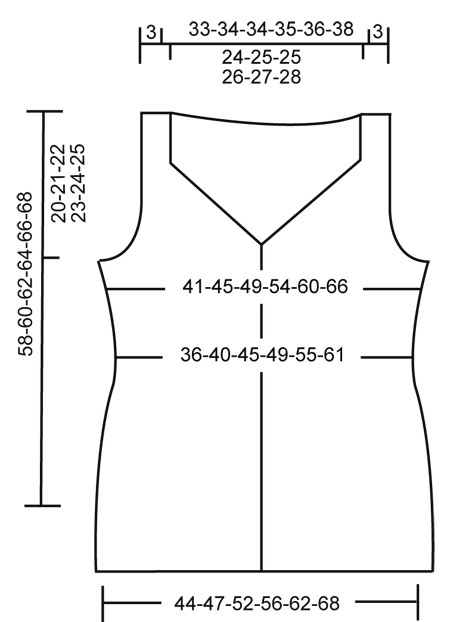
DROPS sleeveless top in double thread “Cotton Viscose“. Size S – XXXL
DROPS 107-22 |
|
|
Garter st, back and forth on needle: Knit all rows. Moss st: First row: *K1/P1*, repeat from *-*. Second row: P over K and K over P. Repeat second row. Decreasing tip (applies to neckline): From RS: Dec as follows after 7 sts: slip 1 st as if to K, K1, psso Dec as follows before 7 sts: K2 tog. From WS: Dec as follows after 7 sts: P2 tog Dec as follows before 7 sts: P2 tog into back of st. Buttonholes: Make buttonholes on right front band. 1 buttonhole = bind off 4th st from mid front and cast on 1 new st on return row. Make buttonholes when piece measures: Size S: 8.75,11.75"and 15" Size M: 9½", 12½" and 15.75". Size L: 9.75", 13" and 16½". Size XL: 9.75", 12.25", 15" and 17.25". Size XXL: 9.75", 12½", 15.25" and 16" Size XXXL: 10.25", 13", 15.75" and 19". Back piece: Loosely cast on 76-82-90-98-108-118 sts (includes 1 edge st each side) on needle size 4.5 mm [US 7] with 2 threads Cotton Viscose. Work 4 rows garter st – see above. Continue in reverse stockinette st. Remember the knitting gauge! At the same time dec 1 st on each side on every 3 cm a total of 6 times = 64-70-78-86-96-106 sts. When piece measures 8.25" work 4 rows garter st and then continue in moss st – see above. When piece measures 9½" inc 1 st each side on every 1"-1"-1"-1½"-1½"-1½" a total of 4 times = 72-78-86-94-104-114 sts. When piece measures 15"-15.2"-15.7"-16"-16½"-17" dec to shape the armhole each side on every other row: 4 sts 0-0-1-1-1-1 time, 3 sts 1-1-1-2-2-3 times, 2 sts 2-2-2-2-3-3 times and 1 st 1-3-3-3-5-6 times = 56-58-58-60-62-64 sts. When piece measures 19.7"-20½"-21.2"-22"-22.7"-23.6" complete piece in garter st. When piece measures 22"-22.7"-23.6"-24.4"-25.2"-26" cm bind off the middle 38-40-40-42-44-46 sts for neck and dec 1 st on neckline on next row = 8 sts left on each shoulder. Bind off when piece measures 22.7"-23.6"-24.4"-25.2"-26"-26.7". Right front piece: Cast on 45-48-52-56-61-66 sts (includes 1 edge st at side and 7 front band sts towards mid front) on needle size 4.5 mm [US 7] with 2 threads Cotton Viscose. Work 4 rows garter st and continue in reverse stockinette st with 7 garter sts towards mid front (= front band). When piece measures 1½" dec at side as described for back piece = 39-42-46-50-55-60 sts. When piece measures 8.2" work 4 rows garter st on all sts. Remember buttonhole on right front band – see above. Now work next row as follows from mid front: 7 garter sts, moss st on the next 31-34-38-42-47-52 sts, 1 edge st. At the same time when piece measures 9½" inc 1 st at side as described for back piece = 43-46-50-54-59-64 sts. When piece measures 15"-15.2"-15.7"-16"-16½"-17" dec to shape the armhole at side as described for back piece. At the same time when piece measures 15.2"-16"-17"-17.7"-18½"-19.2" work 2 rows garter st back on forth on the 7 front band sts only (do not work remaining sts), work 2 rows garter sts on all sts and now work another 2 rows on the 7 front band sts only. Now continue on all sts. When piece measures 16½"-17.2"-18"-19"-19.7"-20½" dec to shape the neckline - see Decreasing tip – as follows: 1 st on every row a total of 27-28-28-29-30-31 times = 8 sts. Bind off when piece measures 22.7"-23.6"-24.4"-25.2"-26"-26.7". Left front piece: Cast on and work like right front piece, but mirrored. Assembly: Sew shoulder seams. Sew side seams inside 1 edge st. Armhole: Pick up 85-90-95-100-105-110 sts round armholes on needle size 4 mm [US 6] with 2 threads Cotton Viscose. P 1 round and continue in Rib as follows: *K3/P2*, repeat from *-*. Bind off in Rib when piece measures 1". Button covers: Crochet 3-3-3-4-4-4 covers with 1 thread Cotton Viscose as follows: 4 ch (= 1 dc), then 15 dc in the first ch = 16 dc, finish with 1 sl st in 3rd ch from beg of round (= round 1) Round 2: 1 sc in each dc and finish with 1 sl st in first sc from beg of round (= 16 sc). Round 3: 3 ch, 1 dc in every other sc = 8 dc dc, finish with 1 sl st in 3rd ch from beg of round. Put buttons inside cover, sew round the edge of cover and tighten thread. Sew on buttons to fit buttonholes. |
|
 |
|
Have you finished this pattern?Tag your pictures with #dropspattern or submit them to the #dropsfan gallery. Do you need help with this pattern?You'll find 24 tutorial videos, a Comments/Questions area and more by visiting the pattern on garnstudio.com. © 1982-2026 DROPS Design A/S. We reserve all rights. This document, including all its sub-sections, has copyrights. Read more about what you can do with our patterns at the bottom of each pattern on our site. |


With over 40 years in knitting and crochet design, DROPS Design offers one of the most extensive collections of free patterns on the internet - translated to 17 languages. As of today we count 325 catalogs and 12298 patterns - 12288 of which are translated into English (US/in).
We work hard to bring you the best knitting and crochet have to offer, inspiration and advice as well as great quality yarns at incredible prices! Would you like to use our patterns for other than personal use? You can read what you are allowed to do in the Copyright text at the bottom of all our patterns. Happy crafting!
Post a comment to pattern DROPS 107-22
We would love to hear what you have to say about this pattern!
If you want to leave a question, please make sure you select the correct category in the form below, to speed up the answering process. Required fields are marked *.