
Popular categories
Looking for a yarn?


Comments / Questions (51)
![]() Anne Chitwood wrote:
Anne Chitwood wrote:
Love your patterns but not easy to follow., the way you write it I have to go back and rewrite. I am older so its a little more confusing to me. Not use to this type of english writing.
02.03.2021 - 20:17
![]() Patricia Rayner wrote:
Patricia Rayner wrote:
I cannot understand the fairisle diagram. Where do I read it from - top or bottom? Right or left. In the picture the design is clearly ridges but according to diagram it is knit one side and purl the other side i.e. sticking stitch. The pattern is extremely confusing. I have printed out all the instructions but to no avail.
05.01.2021 - 20:41DROPS Design answered:
Hi Patricia, The diagram is read from the bottom up, from right to left on the right side and from left to right on the wrong side. Happy knitting!
06.01.2021 - 06:56
![]() Dea wrote:
Dea wrote:
Buongiorno, volevo dire che dopo tutte le diminuzioni indicate per la manica , "Quando il lavoro misura 50-48-46-45-43-42 cm intrecciare per l’arrotondamento della manica a ogni lato a f. alterni come segue: 4 m. 1 volta, 3 m. 1 volta, 2 m. 2 volte, 1 m. 0-2-4-5-7-9 volte, e 2 m. a ogni lato fino a quando il lavoro misura 55 cm, ora diminuire 3 m. a ogni lato e intrecciare sul f. successivo. La manica misura circa 56 cm." rimangono 26 m per la taglia M . ^_^
22.10.2019 - 12:10
![]() Dea wrote:
Dea wrote:
Grazie. Secondo voi dovrei aumentare facendo delle maglie a nuovo? Mi sembra molto strano. Proverò a vedere come viene.
03.09.2019 - 17:28DROPS Design answered:
Buongiorno Dea. Sono le maglie che verranno poi riprese quando lavorerà il bordo tutto intorno all’apertura. In questo modo eventuali irregolarità o scalini che si creano dove vengono avviate le maglie, si regolarizzeranno. Buon lavoro!
04.09.2019 - 12:50
![]() Joan Schroeder wrote:
Joan Schroeder wrote:
Kan det være rigtig, at selve mønsteret - slå om, tag 1 m løs af p. 2 r sm, løft den løse m over, slå om - skal foretages fra vrang siden? På forhånd tak
16.01.2018 - 11:12DROPS Design answered:
Hei Joan. Nei, det burde være slik at man strikker det fra rettsiden. Vi retter det til at 1.rad flyttes opp og blir siste rad på M.1. Takk for tilbakemeldigen. God Fornøyelse videre.
16.01.2018 - 14:08
![]() Carmen wrote:
Carmen wrote:
Hallo liebes Drops-Team, wird bei den Vorderteilen tatsächlich an der mittleren Kante für den V-Ausschnitt nicht abgenommen? Also, wenn die Zunahmen für die Rundung gemacht sind, stricke ich zur Mitte hin gerade nach oben weiter?
22.10.2017 - 16:16DROPS Design answered:
Liebe Carmen, es gibt hier keine Abnahmen für den Halsausschnitt. Viel Spaß beim stricken!
23.10.2017 - 11:31
![]() Michela wrote:
Michela wrote:
La misura finale 56cm,ok,ma non c e ' scritto con quante maglie finali rimango.grazie e buona serata
31.08.2017 - 21:04DROPS Design answered:
Buonasera Michela. Dopo aver lavorato queste diminuzioni: 4 m 1 volta, 3 m 1 volta, 2 m 2 volte, 1 m 0-2-4-5-7-9 volte, le rimangono 36 maglie nelle taglie XS, S, M e 40 maglie nelle taglie L - XL - XXL. Misura il lavoro e poi diminuisce 2 m da ciascun fino a quando il lavoro non misura 55 e infine 3 m da ciascun lato una volta. Buon lavoro!
31.08.2017 - 22:10
![]() Michela wrote:
Michela wrote:
Li Buonasera sto realizzando questo modello,ora ho difficoltà alla tromba della manica,alla fine delle diminuzioni quante maglie mi devo ritrovare?alla fine mi sono ritrovata una manica piu lunga cioè 62 invece di 56,forse sbaglio quando alterno i ferri x cui mi dilungo.grazie
31.08.2017 - 19:32DROPS Design answered:
Buonasera Michela la misura finale della manica dovrebbe essere di 56 cm. Mentre lavora una manica prenda appunti sui veri giri e aumenti in modo da lavorare le due maniche in modo simmetrico. Buon lavoro!
31.08.2017 - 19:59
![]() Michele wrote:
Michele wrote:
Is this catalogue #94 still available for purchase, and if so is it most likely to be found? Thank you so much, Michele
13.03.2016 - 22:32DROPS Design answered:
Dear Michelle, this catalog is out of print - but all of the pattern are still available for you to print them for free from our website. Happy knitting!
14.03.2016 - 09:56
![]() Julie Diesman wrote:
Julie Diesman wrote:
When doing the decreases that begins when piece measures 2", for the right/left front pieces, is the decrease only done on the side edge or on the side AND front edge?
12.03.2016 - 16:48DROPS Design answered:
Dear Mrs Diesman, on right/left front piece, you dec on the side as for back piece, ie towards the side that will be sewn to back piece (opposite side of towards mid front/front edge). Happy knitting!
12.03.2016 - 17:59
|
|||||||
DROPS 94-1 |
|||||||
|
|
|||||||
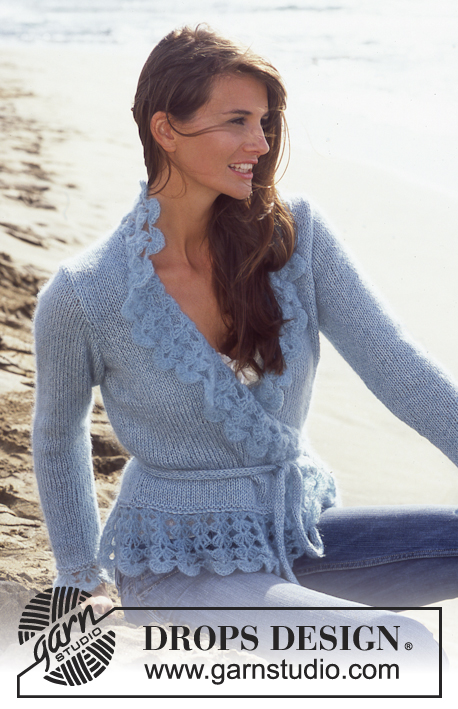
DROPS Jacket in Paris with wavy borders
DROPS 94-1 |
|||||||
|
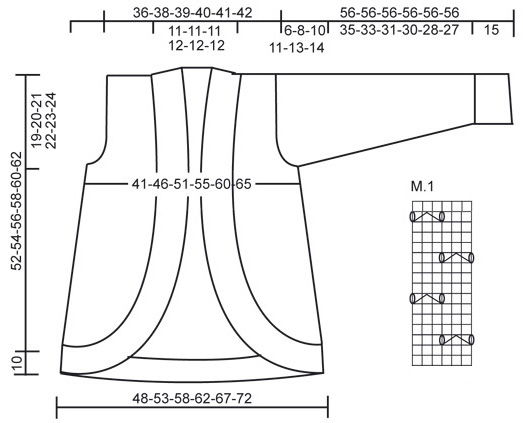
Knitting gauge: 17 sts x 22 rows on needle size 5 mm/ US 8 in stockinette sts = 10 x 10 cm / 4" x 4" Pattern: See diagram M.1. The diagram shows the pattern from the right side Back piece: Cast on 84-92-100-108-116-124 sts (includes 1edge st each side, edge sts are knitted in garter st throughout) on needle size 5 mm/ US 8 with lilac-mix Paris. Knit stockinette stitch with 1 edge st each side in garter st. Read all of the following section before continuing: Decreases at side: When piece measures 5 cm / 2" dec 1 st each side and repeat on every 4.-4.5-4.5-5.-5.-5.5 cm / 1½"-1¾"-1¾"-2"-2"-2¼" a total of 6 times = 72-80-88-96-104-112 sts. At the same time, when piece measures 12 cm / 4¾" knit pattern as follows: 1 edge st, 6-4-5-6-4-5 sts in stockinette st, chart M.1 over the next 66-78-84-90-102-108 sts, 6-4-5-6-4-5 sts in stockinette st, 1 edge st. Knit pattern until piece measures 30 cm / 11¾" and then continue in stockinette st over all sts. When piece measures 33-34-35-36-37-38 cm / 13"-13⅜"-13¾"-14¼"-14½"-15" , bind off for armhole each side on every other row as follows: 3 sts 1 time, 2 sts 0-1-2-3-4-6 times and 1 st 2-3-4-5-6-5 times = 62-64-66-68-70-72 sts remaining. When piece measures 50-52-54-56-58-60 cm / 19¾"-20½"-21¼"-22"-22¾"-23⅝" bind off the middle 16-16-16-18-18-18 sts for neck and work each side separately. Continuing dec 1 st at neck line on next row = 22-23-24-24-25-26 sts left on each shoulder. Bind off when piece measures 52-54-56-58-60-62 cm / 20½"-21¼"-22"-22¾"-23⅝"-24⅜". Right Front: Cast on 18-20-22-24-26-28 sts (includes 1 edge st at side) on needle size 5 mm/US 8 with lilac-mix Paris. Read all of the following section before continuing: Work stockinette stitch with 1 edge st at side in garter st and increase towards mid front on every other row as follows (insert a marking thread where the increases start and where they finish – important as you need these markings when knitting the edge): 3 sts 0-0-1-2-3-4 times, 2 sts 3-4-4-3-3-3 times and 1 st 9-9-8-8-7-6 times. Decreases at side: At the same time, when piece measures 5 cm / 2", dec as described for back piece. At the same time, when piece measures 12 cm / 4¾" (all inc at mid front have now been done) knit pattern as follows: 1 edge st, 1 stockinette st, chart M.1 over the next 21-27-30-33-36-39 sts, remaining sts in stockinette st. Continue the pattern like this until piece measures 30 cm / 11¾" and finish the piece in stockinette st. After all inc and dec are complete, there are 27-31-35-38-42-46 sts remaining. When piece measures 33-34-35-36-37-38 cm / 13"-13⅜"-13¾"-14¼"-14½"-15" from cast-on row, bind off for armhole as described for back piece = 22-23-24-24-25-26 sts left on shoulder. Bind off when piece measures 52-54-56-58-60-62 cm / 20½"-21¼"-22"-22¾"-23⅝"-24⅜". Left front piece: As right front piece, but mirrored. Sleeve: Cast on 51-51-58-58-58-58 sts (includes1 edge st each side) using pointed needle size 4 mm / US 6 and lilac-mix Paris. Work 2 rows stockinette st and work next row as follows from the right side: 1 edge st, *K3, P4*, repeat from *-* and finish with 1 edge st. When piece measures 4 cm / 1½", dec all P-sections from P4 to P3 = 44-44-50-50-50-50 sts. Continue in Rib until piece measures 15 cm / 6". Change to needle size 5 mm / US 8 and continue in stockinette st. At the same time start inc 1 st each side on 5.-3.5-4.-2.5-2.-1.5 cm / 2"-1¼"-1½"-⅞"-¾"-½" a total of 7-9-8-11-13-15 times = 58-62-66-72-76-80 sts. When piece measures 50-48-46-45-43-42 cm / 19¾"-19"-18"-17¾"-17"-16½" bind off for sleeve cap each side on every other row as follows: 4 sts 1 time, 3 sts 1 time, 2 sts 2 times, 1 st 0-2-4-5-7-9 times, and 2 sts each side until piece measures 55 cm / 21½", now bind off 3 sts each side and bind off rem sts on next row. Sleeve measures approx 56 cm / 22" Assembly: Sew shoulder and side seams. Edge: Pick up approx 330-348-366-384-402-420 sts (dividable by 6) from the right side using circular needle 4mm/US 6 and lilac-mix Paris. Begin at the bottom mid back and pick up sts all round the opening. Purl 1 round, knit 1 round and continue in Rib: K3, P3. When Rib measures 4 cm / 1½", inc all P3 to P4 between the marking threads on front pieces. When Rib measures 8 cm / 3⅛", inc all P4 to P5 between the marking threads (to ensure the border fits the rounded front pieces). Bind off when Rib measures 12 cm / 4¾". Crochet border: With off-white Paris crochet round the knitted rib as follows: 1 sc in first knitted st, *4 ch, 1 dc in 1st ch, skip 3 knitted sts, 1 sc in next st*, repeat from *-*. Also crochet border round sleeve edges. Sew sleeve seams and set in sleeves. |
|||||||
Diagram explanations |
|||||||
|
|||||||
 |
|||||||
Have you finished this pattern?Tag your pictures with #dropspattern or submit them to the #dropsfan gallery. Do you need help with this pattern?You'll find 25 tutorial videos, a Comments/Questions area and more by visiting the pattern on garnstudio.com. © 1982-2026 DROPS Design A/S. We reserve all rights. This document, including all its sub-sections, has copyrights. Read more about what you can do with our patterns at the bottom of each pattern on our site. |
|||||||


With over 40 years in knitting and crochet design, DROPS Design offers one of the most extensive collections of free patterns on the internet - translated to 17 languages. As of today we count 324 catalogs and 12290 patterns - 12280 of which are translated into English (US/in).
We work hard to bring you the best knitting and crochet have to offer, inspiration and advice as well as great quality yarns at incredible prices! Would you like to use our patterns for other than personal use? You can read what you are allowed to do in the Copyright text at the bottom of all our patterns. Happy crafting!
Post a comment to pattern DROPS 94-1
We would love to hear what you have to say about this pattern!
If you want to leave a question, please make sure you select the correct category in the form below, to speed up the answering process. Required fields are marked *.