
Popular categories
Looking for a yarn?


Comments / Questions (97)
![]() Inga wrote:
Inga wrote:
I am having a difficult time figuring out the sleeve increase. Marker in the middle of the 6P stitches. Do I then increase another 6 p stitches ? There will then be 12 total then increase to 6S and then 6P and then 6 S?
09.05.2020 - 14:32DROPS Design answered:
Dear Inga, the first 6 sts you will increase mid under sleeve have to be purled -you will then have 18 purled sts on mid under sleeve. Then next 6 increases will be knitted so that you have: P6 (first set of increases), K6 (2nd set of increases), P6 (mid under sleeve, marker is in the middle), K6 (2nd set of increases), P6 (1st set of increases). Happy knitting!
11.05.2020 - 09:23
![]() Stefanie wrote:
Stefanie wrote:
Ich verstehe die Zunahme an der unteren Ärmelmitte leider gar nicht. Wenn ich die Runde mit 3 M li anfange, wo nehme ich dann zu und li oder re M. Am Ende der Runde habe ich ebenfalls 3 M li, wo nehme ich da zu und li oder re M? Wenn ich alle li zunehme habe ich am Ende 18 M li. Aber abketten soll ich doch 3 re, 6 li, 3 re. Oder?
14.02.2020 - 11:11DROPS Design answered:
Liebe Stefanie, die Zunahmen sollen im Rippenmuster gestrickt werden, dh mitte unter der Ärmel wird das Rippenmuster nicht zusammenpassen, aber die neuen Maschen werden nach und nach im Rippenmuster gestrickt, dh Runde beginnt mit 3 M li. Die 3 ersten Zunahmen werden li gestrickt, dann werden die nächsten die 6 nächsten Zunahmmen rechts gestrickt, usw. Viel Spaß beim stricken!
14.02.2020 - 14:02
![]() Marie Lefebvre wrote:
Marie Lefebvre wrote:
Désolée j'ai mis mais yeux de femmes et j'ai vu que l'on doit répéter l'augmentation à 30cm
11.03.2019 - 23:29
![]() Marie Lefebvre wrote:
Marie Lefebvre wrote:
Pour la taille s/M vous dites d'augmenter à 15 cm de hauteur 1m de chaque côté des marqueurs =188. Il manque donc une autre série d'augmentation pour arriver à 192 tel qu'indiqué dans les explications .
11.03.2019 - 23:15
![]() Kari Ubeda wrote:
Kari Ubeda wrote:
Vil strikke med Nord, to tråder, hvilken str.må jeg velge som tilsvarer s/m i eskimogarnet i oppskriften ? Og hvor mye garn av Nord må jeg kjøpe ?
12.01.2019 - 10:38DROPS Design answered:
Hei Kari. Om det er genseren du vil strikke, så strikkes denne i Alaska, det er skjerfet som strikkes i Eskimo. Det skal gå helt fint å strikke genseren i 2 tråder Nord i steden, og følge oppskriftene og størrelsene som anvist. Vi anbefaler likevel at du strikker en prøvelapp så du er sikker på at strikkefastheten din stemmer overens med den som er angitt (17 m x 22 p på p 5 og glstrikk = 10 x 10 cm). Du kan bruke garnkalkulatoren vår for å regne ut hvor mye Nord du trenger å kjøpe. Fyll inn garnmengden i din størrelse, og Alaska, så kommer det opp. God fornøyelse
16.01.2019 - 08:41
![]() Christel wrote:
Christel wrote:
Rebonjour. Vraiment je suis bloquée. J’ai commencé le rang (en diminuant pour les raglans)puis mis les 20 mailles de côté pour l’encolure(taille L). Je ne sais pas si pour l’aller-Retour je dois couper le fils et continuer devant ou si je dois tourner mon travail et continuer en sens inverse. Je suis vraiment bloqué je ne trouve aucune vidéo explicative à ce sujet. Merci
25.10.2017 - 18:12DROPS Design answered:
Bonjour Christel, quand les mailles de l'encolure devant sont en attente, continuez en allers et retours: tricotez le rang à partir des mailles de l'encolure jusqu'aux dernières mailles côté encolure de l'autre côté, tournez et tricotez le rang retour. Continuez bien les diminutions du raglan, et en même temps, au début de chaque rang à partir de l'encolure (= des 2 côtés), rabattez 1 fois 2 m et 2 fois 1 m. Bon tricot!
26.10.2017 - 09:44
![]() Christel wrote:
Christel wrote:
Bonjour, Je me permets encore une fois de poser une question. Pour l’encolure Vous dites de diminué de chaque côté (1fois 2 m et 2 fois une maille). Je ne comprends pas comment faire lés diminutions. Merci beaucoup pour votre aide
11.10.2017 - 19:21DROPS Design answered:
Bonjour Christel, après avoir mis les mailles du milieu devant en attente, vous continuez en allers et retours - les rangs commencent maintenant d'un côté de l'encolure devant - en rabattant au début de chaque rang de chaque côté (= sur l'endroit et sur l'envers): 1 x 2 m et 2 x 1 m. Vous avez ainsi rabattu 4 m de chaque côté de l'encolure, avant et après les mailles en attente. Bon tricot!
12.10.2017 - 09:21
![]() Christel wrote:
Christel wrote:
Bonjour. J’arrive à l’empiecement et il est écrit de mettre les 20 mailles centrales sur un arrêt de mailles(taille L). De quelles mailles centrales parlez vous? Celles du devant ou celle du dos? Ou l’es deux ?
03.10.2017 - 15:36DROPS Design answered:
Bonjour Christel, ce sont les mailles du milieu devant que l'on va mettre en attente pour l'encolure (mention ajoutée), continuez ensuite en allers et retours en rabattant pour l'encolure de chaque côté comme indiqué, et continuez les diminutions du raglan. Bon tricot!
03.10.2017 - 15:42Cheryl wrote:
Would anyone have a picture of the sleeve increases they could post.
27.01.2017 - 23:53DROPS Design answered:
Dear Chery, you cannot post any picture here. For the sleeves you have to inc on each side of the mid P6 sts under sleeve and just inc to keep ribbing matching around (K3/P3). Happy knitting!
30.01.2017 - 10:44
![]() Debra Brown wrote:
Debra Brown wrote:
Hello. I have a question about the neckline shaping. I am knitting size Large. At the end of the raglan and neck shaping, the pattern says that I should have 68 stitches total. Does this include the 20 stitches at the front placed on a stitch holder? Then the pattern says that when I pick up the stitches on the holder I should have more than 90 stitches total. How is this possible, if I only have 68 stitches at the end of the raglan and neck shaping?
16.12.2016 - 07:16DROPS Design answered:
Dear Mrs Brown, there should be 68 sts left after all dec for raglan and neck shaping, then pick up sts along front piece: 20 sts on a st holder + pick up sts along both side of these sts (the cast off sts on each side) = you should have approx. 96-120 sts. P1 round, K1 round, P 1 round and on next K round dec evenly to adjust number of sts to 90 sts (in size L) then work ribbing over these 90 sts. Happy knitting!
16.12.2016 - 09:43
|
|
Of The Sea |
|
 |
 |
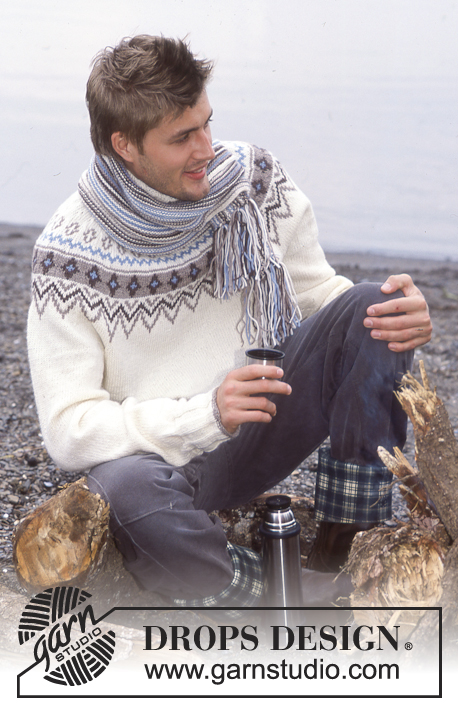
Men's knitted sweater with raglan and rib in DROPS Alaska, and scarf with English rib in DROPS Snow. Size: 12 years - XXL
DROPS 85-2 |
|
|
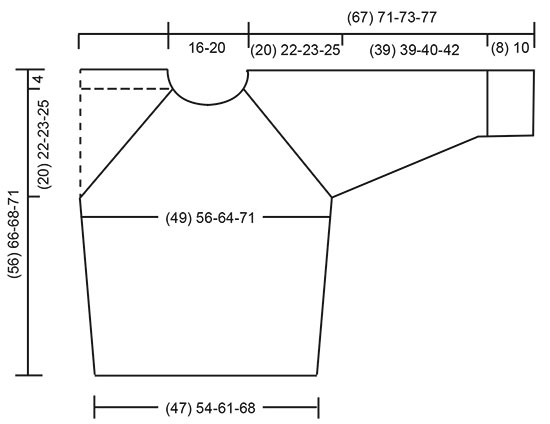
Gauge: 17 sts x 22 rows in stockinette st = 10 x 10 cm. Decreasing tips (for raglan): Dec as follows from right side: Start 4 sts before the marker: K 2 tog, K 4 (the marker is in the center of these 4 sts), slip 1 as if to knit, K 1, psso. Dec as follows from wrong side: Start 4 sts before the marker: P 2 tog, twisting sts, P 4 (the marker is in the center of these 4 sts), P 2 tog. (If it is too difficult to twist the sts, sl them, return to left needle 1 by 1, twisting each, and then P 2 tog). BODY Cast on 160-184-208-232 sts on circular needles; join and place a marker at the join. Knit 2 rows stockinette st, then establish rib as follows: P 1, *K 6, P 6*, repeat from *-* over 72-84-96-108 sts, K 6, P 1, place a marker (= side), P 1, *K 6, P 6*, repeat from *-* over 72-84-96-108 sts, K 6, P 1. Continue the rib as established. When the piece measures 10-15-15-15 cm and 20-30-30-30 cm inc 1 st at each side of each marker – P the increased sts – = 168-192-216-240 sts. When the piece measures 32-40-41-42 cm bind off 12 sts at each side for armhole (= K 3, P 6, K 3) = 72-84-96-108 sts remain on Front and Back. Lay piece aside and knit the sleeves. Sleeve: Cast on 48-48-60-60 sts on double-pointed needles; join and place a marker at the join. Knit 2 rows stockinette st, then knit rib (P 3, K 3) over all sts. When the piece measures 8-10-10-10 cm, change to * K 6, P 6 * rib as on Body – start at marker with P 3 so that the marker is centered in a P 6. When the piece measures 10-13-13-11 cm inc 1 st on both sides of the P 6 containing the marker every 3-3-3-3.5 cm a total of 12 times (knit the increased sts in the rib as you go along, i.e P first 6 inc sts, K next 6 sts) = 72-72-84-84 sts. When the piece measures 47-49-50-52 cm bind off 6 sts each side of marker = 60-60-72-72 sts remain. Lay piece aside and knit a second sleeve. Yoke: Put the sleeves in on the same circular needles as Body where you bound off for armholes = 264-288-336-360 sts. Put a marker in each transition between front, back and sleeves = 4 markers. Knit 0-1-1-1 row before raglan shaping begins. Raglan shaping: Dec 1 st at each side of all markers (= 8 decs) – see Decreasing tips above. Dec every other row 21-24-20-25 times and every row 3-0-10-5 times. At the same time when the piece measures 49-59-61-64 cm put the 8-20-20-32 sts at center front on a st holder for the neck and knit back and forth. Bind off at each neck edge every other row: 2 sts 1 time and 1 st 2 times. After all raglan and neck shaping is complete 56-68-68-80 sts remain and the piece measures approx. 56-66-68-71 cm to shoulder. Neckband: Pick up approx. 16 sts for smallest size, 28 to 40 sts for other sizes at front neck (incl. sts on st holder) = 72 sts for smallest size, 96 to 120 sts for other sizes; join and place a marker at the join. P 1 row, K 1 row and P 1 row, then K 1 row, decreasing evenly distributed to 72-84-90-96 sts. Then knit rib (K 3, P 3) until the collar measures 10-10-12-12 cm. Bind off in rib. Fold the rib in half to wrong side and stitch in place. Assembly: Sew opening under the sleeve. SCARF: English rib: Row 1 (wrong side): K 1 (edge st knit in garter st), *K 1, yo, sl 1 as if to purl*, repeat *-* to last 2 sts, K 2. Row 2 (right side): K 1 (edge st knit in garter st), *yo, sl 1 as if to purl, K tog the next st and yo from previous row*, repeat *-* to last 2 sts, yo, sl 1 as if to purl, K 1 (edge st knit in garter st). Row 3 (wrong side): K 1 (edge st), *K tog the next st and yo from previous row, yo, sl 1 as if to purl*, repeat *-* to last 2 sts + yo from previous row, K tog the next st and yo, K 1. Repeat rows 2 and 3 over all sts. Scarf: Loosely cast on 13 sts and knit English rib– see instructions above. Bind off when the piece measures approx 150 cm. |
|
 |
|
Have you finished this pattern?Tag your pictures with #dropspattern or submit them to the #dropsfan gallery. Do you need help with this pattern?You'll find 31 tutorial videos, a Comments/Questions area and more by visiting the pattern on garnstudio.com. © 1982-2026 DROPS Design A/S. We reserve all rights. This document, including all its sub-sections, has copyrights. Read more about what you can do with our patterns at the bottom of each pattern on our site. |
|


With over 40 years in knitting and crochet design, DROPS Design offers one of the most extensive collections of free patterns on the internet - translated to 17 languages. As of today we count 325 catalogs and 12298 patterns - 12288 of which are translated into English (US/in).
We work hard to bring you the best knitting and crochet have to offer, inspiration and advice as well as great quality yarns at incredible prices! Would you like to use our patterns for other than personal use? You can read what you are allowed to do in the Copyright text at the bottom of all our patterns. Happy crafting!
Post a comment to pattern DROPS 85-2
We would love to hear what you have to say about this pattern!
If you want to leave a question, please make sure you select the correct category in the form below, to speed up the answering process. Required fields are marked *.