
Popular categories
Looking for a yarn?


Comments / Questions (97)
![]() Grant Foden wrote:
Grant Foden wrote:
For the body, which technique is used for the increases in the side rib? I'm assuming it's M1 but it's not specified. Thank you.
02.12.2022 - 12:31DROPS Design answered:
Dear Mrs Foden, you can use the technique you rather, so use M1 if you like to. Happy knitting!
02.12.2022 - 15:06
![]() Roger Lefebvre wrote:
Roger Lefebvre wrote:
Suite problème pour augm des manches. Bonjour et merci de votre réponse rapide. J’ai suivie vos instructions que vous m’avez décrite. J’ai tricoter jusqu’à avoir 9 augm env de chaque côté du marqueur =18 m env centrale. Apres avoir fait les 9 augm env, je suis rendu a 31 cm. Est-ce normale que les augm end commence si haute ? Merci Je suis très embêté
16.12.2021 - 13:17DROPS Design answered:
Bonjour Mme Lefebvre, tout dépend quelle taille vous tricotez, sauf erreur je n'ai pas trouvé cette info, mais lorsque vous avez vos 18 m sous la manche, la manche doit mesurer 23-25-25-27.5 cm (la 6ème augmentation se fait à cette hauteur). La dernière augmentation serra à 41-43-43-48,5 cm de hauteur totale (votre tension en hauteur est juste?). Est -ce que ceci peut vous aider?
16.12.2021 - 14:34
![]() Roger Lefebvre wrote:
Roger Lefebvre wrote:
Je ne comprend pas les Augm manche, j'ai beau lire et relire vos explications et je ne comprend pas. J'ai 3 m env marqueur 3 m env, est ce que je tricote toutes les augm en m env ? Je tricote 1 augm env -3 m env marqueur 3 m env, 1 augm env , 12 fois. merci
15.12.2021 - 04:46DROPS Design answered:
Bonjour Mr Lefebvre, les augmentations sous les manches doivent être incorporées progressivement aux côtes, donc au milieu sous la manche, vous avez 6 m env, tricotez les6 3 premières augmentations de chaque côté à l'envers (vous aurez alors 18 m envers, 9 de chaque côté du marqueur), puis augmentez les 6 fois suivantes à l'endroit vous aurez ainsi: 6 m env (augmentations), 6 m end (augmentations), 3 m env, marqueur, 3 m env, 6 m end (augmentations), 6 m env (augmentations). Bon tricot!
15.12.2021 - 08:17
![]() Sara wrote:
Sara wrote:
Buongiorno. Sto lavorando il raglan per il modello 85/2 in cui si dice di fare 8 diminuzioni, 21 volte, ogni 3 ferri. Beh.. Non capisco dove sbaglio ma é matematicamente impossibile, in 7cm, fare 21 volte le diminuzioni ogni 3 ferri. Seguendo il modello più piccolo, ai più di 56 cm circa fino alla spalla ... Ho un centinaio di maglie sul ferro senza le 8 messe da parte e le 16 per il collo. É la terza volta che rifaccio la maglia e tuttavia i conti non tornano
18.04.2021 - 17:46DROPS Design answered:
Buonasera Sara, le 21 diminuzioni per il raglan vanno fatte a ferri alterni, cioè si lavora un ferro con diminuzioni e un ferro senza, fino a diminuire per 21 volte. Buon lavoro!
18.04.2021 - 18:20
![]() Saara Piiroinen wrote:
Saara Piiroinen wrote:
Haluaisin tuon miesten villapaidan ohjeen
14.03.2021 - 12:14
![]() Ailie Heath wrote:
Ailie Heath wrote:
Searching for mens patterns using group A yarn, fable, alpaca. Can only find patterns that use 2 strands. Your search facility is no help, it is actually misleading. Are there any patterns for a sweater using just 1 strand ? If I want thicker yarn, it will be easier to work with a plyed thicker yarn so I would not want to use 2 strands . I want to knit a mens 4ply sweater on 3.5mm needles. Can you help with pattern selections?
16.11.2020 - 22:58DROPS Design answered:
Dear Mrs Heath, you will find men jumper in yarn group A here - look at the patterns with 22 to 24 sts for 10 cm to get the patterns worked with just 1 strand + the jacket Coast Living. Hope this will help you. Happy knitting!
17.11.2020 - 10:39
![]() Renáta Krolikowská wrote:
Renáta Krolikowská wrote:
Dobrý den, chtěla bych poprosit o radu, zda mohu nahradit přízi ALASKA dle popisu přízí Drops Merino extra fine.Jedná se mi o úpravu superwash.Nebo která příze je dle vás příjemnější a lépe vydrží sportovni zátěž,tim i častější praní?Moc děkuji za radu.Renáta
29.10.2020 - 22:28
![]() DHOURY Lysiane wrote:
DHOURY Lysiane wrote:
Bonjour, Peut on faire ce modèle sans aiguilles circulaires mais des aiguilles ordinaires si oui peut on avoir cette vertion Cordialement
08.07.2020 - 16:40DROPS Design answered:
Bonjour Mme Dhoury, vous trouverez ici comment adapter un modèle sur aiguilles droites. Bon tricot!
08.07.2020 - 16:44
![]() Inga wrote:
Inga wrote:
Sorry, I think I finally got it, thanks for your help!
11.05.2020 - 16:09
![]() Inga wrote:
Inga wrote:
YOu answer makes no sense, if I increase to have 18 purl in the middle I actually end up with 30 purl, since I will run into the 6 purls on each side.
11.05.2020 - 15:45DROPS Design answered:
Dear Inga, you have to increase a total of 24 sts (= 12 times on each side of markers), so that you will have, after all sts have been increased: marker beg of round, P3, (then the 12 increases: K6, P6), *K6, P6*, repeat from *-* and finish with the 12 increases: P6, K6, and the last 3 purl sts. Hope this helps. Happy knitting!
11.05.2020 - 16:48
|
|
Of The Sea |
|
 |
 |
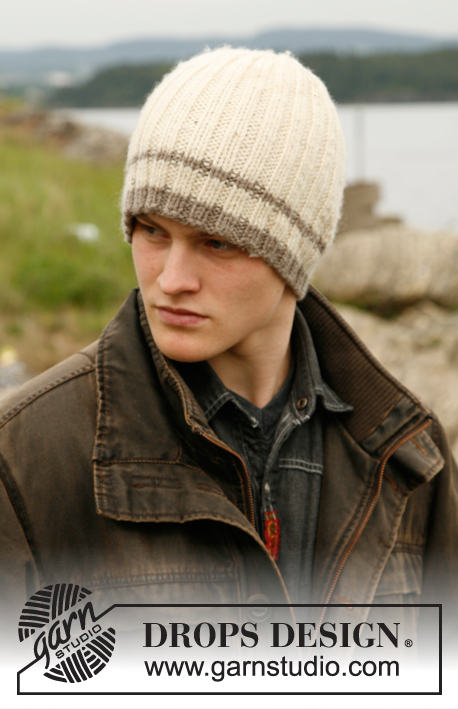
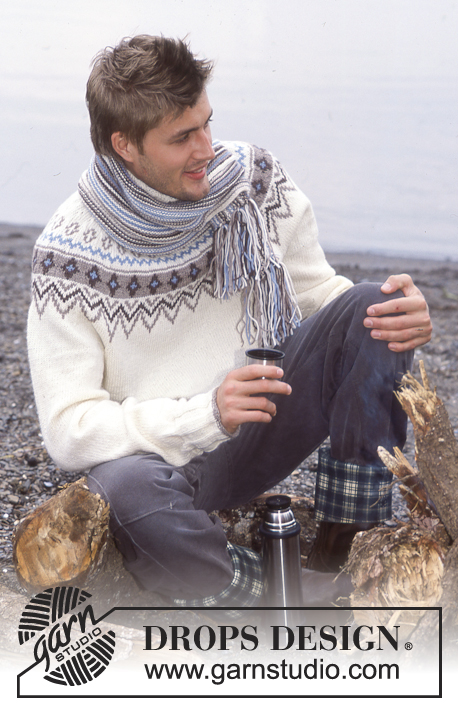
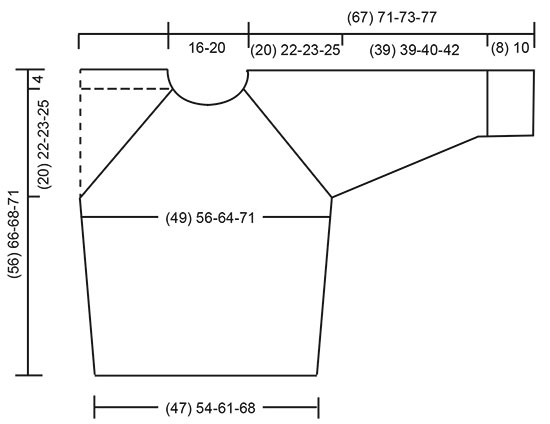
Men's knitted sweater with raglan and rib in DROPS Alaska, and scarf with English rib in DROPS Snow. Size: 12 years - XXL
DROPS 85-2 |
|
|
Gauge: 17 sts x 22 rows in stockinette st = 10 x 10 cm. Decreasing tips (for raglan): Dec as follows from right side: Start 4 sts before the marker: K 2 tog, K 4 (the marker is in the center of these 4 sts), slip 1 as if to knit, K 1, psso. Dec as follows from wrong side: Start 4 sts before the marker: P 2 tog, twisting sts, P 4 (the marker is in the center of these 4 sts), P 2 tog. (If it is too difficult to twist the sts, sl them, return to left needle 1 by 1, twisting each, and then P 2 tog). BODY Cast on 160-184-208-232 sts on circular needles; join and place a marker at the join. Knit 2 rows stockinette st, then establish rib as follows: P 1, *K 6, P 6*, repeat from *-* over 72-84-96-108 sts, K 6, P 1, place a marker (= side), P 1, *K 6, P 6*, repeat from *-* over 72-84-96-108 sts, K 6, P 1. Continue the rib as established. When the piece measures 10-15-15-15 cm and 20-30-30-30 cm inc 1 st at each side of each marker – P the increased sts – = 168-192-216-240 sts. When the piece measures 32-40-41-42 cm bind off 12 sts at each side for armhole (= K 3, P 6, K 3) = 72-84-96-108 sts remain on Front and Back. Lay piece aside and knit the sleeves. Sleeve: Cast on 48-48-60-60 sts on double-pointed needles; join and place a marker at the join. Knit 2 rows stockinette st, then knit rib (P 3, K 3) over all sts. When the piece measures 8-10-10-10 cm, change to * K 6, P 6 * rib as on Body – start at marker with P 3 so that the marker is centered in a P 6. When the piece measures 10-13-13-11 cm inc 1 st on both sides of the P 6 containing the marker every 3-3-3-3.5 cm a total of 12 times (knit the increased sts in the rib as you go along, i.e P first 6 inc sts, K next 6 sts) = 72-72-84-84 sts. When the piece measures 47-49-50-52 cm bind off 6 sts each side of marker = 60-60-72-72 sts remain. Lay piece aside and knit a second sleeve. Yoke: Put the sleeves in on the same circular needles as Body where you bound off for armholes = 264-288-336-360 sts. Put a marker in each transition between front, back and sleeves = 4 markers. Knit 0-1-1-1 row before raglan shaping begins. Raglan shaping: Dec 1 st at each side of all markers (= 8 decs) – see Decreasing tips above. Dec every other row 21-24-20-25 times and every row 3-0-10-5 times. At the same time when the piece measures 49-59-61-64 cm put the 8-20-20-32 sts at center front on a st holder for the neck and knit back and forth. Bind off at each neck edge every other row: 2 sts 1 time and 1 st 2 times. After all raglan and neck shaping is complete 56-68-68-80 sts remain and the piece measures approx. 56-66-68-71 cm to shoulder. Neckband: Pick up approx. 16 sts for smallest size, 28 to 40 sts for other sizes at front neck (incl. sts on st holder) = 72 sts for smallest size, 96 to 120 sts for other sizes; join and place a marker at the join. P 1 row, K 1 row and P 1 row, then K 1 row, decreasing evenly distributed to 72-84-90-96 sts. Then knit rib (K 3, P 3) until the collar measures 10-10-12-12 cm. Bind off in rib. Fold the rib in half to wrong side and stitch in place. Assembly: Sew opening under the sleeve. SCARF: English rib: Row 1 (wrong side): K 1 (edge st knit in garter st), *K 1, yo, sl 1 as if to purl*, repeat *-* to last 2 sts, K 2. Row 2 (right side): K 1 (edge st knit in garter st), *yo, sl 1 as if to purl, K tog the next st and yo from previous row*, repeat *-* to last 2 sts, yo, sl 1 as if to purl, K 1 (edge st knit in garter st). Row 3 (wrong side): K 1 (edge st), *K tog the next st and yo from previous row, yo, sl 1 as if to purl*, repeat *-* to last 2 sts + yo from previous row, K tog the next st and yo, K 1. Repeat rows 2 and 3 over all sts. Scarf: Loosely cast on 13 sts and knit English rib– see instructions above. Bind off when the piece measures approx 150 cm. |
|
 |
|
Have you finished this pattern?Tag your pictures with #dropspattern or submit them to the #dropsfan gallery. Do you need help with this pattern?You'll find 31 tutorial videos, a Comments/Questions area and more by visiting the pattern on garnstudio.com. © 1982-2026 DROPS Design A/S. We reserve all rights. This document, including all its sub-sections, has copyrights. Read more about what you can do with our patterns at the bottom of each pattern on our site. |
|


With over 40 years in knitting and crochet design, DROPS Design offers one of the most extensive collections of free patterns on the internet - translated to 17 languages. As of today we count 325 catalogs and 12298 patterns - 12288 of which are translated into English (US/in).
We work hard to bring you the best knitting and crochet have to offer, inspiration and advice as well as great quality yarns at incredible prices! Would you like to use our patterns for other than personal use? You can read what you are allowed to do in the Copyright text at the bottom of all our patterns. Happy crafting!
Post a comment to pattern DROPS 85-2
We would love to hear what you have to say about this pattern!
If you want to leave a question, please make sure you select the correct category in the form below, to speed up the answering process. Required fields are marked *.