
Popular categories
Looking for a yarn?


Comments / Questions (19)
![]() Marion wrote:
Marion wrote:
Guten Tag. Kann man diese Anleitung auch mit 2 Fäden von Brushed Alpaka stricken?
23.02.2026 - 10:51DROPS Design answered:
Liebe Marion, dieses Modell kann mit nur 1 Faden Brushed Alpaca Silk gestrickt werden, siehe Material sowie Maschenprobe unter Tab "Anleitung". Viel Spaß beim Stricken!
27.02.2026 - 13:41
![]() Jose Munster wrote:
Jose Munster wrote:
Bij het telpatroon op regel 27 t/m 32 gaat het patroon 1 st aan beide kanten over de middelste 8 steken van patroon 1b, dus dat worden dan 10 steken. Hoe brei ik deze?
04.07.2025 - 18:24DROPS Design answered:
Dag Jose,
Je breit het telpatroon zover mogelijk door en als je de steken van het patroon niet meer kunt maken omdat je bijvoorbeeld nog maar 1 steek over hebt, dan brei je die in tricotsteek. De omslagen horen steeds bij het samen breien, dus als je niet 2 steken kunt samen breien maak je ook geen bijbehorende omslag.
07.07.2025 - 18:51
![]() Vijay Sharma wrote:
Vijay Sharma wrote:
Hello! I am confused about the yarn required for this cardigan. I understand that Vivaldi is not available. How many skeins/balls are required for this cardigan. Thank you for your help.
05.03.2025 - 21:10DROPS Design answered:
Hi Vijay, The alternative yarn suggested for this pattern is Brushed Alpaca Silk, no 18, light sea green, which comes in 25g skeins. You will therefore need 6 skeins for the smaller sizes or 8 skeins for the larger sizes. Happy crafting!
06.03.2025 - 06:29
![]() Michele wrote:
Michele wrote:
Hi, Is there a video for this lace pattern? Thanks.
04.12.2024 - 21:23DROPS Design answered:
Dear Michele, this lace pattern doesn't have a specific step-by-step tutorial. You can see the following video for a similar lace pattern variant: https://www.garnstudio.com/video.php?id=1208&lang=en. You can also ask us for any specific row of the chart and we will help you understand it. Happy knitting!
08.12.2024 - 13:40
![]() Mariana wrote:
Mariana wrote:
Hola. Si quiero usar silk mohair: El patrón se teje con uno o dos hilos ?
03.04.2023 - 02:14DROPS Design answered:
Hola, el patrón se teje con uno hilo. Happy knitting!
03.04.2023 - 12:11
![]() Anne wrote:
Anne wrote:
Je ne comprends pas à quoi va ressembler le col en côte. Si je comprends bien, il y aura 4 rgs de côte sur 13 m centrales puis 6 et 8 rgs sur les autres rgs diminués de chaque côtés??? Le col en côtes1/1 sera arrondi mais le visuel rectangle non? Auriez-vous une image du col dans le dos? ou un tuto explicatif? Merci pour vos réponses
29.09.2021 - 07:43DROPS Design answered:
Bonjour Anne, l'encolure dos se tricote en même temps que les mailles des épaules, autrement dit, vous tricotez 4 rangs de côtes sur les 25 m centrales et les autres mailles comme avant, puis, vous rabattez les 13 mailles centrales pour l'encolure (la bordure côtes termine l'encolure/forme le col), vous terminez ensuite chaque épaule séparément avec 6 mailles en côtes côté encolure et les autres mailles comme avant (en diminuant 2 x 1 m pour l'encolure). Bon tricot!
29.09.2021 - 07:48
![]() Anne Barés wrote:
Anne Barés wrote:
1 m lis au point mousse, 0-3-2-3-3 m jesrey, M1A (=5m), M1B sur les 48-48-56-64-72 m suiv, M1C (=6m), 0-3-2-3-3 m jersey, 1 m lis au point mousse. Je ne comprends pas comment enchaîner M1A, M1B, M1C,
14.09.2021 - 00:06DROPS Design answered:
Bonjour Mme Barès, vous tricotez d'abord M.1A ( 5 mailles) puis vous répétez 6-6-7-8-9 fois les 8 mailles de M.1B et tricotez ensuite les 6 mailles de M.1C. Aux rangs 27-29-31, tricotez la dernière maille de M.1A avec la 1ère/les 2 premières mailles de M.1B, puis la dernière maille de M.1B avec la maille/les 2 mailles suivantes du M.1B suivant de M.1C - pensez à bien vérifier votre nombre de mailles à chaque fois (ajouter des marqueurs entre chaque motif peut aider) pour que votre nombre de mailles soit toujours correct. Bon tricot!
14.09.2021 - 07:56
![]() AH wrote:
AH wrote:
Voiko langan korvata Brushed alpakka silk langalla? Onnistuuko, jos jätän kuvion tekemättä eli vaan sileää neuletta?
21.07.2021 - 00:28DROPS Design answered:
Kyllä, kunhan langassa on oikea neuletiheys. DROPS Brushed Alpaca Silk: 150-150-150-200-200 g nro 15, light sea green
09.08.2021 - 12:08
![]() Agneta Borgström wrote:
Agneta Borgström wrote:
Hej! Jag förstår inte när man ska göra utläggen på ärmen. Hur utläser jag "ökas det 1 m i var sida på var 5,5:e-4:e-3, 5:e-3:e-3:e cm, totalt 10 ggr". Jag förstår att det är ett utlägg i var sida 10 ggr, men inte när. Om jag gör första utlägget när arbetet mäter 14 cm, när ska jag göra de övriga? Tackar på förhand för hjälpen. Med vänliga hälsningar Agneta Borgström
11.07.2021 - 22:19DROPS Design answered:
Hej Agneta. I storlek S gör du utlägg med 5,5 cm mellanrum, i storlek M med 4 cm mellanrum osv enligt beskrivningen. Mvh DROPS Design
13.07.2021 - 08:36
![]() Fausta wrote:
Fausta wrote:
Salve, si potrebbe avere la traduzione in italiano del cardigan in Vivaldi? Si può eseguire con filato kid silk?
26.03.2021 - 13:03DROPS Design answered:
Buonasera Fausta, tradurremo il modello nei prossimi giorni. Può sostituire Vivaldi con 2 capi di Kid-Silk. Buon lavoro!
27.03.2021 - 18:46
|
|||||||||||||
DROPS 88-14 |
|||||||||||||
 |
 |
||||||||||||
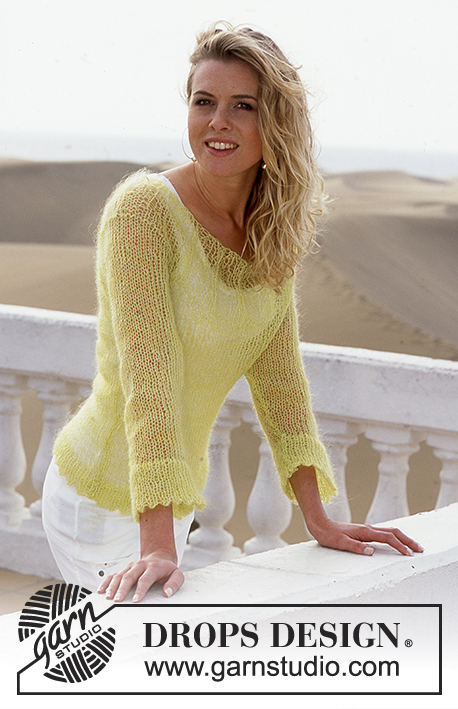
Knitted jacket with lace pattern in DROPS Vivaldi or Brushed Alpaca Silk
DROPS 88-14 |
|||||||||||||
|
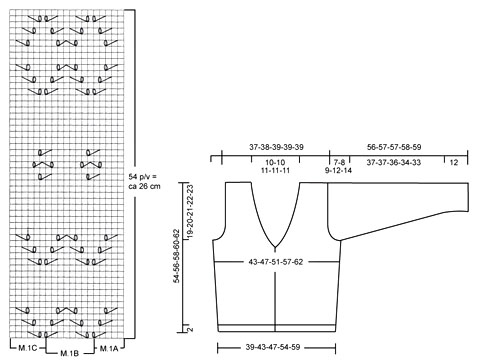
Gauge: 15 sts x 21 rows in stockinette st = 10 x 10 cm. Knitting tips (for neckband): Dec inside of 6 buttonband sts knit as follows on right side from edge: K 2 (garter st), K 1, P 1, K 1, P 1. Dec 1 st as follows: After 6 edge sts: Slip 1 st as if to knit, K 1, psso. Before 6 edge sts: K 2 tog. Rib: * K 1, P 1 *, repeat from * - *. Pattern: See the chart. The chart shows Patterns 1A (M.1A), 1B (M.1B) and 1C (M.1C). The patterns are seen from the right side. «54 p/v = ca 26 cm»: 54 rows = approx. 26 cm. Back: Cast on 61-67-73-83-91 sts around 2 needles (so that the cast-on edge will be elastic). Pull out one needle and P 1 row (wrong side). Then knit 4 rows rib, keeping 1 edge st at each side in garter st and begin rib with P 1. Change to stockinette st. When the piece measures 3 cm establish the pattern on the next row as follows (right side row): K 1 (edge st knit in garter st), 0-3-2-3-3 sts stockinette st, Pattern 1A (= 5 sts), Pattern 1B over the following 48-48-56-64-72 sts, Pattern 1C (= 6 sts), 0-3-2-3-3 sts stockinette st, K 1 (edge st knit in garter st). Continue in pattern as established until piece measures 34-35-36-37-38 cm – adjust so that you end after you complete one of the lace patterns in the pattern – then knit stockinette st to finished measurements. When the piece measures 9-9-9-13-13 cm inc 1 st at each side every 9-9-9-13-13 cm a total of 3-3-3-2-2 times = 67-73-79-87-95 sts – knit the increased sts in stockinette st. When the piece measures 35-36-37-38-39 cm bind off for armhole at each side every other row: 3 sts 1 time, 2 sts 1-1-2-3-4 times and 1 st 1-3-3-5-7 times = 55-57-59-59-59 sts. When the piece measures 50-52-54-56-58 cm knit 4 rows with rib over the center 23-23-25-25-25 sts – start and end the rib with P 1 (knit the remaining sts in stockinette st as before), then bind off the center 11-11-13-13-13 sts for the neck in rib. Dec 1 st at each neck edge every other row 2 times – see knitting tips above = 20-21-21-21-21 sts remain on each shoulder. Bind off, the piece measures approx. 54-56-58-60-62 cm. Right front: Cast on 36-40-44-48-52 sts around 2 needles (so that the cast-on edge will be elastic). Pull out one needle and P 1 row (wrong side). Then knit 4 rows rib as follows from center front edge: K 2 (edge sts knit in garter st), * K 1, P 1 *, repeat from * - * and finish with K 1 and K 1 (edge st knit in garter st). Then knit stockinette st but keep the outermost 6 sts at the center front as before to finished measurements (= buttonband). Read the entire next section before knitting: Pattern: When the piece measures 3 cm knit the next row as follows from center front edge (seen from the right side): K 2 (edge sts knit in garter st), K 1, P 1, K 1, P 1 (= buttonband), 2-3-0-3-0 sts stockinette st, Pattern 1A (= 5 sts), Pattern 1B over the following 16-16-24-24-32 sts, Pattern 1C (= 6 sts), 0-3-2-3-2 sts stockinette st and K 1 (edge st knit in garter st). Continue in pattern as established until piece measures 34-35-36-37-38 cm – adjust as on back – then knit stockinette st to finished dimensions. Side inc: When the piece measures 9-9-9-13-13 cm increase at the side as on back. Neckband: When the piece measures 28-29-30-31-32 cm dec 1 st at center front edge for neck every other row – see knitting tips above: 3-4-6-3-2 times and every 4 rows: 10-10-10-12-13 times. Bind off the sts in pattern or in stockinette st, as appropriate. Armhole: When the piece measures 35-36-37-38-39 cm bind off for armhole at the side as on back. After all incs and decs are complete 20-21-21-21-21 sts remain on shoulder. Continue in stockinette st with the 6 outermost sts at the center front edge as before. Bind off when the piece measures 54-56-58-60-62 cm. Left front: Cast on and knit the same as the right reversing shaping. Sleeve: Cast on 39-39-41-41-45 sts around 2 needles. Pull out one needle and knit 4 rows garter st. Then knit stockinette st, keeping 1 st at each edge in garter st. When the piece measures 12 cm knit the next row as follows (right side row): K 1 (edge st knit in garter st), 1-1-2-2-0 sts stockinette st, Pattern 1A (= 5 sts), Pattern 1C over the following 24-24-24-24-32 sts, Pattern 1C (= 6 sts), 1-1-2-2-0 sts stockinette st and K 1 (edge st knit in garter st). Continue in pattern as established. When the piece measures 14-14-14-14-12 cm inc 1 st at each side every 5.5-4-3.5-3-3 cm a total of 7-9-10-11-11 times = 53-57-61-63-67 sts – knit the increased sts in stockinette st. When the piece measures approx. 40 cm, end lace pattern and knit stockinette st to finished measurements. When sleeve measures 49-49-48-46-45 cm bind off for sleeve cap at each side every other row: 3 sts 1 time, 2 sts 2-2-2-3-4 times and 1 st 1-2-3-5-6 times, continue to bind off 2 sts at each side until the piece measures 55-56-56-57-58 cm, then bind off 3 sts 1 time at each side. Bind off remaining sts, the piece measures approx. 56-57-57-58-59 cm. Assembly: Sew shoulder seams. Sew in sleeves. Sew sleeve and side seams using edge sts as a seam allowance. Crocheted edge: Crochet 1 row of ch-loops around lower edge of each sleeve and along both fronts and around neckband as follows: 1 sc in first st, * ch 3, skip over approx. 2.5 cm, 1 sc in the next st *, repeat from * - *. Sew on buttons. Use ch-loops on the crocheted edge for buttonholes. |
|||||||||||||
Diagram explanations |
|||||||||||||
|
|||||||||||||
 |
|||||||||||||
Have you finished this pattern?Tag your pictures with #dropspattern or submit them to the #dropsfan gallery. Do you need help with this pattern?You'll find 25 tutorial videos, a Comments/Questions area and more by visiting the pattern on garnstudio.com. © 1982-2026 DROPS Design A/S. We reserve all rights. This document, including all its sub-sections, has copyrights. Read more about what you can do with our patterns at the bottom of each pattern on our site. |
|||||||||||||


With over 40 years in knitting and crochet design, DROPS Design offers one of the most extensive collections of free patterns on the internet - translated to 17 languages. As of today we count 325 catalogs and 12298 patterns - 12288 of which are translated into English (US/in).
We work hard to bring you the best knitting and crochet have to offer, inspiration and advice as well as great quality yarns at incredible prices! Would you like to use our patterns for other than personal use? You can read what you are allowed to do in the Copyright text at the bottom of all our patterns. Happy crafting!
Post a comment to pattern DROPS 88-14
We would love to hear what you have to say about this pattern!
If you want to leave a question, please make sure you select the correct category in the form below, to speed up the answering process. Required fields are marked *.