
Popular categories
Looking for a yarn?


Comments / Questions (28)
![]() Christiane wrote:
Christiane wrote:
Bonjour. Diagramme 4 taille M. Pour cette partie sur le rang 2 qui est à l envers. Faut il commencer comme le rang 1 ou bien directement le rang 2. Merçi de me expliquer au complet ce rang. Cela me servira pour les prochains rangs. Je tricote depuis un an seulement. Cordialement.
22.04.2026 - 08:17DROPS Design answered:
Bonjour Christiane, lorsque vous tricotez sur l'endroit vous tricotez ainsi: les 3 premières mailles de A.4, vous augmentez1 maille inclinée à gauche, vous terminez A.4, puis vous tricotez A.3 au-dessus de A.2, puis 3 mailles envers, 5 mailles de A.1 et 3 mailles endroit. Sur l'envers, vous tricotez: 3 m envers, 5 m de A.1 (lisez les diagrammes de gauche à droite), 3 m endroit, A.3, puis A.4. Bon tricot!
22.04.2026 - 10:15
![]() Christiane wrote:
Christiane wrote:
Bonjour. GrilleA4 tailleM. Je suis bloquée car je ne sais pas comment tricoter le rang 2 qui est un rang envers. Merçi de me l'expliquer.
21.04.2026 - 14:10DROPS Design answered:
Bonjour Christiane, au 2ème rang de A.4, taille M, on tricote ainsi: 9 m endroit, 6 m envers, 3 m end et 3 m env (on a augmenté 1 maille au 1er rang, à 3 m du bord en début de rang, on a donc 1 m en plus en fin de rang sur l'envers, avant les 3 m envers). Bon tricot!
21.04.2026 - 16:32
![]() Kasprowicz wrote:
Kasprowicz wrote:
Rebonjour. Diagramme 4 taille M. Comment tricoter le rangement 2 qui est un rang envers. Cordialement
21.04.2026 - 11:12DROPS Design answered:
Bonjour Mme Kasprowicz, au 2ème rang de A.4, taille M, on tricote ainsi: 9 m endroit, 6 m envers, 3 m end et 3 m env (on a augmenté 1 maille au 1er rang, à 3 m du bord, on a donc 1 m en plus). Bon tricot!
21.04.2026 - 16:21
![]() Kasprowicz wrote:
Kasprowicz wrote:
Merçi pour la réponse et votre réactivité
21.04.2026 - 10:00
![]() Kasprowicz wrote:
Kasprowicz wrote:
Bonjour. Je souhaite savoir comment tricoter le rang 5 du diagramme 4 en taille M. Cordialement
21.04.2026 - 08:32DROPS Design answered:
Bonjour Mme Kasprowicz, tricotez le 5ème rang de A.4 en M ainsi: 3 m end, 3 m env, glissez 1 maille sur l'aiguille à torsades derrière l'ouvrage, tricotez les 3 mailles suivantes à l'endroit, reprenez la maille sur l'aiguille à torsades et tricotez la à l'endroit, puis glissez 3 mailles sur l'aiguille à torsades devant l'ouvrage, tricotez 1 maille envers, reprenez les 3 mailles sur l'aiguille à torsades et tricotez les à l'endroit, puis terminez par 8 m envers. Bon tricot!
21.04.2026 - 09:46
![]() Marie-Madeleine wrote:
Marie-Madeleine wrote:
Bonjour, Il n'y a pas d'infos pour les boutonnières ?
14.04.2026 - 21:44DROPS Design answered:
Bonjour Marie-Madeleine, vous trouverez toutes ces infos dans le paragraphe BOUTONNIÈRES: au début des explications. Bon tricot!
15.04.2026 - 08:00
![]() Marylène wrote:
Marylène wrote:
Je voudrait le gilet stone
01.04.2026 - 08:52DROPS Design answered:
Bonjour Marylène, vous trouverez les explications en français ici. Bon tricot!
07.04.2026 - 16:01
![]() Marion wrote:
Marion wrote:
Het is mij niet duidelijk hoe de mouw geminderd moet worden in het patroon, de minderingen zoals voorgeschreven vallen niet in het patroon. Dat komt omdat aan een kant van de middensteek, na het minderen ook het patroon gewisseld moet worden, en dat klopt niet met het patroon. ik heb erop zitten puzzelen maar kom er niet uit en krijg het ook niet mooi. hebben jullie een betere instructie voor dit minderen?
22.02.2026 - 17:44
![]() Marion wrote:
Marion wrote:
De sectie met de beschrijving voor de mouwen klopt niet helemaal, (maat M) als je de verkorte toeren breit zoals in het patroon, houdt je aan het einde aan een kant 4 steken meer over dan aan de andere kant. de mouw is niet symmetrisch. kan het patroon hierop worden aangepast?
22.02.2026 - 17:41
![]() Corinne wrote:
Corinne wrote:
Bonjour pour le devant gauche quand faut-il commencer les augmentations d’emmanchures tout de suite au début du diagramme A5 ou quand l’ouvrage mesure 23 cm ?
03.02.2026 - 13:48DROPS Design answered:
Bonjour Corinne, en taille L, on commence les augmentations de l'emmanchure quand le devant mesure 23 cm à partir des mailles relevées, continuez le point fantaisie comme avant jusqu'à ces 23 cm. Bon tricot!
03.02.2026 - 17:55
|
||||||||||||||||||||||
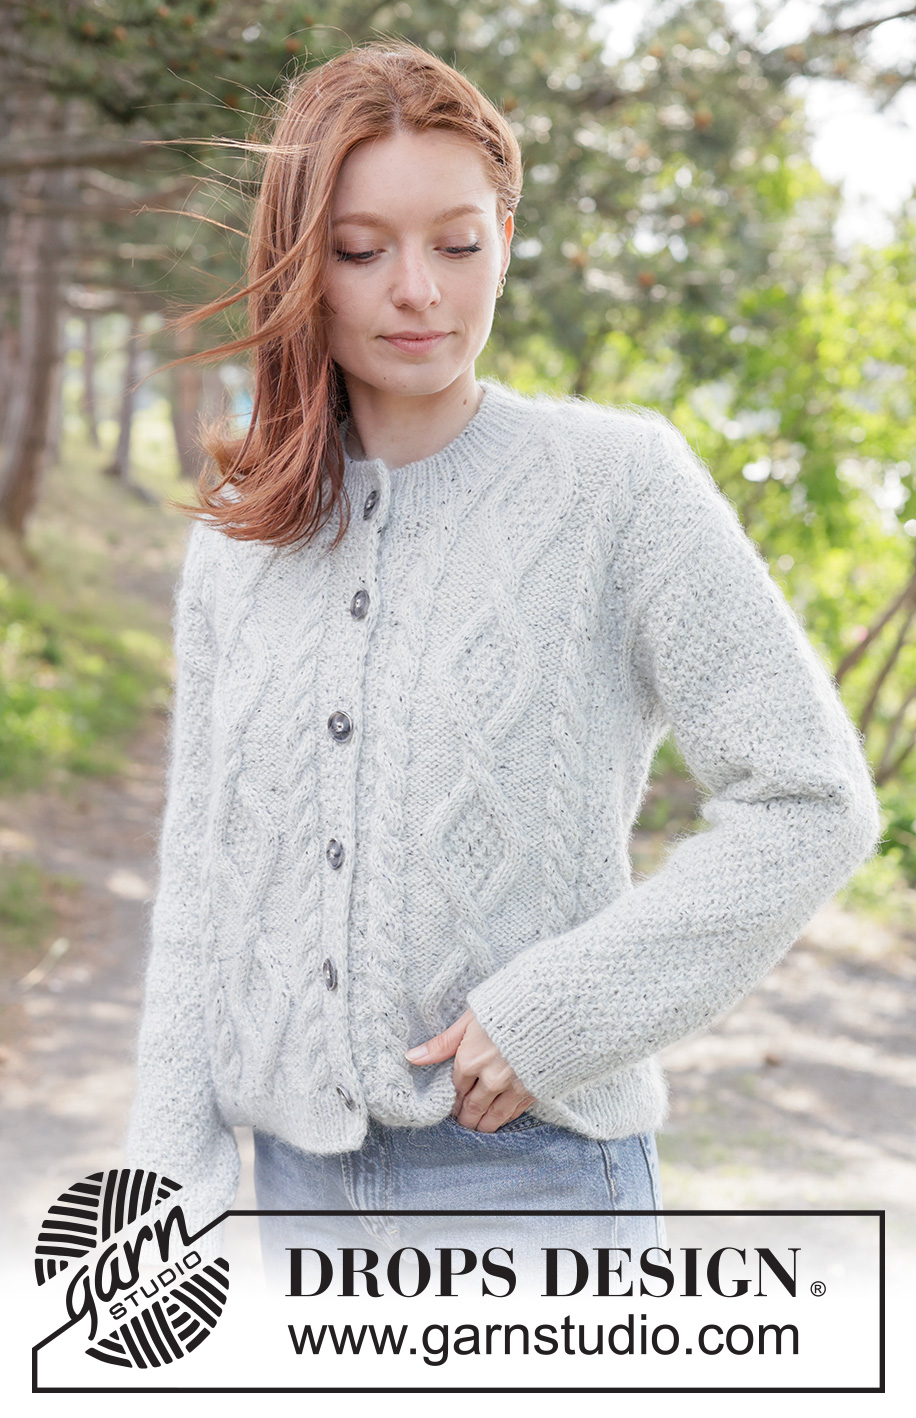
Stone Veil Cardigan#stoneveilcardigan |
||||||||||||||||||||||
 |
 |
|||||||||||||||||||||
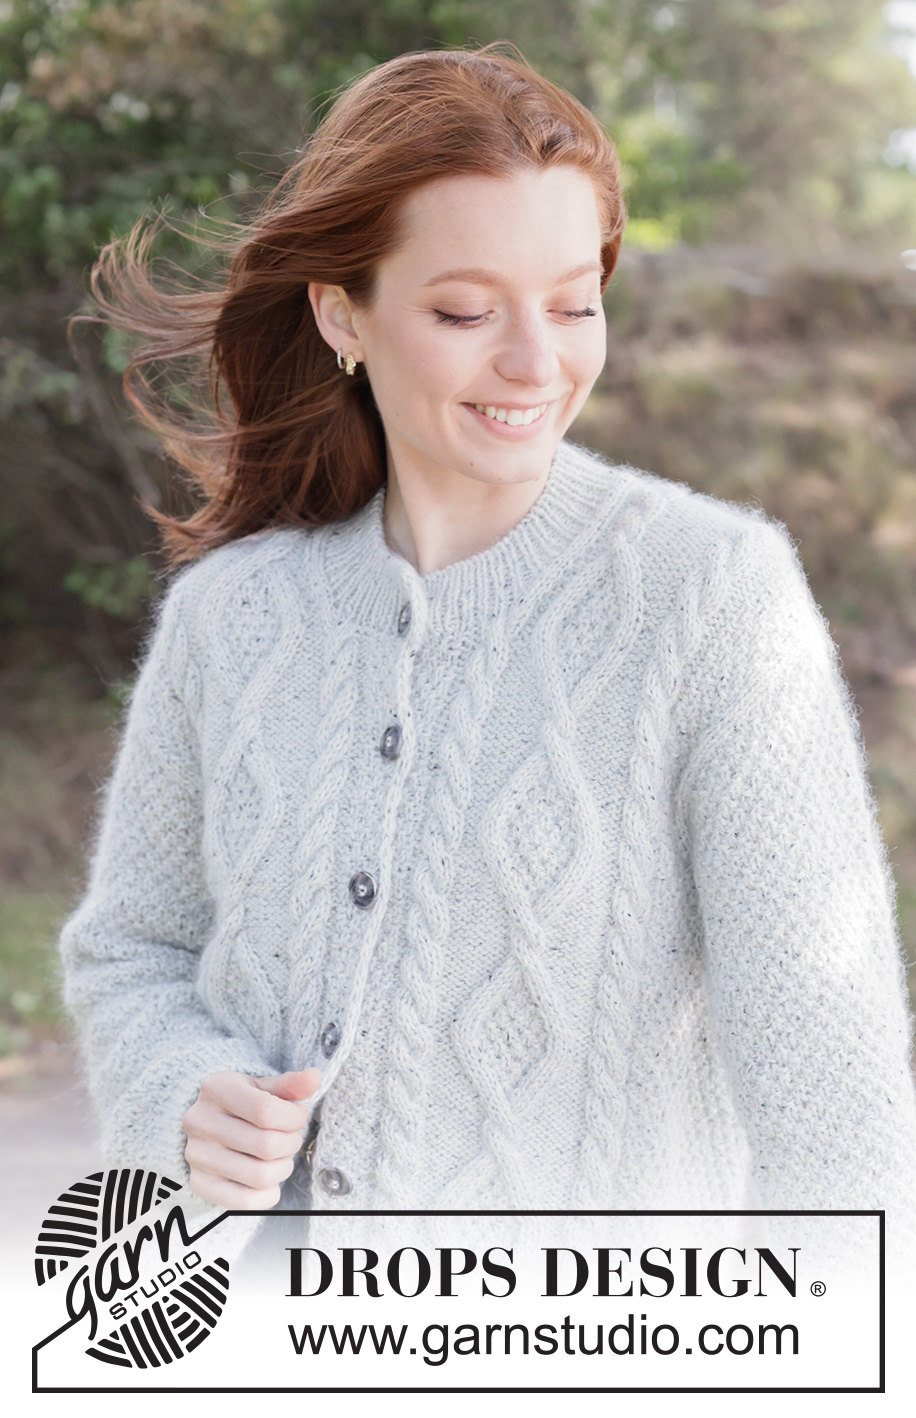
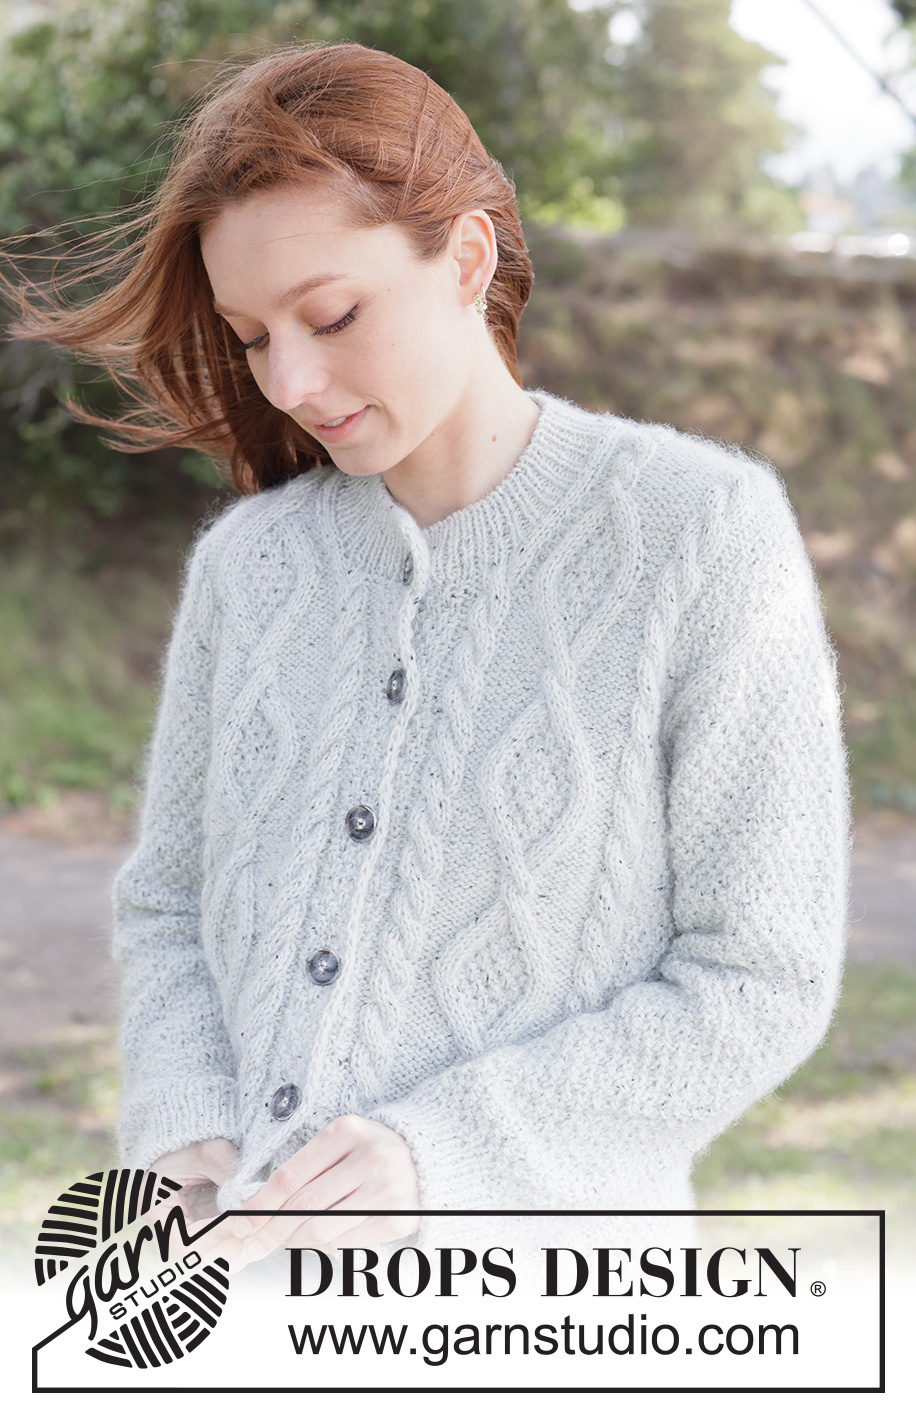
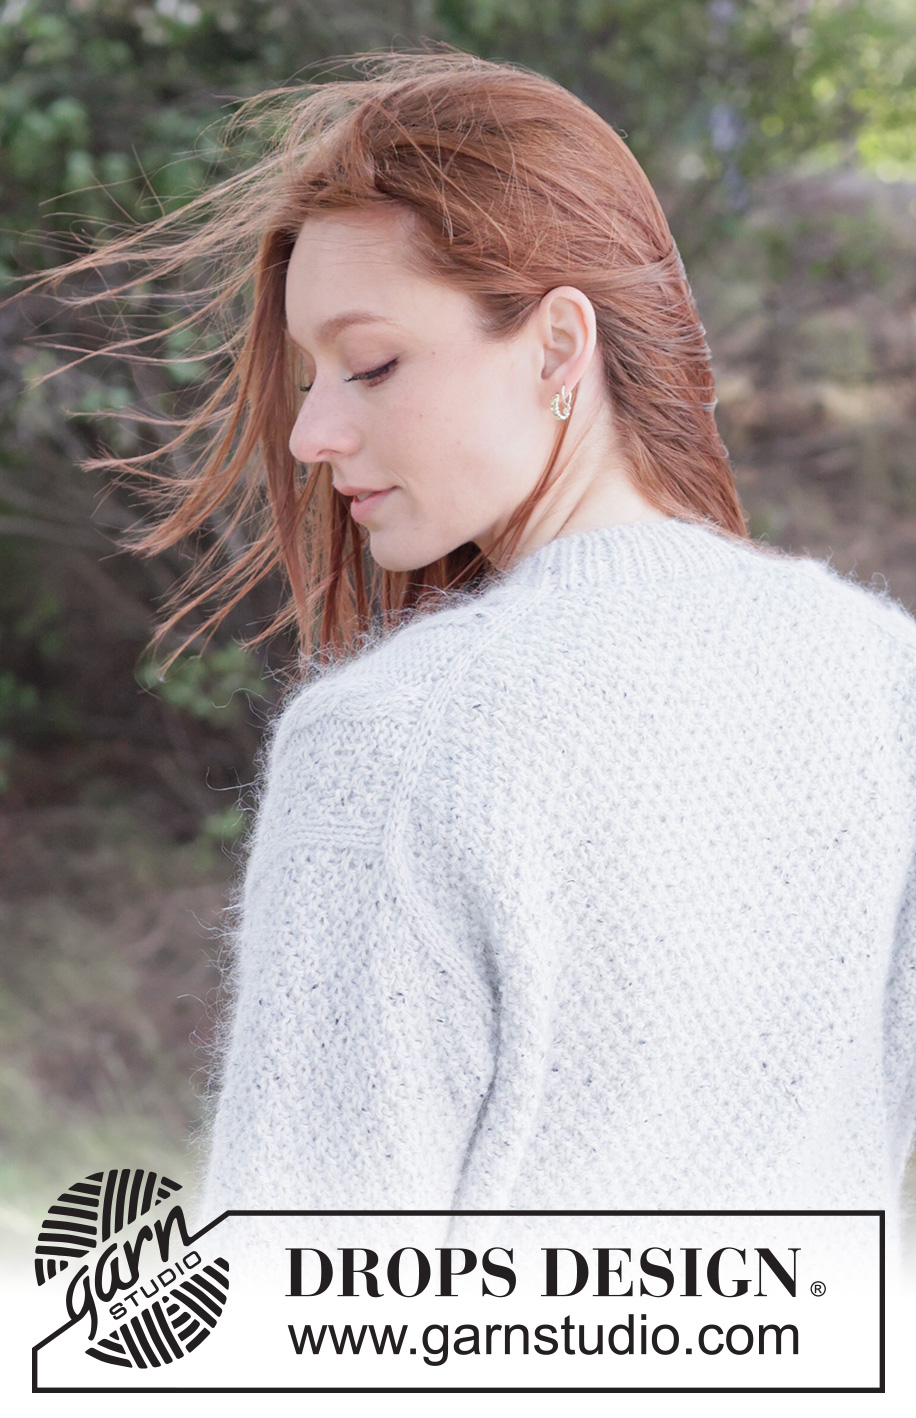
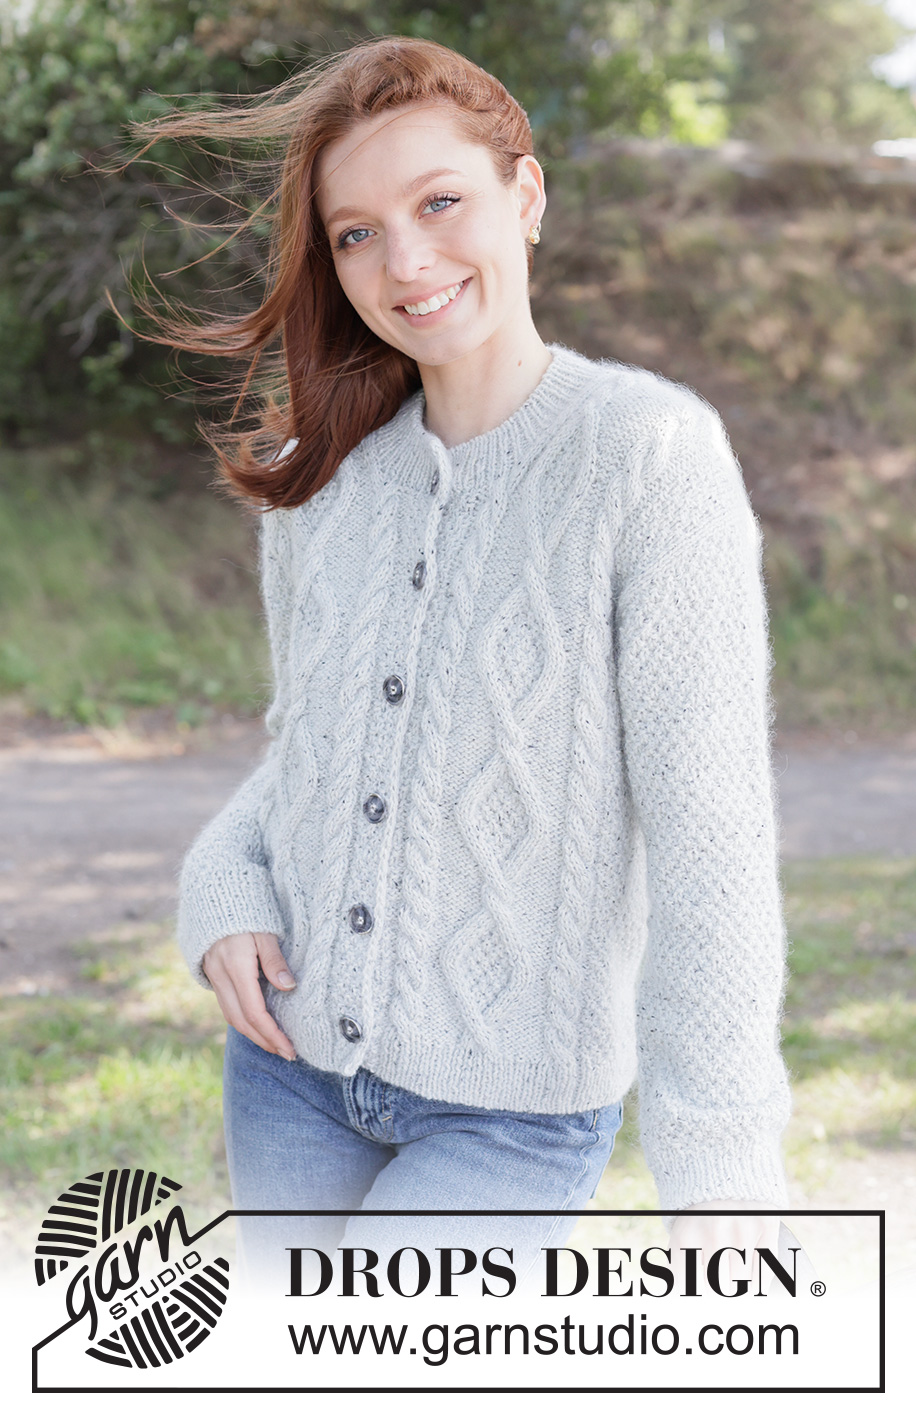
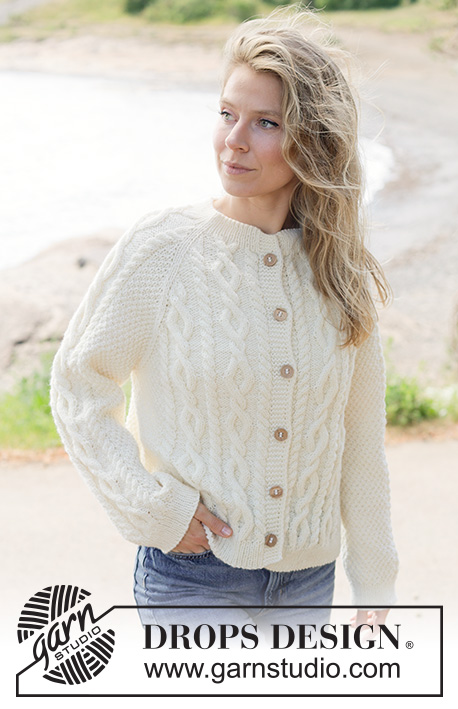
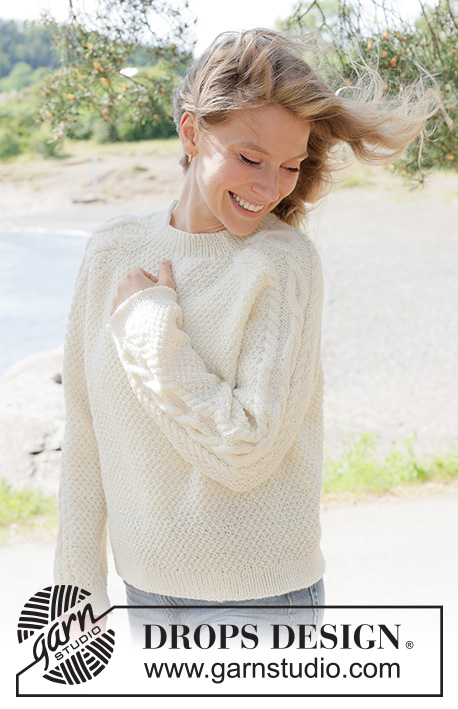
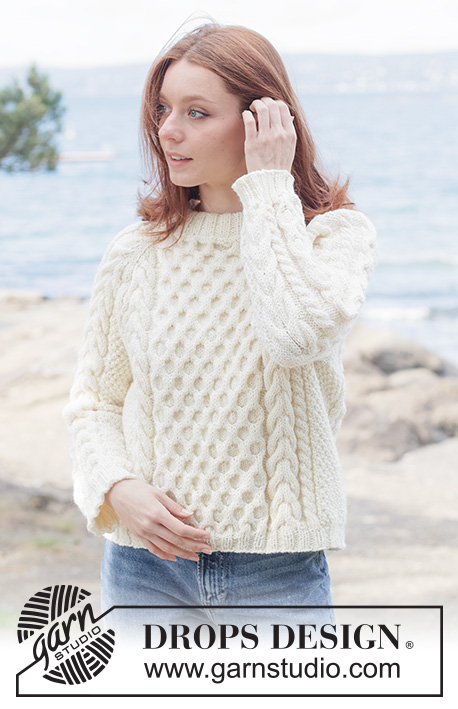
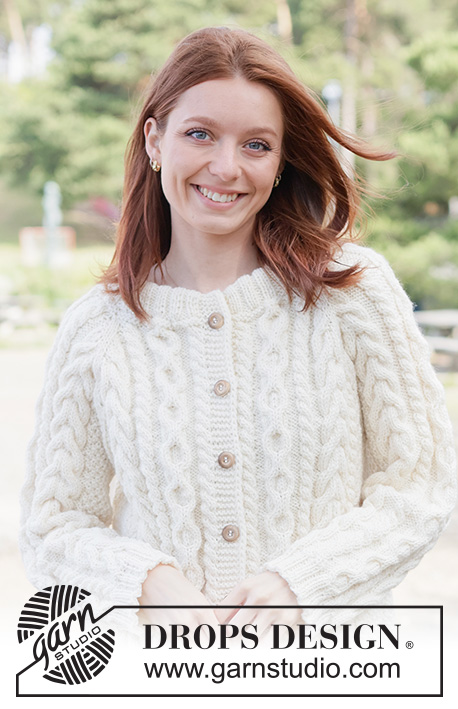
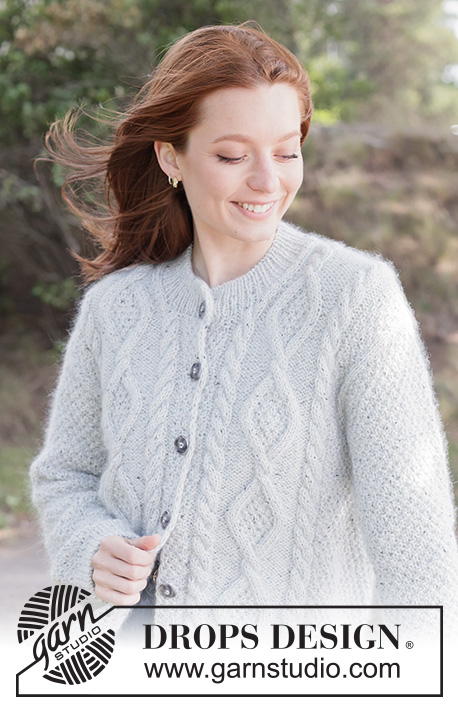
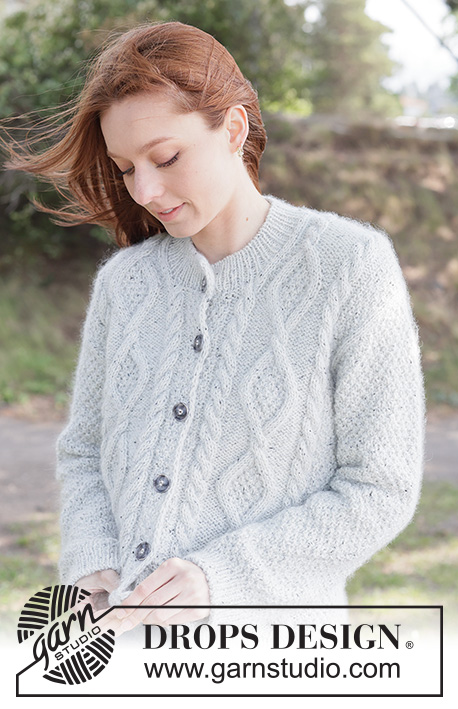
Knitted jacket in DROPS Soft Tweed and DROPS Kid-Silk. Piece is knitted top down with diagonal shoulders / European shoulders, double moss stitch and I-cord. Size XS – XXXL.
DROPS 263-10 |
||||||||||||||||||||||
|
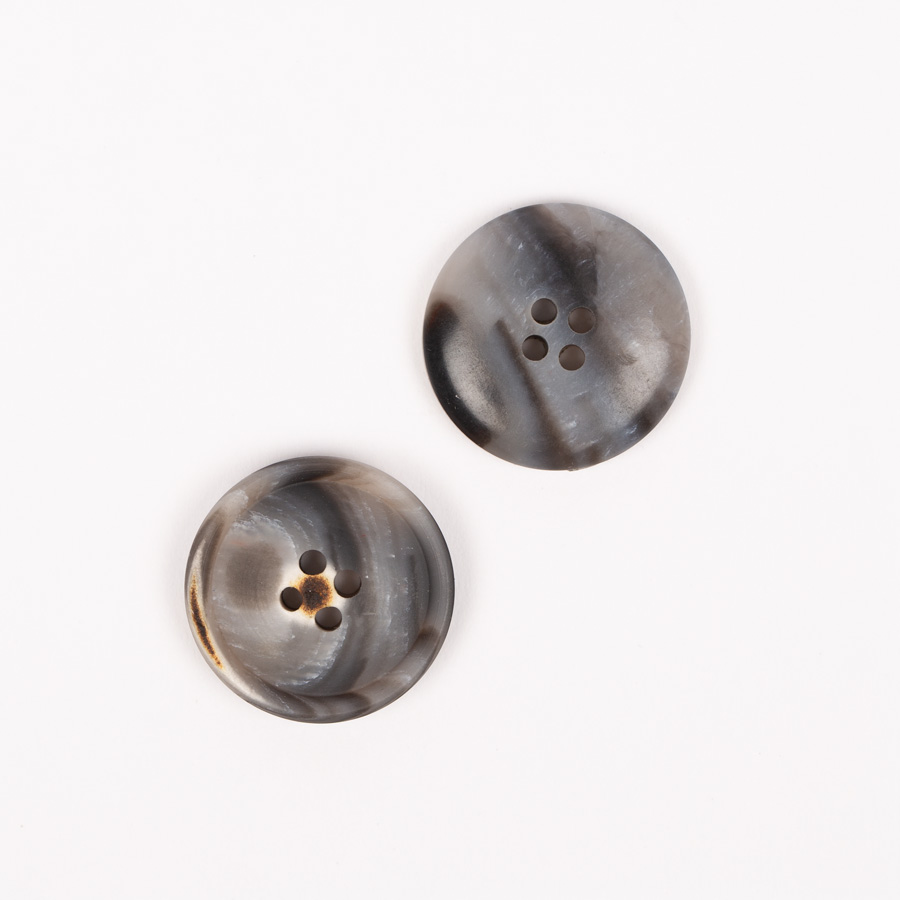
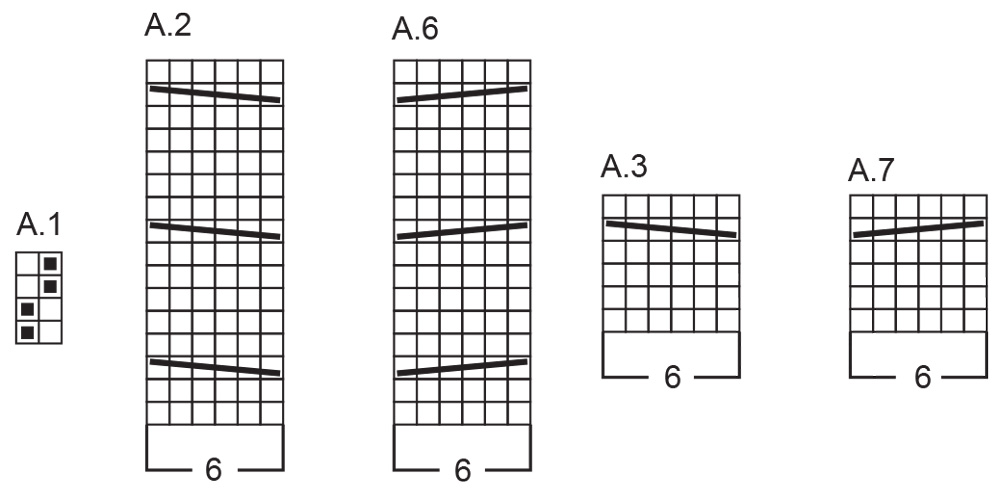
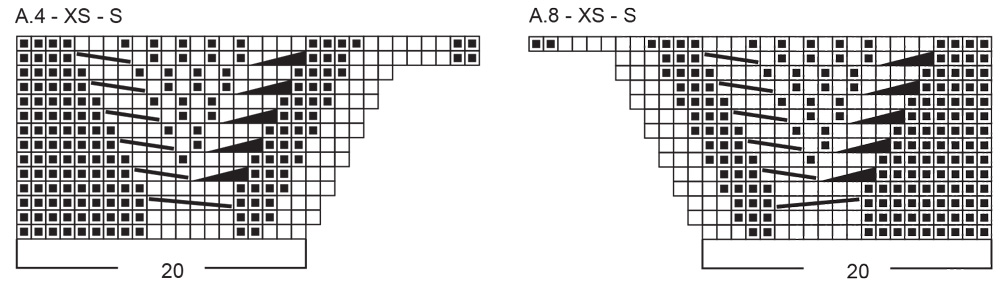
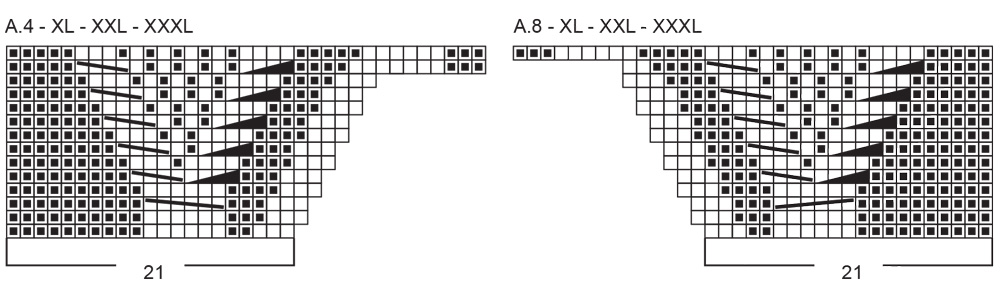
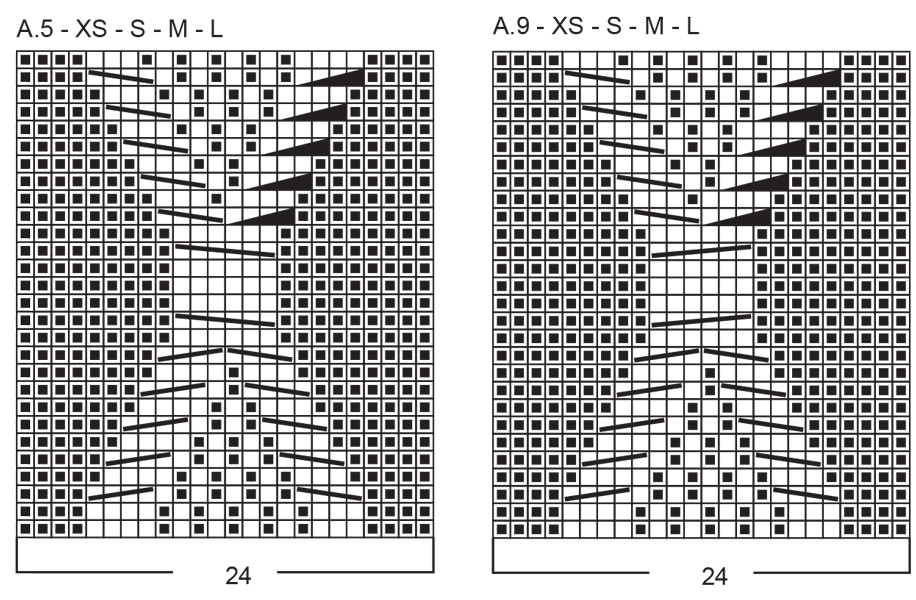
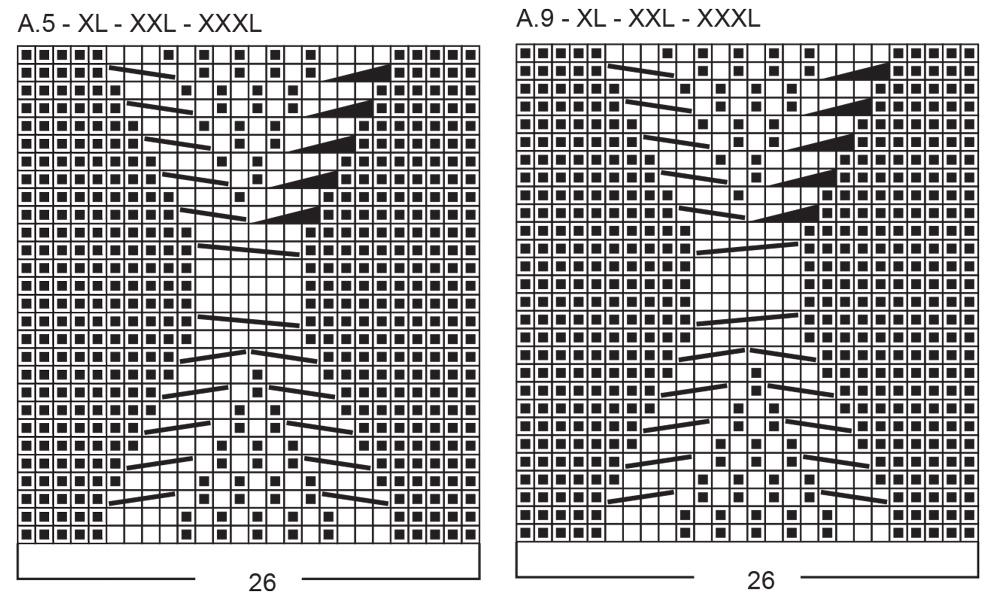
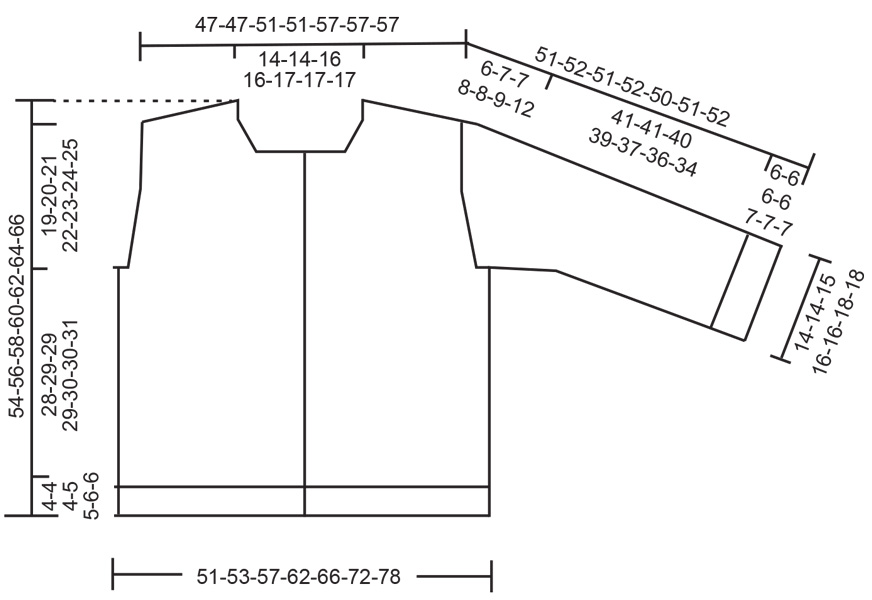
---------------------------------------------------------- EXPLANATION FOR THE PATTERN: ---------------------------------------------------------- PATTERN: See diagrams A.1 to A.9. Choose diagram for correct size. Diagrams show all rows in pattern seen from the right side. Remember to read the diagram from left to right when working from the wrong side. The diagrams are repeated over a different number of rows vertically. INCREASE TIP-1: INCREASE 1 STITCH TOWARDS THE LEFT - from RIGHT SIDE: Use left needle to pick up yarn between 2 stitches from row below, pick up yarn from the front and knit in the stitch loop that is on the back of the needle. INCREASE 1 STITCH TOWARDS THE RIGHT - from RIGHT SIDE: Use left needle to pick up yarn between 2 stitches from row below, pick up yarn from the back and knit in the stitch loop that is on the front side of the needle. INCREASE TIP-2: INCREASE 1 STITCH TOWARDS THE RIGHT - from WRONG SIDE: Use left needle to pick up yarn between 2 stitches from row below, pick up yarn from the back and purl in the stitch loop that is on the front side of the needle. INCREASE 1 STITCH TOWARDS THE LEFT - from WRONG SIDE: Use left needle to pick up yarn between 2 stitches from row below, pick up yarn from the front and purl in the stitch loop that is on the back side of the needle. BAND WITH I-CORD: BEGINNING OF ROW: Work band as follows (= 7 stitches): Slip 1 stitch purlwise with strand in front of piece, knit 1, then work the next 5 stitches in pattern A.1. END OF ROW: Work band as follows (= 7 stitches): Work until 7 stitches remain on row, work the first 5 stitches of these 7 stitches in pattern A.1, slip 1 stitch purlwise with strand in front of piece, knit 1. Continue like this on right side and wrong side. BUTTONHOLES: Decrease for buttonholes on right band (when garment is worn) - band = 7 stitches. Decrease from right side when 5 stitches remain on row as follows: ROW 1 (= right side): Make 1 yarn over, work 2 together (knit or purl together depending on on what fits the pattern), knit 1, slip 1 stitch purlwise with strand in front of piece, knit 1. ROW 2 (= wrong side): Work band as before and knit/purl (depending on what fits the pattern) yarn over, to make a buttonhole. Decrease first buttonhole when piece measures 7-7-7-8-8-7-9 cm = 2¾"-2¾"-2¾"-3⅛"-3⅛"-2¾"-3½" after neck edge. Then decrease the next 4-4-4-4-5-5-5 buttonholes, approx. 8-8½-9-9-7½-8-8 cm = 3⅛"-3¼"-3½"-3½"-2⅞"-3⅛"-3⅛" apart. Adjust so that bottom buttonhole is placed in the transition between pattern and rib on body. Dec the last buttonhole on neck edge. DECREASE TIP: Decrease 1 stitch on each side of marker as follows: Work until 2 stitches remain before marker, purl 2 together, knit 1 (marker is in this stitch), purl 2 twisted together (= 2 stitches decreased). KNITTING TIP: When working short row there will be a small hole when turning the piece - the hole can be closed by tightening the yarn or using the technique German Short Rows as follows: Slip first stitch purlwise. Place strand over right needle and tighten well at the back (should lead to two loops on needle). Work these loops together on next row. ---------------------------------------------------------- START THE PIECE HERE: ---------------------------------------------------------- JACKET - SHORT OVERVIEW OF THE PIECE: In this pattern needles of different length have been used, begin with fitting length for number of stitches and switch as needed. Begin by casting on stitches in the back of neck. Then work back piece downwards while AT THE SAME TIME increasing in each side of piece until number of stitches for shoulder width is reached. Back piece has a slight diagonal shoulder. Then work down to armholes. Now put back piece aside and work the front pieces. Pick up stitches along one shoulder from back piece. Work downwards to armhole while at the same time increasing towards the neck. Repeat on the other shoulder. At the armholes slip front pieces and back piece on to same circular needle and work body downwards back and forth on circular needle. Pick up stitches for sleeves around the armholes and work sleeves downwards. First work back and forth with short rows to form a sleeve cap, then work sleeves downwards in the round on needle. Finish by picking up stitches around the neck, and work a neck edge. BACK PIECE: Work piece back and forth on circular needle. Cast on 25-25-27-27-29-29-29 stitches on circular needle size 5.5 MM = US 9 with 1 strand DROPS Soft Tweed and 1 strand DROPS Kid-Silk (= 2 strands). Work PATTERN – read explanation above, and increase in each side as follows: ROW 1 (= wrong side): Purl all stitches. ROW 2 (= right side): Read INCREASE TIP-1 and knit 3, increase 1 stitch towards the left, work A.1 until 3 stitches remain (pattern begins and ends the same in each side), increase 1 stitch towards the right, knit 3. ROW 3 (= wrong side): Read INCREASE TIP-2 and purl 3, increase 1 stitch towards the right, work A.1 until 3 stitches (work the increased stitches in A.1), increase 1 stitch towards the left, purl 3. AFTER 3RD ROW: Work 2nd and 3rd ROW 13-13-14-14-16-16-16 times (= 26-26-28-28-32-32-32 rows have been worked), after increase there are 77-77-83-83-93-93-93 stitches on needle. Insert 1 marker in the side. Now measure piece from here! Work A.1 with 3 stitches in stockinette stitch in each side - remember to follow the knitting gauge - until piece measures 12-11-11-9-12-8-5 cm = 4¾"-4⅜"-4⅜"-3½"-4¾"-3⅛"-2" measured from marker along armhole. Now increase in each side for armholes. INCREASE FOR ARMHOLES: ROW 1 (= right side): Remember INCREASE TIP-1 and knit 3, increase 1 stitch towards the left, continue A.1 until 3 stitches remain, increase 1 stitch towards the right, knit 3. ROW 2 (= wrong side): Work A.1 with 3 purl stitches in each side (work the increased stitches in A.1). Work 1st and 2nd ROW 1-3-3-6-4-9-13 times in total (= 2-6-6-12-8-18-26 rows have been worked) = 79-83-89-95-101-111-119 stitches on needle. Work until piece measures 13-14-14-15-16-17-18 cm = 5⅛"-5½"-5½"-6"-6¼"-6¾"-7", measured from marker along armhole, finish with a row from right side. Cut the yarn, slip stitches on a thread or stitch holder, now work left front piece along the left shoulder from back piece - read explanation below. LEFT FRONT PIECE: Find left shoulder on back piece as follows: Place back piece flat with right side up, place back piece so that stitches on thread/stitch holder is towards you, left side of piece = left shoulder. Now pick up stitches along left diagonal shoulder on back piece - begin from right side at the neck and pick up stitches out towards the armhole as follows: Pick up 1 stitch in every worked row inside outermost stitch, pick in addition up 3 stitches down along the side on back piece = 29-29-31-31-35-35-35 stitches. All length measurements on front piece are done from pick-up edge. ROW 1 (= wrong side): Purl and increase at the same time 5-5-6-6-5-5-5 stitches evenly = 34-34-37-37-40-40-40 stitches. ROW 2 (= right side): Knit 3, purl 2, A.2, purl 9-9-9-9-10-10-10, A.2, purl 2-2-3-3-3-3-3, work 3-3-5-5-7-7-7 stitches A.1, knit 3. ROW 3 (= wrong side): Purl 3, work 3-3-5-5-7-7-7 stitches A.1, knit 2-2-3-3-3-3-3, A.2, knit 9-9-9-9-10-10-10, A.2, knit 2, purl 3. Work 2nd and 3rd ROW until A.2 has been worked vertically, piece measures approx. 8 cm = 3⅛" (next row is from right side). Now increase for neck. INCREASE FOR NECK: ROW 1 (= right side): Work the first 3 stitches in A.4, increase 1 stitch towards the left – remember INCREASE TIP-1, work the rest of A.4, work A.3 over stitches in A.2, purl 2-2-3-3-3-3-3, work 3-3-5-5-7-7-7 stitches A.1, knit 3. ROW 2 (= wrong side): Work the established pattern - work the increased stitches in pattern as shown in A.4, i.e. increase for neck inside 3 stitches in stockinette stitch towards the neck. Work 1st and 2nd ROW 6 times in total (= 12 rows have been worked) = 40-40-43-43-46-46-46 stitches. On first row from wrong side after last increase for neck, cast 12-12-13-13-14-14-14 new stitches at the end of row = 52-52-56-56-60-60-60 stitches. Turn piece and work as follows from right side: work 7 stitches BAND WITH I-CORD – read explanation above, continue established pattern the rest of row AT THE SAME TIME increase 1 stitch towards the left after the first 8 stitches in A.4 = 53-53-57-57-61-61-61 stitches. Work until A.4 has been worked vertically. Then work pattern as follows: ROW 1 (= right side): 7 stitches band with I-cord, purl 2-2-3-3-3-3-3, work A.3, A.5, A.3, purl 2-2-3-3-3-3-3, work 3-3-5-5-7-7-7 stitches A.1, knit 3. ROW 2 (= wrong side): Purl 3, work 3-3-5-5-7-7-7 stitches A.1, knit 2-2-3-3-3-3-3, work A.3, A.5, A.3, knit 2-2-3-3-3-3-3, 7 stitches band with I-cord. Work 1st and 2nd ROW until piece measures 22-21-24-23-24-20-16 cm = 8¾"-8¼"-9½"-9"-9½"-8"-6¼" from pick-up edge, now increase in the side for armholes. INCREASE FOR ARMHOLES: ROW 1 (= right side): Work as before until 3 stitches remain towards the side, increase 1 stitch towards the right - read INCREASE TIP-1, knit 3. ROW 2 (= wrong side): Work as before (work the increased stitches in A.1). Work 1st and 2nd ROW 3-5-4-6-6-11-16 times in total (= 6-10-8-12-12-22-32 rows worked – note that more stitches are increased on front piece than on back piece because cables contract the piece) = 56-58-61-63-67-72-77 stitches. Work until piece measures approx. 25-26-28-29-30-31-32 cm = 9¾"-10¼"-11"-11⅜"-11¾"-12¼"-12½", measured from pick-up edge at the top of front piece, adjust with a row from right side, but adjust to finish on the same place in A.1 as on back piece so that the pattern fits when the parts are placed together (outermost stitch in the side on back piece and front piece must both either be knit or purl). Cut the yarn, slip stitches on a thread or stitch holder, now work right front piece along the right shoulder from back piece - read explanation below. RIGHT FRONT PIECE: Now pick up stitches along right diagonal shoulder on back piece - begin from right side at the armhole and pick up stitches in towards the neck as follows: NOTE! Begin 3 stitches down on back piece, pick up 3 stitches along the side on back piece, then pick up 1 stitch in every worked row inside outermost stitch = 29-29-31-31-35-35-35 stitches. All length measurements on front piece are done from pick-up edge. ROW 1 (= wrong side): Purl and increase at the same time 5-5-6-6-5-5-5 stitches evenly = 34-34-37-37-40-40-40 stitches. ROW 2 (= right side): Knit 3, work 3-3-5-5-7-7-7 stitches A.1, purl 2-2-3-3-3-3-3, A.6, purl 9-9-9-9-10-10-10, A.6, purl 2, knit 3. ROW 3 (= wrong side): Purl 3, knit 2, A.6, knit 9-9-9-9-10-10-10, A.6, knit 2-2-3-3-3-3-3, work 3-3-5-5-7-7-7 stitches A.1, purl 3. Work 2nd and 3rd ROW until A.6 has been worked vertically, piece measures approx. 8 cm = 3⅛" (next row is from right side). Now increase for neck. INCREASE FOR NECK: ROW 1 (= right side): Knit 3, work 3-3-5-5-7-7-7 stitches A.1, purl 2-2-3-3-3-3-3, work A.7 over stitches in A.6, work A.8 until 3 stitches remain on row, increase 1 stitch towards the right – remember INCREASE TIP-1, work the last 3 stitches in A.8. ROW 2 (= wrong side): Work the established pattern - work the increased stitches in pattern as shown in A.8, i.e. increase inside 3 stitches in stockinette stitch towards the neck. Work 1st and 2nd ROW 6 times in total (= 12 rows have been worked) = 40-40-43-43-46-46-46 stitches. On first row from right side after last increase for neck, cast on 12-12-13-13-14-14-14 new stitches at the end of row = 52-52-56-56-60-60-60 stitches. Turn piece and work as follows from the wrong side: 7 stitches band with I-cord, continue established pattern the rest of row AT THE SAME TIME increase 1 stitch towards the right after the first 8 stitches in A.8 = 53-53-57-57-61-61-61 stitches. A.8 is now finished vertically. Then work pattern as follows: ROW 1 (= right side): Knit 3, work 3-3-5-5-7-7-7 stitches A.1, purl 2-2-3-3-3-3-3, work A.7, A.9, A.7, purl 2-2-3-3-3-3-3, 7 stitches band as before. ROW 2 (= wrong side): 7 stitches band as before, knit 2-2-3-3-3-3-3, work A.7, A.9, A.7, knit 2-2-3-3-3-3-3, work 3-3-5-5-7-7-7 stitches A.1, purl 3. Work 1st and 2nd ROW until piece measures 22-21-24-23-24-20-16 cm = 8¾"-8¼"-9½"-9"-9½"-8"-6¼" from pick-up edge, now increase in the side for armholes. INCREASE FOR ARMHOLES: ROW 1 (= right side): Knit 3, increase 1 stitch towards the left, work as before the rest of row. ROW 2 (= wrong side): Work as before (work the increased stitches in A.1). Work 1st and 2nd ROW 3-5-4-6-6-11-16 times in total (= 6-10-8-12-12-22-32 rows have been worked) = 56-58-61-63-67-72-77 stitches. Work until piece measures 25-26-28-29-30-31-32 cm = 9¾"-10¼"-11"-11⅜"-11¾"-12¼"-12½", measured from pick-up edge at the top of front piece, finish with a row from right side - adjust the same way as on left front piece. Now put front pieces and back piece together for body as explained below. Now measure the piece from here. BODY: Work first row from wrong side - begin with stitches from right front piece and work as follows: Work the first 53-55-58-60-64-69-74 stitches from right front piece as before (3 stitches remain), work the last 3 stitches in A.1, cast on 1-1-1-3-3-3-5 new stitches at the end of row (= in the side mid under sleeve), continue A.1 over all the 79-83-89-95-101-111-119 stitches from back piece, cast on 1-1-1-3-3-3-5 new stitches (= in the side mid under sleeve), work the first 3 stitches from left front piece in A.1, and work the remaining 53-55-58-60-64-69-74 stitches on left front piece as before = 193-201-213-227-241-261-283 stitches on row. Now measure piece from here! Work back and forth from mid front over all stitches as before (work the new stitches under each sleeve in A.1). Work until piece measures approx. 28-29-29-29-30-30-31 cm = 11"-11⅜"-11⅜"-11⅜"-11¾"-11¾"-12¼" from armhole. On next row from right side begin rib while AT THE SAME TIME increasing 14-14-18-22-24-26-28 stitches evenly on row (do not increase over bands – adjust increase so that 6 of the increased stitches are placed with 1 stitch increased in the middle of each cable on front pieces, increase the remaining 8-8-12-16-18-20-22 stitches over A.1 on back piece) = 207-215-231-249-265-287-311 stitches, work as follows: Switch to circular needle size 4 MM = US 6 and work band as before, work rib (= knit 1/purl 1) until 8 stitches remain, knit 1 and band as before. Continue rib back and forth like this for 4-4-4-5-5-6-6 cm = 1½"-1½"-1½"-2"-2"-2⅜"-2⅜". Bind off - you can use Italian bind-off. Jacket measures approx. 54-56-58-60-62-64-66 cm = 1½"-1½"-1½"-2"-2"-2⅜"-2⅜", measured furthest in towards the neck. SLEEVES: Sleeve is worked from the armhole and down. Place piece flat and insert 1 marker at the top of armhole = mid on top shoulder (NOTE! Mid on top shoulder is not the same place as stitches were picked up for front piece but approx. 6-7 cm = 2⅜"-2¾" down on front piece). Pick up stitches around the armhole, use circular needle size 4 MM = US 6 and begin in the middle stitch cast on under sleeve - pick up 56-58-62-70-72-78-82 stitches – adjust to pick up same number of stitches on each side of marker. Switch to circular needle size 5.5 MM = US 9. Now work A.1 back and forth with short rows over sleeve cap to get a better shape on sleeve, begin round mid under sleeve and work as follows: ROW 1 (= right side): Knit from mid under sleeve until 8-8-10-10-10-12-12 stitches remain before marker on top of shoulder, work A.1 over the next 16-16-20-20-20-24-24 stitches, turn piece – read KNITTING TIP. ROW 2 (= wrong side): Work A.1 over the first 20-20-24-24-24-28-28 stitches, work stitches in A.1, turn piece. ROW 3 (= right side): Work A.1 until 4-4-4-6-6-6-4 stitches have been worked past previous turn, turn piece. ROW 4 (= wrong side): Work A.1 until 4-4-4-6-6-6-4 stitches have been worked past previous turn, turn piece. ROW 5 (= right side): Work A.1 until 2-2-2-2-2-2-2 stitches have been worked past previous turn, turn piece. ROW 6 (= wrong side): Work A.1 until 2-2-2-2-2-2-2 stitches have been worked past previous turn, turn piece. Repeat ROWS 5 and 6. Work until 12-14-14-16-16-18-24 turns have been done in total (= 6-7-7-8-8-9-12 times in each side and last row is worked from wrong side). AFTER LAST TURN: The last time 6th row is worked finish row by turning piece, then work from right side until beginning of round (mid under sleeve), work stitches in A.1. Insert 1 marker in the middle stitch mid under sleeve, marker is used when decreasing stitches under sleeve. Move marker upwards when working. Now work A.1 in the round over all stitches while AT THE SAME TIME decreasing under sleeve, read DECREASE TIP and decrease like this: When sleeve measures 1 cm = ⅜" measured mid under sleeve, decrease 2 stitches 2-2-2-3-3-4-4 times on every other round, then decrease 2 stitches 4-4-5-7-7-7-8 times every 2-2-2-1½-1½-1½-1½ cm = ¾"-¾"-¾"-½"-½"-½"-½" = 44-46-48-50-52-56-58 stitches on row. Work until sleeve measures 47-48-47-47-45-45-46 cm = 18½"-19"-18½"-18½"-17¾"-17¾"-18" from mid on top shoulder. Switch to double pointed needles size 4 MM = US 6 and work rib (= knit 1/purl 1) while AT THE SAME TIME increasing 10 stitches evenly in all sizes on 1st round = 54-56-58-60-62-66-68 stitches. When rib measures 4-4-4-5-5-6-6 cm = 1½"-1½"-1½"-2"-2"-2⅜"-2⅜" bind off - you can use Italian bind-off. Sleeve measures approx. 51-52-51-52-50-51-52 cm = 20"-20½"-20"-20½"-19¾"-20"-20½" from mid on top of shoulder. NECK EDGE: Use circular needle size 4 MM = US 6 and 1 strand of each quality (= 2 strands). Begin from right side mid front and pick up approx. 93-93-101-101-105-105-105 stitches around the neck inside outermost stitch – number of stitches must be divisible by 2 + 1, make sure to pick up 1 stitch in each of the 2 outermost stitches on band and 2 stitches in each of the next 5 stitches in band (to avoid the neck edge from contracting the band). Work first row as follows from wrong side: Work the first 2 stitches in band as before, work rib (= purl 1/knit 1) until 3 stitches remain, purl 1, work the last 2 stitches in band as before. Work next row as follows from right side: Work the first 2 stitches in band as before, work rib (= knit 1/purl 1) until 3 stitches remain, knit 1, work the last 2 stitches in band as before. Continue neck edge like this but after approx. 1-1½ cm = ⅜"-½" bind off for 1 buttonhole over the other buttonholes on right band. Continue until neck edge measures 4-4-5-5-6-6-6 cm = 1½"-1½"-2"-2"-2⅜"-2⅜"-2⅜". Bind off - you can use Italian bind-off. ASSEMBLY: Sew buttons on to left front piece. |
||||||||||||||||||||||
Diagram explanations |
||||||||||||||||||||||
|
||||||||||||||||||||||
 |
||||||||||||||||||||||
 |
||||||||||||||||||||||
 |
||||||||||||||||||||||
 |
||||||||||||||||||||||
 |
||||||||||||||||||||||
 |
||||||||||||||||||||||
 |
||||||||||||||||||||||
Have you finished this pattern?Tag your pictures with #dropspattern #stoneveilcardigan or submit them to the #dropsfan gallery. Do you need help with this pattern?You'll find 38 tutorial videos, a Comments/Questions area and more by visiting the pattern on garnstudio.com. © 1982-2026 DROPS Design A/S. We reserve all rights. This document, including all its sub-sections, has copyrights. Read more about what you can do with our patterns at the bottom of each pattern on our site. |
||||||||||||||||||||||


With over 40 years in knitting and crochet design, DROPS Design offers one of the most extensive collections of free patterns on the internet - translated to 17 languages. As of today we count 324 catalogs and 12291 patterns - 12281 of which are translated into English (US/in).
We work hard to bring you the best knitting and crochet have to offer, inspiration and advice as well as great quality yarns at incredible prices! Would you like to use our patterns for other than personal use? You can read what you are allowed to do in the Copyright text at the bottom of all our patterns. Happy crafting!
Post a comment to pattern DROPS 263-10
We would love to hear what you have to say about this pattern!
If you want to leave a question, please make sure you select the correct category in the form below, to speed up the answering process. Required fields are marked *.