
Popular categories
Looking for a yarn?


Comments / Questions (208)
![]() Eline Vangeel wrote:
Eline Vangeel wrote:
Ik heb een vraagje over het minderen in de mouw. Doe ik dat telkens op dezelfde plaats ? Of verspreid ik de minderingen ? Bij tips lees ik: de steken die niet in een kabel passen worden recht gebreid. Kunt u dit even toelichten? Dankjewel!
30.12.2024 - 19:45DROPS Design answered:
Dag Eline,
Je mindert aan elke kant van de markeerdraad midden onder de mouw. Door het minderen wordt het patroon verbroken. De steken die je door het minderen niet meer in patroon kunt breien onder de mouw, brei je in tricotsteek.
01.01.2025 - 15:55
![]() LAURA wrote:
LAURA wrote:
Est-il possible et adapté de tricoter ce modèle avec la laine Drops Air ? Merci d'avance !
29.12.2024 - 11:23DROPS Design answered:
Bonjour Laura, oui, vous pouvez tricoter ce modèle avec un seul fil DROPS AIR pour remplacer DROPS Alpaca + DROPS Kid-Silk. Bon tricot!
29.12.2024 - 11:32
![]() Magdalena wrote:
Magdalena wrote:
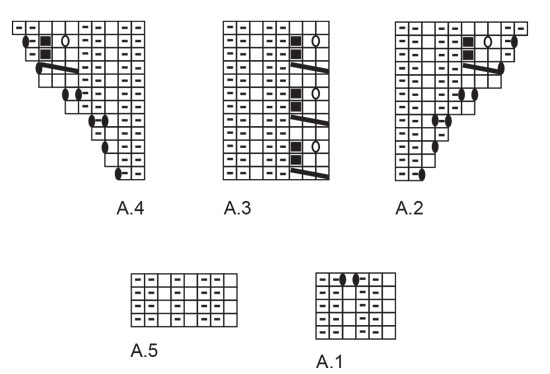
Czy ten opis jest: KARCZEK: Dalej przerabiać na okrągło następująco: nabrać 1 oczko z nitki poprzecznej między 2 oczkami poprzedniego okrążenia (wszystkie nabrane oczka są przerabiane przekręcone na lewo), przerobić 1 oczko prawe (= reglan), nabrać 1 oczko z nitki poprzecznej między 2 oczkami poprzedniego okrążenia jest ujęty w schematach? Czy to są te dodatkowe oczka?
27.12.2024 - 08:59DROPS Design answered:
Witaj Magdaleno, zobacz na górze część REGLAN. Jest tam informacja, że dodawanie oczek jest uwzględnione w schematach. Pozdrawiamy!
28.12.2024 - 17:15
![]() Magdalena wrote:
Magdalena wrote:
Czy w każdym okrążeniu dodajemy oczka przy reglanie? Czy w co drugim rzędzie?
25.12.2024 - 11:25DROPS Design answered:
Witaj Magdaleno, oczka przy reglanie są dodawane co 2 okrążenia - patrz schematy A.2 i A.4. Innymi słowy dodawanie oczek jest uwzględnione w schematach A.2 i A.4, czyli dodajesz oczka przy reglanach trzymając się schematów. Pozdrawiamy!
28.12.2024 - 17:48
![]() Charlotte wrote:
Charlotte wrote:
Hvad gør jeg med de 13 nyopslåede masker under ærmet, og så har jeg 4 masker fra raglanlinjen. To på hver side af de 13 masker. Jeg kan ikke få det til at gå op med A3 mønsteret. Hvordan skal man sætte det sammen med mønsteret. Det giver 17 masker? Samt kan jeg ikke forstå hvordan det kan flyde over i mønsteret på for/bagstykket?
22.12.2024 - 17:51DROPS Design answered:
Hei Charlotte. Vi skal hjelpe deg så godt vi kan, men hvilken størrselse strikker du og stemmer maskeantallet ditt med det som står i oppskriften når du skal dele bærestykket til bol og ermer? mvh DROPS Design
03.01.2025 - 08:19
![]() Nadine wrote:
Nadine wrote:
Hoe neem je een steek op van de vorige naald, zoals hieronder beschreven? Dit is al eerder door iemand gevraagd, maar de vraag werd verkeerd begrepen. PAS: Ga verder in de rondte als volgt: Neem 1 steek op van de vorige naald (alle opgenomen steken worden gedraaid averecht gebreid), 1 recht ( = raglanlijn), neem 1 steek op vanaf de vorige naald, brei A.2, A.3 over de volgende 24 steken,
20.12.2024 - 20:42
![]() Magdalena wrote:
Magdalena wrote:
Witam. Proszę o wyjaśnienie. Mam zrobiony ściągacz ze 108 oczek początkowych. Następnie w opisie pojawiają się 144 oczka, kiedy dodaje się te 36 oczka?
19.12.2024 - 08:06DROPS Design answered:
Witaj Magdo, te oczka są dodane podczas przerabiania ostatniego okrążenia schematu A.1 (dodane 2 oczka w każdym schemacie A.1). Pozdrawiamy!
19.12.2024 - 10:20
![]() Charlotte Kristensen wrote:
Charlotte Kristensen wrote:
Jeg skal til at strikke første runde efter ribkanten. Jeg kan dog ikke forstå hvad jeg skal gøre i A3, når den vil have jeg skal løfte en maske løst af, for det vil sige det omslag jeg lavede omgangen inden skal løftes løst af, men i instruksen ved A1 stod der at jeg skulle strikke den drejet ret omgangen efter. Hvilken instruks skal jeg så følge?
16.12.2024 - 16:38DROPS Design answered:
Hej, når du strikker ifølge diagrammet, så skal du følge diagramforklaringen: = tag 1 maske løst af pinden, strik 2 masker ret, løft den løse maske over maskerne som blev strikket. Se også videoen hvor vi viser hvordan man strikker det lille hulmønster :)
17.12.2024 - 14:07
![]() Claudia wrote:
Claudia wrote:
Guten Morgen, Raglanzunahme ist immer beidseits, richtig? Es gibt im Diagramm mal eine Zunahme: Reihe 1,3,9 und 11 Und in Reihe 5 nd 7 sind 2 Zunahmen ei gezeichnet, d.h hier nehme ich insgesamt 3 Maschen ( Raglanzunahme 2Maschen zzgl. 1 Mache) zu, richtig? Danke und Gruß
15.12.2024 - 11:00DROPS Design answered:
Liebe Claudia, die RAglanzunahmen sind in den Diagramme gezeichnet, dh bei der 1., 3.. 9. und 11. Reihe nehmen Sie 1 Masche zu und bei der 5. und 7. nehmen Sie 2 Maschen zu. Vile Spaß beim Stricken!
16.12.2024 - 10:42
![]() Lise Hebert wrote:
Lise Hebert wrote:
Dans le 1 er rang d’augmentation et diminution pour terminer une séquence c’est à dire Tricoter À 3 au dessus des 24 mailles suivantes (donc 3 fois, 3 diminutions Ensuite terminé avec 3 premières mailles de A3 (donc 1 diminution) C’est bien ça que je comprends Alors au total c’est bien 18 diminution , Alors s’il me reste 142 mailles sur ma broche Je serais correct, Si j’ai bien compris
13.12.2024 - 21:38DROPS Design answered:
Bonjour Mme Hebert, vous tricotez effectivement 8 fois A.3 sur les 24 m suivantes, mais comptez toujours le nombre de mailles de A.3 comme s'il y en avait 8, mais lorsque vous tricotez le 1er rang de A.3, vous diminuez 1 m, il restera ainsi seulement 7 mailles dans chaque A.3. Bon tricot!
16.12.2024 - 09:48
|
|||||||||||||||||||
Winter Pearl Sweater#winterpearlsweater |
|||||||||||||||||||
 |
 |
||||||||||||||||||
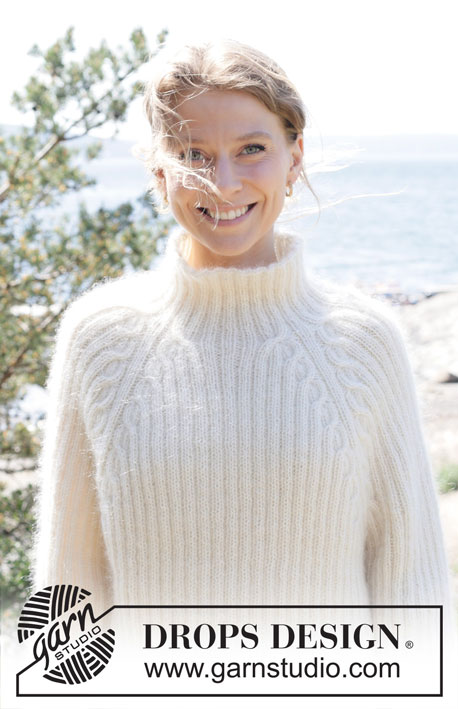
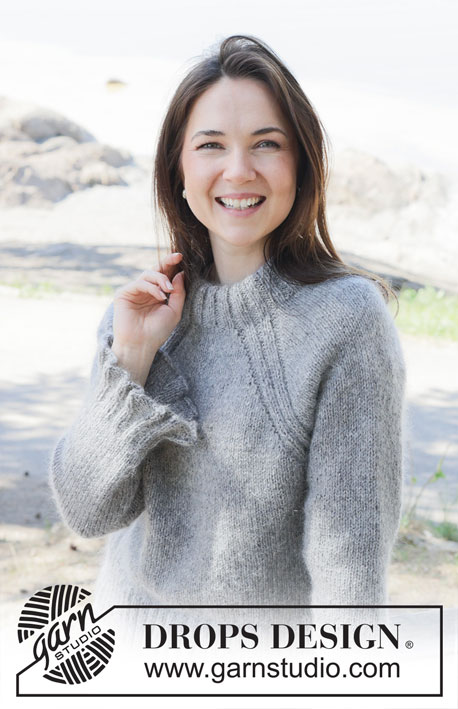
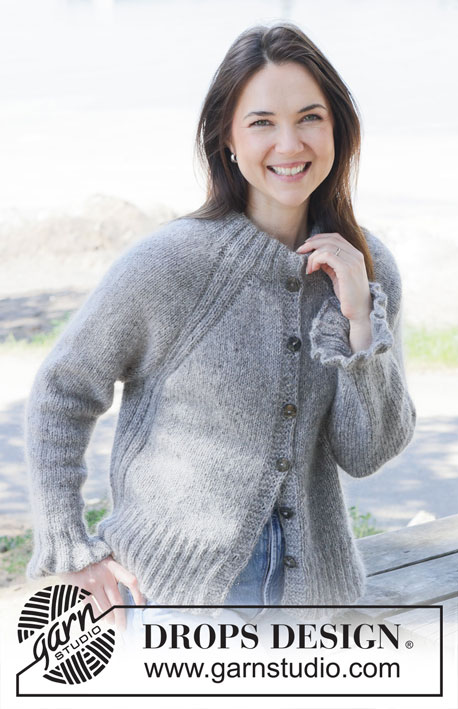
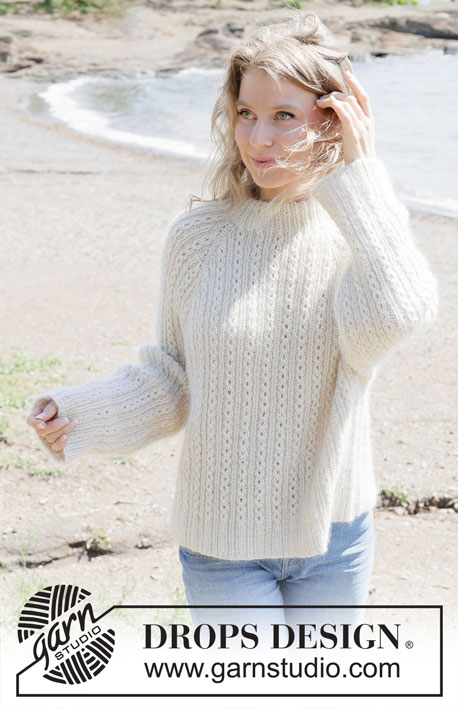
Knitted sweater in DROPS Alpaca and DROPS Kid-Silk. The piece is worked top down with double neck, raglan and cables. Sizes S - XXXL.
DROPS 255-1 |
|||||||||||||||||||
|
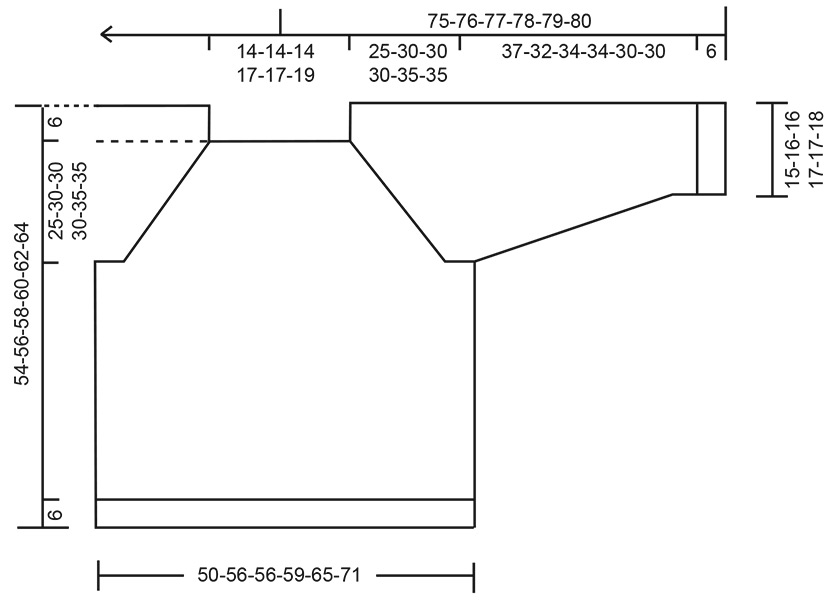
------------------------------------------------------- EXPLANATIONS FOR THE PATTERN: ------------------------------------------------------- PATTERN: See diagrams A.1 to A.5. A.3 is always counted as 8 stitches. RAGLAN: Increase for raglan before/after 1 purled + 1 knitted + 1 purled stitch (= raglan-line). The increased stitches are worked into the pattern. The increases are marked in the diagrams. DECREASE TIP (for sleeves): Decrease by purling 2 together on each side of 1 knitted stitch (= 2 decreased stitches). The stitches which do not fit into a complete cable are knitted. ----------------------------------------------------- START THE PIECE HERE: ------------------------------------------------------- SWEATER – SHORT OVERVIEW OF THE PIECE: The pattern uses both long and short needles; start with the length which fits the number of stitches and change when necessary. The neck and yoke are worked in the round with circular needle, top down and from the right back shoulder. When the yoke is finished, it is divided for the body and sleeves and the body continued in the round, while the sleeves wait. The sleeves are worked top down, in the round. The neck is folded double and fastened to the inside. DOUBLE NECK: Cast on 108-108-108-120-120-132 stitches with circular needle size 3 MM = US 2.5 and 1 strand of each quality (= 2 strands). Work rib according to A.1 in the round. Repeat the first 4 rounds of A.1 until the rib measures 9-9-9-11-11-11 cm = 3½"-3½"-3½"-4⅜"-4⅜"-4⅜"; the neck is later folded double. Change to circular needle size 4.5 MM = US 7 and work the last round in A.1 (yarn overs knitted twisted on the next round) = 144-144-144-160-160-176 stitches. Insert 1 marker after the first 52-52-52-57-57-61 stitches (approx. mid-front); the piece is measured from here. YOKE: Continue in the round as follows: Pick up 1 stitch from the previous round (all picked-up stitches are purled twisted), knit 1 ( = raglan-line), pick up 1 stitch from the previous round, work A.2, A.3 across the next 24 stitches, work the first 3 stitches in A.3, A.4 (= sleeve), pick up 1 stitch from the previous round, knit 1 (= raglan-line), pick up 1 stitch from the previous round, work A.2, A.3 across the next 32-32-32-40-40-48 stitches, work the first 3 stitches in A.3, A.4 (= front piece), pick up 1 stitch from the previous round, knit 1 (= raglan-line), pick up 1 stitch from the previous round, work A.2, A.3 across the next 24 stitches, work the first 3 stitches in A.3, work A.4 (= sleeve) pick up 1 stitch from the previous round, knit 1 (= raglan-line), pick up 1 stitch from the previous round, work A.2, A.3 across the next 32-32-32-40-40-48 stitches, work the first 3 stitches in A.3, A.4 (= back piece). NOTE! Make sure the pattern matches the rib. The increases for raglan are marked in the diagrams, you have picked up 8 extra stitches = 160-160-160-176-176-192 stitches. RAGLAN: Increase as shown in the diagrams, increasing on each side of 1 purled + 1 knitted + 1 purled stitch in each raglan-line. Each time A.2 and A.4 are finished in height, there is room for 2 more repeats of A.3 in width. Continue with pattern and increases until A.2, A.3 and A.4 have been worked a total of 3-4-4-4-5-5 times in height. There are 344-408-408-424-488-504 stitches. Now increase only on the front and back pieces; the increases on the sleeves are finished. Work 2 more repeats in height with increases as shown in A.2 and A.4 on the front and back pieces, continuing the pattern on the sleeves without further increases. There are 408-472-472-488-552-568 stitches. Continue working without further increases until the yoke measures 25-30-30-30-35-35 cm = 9¾"-11¾"-11¾"-11¾"-13¾"-13¾" from the marker mid-front. DIVIDE FOR BODY AND SLEEVES: Work the next round as follows: Work the first 2 stitches (belong to back piece), place the next 81-97-97-97-113-113 stitches on a thread for the sleeve, cast on 13-13-13-13-13-21 stitches (in side under sleeve), work 123-139-139-147-163-171 stitches (front piece), place the next 81-97-97-97-113-113 stitches on a thread for the sleeve, cast on 13-13-13-13-13-21 stitches (in side under sleeve), work the remaining 121-137-137-145-161-169 stitches (back piece). BODY: = 272-304-304-320-352-384 stitches. Continue the pattern in the round until the piece measures 42-44-46-48-50-52 cm = 16½"-17¼"-18"-19"-19¾"-20½" from the marker mid-front. Change to circular needle size 3 MM = US 2.5 and work rib according to A.5 for 6 cm = 2⅜", make sure you have knit 1, purl 1, knit 1 across the cables and knit over knit and purl over purl otherwise. Bind off. The sweater measures approx. 48-50-52-54-56-58 cm = 19"-19¾"-20½"-21¼"-22"-22¾" from the marker and 54-56-58-60-62-64 cm = 21¼"-22"-22¾"-23⅝"-24⅜"-25¼" from the shoulder. SLEEVES: Place the 81-97-97-97-113-113 sleeve-stitches from the thread on one side of the piece on circular needle size 4.5 MM = US 7 and knit up 1 stitch in each of the 13-13-13-13-13-21 stitches cast on under the sleeve + 1 extra stitch on each side = 96-112-112-112-128-136 stitches. Insert a marker-thread mid-under sleeve. Continue the pattern from the yoke, in the round. When the sleeve measures 4 cm = 1½", decrease 2 stitches under the sleeve – read DECREASE TIP. Decrease like this every 4-2-2-2½-1-1 cm = 1½"-¾"-¾"-1"-⅜"-⅜" a total of 8-14-13-11-18-20 times = 80-84-86-90-92-96 stitches. Continue working until the sleeve measures 37-32-34-34-30-30 cm = 14½"-12½"-13⅜"-13⅜"-11¾"-11¾". Change to double pointed needles size 3 MM = US 2.5. Work rib as shown in A.5 for 6 cm = 2⅜", make sure you have knit 1, purl 1, knit 1 across the cables and knit over knit and purl over purl otherwise. Bind off. The sleeve measures approx. 43-38-40-40-36-36 cm = 17"-15"-15¾"-15¾"-14¼"-14¼" from the division. ASSEMBLY: Fold the neck double to the inside and sew down. Make sure the seam is elastic to avoid the neck being tight. |
|||||||||||||||||||
Diagram explanations |
|||||||||||||||||||
|
|||||||||||||||||||
 |
|||||||||||||||||||
 |
|||||||||||||||||||
Have you finished this pattern?Tag your pictures with #dropspattern #winterpearlsweater or submit them to the #dropsfan gallery. Do you need help with this pattern?You'll find 23 tutorial videos, a Comments/Questions area and more by visiting the pattern on garnstudio.com. © 1982-2026 DROPS Design A/S. We reserve all rights. This document, including all its sub-sections, has copyrights. Read more about what you can do with our patterns at the bottom of each pattern on our site. |
|||||||||||||||||||


With over 40 years in knitting and crochet design, DROPS Design offers one of the most extensive collections of free patterns on the internet - translated to 17 languages. As of today we count 324 catalogs and 12290 patterns - 12280 of which are translated into English (US/in).
We work hard to bring you the best knitting and crochet have to offer, inspiration and advice as well as great quality yarns at incredible prices! Would you like to use our patterns for other than personal use? You can read what you are allowed to do in the Copyright text at the bottom of all our patterns. Happy crafting!
Post a comment to pattern DROPS 255-1
We would love to hear what you have to say about this pattern!
If you want to leave a question, please make sure you select the correct category in the form below, to speed up the answering process. Required fields are marked *.