
Popular categories
Looking for a yarn?


Comments / Questions (29)
![]() Dana wrote:
Dana wrote:
Hvordan strikker jeg efter diagrammet, så vidt som jeg kan forstå i opskriften så strikker man rundt på rundpindene, skal jeg bare strikke første række igen og igen hele runden ud?
02.03.2026 - 17:39DROPS Design answered:
Hei Dana. Ja, det stemmer. Og etter 1.runde strikker du 2. rekke på diagrammet (igjen og igjen). mvh DROPS Design
03.03.2026 - 12:51
![]() Natalia wrote:
Natalia wrote:
Buenos días ,para hacer el jersey solo con drops flora, a dos hilos, necesito para talla M , unos 500 gr? He convertido los gr de alpaca y he sumado lo que sale de convertir los de kid silk y los he sumado, es correcto? Gracias.
18.11.2024 - 13:47DROPS Design answered:
Hola Natalia, puedes leer cómo cambiar de hilos en la siguiente lección: https://www.garnstudio.com/lesson.php?id=14&cid=23. Si necesitas 400 gr de Alpaca, entonces el metraje de la labor son: (400gr/50gr en cada ovillo)= 8 ovillos x167 metros en cada ovillo = 1336m. Que serían 7 ovillos de Flora. Como tienes que trabajar con doble hilo de Flora, entonces necesitas el doble de lana, por lo que necesitarías aprox. 14 ovillos o 700gr.
24.11.2024 - 19:31
![]() Margarita wrote:
Margarita wrote:
Hola, al principio de los patrones quando poneis la lana que se utiliza para el modelo seleccionado, poneis dos tipos. Se entiende que son dos opciones a elegir para tejer el modelo?? Que puedes excoger uno u otro en el mismo color?? Gracias
29.08.2024 - 22:48DROPS Design answered:
Hola Margarita, en algunos patrones, en la sección HILOS de los materiales te indicamos dos lanas separadas por O. Esto quiere decir que son dos opciones diferentes para trabajar el modelo. Sin embargo, en este caso dice Y USAR. Eso quiere decir que usas las dos lanas juntas; 1 hilo de cada una de ellas. También puedes ver esto en el apartado grupo de lanas, arriba, donde pone A+A.
31.08.2024 - 20:48
![]() Karin wrote:
Karin wrote:
När man avslutat resårstickningen på framstycket ska man då maska av innan man lägger det åt sidan för att sticka bakstycket? Eller trä upp maskorna på tråd?
17.05.2024 - 21:24DROPS Design answered:
Hei Karin. Sett maskene på en tråd eller en annen strikkepinne. Når bakstykket er ferdig, skal fram og bakstykket settes sammen. mvh DROPS Design
21.05.2024 - 14:08
![]() Lyne wrote:
Lyne wrote:
Ma question sur est: pour ce qui est du diagramme je me demande à s avoir si je comprends bien, j ai 180 donc devant et derrière 90 m chacun a1 je lis le patron de droite à gauche et de bas en haut et ce tricote en rond comme suit 6 m end,1 m end,4 m env,1 m end 4 fois et 6 m end, 2 m env,2 m end,2 m env, 4 fois et 6 m end jusqu’à terminer mes 180 m? Si c est cela mon dessein ne fais pas des petits carreaux comme le patron ou bien je ne comprends pas le diagramme merci. De m aider
02.04.2024 - 20:44DROPS Design answered:
Bonjour Lyne, on lit le diagramme de bas en haut et de droite à gauche, ainsi le 1er rang se tricote à l'endroit, puis les rangs 2 à 5 se tricotent ainsi: *1 m end, 4 m env, 1 m end*, répétez de *à*; le rang 6 se tricote à l'endroit, puis les rangs 7 à 10 se tricotent ainsi: *2 m env, 2 m end, 2 m env*, répétez de *à*. Répétez ces 10 rangs ainsi tant que vous tricotez sur l'endroit. Bon tricot!
03.04.2024 - 08:33
![]() Elaine Wilson wrote:
Elaine Wilson wrote:
I cant find hiw much yarn c I need.
12.03.2024 - 11:54
![]() Corina Avram wrote:
Corina Avram wrote:
Hello Drops Team! I am wondering if it would be a good idea to knit this sweater in 2 strands Flora without the textured pattern, just like a basic jumper. Is it recommended for a good, not too-heavy jumper?
31.01.2024 - 11:12DROPS Design answered:
Dear Mrs Avram, sure, you can also find basic jumpers without textured pattern with the same tension as for 2 strands Flora here. Happy knitting!
01.02.2024 - 07:37
![]() Judith wrote:
Judith wrote:
Dankjewel voor de snelle reactie, maar mijn vraag is nog niet beantwoord: de averechtse naald is de vouwlijn van het halsboord. Ik brei al 5 cm aan de goede kant met een rondbreinaald. Ik veronderstel dat het averecht aan de goede kant moet zijn?
09.12.2023 - 09:57DROPS Design answered:
Dag Judith,
Oh sorry, ik dacht dat je bij de boord aan de onderkant was. Inderdaad een beetje raar om averecht op de verkeerde kant te breien bij de hals; dit moet inderdaad averecht op de goede kant zijn om een vouwrand te maken.
10.12.2023 - 16:23
![]() Melissa wrote:
Melissa wrote:
Bonjour, merci d'avance si vous pouvez me confirmer s'il s'agit bien d'une diminution car je vois le nombre de maille a augmenté par ex pour xs est passé de 110 à 160 comme mentionné dans les instructions: tricoter les mailles du dos à l'endroit en diminuant en même temps 26-28-30-36-40-46 mailles à intervalles réguliers, tricoter les mailles du devant à l'endroit en diminuant en même temps 26-28-30-36-40-46 mailles à intervalles réguliers = 168-180-192-204-228-240 mailles.
08.12.2023 - 23:46DROPS Design answered:
Bonjour Melissa, lorsque vous tricotez le 1er tour du devant et du dos ensemble, vous allez diminuer 52 mailles au total: tricotez les mailles du dos en diminuant 26 mailles (il reste 84 mailles), et tricotez les mailles du devant en diminuant 26 mailles (il reste 84 mailles) vous avez désormais 168 mailles sur l'aiguille. Bon tricot!
11.12.2023 - 07:40
![]() Melissa wrote:
Melissa wrote:
Bonjour, C'est mon premier tricot. Je vous remercie pour les infos. J'ai besoin d'une confirmation pour le montage du devant/dos - s'agit it d'une diminution or augmentation: Tricoter les mailles du dos à l'endroit en diminuant en même temps 26-28-30-36-40-46 mailles à intervalles réguliers, tricoter les mailles du devant à l'endroit en diminuant en même temps 26-28-30-36-40-46 mailles à intervalles réguliers = 168-180-192-204-228-240 mailles. Vous voulez di
08.12.2023 - 23:43
|
||||||||||
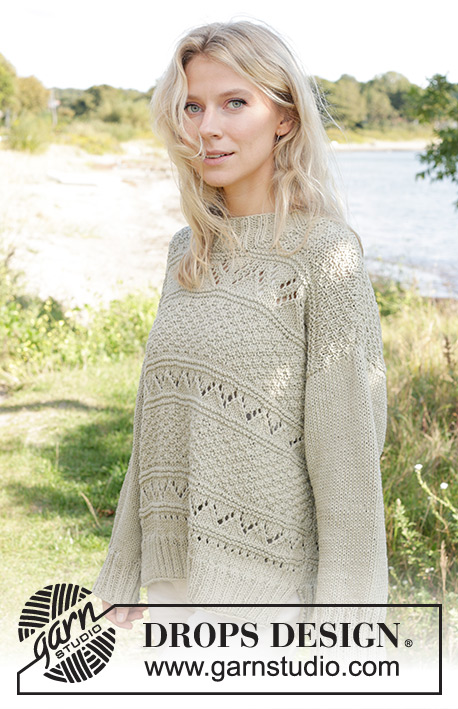
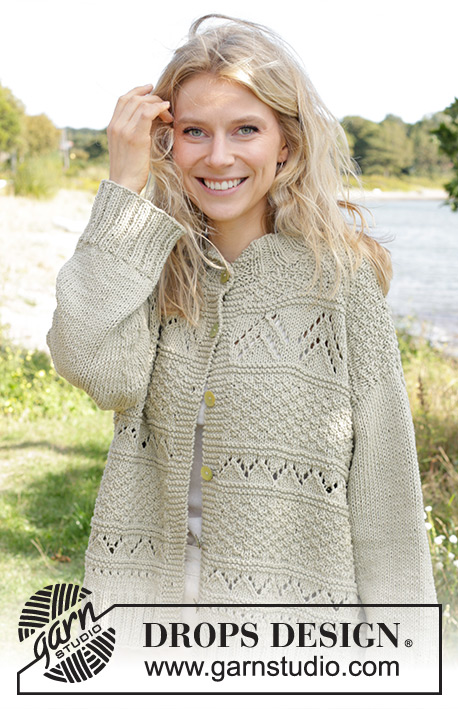
Scottish Thistle Sweater#scottishthistlesweater |
||||||||||
 |
 |
|||||||||
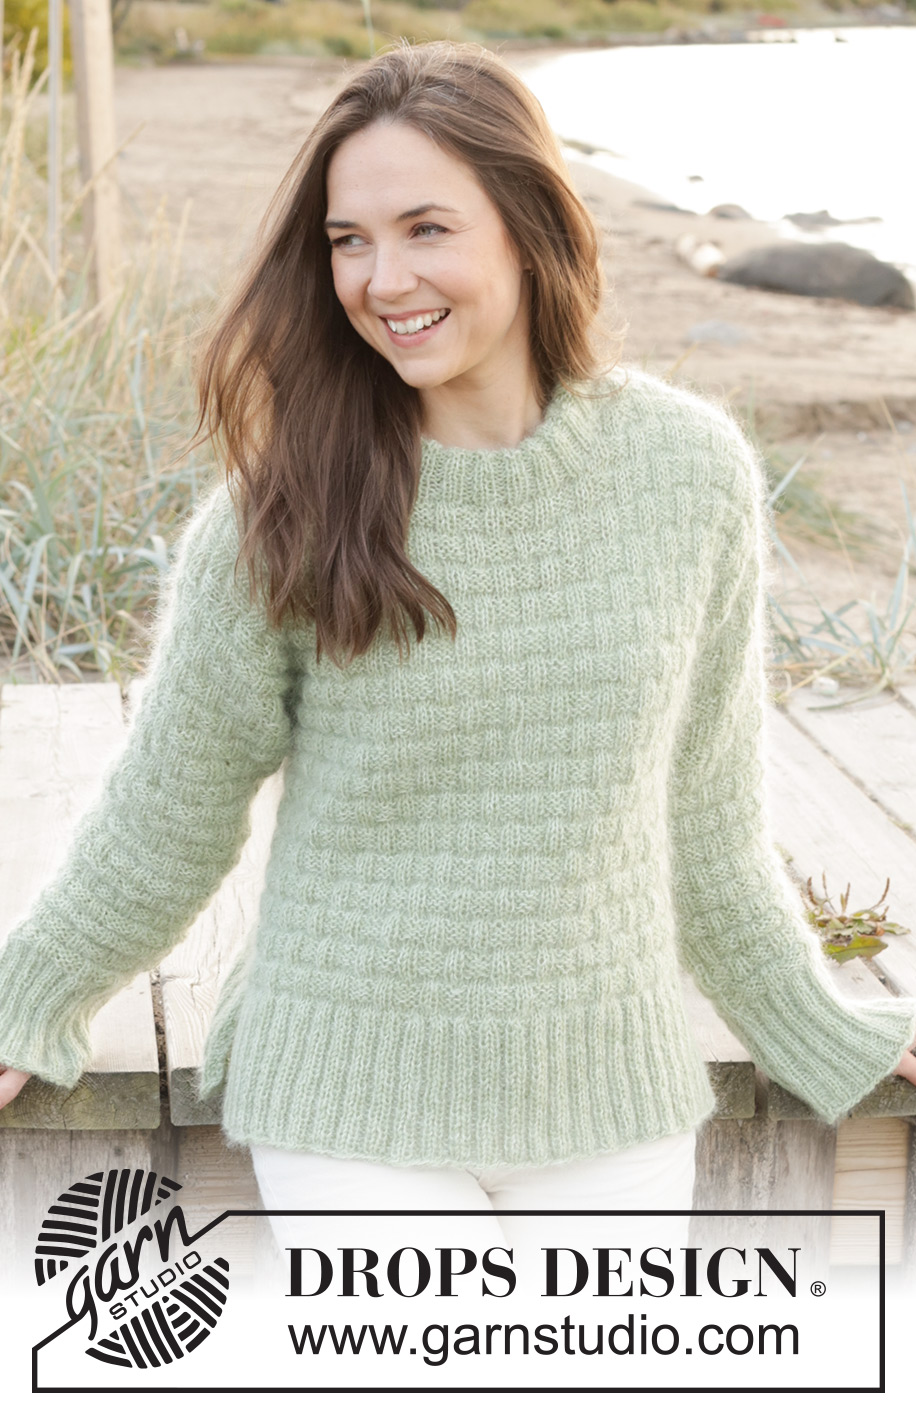
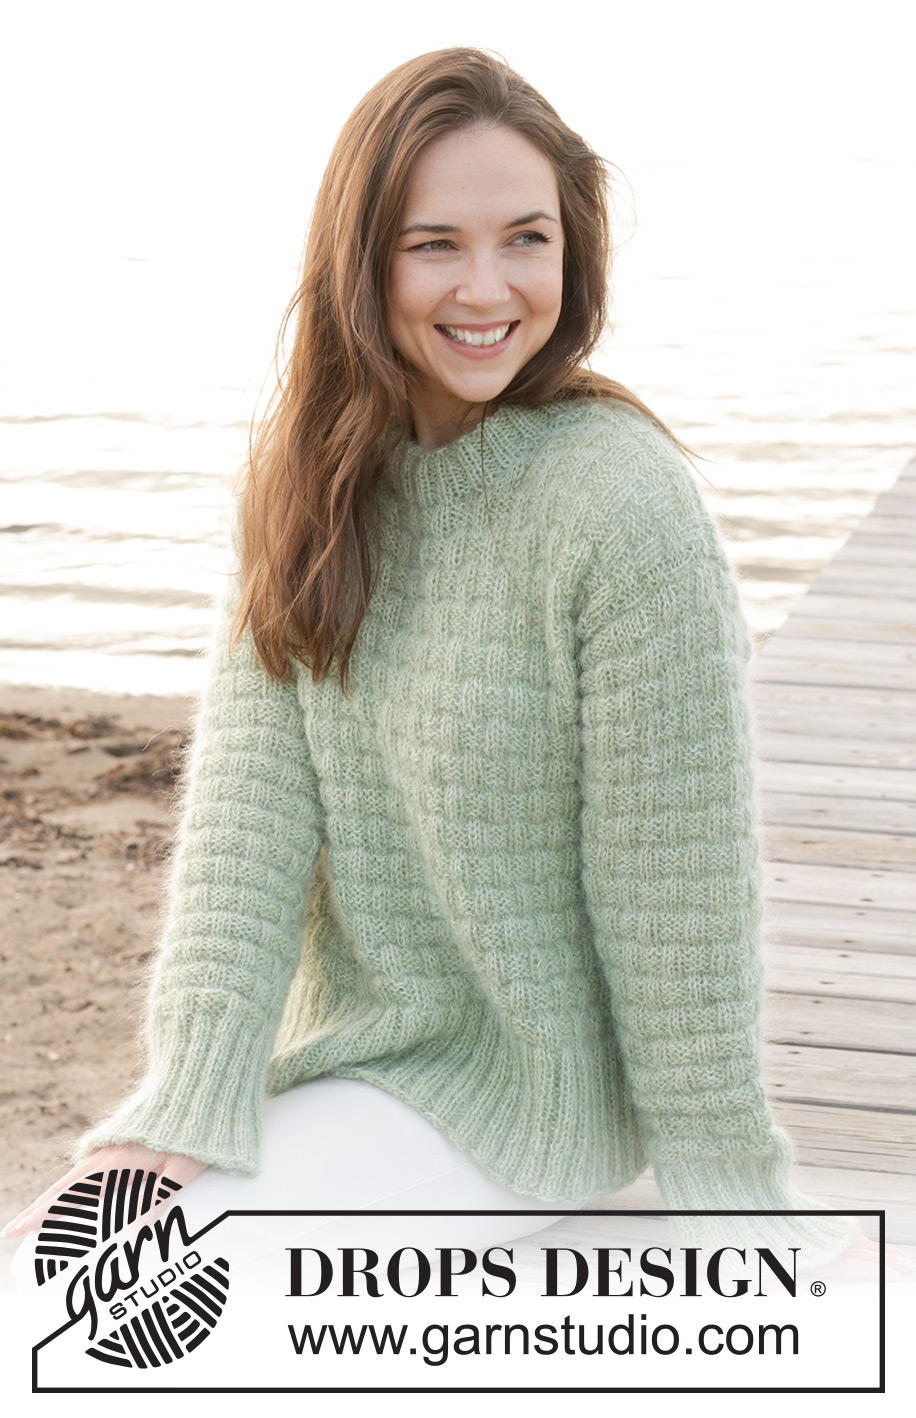
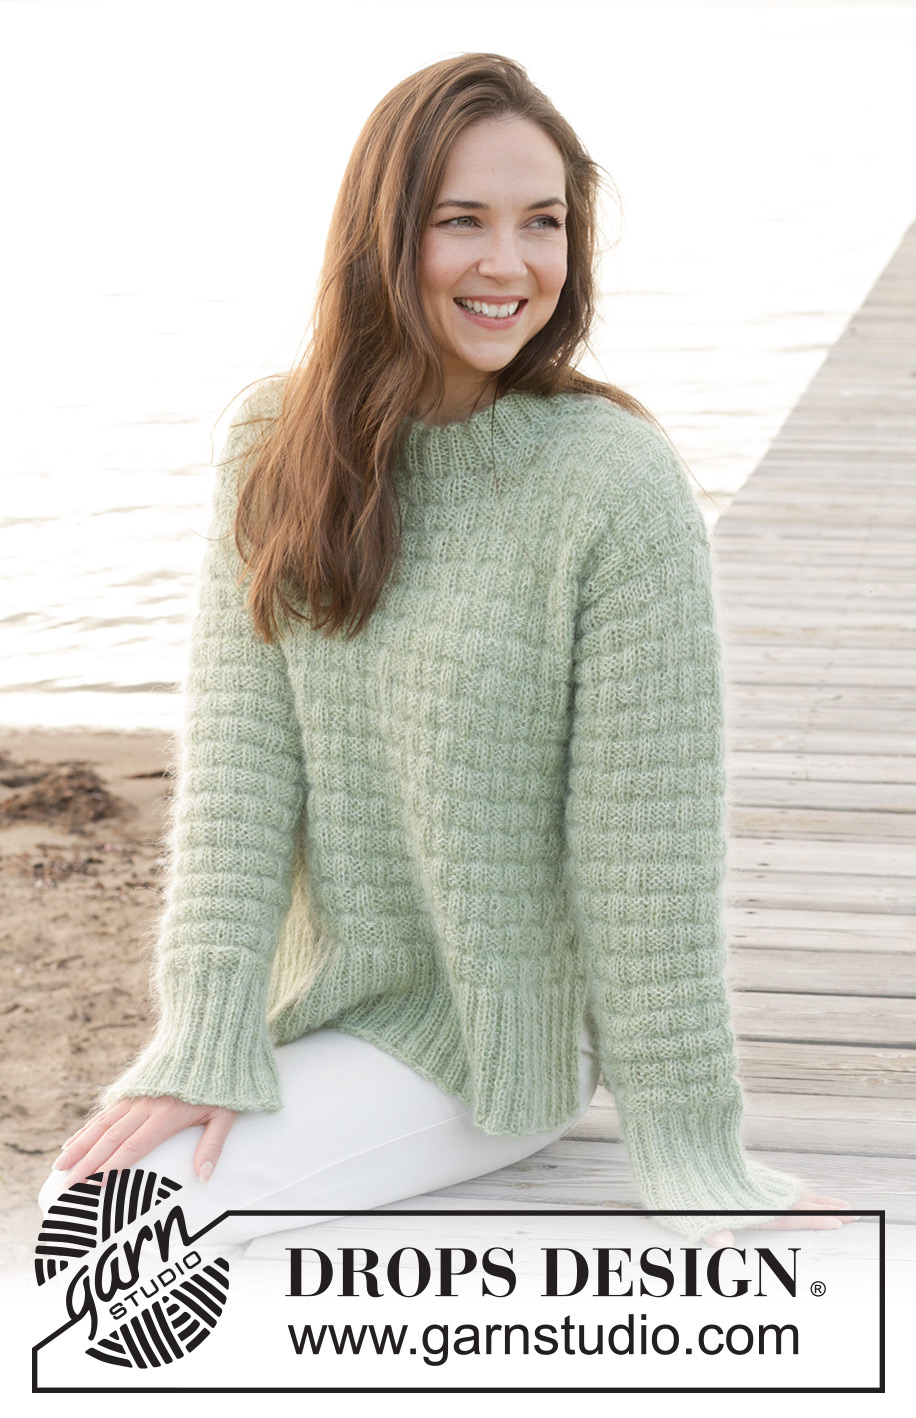
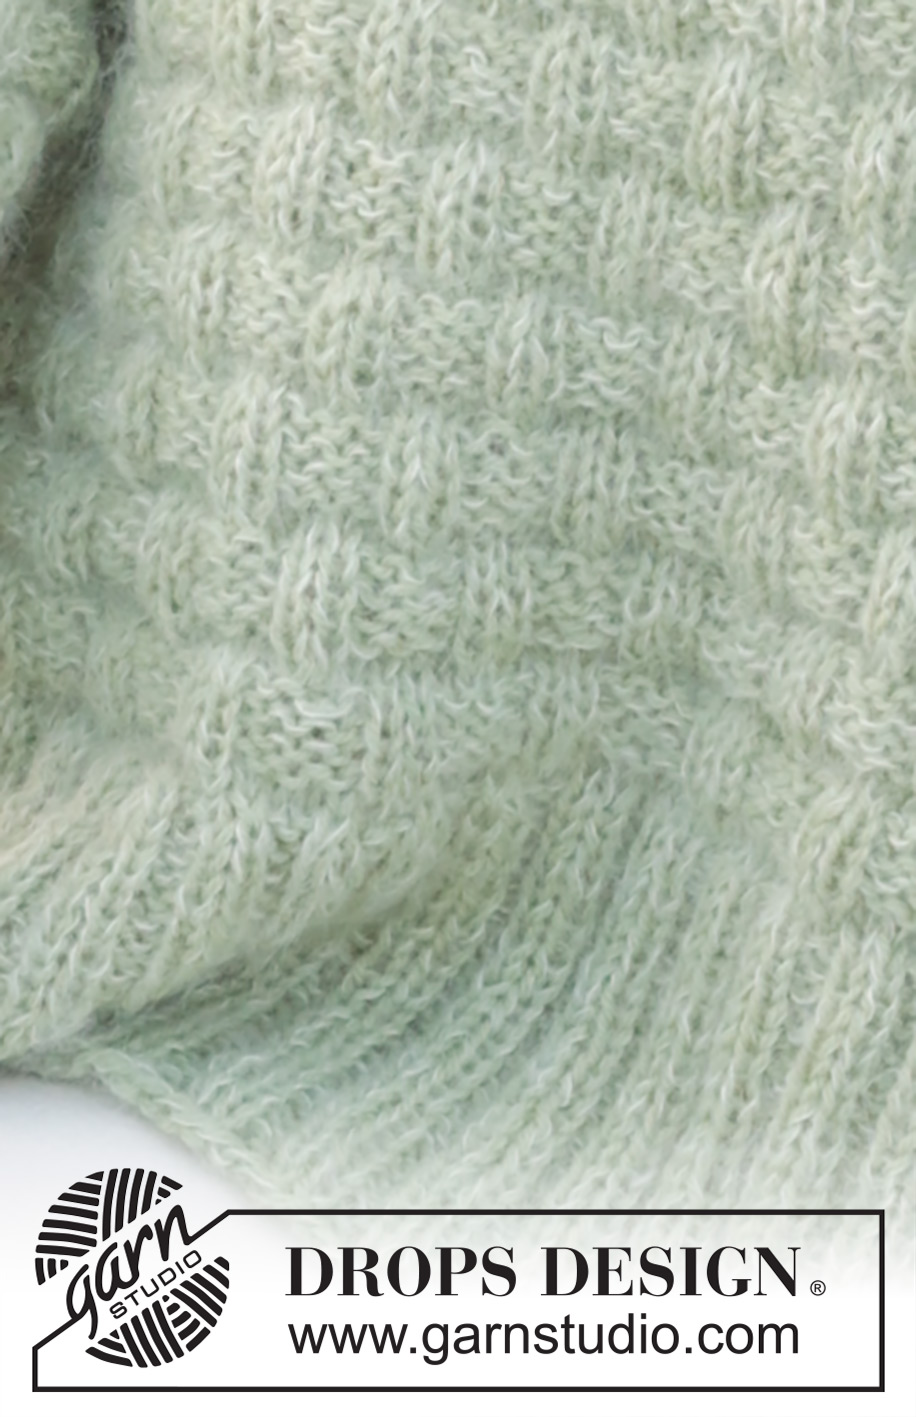
Knitted sweater in DROPS Alpaca and DROPS Kid-Silk. Piece is knitted bottom up with relief pattern and sewn-in sleeves. Size XS – XXL.
DROPS 241-6 |
||||||||||
|
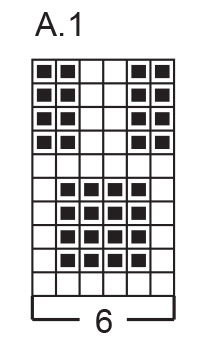
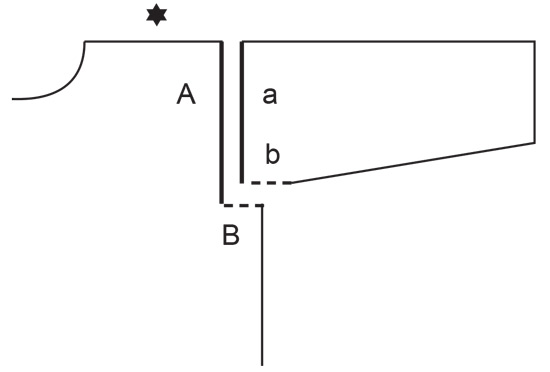
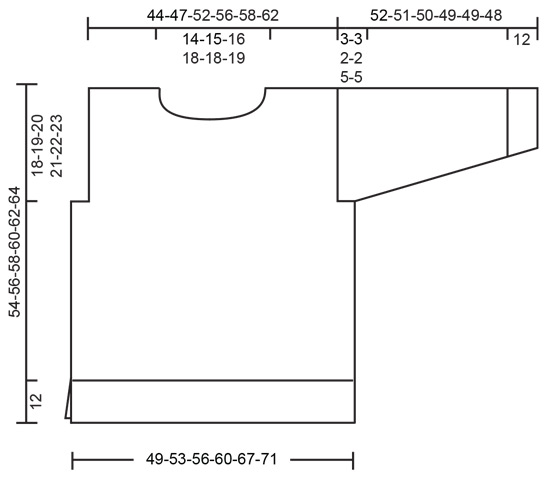
---------------------------------------------------------- EXPLANATION FOR THE PATTERN: ---------------------------------------------------------- GARTER STITCH (back and forth): Knit all rows. 1 ridge vertically = knit 2 rows. PATTERN: See diagram A.1. Diagrams show all rows in pattern seen from the right side. INCREASE TIP (applies to mid under sleeves): Work until there remains 1 stitch before the marking thread, make 1 yarn over, knit the next 2 stitches (the marking thread is between these 2 stitches), make 1 yarn over (= 2 stitches increased). On next round knit yarn overs twisted to avoid holes. Then work the new stitches in pattern (A.1). ---------------------------------------------------------- START THE PIECE HERE: ---------------------------------------------------------- SWEATER - SHORT OVERVIEW OF THE PIECE: Front and back piece back and forth on circular needle, bottom up until rib has been worked, then place piece together. Body is worked in the round on circular needle up to armholes. Then finish back piece and front piece back and forth on circular needle separately until finished measurements. Work sleeves in the round on double pointed needles/short circular needle to the finished measurements. Finish with a double neck edge. FRONT PIECE: Cast on 110-118-126-138-154-166 stitches on circular needle size 4 MM = US 6 with 1 strand DROPS Alpaca and 1 strand DROPS Kid-Silk (= 2 strands). Purl 1 row from wrong side. Then work rib as follows: 2 stitches in GARTER STITCH - read explanation above - * knit 2, purl 2 *, work from *-* until 4 stitches remain, knit 2 and finish with 2 stitches in garter stitch. Continue rib like this for 12 cm = 4¾" - finish after a row from wrong side. Put piece aside and work the back piece. BACK PIECE: Cast on the same number of stitches as on front piece and work the same way as front piece until rib measures 12 cm = 4¾" - finish after a row from wrong side. BODY: Put piece together as follows: Knit over stitches from back piece and decrease at the same time 26-28-30-36-40-46 stitches evenly, knit over stitches from front piece and decrease at the same time 26-28-30-36-40-46 stitches evenly = 168-180-192-204-228-240 stitches on needle. Switch to circular needle size 5 MM = US 8. Insert 1 marker thread at beginning of round and 1 marker thread after 84-90-96-102-114-120 stitches (in the sides on body). Move the marker threads upwards when working; they should be used for armhole. Work A.1 in the round. REMEMBER THE KNITTING GAUGE! When piece measures 36-37-38-39-40-41 cm = 14¼"-14½"-15"-15¼"-15¾"-16⅛", bind off for armholes as follows: Begin 5-5-4-3-8-7 stitches before marker thread at the beginning of round, bind off 10-10-8-6-16-14 stitches for armhole, work as before until 5-5-4-3-8-7 stitches remain before marker thread in the other side, bind off 10-10-8-6-16-14 stitches for armhole, work as before the rest of round. Finish front and back piece separately. FRONT PIECE: = 74-80-88-96-98-106 stitches. Begin from wrong side and continue A.1 with 1 stitch in garter stitch in each side. When piece measures 47-49-50-52-53-55 cm = 18½"-19¼"-19¾"-20½"-21"-21⅝", slip the middle 12-14-16-18-18-20 stitches on a thread for neck, and finish each shoulder separately. Continue as before and bind off stitches for neck on every row from neck as follows: Bind off 2 stitches 2 times and 1 stitch 2 times = 25-27-30-33-34-37 stitches remain on shoulder. Bind off when piece measures 54-56-58-60-62-64 cm = 21¼"-22"-22¾"-23⅝"-24⅜"-25¼". Work the other shoulder the same way. BACK PIECE: = 74-80-88-96-98-106 stitches. Begin from wrong side and work pattern and 1 stitch in garter stitch in each side the same way as on front piece. When piece measures 52-54-56-58-60-62 cm = 20½"-21¼"-22"-22¾"-23⅝"-24⅜", bind off the middle 22-24-26-28-28-30 stitches for neck, and finish each shoulder separately. Bind off for neck at the beginning of every row from neck as follows: Bind off 1 stitch 1 time = 25-27-30-33-34-37 stitches remain on shoulder. Work until piece measures 54-56-58-60-62-64 cm = 21¼"-22"-22¾"-23⅝"-24⅜"-25¼". Bind off. Work the other shoulder the same way. SLEEVES: Cast on 60-64-64-68-68-72 stitches on double pointed needles size 4 MM = US 6 with 1 strand of each quality (= 2 strands). Knit 1 round. Then work rib (knit 2/purl 2) in the round for 12 cm = 4¾". Knit 1 round while decreasing 14-16-14-16-14-18 stitches evenly = 46-48-50-52-54-54 stitches. Switch to double pointed needles size 5 MM = US 8. Insert 1 marking thread at the beginning of the round = mid under sleeve. Let the marking thread follow onwards, it is used for the increases. In addition insert 1 marking thread between the middle 2 stitches on top of sleeve. Count from this marking thread to know how pattern should start mid under sleeve. The marking thread mid on top of sleeve should be in the middle of A.1. Work A.1 in the round. When piece measures 14-14-14-14-15-15 cm = 5½"-5½"-5½"-5½"-6"-6", increase 2 stitches mid under sleeve – read INCREASE TIP. Increase like this every 4½-4½-4-3½-2½-2½ 8-8-9-10-11-12 times in total = 62-64-68-71-75-78 stitches. When sleeve measures 50-49-48-47-44-43 cm = 19¾"-19¼"-19"-18½"-17¼"-17", work sleeve cap back and forth (from the marking thread mid under sleeve) on circular needle til finished measurements. Bind off when sleeve measures 52-51-50-49-49-48 cm = 20½"-20"-19¾"-19¼"-19¼"-19". Work the other sleeve the same way. ASSEMBLY: Sew shoulder seams inside bind-off edge. Sew sleeve cap to armhole. Then sew vent at the top of sleeve to bottom of armhole - see chart. DOUBLE NECK EDGE: Use a short circular needle size 4 MM = US 6, start at one shoulder seam and pick up approx. 72 to 92 stitches around the neck (including stitches on thread). Number of stitches must be divisible 4. Work rib (knit 2/purl 2) for 5 cm = 2". Purl a row from wrong side and continue with (knit 2/purl 2) for another 5 cm = 2". Neck now measures approx. 10 cm = 4", and bind off with knit over knit and purl over purl. Fold the rib down on inside of garment. Fasten rib to get a double neck edge. To avoid a tight neck edge that sticks out it is important to keep the seam elastic. |
||||||||||
Diagram explanations |
||||||||||
|
||||||||||
 |
||||||||||
 |
||||||||||
 |
||||||||||
Have you finished this pattern?Tag your pictures with #dropspattern #scottishthistlesweater or submit them to the #dropsfan gallery. Do you need help with this pattern?You'll find 29 tutorial videos, a Comments/Questions area and more by visiting the pattern on garnstudio.com. © 1982-2026 DROPS Design A/S. We reserve all rights. This document, including all its sub-sections, has copyrights. Read more about what you can do with our patterns at the bottom of each pattern on our site. |
||||||||||


With over 40 years in knitting and crochet design, DROPS Design offers one of the most extensive collections of free patterns on the internet - translated to 17 languages. As of today we count 324 catalogs and 12290 patterns - 12280 of which are translated into English (US/in).
We work hard to bring you the best knitting and crochet have to offer, inspiration and advice as well as great quality yarns at incredible prices! Would you like to use our patterns for other than personal use? You can read what you are allowed to do in the Copyright text at the bottom of all our patterns. Happy crafting!
Post a comment to pattern DROPS 241-6
We would love to hear what you have to say about this pattern!
If you want to leave a question, please make sure you select the correct category in the form below, to speed up the answering process. Required fields are marked *.