
Popular categories
Looking for a yarn?


Comments / Questions (30)
![]() Staini wrote:
Staini wrote:
Hallo, Sind in den Diagrammen nur die Hinreihen, oder Hin- und Rückreihen gezeichnet? - Wenn nur die Hinreihen gezeichnet sind muss ich dann in den Rückreihen die Maschen stricken wie sie erscheinen? Danke
01.04.2026 - 10:08DROPS Design answered:
Liebe Frau Staini, alle Reihen sind in den Diagramme gezeichnet, siehe die Symbolerklärung je nach "Hin- oder Rückreihen", dh 1 leeres Kästchen wird bei den Hinreihen rechts gestrickt aber bei den Rückreihen links gestrickt, ein Pünktchen wird bei den Hin-Reihen links gestrickt - die Rückreihen lesen Sie links nach rechts. Viel Spaß beim Stricken!
07.04.2026 - 16:09
![]() Elisabeth wrote:
Elisabeth wrote:
Fick inget svar på min fråga. Frågan är : 1 rät, 1 omslag, 13 räta 1 omslag 1 rät, nästa ökning blir : 1 rät, 1 omslag, 15 räta, 1 omslag, 1 rät Eller: 2 räta, 1 omslag, 13 räta, 1 omslag, 2 räta?
24.03.2026 - 12:02DROPS Design answered:
Hej Elisabet, det blir till 15 räta på nästa varv :)
09.04.2026 - 07:36
![]() Elisabeth wrote:
Elisabeth wrote:
Stickar i stl M. Sätter markör framstycket börjar, 1 rätmaska, 1 omslag, 13 maskor, 1 omslag, 1 rätmaska. Detta ska upprepas 27 ggr. Var blir ökningen av antal maskor. 1 rät, 1 omslag, 15 maskor, 1 omslag , 1 rät. Eller? 2 räta 1 omslag, 13 maskor, 1 omslag, 2 räta ……osv.
07.03.2026 - 13:06DROPS Design answered:
Hei Elisabeth. Beklager, men kan ikke se noe skal gjentas 27 ganger. Det økes til raglan på ermene på hver 2.pinne totalt 26 ganger. Kan du gi en litt bedre beskrivelse på hvor i oppskriften du mener, så skal vi hjelpe deg så godt vi kan. mvh DROPS Design
23.03.2026 - 11:47
![]() Fie wrote:
Fie wrote:
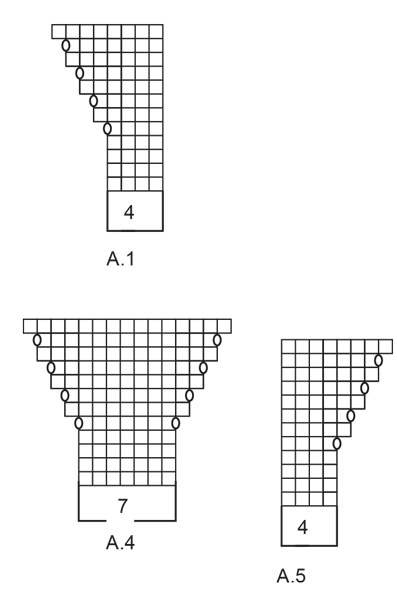
Greetings Drops Team! Thank you very much for your earlier reply! I understand that there are 4 increases around each sleeve which is a total of 8 stitches. What confuses me is the A.4 chart. 1) Do I start increasing from the 5th row in the middle of the back??? That would be 10 increases from then on? 2) How should I slat the yarn overs for the visual appearance ??? I haven’t seen this before! Needless to that I would appreciate your help!!! Best regards Fie
12.02.2026 - 10:26
![]() Fie wrote:
Fie wrote:
Hi! When knitting the back, the charts indicate A.3 - A.4 - A.2. This way the yarn- overs sit next to one another? Please clarify!!!!
11.02.2026 - 17:10DROPS Design answered:
Hi Fie, A.3 and A.2 have increases on rows 1 and 3, whereas A.4 (between them) only begins increases on row 5. So there are no yarn overs next to each other. Regards, Drops Team.
12.02.2026 - 07:14
![]() Babette wrote:
Babette wrote:
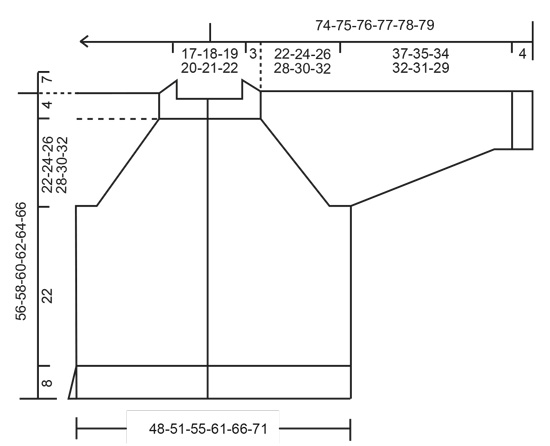
Bonjour, quand j'additionne le nombre de maille après les augmentations (devants+dos+manches et bordures) il manque 72 mailles pour arriver à 409 mailles. Ou est mon erreur ? merci d'avance pour votre réponse
11.11.2025 - 15:23DROPS Design answered:
Bonjour Babette, vous allez augmenter 32 fois pour les manches (32x2 m x 2 manches = 128 m au total pour les manches), en même temps, vous augmentez 37 fois pour les devants et le dos (pour avoir 41 m jersey pour les devants et 81 m jersey pour le dos) soit 37x4=148 m au total pour les raglans des devants/du dos et vous augmentez également 2 m au début de chaque A.2/A.3 (soit 8 m au total), vous aviez 125+128+148+8=409 mailles. Bon tricot!
11.11.2025 - 17:12
![]() Andree wrote:
Andree wrote:
Merci !
06.10.2025 - 08:48
![]() Andree wrote:
Andree wrote:
Est-il possible de ne pas doubler le col pour ce modèle?
04.10.2025 - 00:50DROPS Design answered:
Bonjour Andrée, tout à fait, tricotez le col à la longueur souhaitée avant de rabattre. Bon tricot!
06.10.2025 - 07:17
![]() Sandra wrote:
Sandra wrote:
Olá, comecei a fazer esta blusa, mas travei por não entender se estou fazendo certo, a quantidade de pontos que fiz para as costas, diz para fazer até 61 pontos entre os detalhes, mas depois está 91 pontos para as costas. Então eu deveria ter feito 31 pontos somando os detalhes, mas acho essa quantidade insuficiente para as costas. Poderia me explicar, não estou entendendo. Obrigada Sandra.
24.05.2025 - 08:29DROPS Design answered:
Bom dia, Essas 61 malhas fiicam entre A.2 e A.3 (que têm 13 malhas, cada um) o que dá as 91 malhas das costas. Ou seja, deve contar as 61 malhas mais 13 malhas de cada detalhe. Quanto ao número de malhas poder ser insuficiente, é bom não esquecer que se vai montar 10 malhas para cada cava entre as frentes e as contas para formar o corpo do casaco = 219 malhas. Bons tricôs!
26.05.2025 - 10:31
![]() Madeline Cohen wrote:
Madeline Cohen wrote:
When measuring the blocked gauge swatch, I had fewer stitches and more rows than required. Is it better to get the stitch count exact by using smaller needles, or try to get the number of rows exact?
02.04.2025 - 00:29DROPS Design answered:
Hi Madeline, The number of stitches in width is the most important. As long as your row numbers are not too far from the recommended number in the swatch, you can use the length measurements as written in the text. Happy crafting!
02.04.2025 - 06:53
|
||||||||||
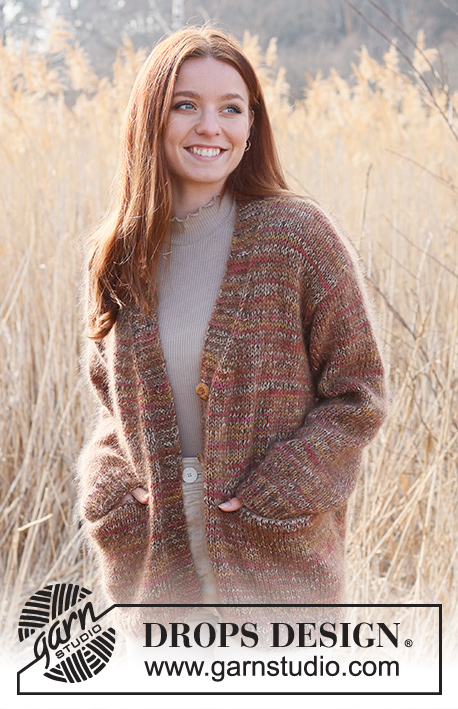
Spice Market Cardigan#spicemarketcardigan |
||||||||||
 |
 |
|||||||||
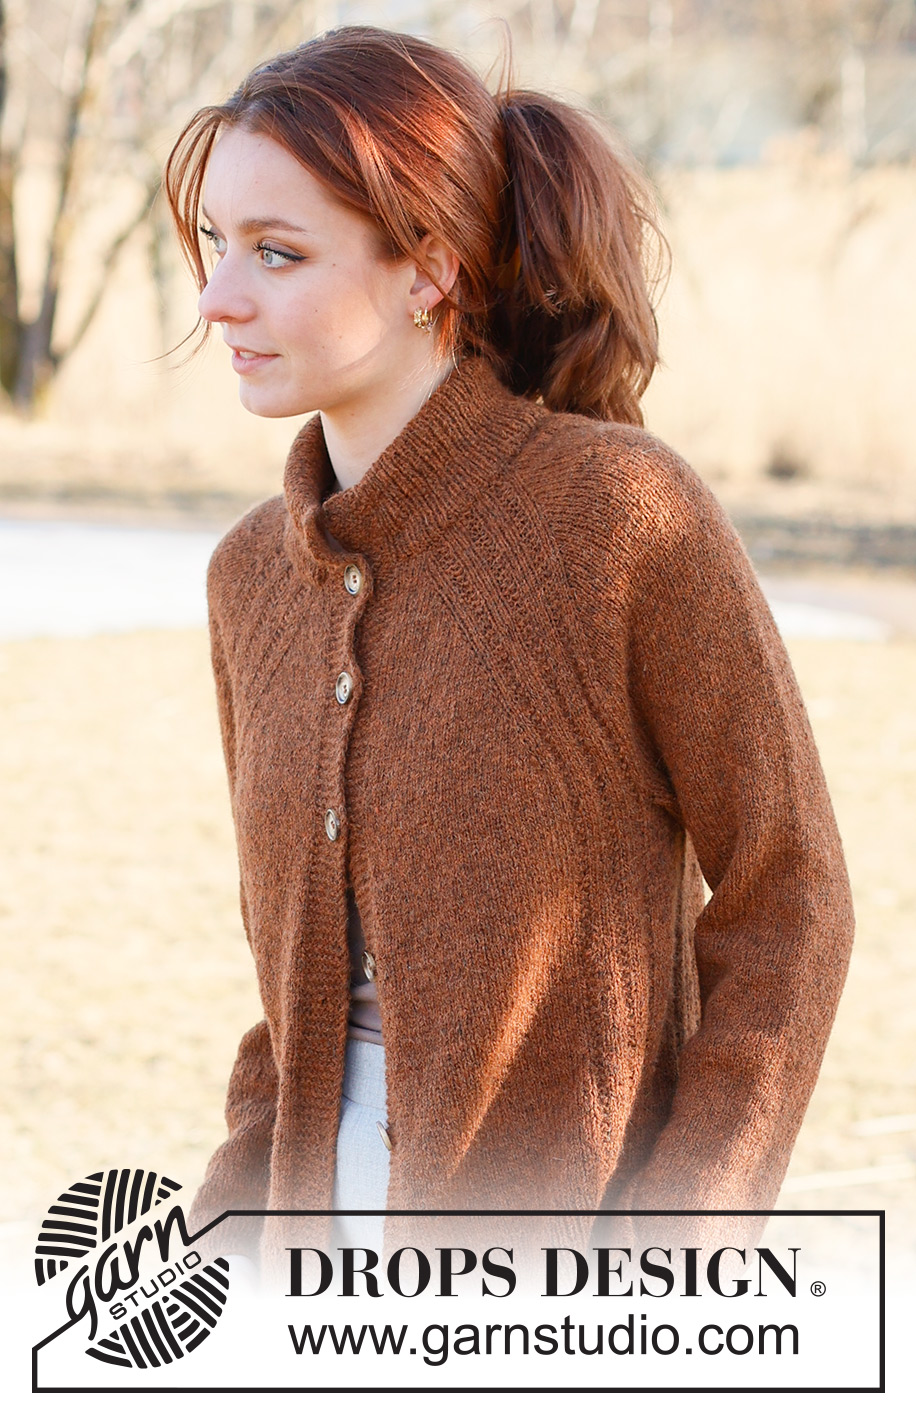
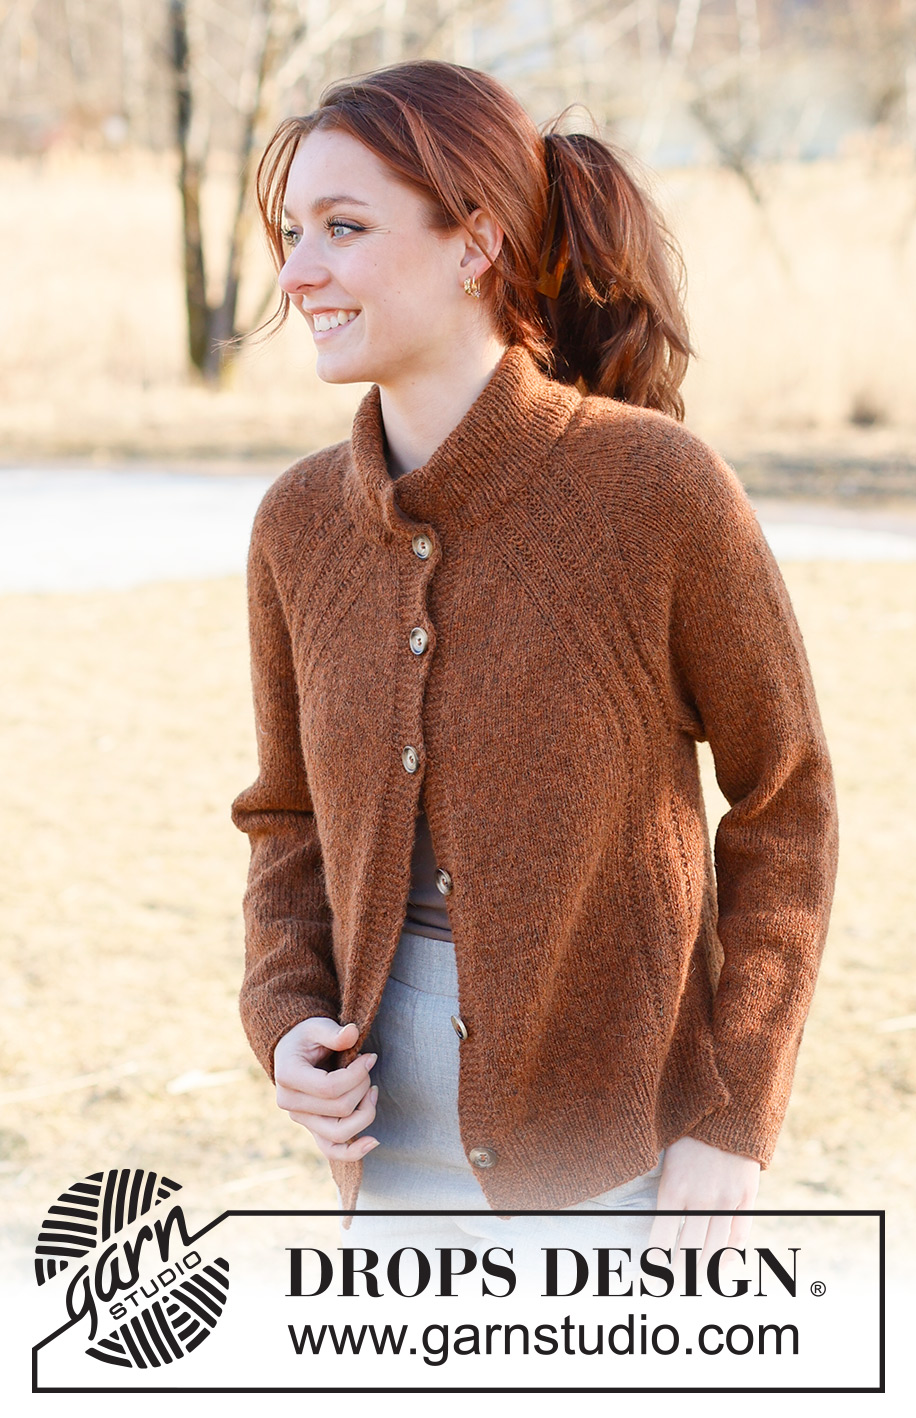
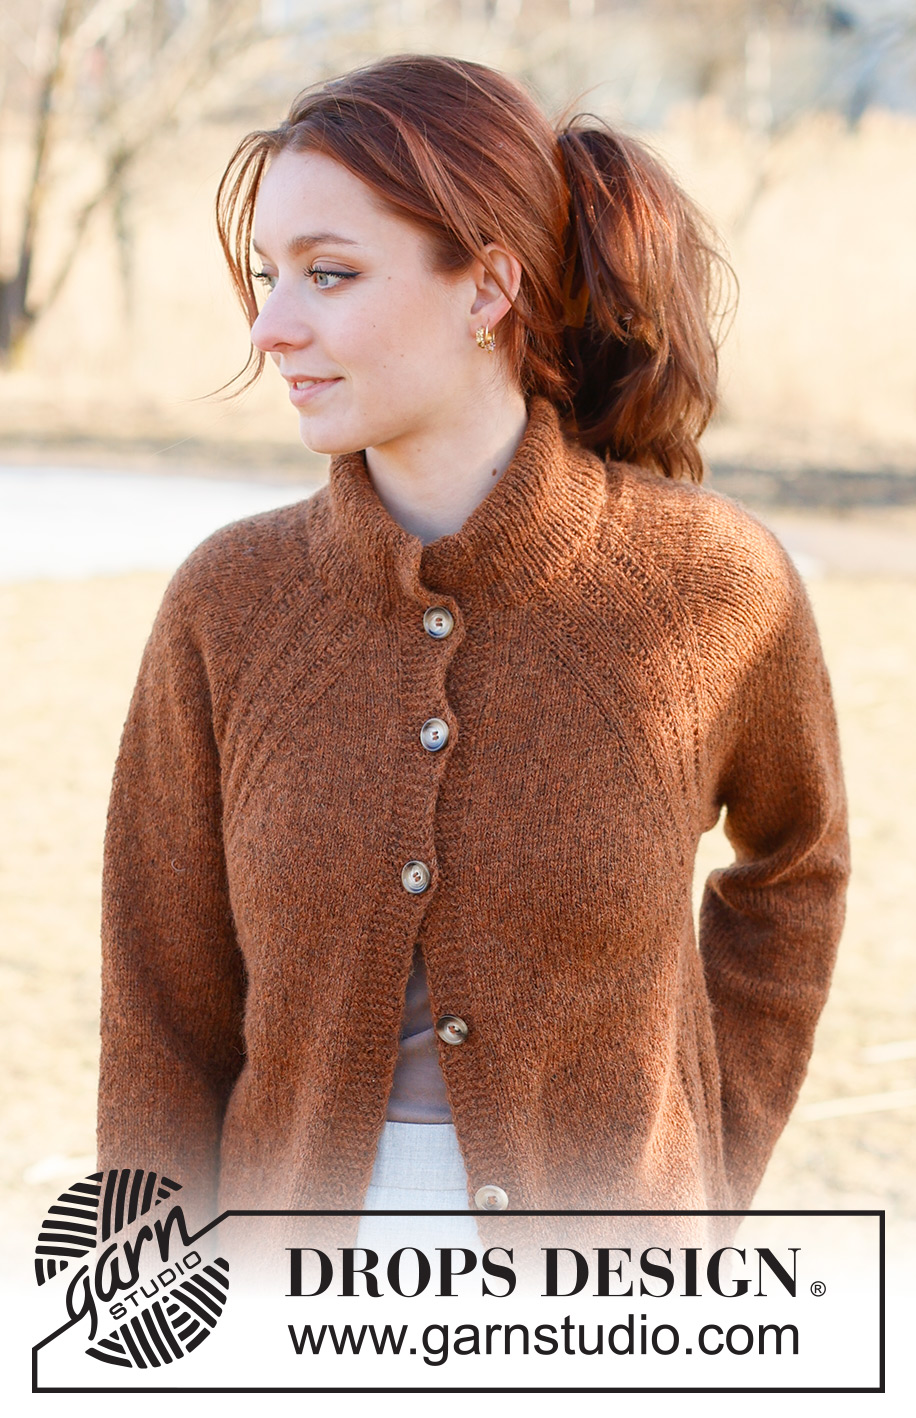
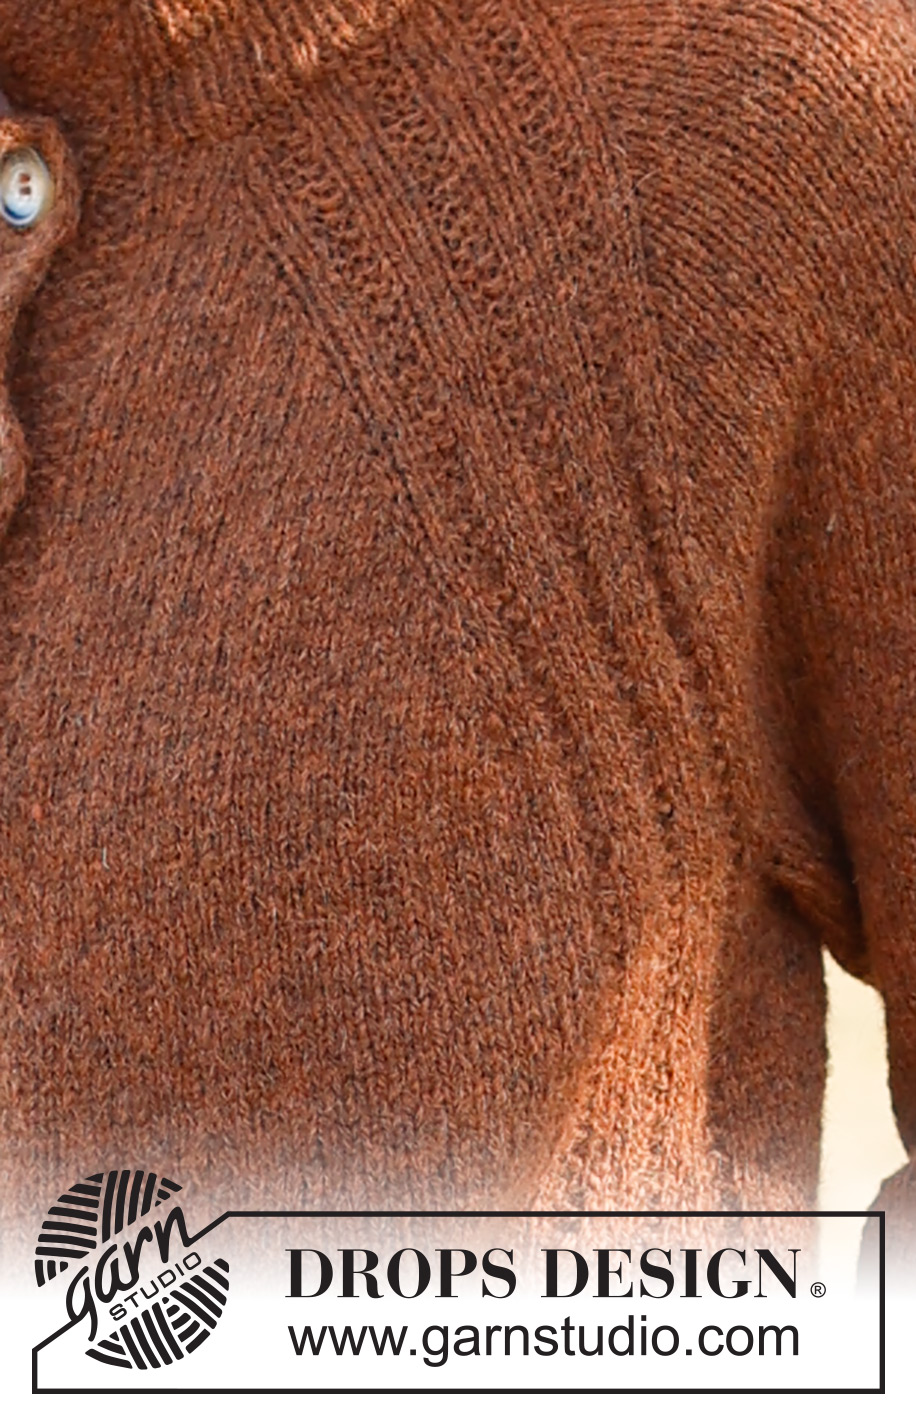
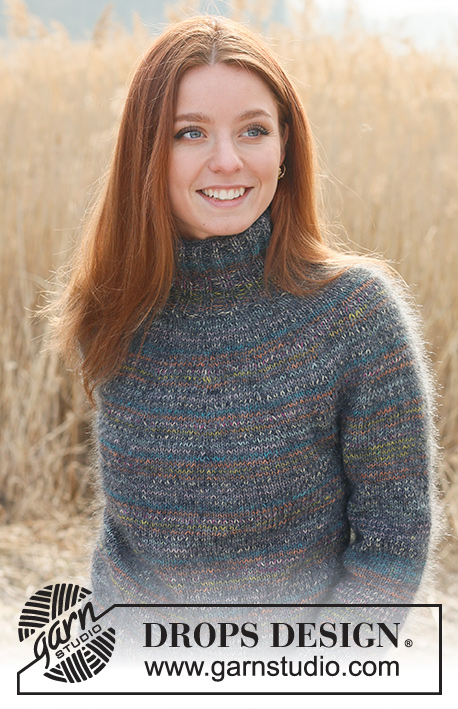
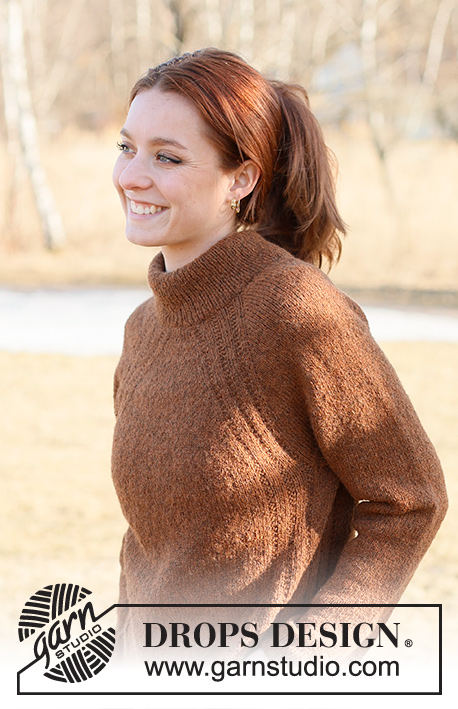
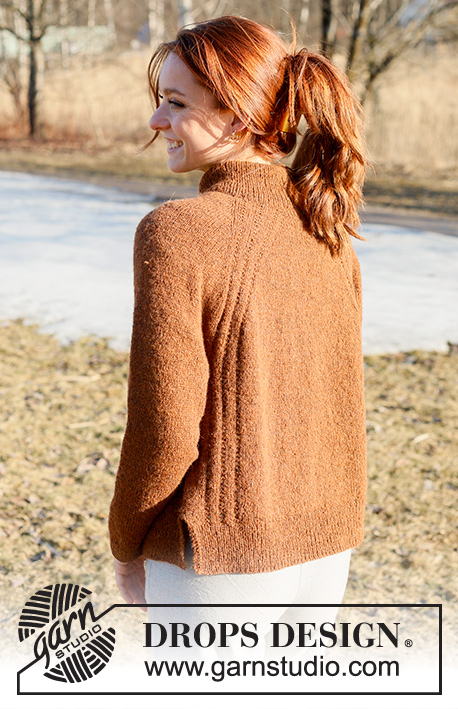
Knitted jacket in DROPS Sky. Piece is knitted top down with raglan, textured pattern and vents in the sides. Size: S - XXXL
DROPS 236-27 |
||||||||||
|
---------------------------------------------------------- EXPLANATION FOR THE PATTERN: ---------------------------------------------------------- GARTER STITCH (back and forth): Knit all rows. 1 ridge vertically = knit 2 rows. PATTERN: See diagrams A.1 to A.5. Choose diagram for your size in A.2 and A.3. BUTTONHOLES: Decrease for buttonholes on right band (when garment is worn). Decrease from right side when 5 stitches remain on row as follows: Bind off the next 2 stitches, knit the next 3 stitches. On next row cast on 2 new stitches over the bind off stitches. Bind off first button hole right after rib in the neck. Then decrease the next 5-5-5-5-6-6 buttonholes, approx. 9-9-10-10-9-9 cm = 3½"-3½"-4"-4"-3½"-3½" between each. RAGLAN (applies to sleeves): All increases are done from the right side. Increase 1 stitch before/after marker threads on sleeves as follows: Work until first marker thread on sleeve, knit 1, make 1 yarn over, work until 1 stitch before next marker thread, make 1 yarn over, knit 1. Repeat on the other sleeve (= 4 stitches increased on sleeves). On next row (wrong side) purl yarn over twisted to avoid holes. Then work the new stitches in stockinette stitch. DECREASE TIP (applies to sleeves): Decrease 1 stitch on each side of marker thread: Work until 3 stitches remain before marker thread and knit 2 together, knit 2 (marker thread is between these 2 stitches), slip 1 stitch knitwise, knit 1, pass slipped stitch over stitch worked. ---------------------------------------------------------- START THE PIECE HERE: ---------------------------------------------------------- JACKET - SHORT OVERVIEW OF THE PIECE: Work double neck edge and yoke back and forth on circular needle work top down. Work body back and forth in one down to vent in the sides, then finish front pieces and back back and forth separately. Work sleeves in the round on a short circular needle/double pointed needles. DOUBLE NECK EDGE: Cast on 119-123-129-133-139-143 stitches with DROPS Sky over a short circular needle size 4.5 and a short circular needle size 3.5 MM = US 4 held together. Pull out circular 4.5 MM = US 7 and keep stitches on the short circular needle size 3.5 MM = US 4 (cast is done like this to get an elastic cast-on edge). Purl 1 row from wrong side, then work as follows from right side: * Knit 1, purl 1 *, work from *-* until 1 stitch remain, knit 1. Work like this until piece measures 7 cm = 2¾". Now cast on 8 new stitches in each side = 135-139-145-149-155-159 stitches. Continue rib as before, work the outermost 8 stitches in each side in GARTER STITCH – read explanation above (= band stitches). This way the neck edge is worked double but the band stitches in garter stitch are not double (edge towards mid front will not be as thick when buttoned). Work rib until piece measures 14 cm = 5½". Now fold the rib inwards to form a double edge - then work next row from right side in rib as before, at the same time work every other stitch together with every other stitch from cast-on edge (begin and end with 8 stitches in garter stitch in each side). You now have a double neck edge. Insert 1 marker here – measure the piece from here. YOKE: Switch to circular needle size 4.5 MM = US 7. Purl 1 row from wrong side while decreasing 26-26-28-28-30-30 stitches evenly(work bands in garter stitch and do not decrease over bands) = 109-113-117-121-125-129 stitches. Work pattern as follows from right side: 8 band stitches in garter stitch, A.1, A.2, insert 1 marker thread here (left front piece), knit 1 stitch, make 1 yarn over, knit 11-13-15-9-11-13, make 1 yarn over, knit 1, insert a marker thread here (sleeve), A.3, A.4 (mid back), A.2, insert a marker thread here (back piece), knit 1, make 1 yarn over, knit 11-13-15-9-11-13, make 1 yarn over, knit 1, insert a marker thread here (sleeve), A.3, A.5, 8 band stitches in garter stitch (right front piece). 1 stitch for RAGLAN has now been increased – read explanation above, in each side of sleeve and 1 stitch has been increased on each A.2/A.3 on front pieces and back piece = 117-121-125-129-133-137 stitches. REMEMBER THE KNITTING GAUGE and remember BUTTONHOLES - see explanation above. Continue back and forth like this and increase for raglan on sleeves every other row 21-25-26-31-31-30 more times (22-26-27-32-32-31 times in total), AT THE SAME TIME when diagrams have been worked vertically, repeat the last 2 rows vertically 20-23-27-28-33-36 more times (i.e. until there are 55-61-69-71-81-87 stitches in stockinette stitch between A.2/A.3 on back piece and there are 28-31-35-36-41-44 stitches in stockinette stitch between A.2/A.3 and the front band stitches on each of front piece) = 301-333-357-385-409-421 stitches. Continue with texture over the 15-15-15-19-19-19 stitches in A.2 and A.3, 8 band stitches in garter stitch in each side towards mid front and stockinette stitch over the remaining stitches until piece measures 22-24-26-28-30-32 cm = 8¾"-9½"-10¼"-11"-11¾"-12½" measured from marker mid front. Work next row from wrong side as follows: Work pattern as before over the first 51-54-58-63-68-71 stitches (= right front piece), slip the next 57-67-71-75-77-77 stitches on a thread (= sleeve), cast on 10-10-10-12-12-16 new stitches on needle (= in the side under sleeve), work the next 85-91-99-109-119-125 stitches (= back piece), slip the next 57-67-71-75-77-77 stitches on a thread (= sleeve), cast on 10-10-10-12-12-16 stitches on needle (= in the side under sleeve), work the remaining 51-54-58-63-68-71 stitches on needle (= left front piece). Now measure piece from here! BODY: = 207-219-235-259-279-299 stitches. Continue with the last 2 rows in A.2 and A.3, 8 band stitches in garter stitch in each side towards mid front, and stockinette stitch over the remaining stitches. Work until piece measures 22 cm = 8¾". Slip the first and last 56-59-63-69-74-79 stitches on a thread for left and right front piece. Then finish front/back piece separately to get a vent in each side. BACK PIECE: = 95-101-109-121-131-141 stitches. Knit 1 row from right side while increasing 24-24-28-28-32-38 stitches evenly = 119-125-137-149-163-179 stitches. Switch to circular needle size 3.5 MM = US 4. Work rib as follows – from wrong side: 2 edge stitches in garter stitch, * purl 1, knit 1 *, work from *-* until 3 stitches remain, purl 1 and 2 edge stitches in garter stitch. When rib measures 8 cm = 3⅛", bind off with knit over knit and purl over purl. Jacket measures approx. 56-58-60-62-64-66 cm = 22"-22¾"-23⅝"-24⅜"-25¼"-26" from shoulder and down. RIGHT FRONT PIECE: Slip the 56-59-63-69-74-79 stitches from thread back on circular needle size 4.5 MM = US 7. Purl 1 row from wrong side while increasing 13-12-16-16-19-22 stitches evenly = 69-71-79-85-93-101 stitches. Switch to circular needle size 3.5 MM = US 4. Work rib as follows – from wrong side: 2 edge stitches in garter stitch, * purl 1, knit 1 *, work from *-* until 9 stitches remain, purl 1 and 8 band stitches in garter stitch. When piece measures 8 cm = 3⅛", bind off. LEFT FRONT PIECE: Work the same way as on right front piece but reversed. SLEEVE: Slip the 57-67-71-75-77-77 stitches from thread in one side of piece on a short circular needle/double pointed needles size 4.5 MM = US 7 and pick in addition up 1 stitch in each of the 10-10-10-12-12-16 stitches cast on under sleeve = 67-77-81-87-89-93 stitches. Insert 1 marker thread in the middle of the new stitches under sleeve (= 5-5-5-6-6-8 new stitches on each side of marker thread). Work in stockinette stitch in the round. When piece measures 4 cm = 1½" from division, decrease 2 stitches mid under sleeve - read DECREASE TIP. Decrease like this every 7½-3½-3-2-2-2 cm = 2⅞"-1¼"-1⅛"-¾"-¾"-¾" 5-9-10-12-12-13 times in total. When all decreases are done, there are 57-59-61-63-65-67 stitches on round. Work until sleeve measures 37-35-34-32-31-29 cm = 14½"-13¾"-13⅜"-12½"-12¼"-11⅜" from division. Knit 1 round while increasing 11 stitches evenly = 68-70-72-74-76-78 stitches. Switch to double pointed needles size 3.5 MM = US 4 and work rib = knit 1/purl 1 for 4 cm = 1½". Bind off. Sleeve measures approx. 41-39-38-36-35-33 cm = 16⅛"-15¼"-15"-14¼"-13¾"-13" from division. Work the other sleeve the same way. ASSEMBLY: Sew opening towards mid front together on bands with neat little stitches. Sew the buttons on to the left band. |
||||||||||
Diagram explanations |
||||||||||
|
||||||||||
 |
||||||||||
 |
||||||||||
 |
||||||||||
Have you finished this pattern?Tag your pictures with #dropspattern #spicemarketcardigan or submit them to the #dropsfan gallery. Do you need help with this pattern?You'll find 28 tutorial videos, a Comments/Questions area and more by visiting the pattern on garnstudio.com. © 1982-2026 DROPS Design A/S. We reserve all rights. This document, including all its sub-sections, has copyrights. Read more about what you can do with our patterns at the bottom of each pattern on our site. |
||||||||||


With over 40 years in knitting and crochet design, DROPS Design offers one of the most extensive collections of free patterns on the internet - translated to 17 languages. As of today we count 324 catalogs and 12290 patterns - 12280 of which are translated into English (US/in).
We work hard to bring you the best knitting and crochet have to offer, inspiration and advice as well as great quality yarns at incredible prices! Would you like to use our patterns for other than personal use? You can read what you are allowed to do in the Copyright text at the bottom of all our patterns. Happy crafting!
Post a comment to pattern DROPS 236-27
We would love to hear what you have to say about this pattern!
If you want to leave a question, please make sure you select the correct category in the form below, to speed up the answering process. Required fields are marked *.