
Popular categories
Looking for a yarn?


Comments / Questions (12)
![]() Yvonne wrote:
Yvonne wrote:
Klopt het dat de regelmaat van de boord steek , en het A.1 patroon in de hals onderbroken worden bij: Markeer draad 2: 2 st recht vóór en 2 st recht na de draad. Vóór markeer draad 3: 4 st averecht. Markeer draad 4: 2 st recht vóór en 2 st recht na de draad Midden achter: 2 recht vóór het midden en 2 recht na het midden. Of heb ik de beschrijving verkeerd gelezen? Met vriendelijke groet, Yvonne
02.03.2026 - 22:09
![]() Mette Lisbjerg wrote:
Mette Lisbjerg wrote:
Hej Spørgsmål til halskanten: tages der ud under rib? Det står der ikke, men når man har skiftet til pind 4 står der pludselig at der er taget masker ud og et større maskeantal fremgår. Mønster: i mønster A1 er et tegn som ikke forklares. Hvad betyder det? På forhånd tak! Mh Mette
09.02.2026 - 16:20DROPS Design answered:
Hei Mette. Man legger opp 100-106-114-120-126-126 masker på rundpinne 3,5, og strikker som forklart til arbeidet måler 3 cm, bytt til pinne 4 og nå skal 3. omgang av A.1 strikkes, og her økes det masker. Se det ovale diagramikonet på slutten av A.1 på 3. pinne. I diagram A.1 er det 3 ulike ikoner. Firkant = rett. Firkant med en strek i = vrang. Oval sirkel mellom 2 masker= lav 1 omslag mellem 2 masker. På næste omgang strikkes omslaget vrang eller ret - se næste omgang i diagrammet (det skal blive hul). mvhh DROPS Design
13.02.2026 - 10:06
![]() Wil wrote:
Wil wrote:
Is dit patroon er ook voor haken. Truitje met raglan mouw.
05.04.2025 - 15:23DROPS Design answered:
Dag Wil,
Nee, helaas is dit patroon er alleen in de vorm van een breipatroon.
06.04.2025 - 11:10
![]() Kathleen Cameron wrote:
Kathleen Cameron wrote:
I love the look of this pattern but need an alternative for the Kid-Silk but I am horribly allergic to mohair in any form. What would you suggest as a substitute? Many thanks
05.09.2024 - 15:01DROPS Design answered:
Dear Mrs Cameron, please use the yarn converter to see all alternatives and new amount of yarn. Happy knitting!
06.09.2024 - 08:05
![]() Alexandra Marshall wrote:
Alexandra Marshall wrote:
I just finished this (lovely!) but I'm wondering if in the Pattern section where it says work the first 2 stitches in A2 if it should say K2 every row? That's what I ended up doing as otherwise using the A2 chart (first 2 stitches each row) changes and you create an extra hole. Maybe I did it wrong? But it looks fine with K2 instead of following A2 chart for those two stitches.
05.09.2023 - 18:32DROPS Design answered:
Dear Msr Marshall, with working only the first 2 stitches in A.2 we mean to work the pattern in A.2 over these 2 sts, just without the last P2, ie with yarn over and then decrease as in all other A.2 (so that pattern is symmetrical). Happy knitting!
06.09.2023 - 08:54
![]() Gitte wrote:
Gitte wrote:
Fortsættes mønstret A2 på de nyopståede masker under armen? Og hvordan? Der er 10 masker, men mønstret dækker kun 8.
14.02.2023 - 18:29
![]() Charlotte Oure wrote:
Charlotte Oure wrote:
Garn forbruget passer desværre ikke på denne opskrift
24.01.2023 - 20:34
![]() Diana wrote:
Diana wrote:
Hola! Estoy trabajando este patrón. La duda que tengo es donde aumentar los puntos al dejar las mangas en aguja auxiliar y luego como se retoman al tejer las mangas. Agradecería mucho la respuesta.
27.04.2022 - 04:12DROPS Design answered:
Hola Diana, con aumentar te refieres a montar bajo la manga los puntos? En ese caso, este vídeo podría ayudarte: https://www.garnstudio.com/video.php?id=1634&lang=es En el siguiente vídeo también te explican cómo retomar los puntos de las mangas: https://www.garnstudio.com/video.php?id=592&lang=es
27.04.2022 - 21:58
![]() Sue Sommer wrote:
Sue Sommer wrote:
Snowdrop The sleeves remind me of the flower :)
04.02.2022 - 17:29
![]() Helena Mjöberg wrote:
Helena Mjöberg wrote:
Summer nights
15.01.2022 - 08:48
|
|||||||||||||||||||
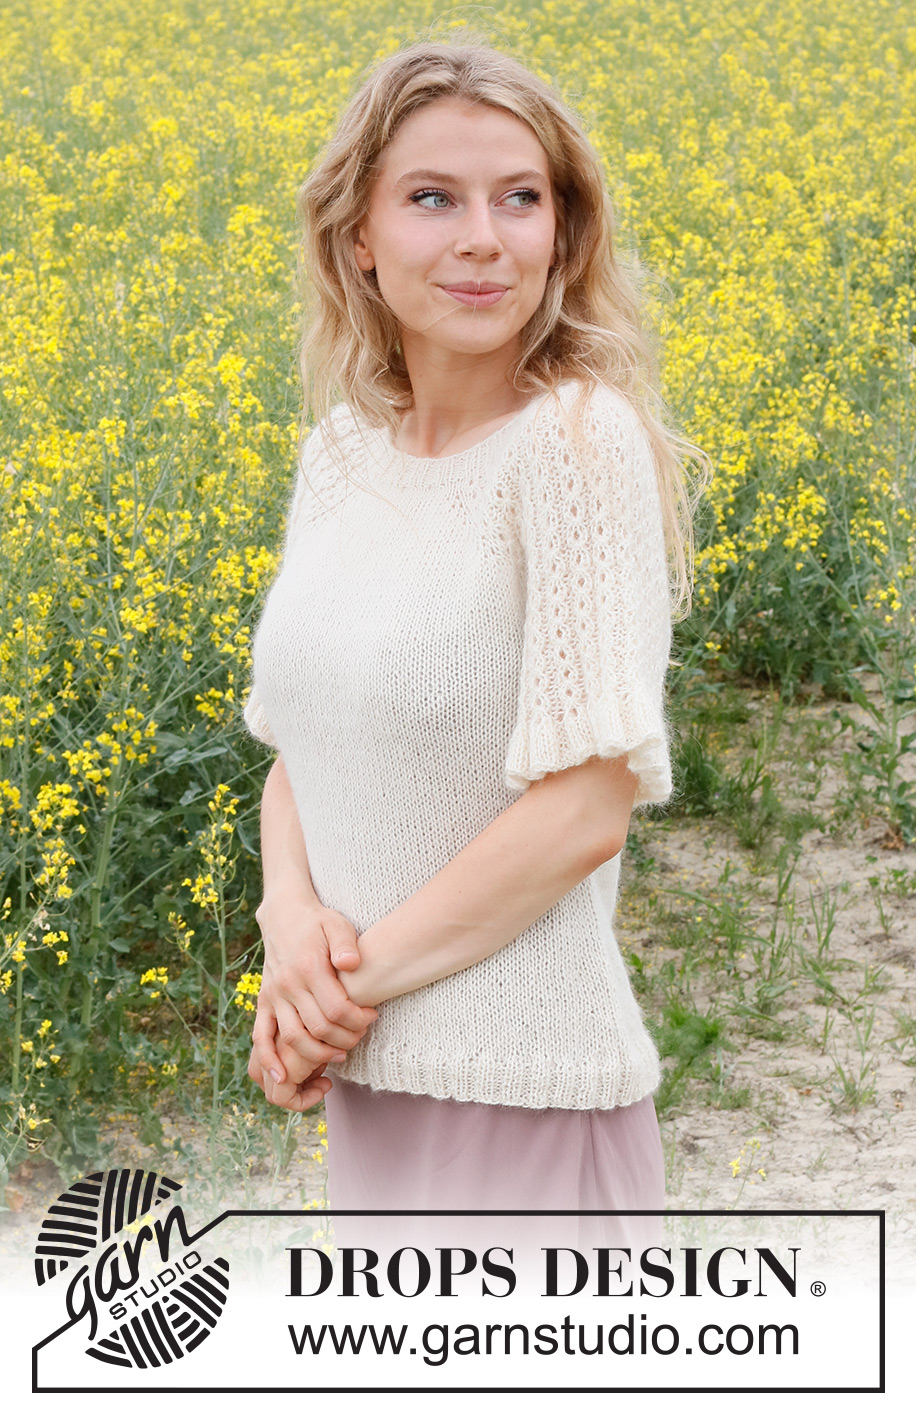
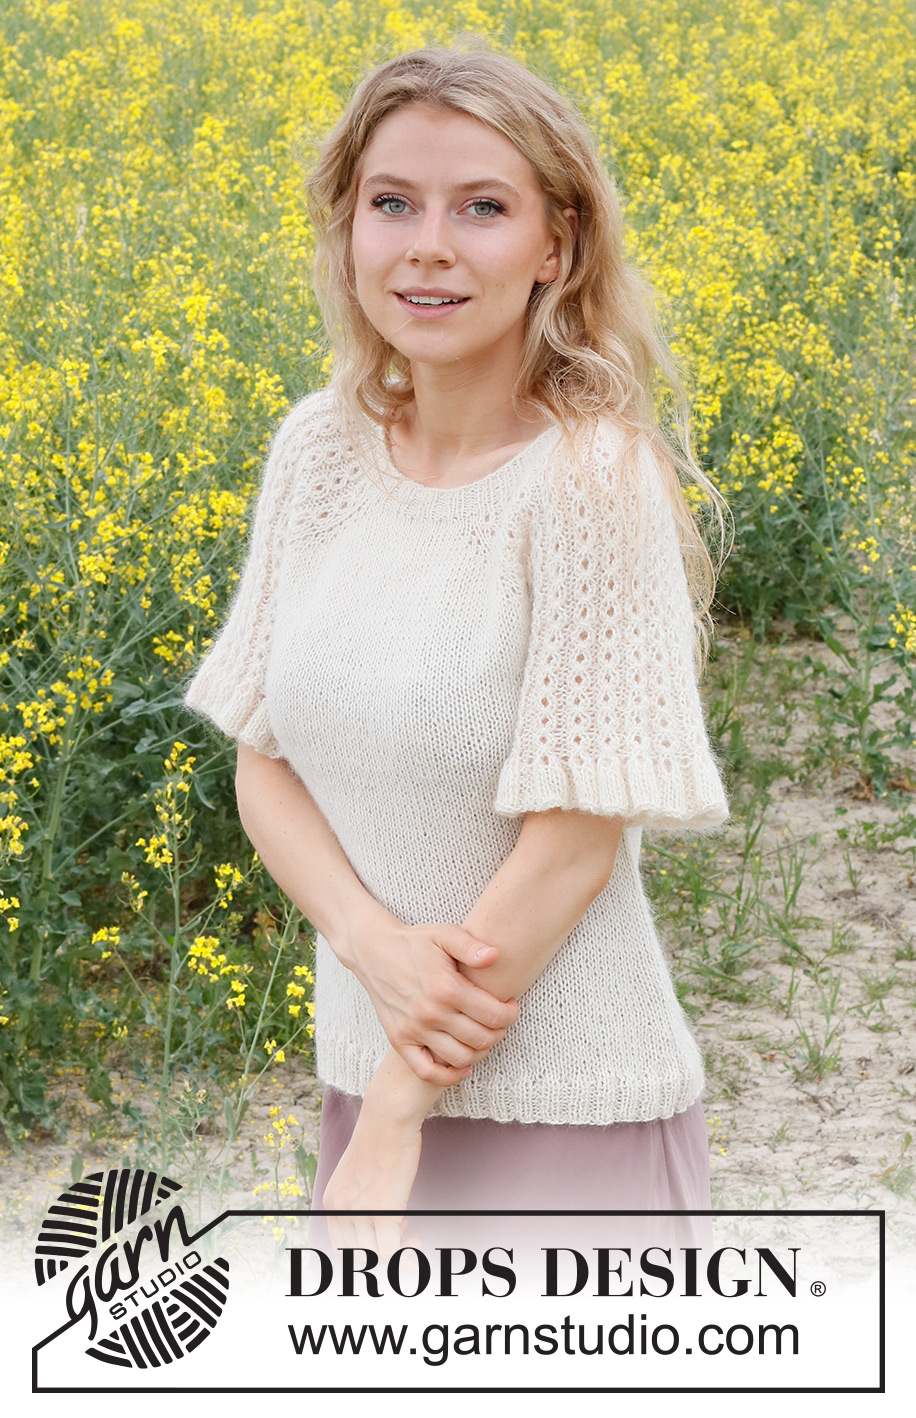
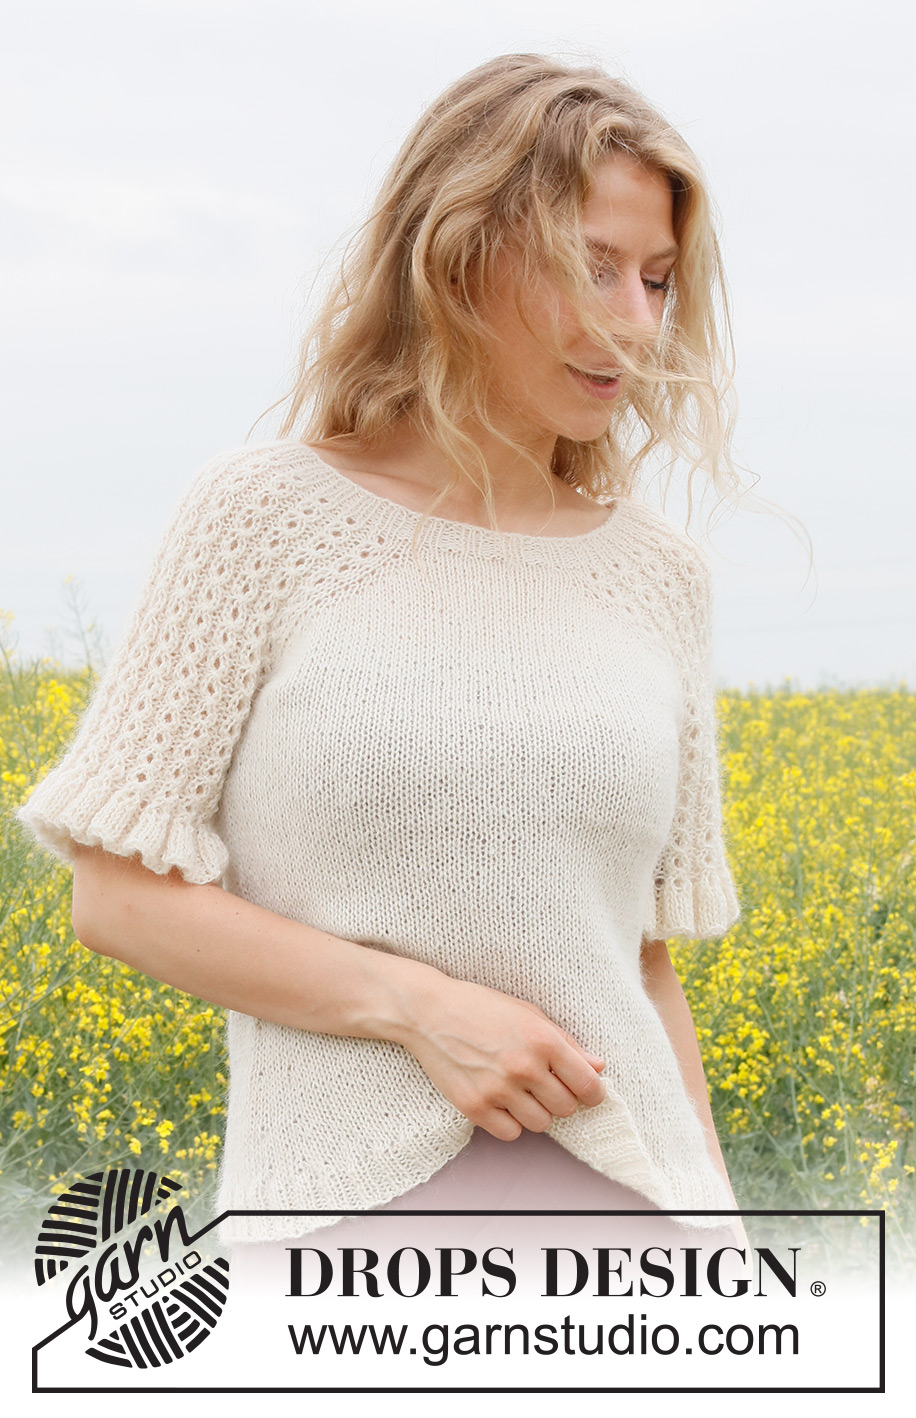
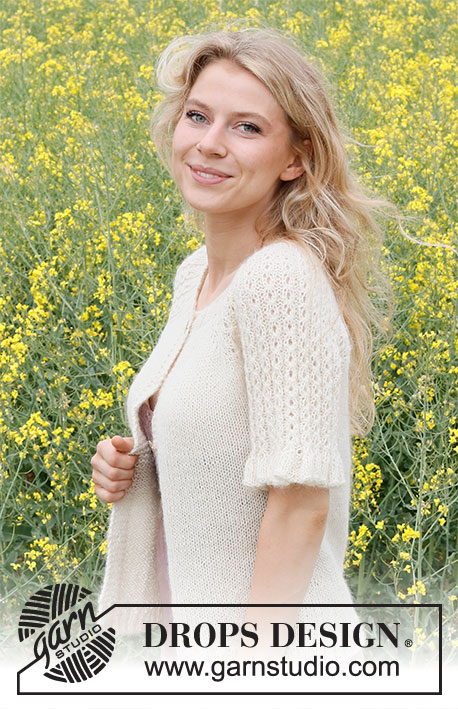
Pearlescent Top#pearlescenttop |
|||||||||||||||||||
 |
 |
||||||||||||||||||
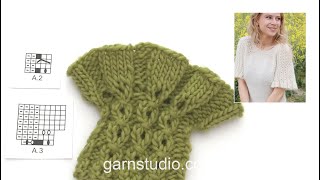
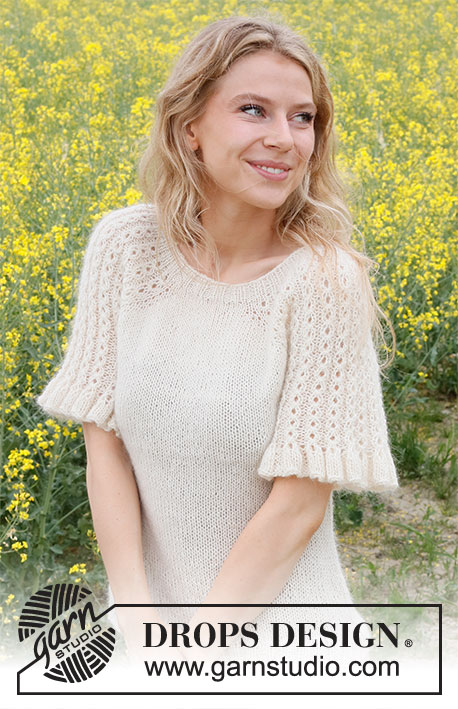
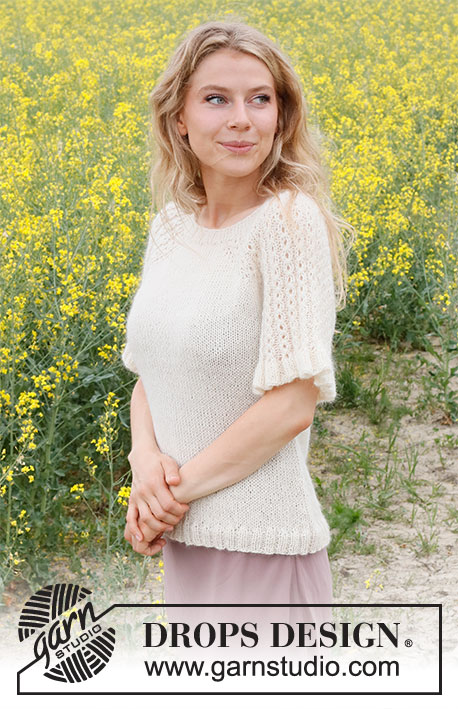
Knitted sweater in DROPS Alpaca and DROPS Kid-Silk. The piece is worked top down, with cables and flounces on the sleeves. Sizes S - XXXL.
DROPS 230-25 |
|||||||||||||||||||
|
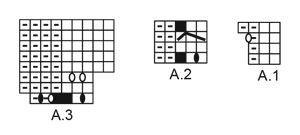
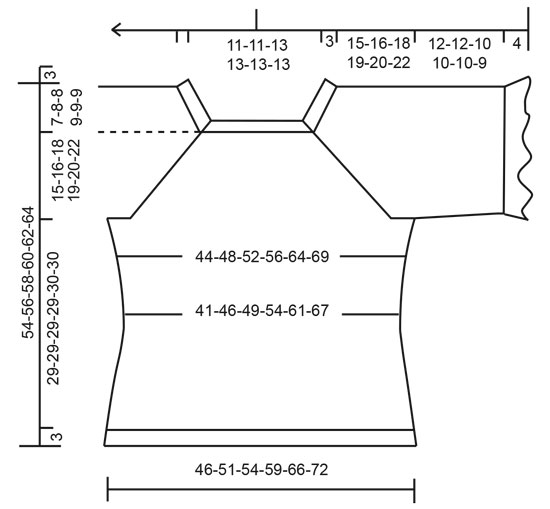
------------------------------------------------------- EXPLANATIONS FOR THE PATTERN: ------------------------------------------------------- PATTERN: See diagrams A.1 to A.3. RAGLAN: All increases are worked on the front and back pieces (not on the sleeves). First increase 2 stitches towards each raglan on the front and back pieces (= 8 stitches increased on the round), then increase 1 stitch towards each raglan on the front and back pieces (= 4 stitches increased on the round). Increase 2 stitches before markers 1 and 3 as follows: Work until there are 2 stitches left before the marker, make 1 yarn over, knit 1, 1 yarn over, knit 1, marker sits here. Increase 2 stitches after markers 2 and 4 as follows: Knit 1, 1 yarn over, knit 1, 1 yarn over. Increase 1 stitch before markers 1 and 3 as follows: Work until there is 1 stitch left before the marker, 1 yarn over, knit 1, marker sits here. Increase 1 stitch after markers 2 and 4 as follows: Knit 1, 1 yarn over. On the next round knit the yarn overs twisted to avoid holes. Then work the new stitches in stockinette stitch. DECREASE TIP: Decrease 1 stitch on each side of the marker thread as follows: Work until there are 3 stitches left before the marker thread, knit 2 together, knit 2 (the marker thread sits between these 2 stitches), slip 1 stitch as if to knit, knit 1 and pass the slipped stitch over the knitted stitch (= 2 stitches decreased). Repeat at the second marker thread (= 4 stitches decreased on the round). INCREASE TIP-1 (sides of body): Work until there are 2 stitches left before the marker thread, 1 yarn over, knit 4 (marker thread sits between these 4 stitches), 1 yarn over. On the next round knit the yarn overs twisted to avoid holes. Then work the new stitches in stockinette stitch. INCREASE TIP-2 (evenly spaced): To work out how to increase evenly, count the total number of stitches on the needle (e.g. 148 stitches) and divide by the number of increases to be made (e.g. 28) = 5.2. In this example, increase by making 1 yarn over after approx. each 5th stitch. On the next round work the yarn overs twisted to avoid holes. BINDING-OFF TIP: To avoid the bind-off edge being tight you can bind off with a larger size needle. If the edge is still tight, make 1 yarn over after approx. each 4th stitch at the same time as binding off; the yarn overs are bind off as normal stitches. ------------------------------------------------------- START THE PIECE HERE: ------------------------------------------------------- SWEATER – SHORT OVERVIEW OF THE PIECE: The neck and yoke are worked in the round with circular needle, from mid back and top down. The yoke is divided for body and sleeves and the body is continued in the round with circular needle. The sleeves are worked with short circular needle/double pointed needles, top down. NECK: Cast on 100-106-114-120-126-126 stitches with circular needle size 3.5 MM = US 4 and 1 strand of each quality (= 2 strands). Knit 1 round. Then work the next round as follows: Work rib (knit 2, purl 2) over the first 8-8-12-12-12-12 stitches, insert marker 1 here, work A.1 over the next 30-33-33-36-39-39 stitches, work the first 2 stitches in A.1, insert marker 2 here, work rib (knit 2, purl 2) over the next 16-16-20-20-20-20 stitches, purl 2, insert marker 3 here, work A.1 over the next 30-33-33-36-39-39 stitches, work the first 2 stitches in A.1, insert marker 4 here, work rib (knit 2, purl 2) over the last 10-10-10-10-10-10 stitches. Continue this rib and repeat the first 2 rounds in A.1 until the piece measures 3 cm = 1⅛". Change to circular needle size 4 MM = US 6. Work the next round as follows: Work stockinette stitch as far as marker 1, work round 3 in A.1 as far as marker 2 (= 10-11-11-12-13-13 stitches increased), stockinette stitch as far as marker 3, work round 3 in A.1 as far as marker 4 (= 10-11-11-12-13-13 stitches increased), stockinette stitch to the end of the round = 120-128-136-144-152-152 stitches. Work the last round in A.1 and stockinette stitch over the other stitches. Insert a marker at the beginning of the round. The piece is now measured from here. YOKE: Change to circular needle size 5 MM = US 8. Now work pattern at the same time as you increase to raglan. Read PATTERN and RAGLAN before continuing. PATTERN: Work stockinette stitch as far as marker 1, work A.2 over the next 40-44-44-48-52-52 stitches (= 10-11-11-12-13-13 repeats), work the first 2 stitches in A.2, marker 2 sits here, work stockinette stitch as far as marker 3, work A.2 over the next 40-44-44-48-52-52 stitches (= 10-11-11-12-13-13 repeats), work the first 2 stitches in A.2, marker 4 sits here, work stockinette stitch to the end of the round. REMEMBER THE KNITTING GAUGE! RAGLAN: At the same time, on the first round begin to increase to RAGLAN – read description above. Increase 2 stitches every 2nd round 8-11-12-14-15-20 times, then increase 1 stitch every 2nd round 7-5-4-4-8-3 times = 23-27-28-32-38-43 stitches increased on each side of the front and back pieces. When all the increases to raglan are finished there are 212-236-248-272-304-324 stitches. Continue working until the piece measures 15-16-18-19-20-22 cm = 6"-6¼"-7"-7½"-8"-8¾" from the marker mid-back – adjust so you finish after round 3 in A.2. Now divide the yoke for the body and sleeves: Work the first 31-35-40-44-50-55 stitches (= half back piece), place the next 42-46-46-50-54-54 stitches on 1 thread for the sleeve, cast on 10 stitches (= in side under the sleeve), work the next 64-72-78-86-98-108 stitches (= front piece), place the next 42-46-46-50-54-54 stitches on 1 thread for the sleeve, cast on 10 stitches (= in side under the sleeve), work the last 33-37-38-42-48-53 stitches. The body and sleeves are finished separately. THE PIECE IS NOW MEASURED FROM HERE. BODY: = 148-164-176-192-216-236 stitches. Insert 1 marker thread in the middle of the new stitches cast on under each sleeve (= 5 new stitches on each side of the thread). Allow the threads to follow your work onwards; they are used when decreasing/increasing in the sides. Work stockinette stitch in the round for 4 cm = 1½". Now decrease 1 stitch on each side of both marker threads – read DECREASE TIP. Decrease like this every 3 cm = 1⅛" a total of 2 times = 140-156-168-184-208-228 stitches. When the piece measures 12 cm = 4¾" from the division, increase 1 stitch on each side of both marker threads – read INCREASE TIP-1. Increase like this every 3 cm = 1⅛" a total of 4 times = 156-172-184-200-224-244 stitches. Continue working until the piece measures 29-29-29-29-30-30 cm = 11⅜"-11⅜"-11⅜"-11⅜"-11¾"-11¾" from the division. There is approx. 3 cm = 1⅛" left; try the sweater on and work to desired length. To avoid the following rib being tight, increase 32-32-36-40-44-48 stitches evenly spaced – read INCREASE TIP-2 = 188-204-220-240-268-292 stitches. Change to circular needle size 4 MM = US 6. Work rib (knit 2, purl 2) for 3 cm = 1⅛". Bind off with knit over knit and purl over purl – read BINDING-OFF TIP. The sweater measures approx. 54-56-58-60-62-64 cm = 21¼"-22"-22¾"-23⅝"-24⅜"-25¼" from the shoulder down. SLEEVES: Place the 42-46-46-50-54-54 stitches from the thread on the one side of the piece on double pointed needles/short circular needle size 5 MM = US 8 and knit up 1 stitch in each of the 10 stitches cast on under the sleeve = 52-56-56-60-64-64 stitches. Work A.2 in the round – adjust so the pattern matches the yoke. When the sleeve measures 12-12-10-10-10-9 cm = 4¾"-4¾"-4"-4"-4"-3½" – adjust to finish after a complete repeat in height, work a flounce-edge. There is approx. 4 cm = 1½" left; try the sweater on and work to desired length.. Work A.3 over A.2. When all the increases in A.3 are finished, there are 117-126-126-135-144-144 stitches. When A.3 is finished, bind off with knit over knit and purl over purl – remember BINDING-OFF TIP. The sleeve measures approx. 16-16-14-14-14-13 cm = 6¼"-6¼"-5½"-5½"-5½"-5⅛". Work the other sleeve in the same way. |
|||||||||||||||||||
Diagram explanations |
|||||||||||||||||||
|
|||||||||||||||||||
 |
|||||||||||||||||||
 |
|||||||||||||||||||
Have you finished this pattern?Tag your pictures with #dropspattern #pearlescenttop or submit them to the #dropsfan gallery. Do you need help with this pattern?You'll find 29 tutorial videos, a Comments/Questions area and more by visiting the pattern on garnstudio.com. © 1982-2026 DROPS Design A/S. We reserve all rights. This document, including all its sub-sections, has copyrights. Read more about what you can do with our patterns at the bottom of each pattern on our site. |
|||||||||||||||||||


With over 40 years in knitting and crochet design, DROPS Design offers one of the most extensive collections of free patterns on the internet - translated to 17 languages. As of today we count 324 catalogs and 12290 patterns - 12280 of which are translated into English (US/in).
We work hard to bring you the best knitting and crochet have to offer, inspiration and advice as well as great quality yarns at incredible prices! Would you like to use our patterns for other than personal use? You can read what you are allowed to do in the Copyright text at the bottom of all our patterns. Happy crafting!
Post a comment to pattern DROPS 230-25
We would love to hear what you have to say about this pattern!
If you want to leave a question, please make sure you select the correct category in the form below, to speed up the answering process. Required fields are marked *.