
Popular categories
Looking for a yarn?


Comments / Questions (15)
![]() Michaela wrote:
Michaela wrote:
Warum kann ich diese Anleitung nicht richtig ausdrucken, am rechten Rand wird immer Text abgeschnitten. Ich habe alle möglichen Einstellungen am Drucker und am PC probiert, auch alle möglichen Schriftarten. Bei der Alneitung für den gleichen Pullover gibt es dieses Problem nicht. Sehr schade.
22.11.2025 - 08:50DROPS Design answered:
Liebe Michaela, versuchen Sie mal die Cookies zu leeren und versuchen Sie noch einmal, ob es hilft können Sie auch zuerst einen virtuellen Drucker wählen, um die Anleitung als .PDF zu speichern, dann drücken. Viel Spaß beim Stricken!
24.11.2025 - 13:07
![]() Pia Hansen wrote:
Pia Hansen wrote:
Når jeg skal begynde på et mønster diagram, skal jeg starte fra papiret(hvor mønstret er når det er fotokopieret) venstre side eller fra højre side. Pia Hansen
05.09.2025 - 15:11DROPS Design answered:
Hi Pia, you read the diagram from right to left on the right side of you work, and from left to right from the wrong side. Please see HERE, the part 'Back and forth'. Happy knitting!
18.09.2025 - 10:06
![]() Anne Mette wrote:
Anne Mette wrote:
Skal omslagene ikke strikkes vrang hhv. drejet vrang på næste pind?
10.07.2025 - 22:24DROPS Design answered:
Hej Anne Mette. Jo det stämmer, vi ska ordna en rättelse på det. Mvh DROPS Design
11.07.2025 - 08:50
![]() Tina wrote:
Tina wrote:
Når jeg skal lave knaphuller i slutningen af retpinden, hvordan kan de så komme til at sidde på højre forkant? Vh Tina
14.02.2025 - 13:30DROPS Design answered:
Hej Tina, når du strikker oppefra og ned, så vil du starte med venstre forstykke fra retsiden, strikker ryggen og til sidst højre forstykke :)
18.02.2025 - 10:16
![]() Gunn M Mathiassen wrote:
Gunn M Mathiassen wrote:
17 cm fra deling til armer og bol,og til vrangbord nede, kan det være rett. Jakken ser mye sidere ut på bildet. !
05.04.2022 - 21:22
![]() Raffaella wrote:
Raffaella wrote:
Buongiorno scusate quando lo schema dice “ Aumentare facendo 1 gettato dopo ogni sezione a rovescio, a sezioni alterne” sezioni alterne intende 1 aumento ogni ferro non più di uno giusto? Grazie
09.03.2022 - 08:33DROPS Design answered:
Buonasera Raffaella, deve aumentare in una sezione a rovescio, saltare gli aumenti in quella successiva e aumentare in quella ancora dopo, e così via. Buon lavoro!
10.03.2022 - 23:15
![]() Deborah wrote:
Deborah wrote:
Buongiorno scusate ho un problema col campione. Ho provato con i ferri da 3 ma non raggiungo i 10 cm montando 21 maglie dove sbaglio? scusate sono una principiante
04.03.2022 - 16:58DROPS Design answered:
Buonasera Debora, deve rifare il campione con il numero di ferri che le permette di raggiungere le indicazioni. Buon lavoro!
04.03.2022 - 17:39
![]() Segalen wrote:
Segalen wrote:
Bonsoir. A l empiècement comment on obtient 198 mailles pour la taille S. On continue à augmenter 15 mailles à intervalles réguliers. merci pour votre réponse.
21.01.2022 - 21:39
![]() Segalen wrote:
Segalen wrote:
Bonsoir. A l empiècement comment on obtient 198 mailles pour la taille S. On continue à augmenter 15 mailles à intervalles réguliers. merci pour votre réponse.
21.01.2022 - 21:17DROPS Design answered:
Bonjour Mme Segalen, vous pensiez 298 je présume? on va augmenter comme indiqué dans A.1 autrement dit, on commence A.1 sur 10 mailles et, on augmente 2 m au 9ème rang, 1 m au 15ème rang et 2 m au 21ème rang; quand A.1 est terminé, vous avez: 6 m de bordure devant, 19 fois A.1 (= 19x15=285), la 1ère m de A.1 et 6 m de bordure devant soit: 298 m. Bon tricot!
24.01.2022 - 08:29
![]() Myra wrote:
Myra wrote:
How many yards or meters is in each skein of Drops Karisma (yarn group B)? Thank you.
19.01.2022 - 08:05
|
|||||||||||||
December Bloom Jacket#decemberbloomjacket |
|||||||||||||
 |
 |
||||||||||||
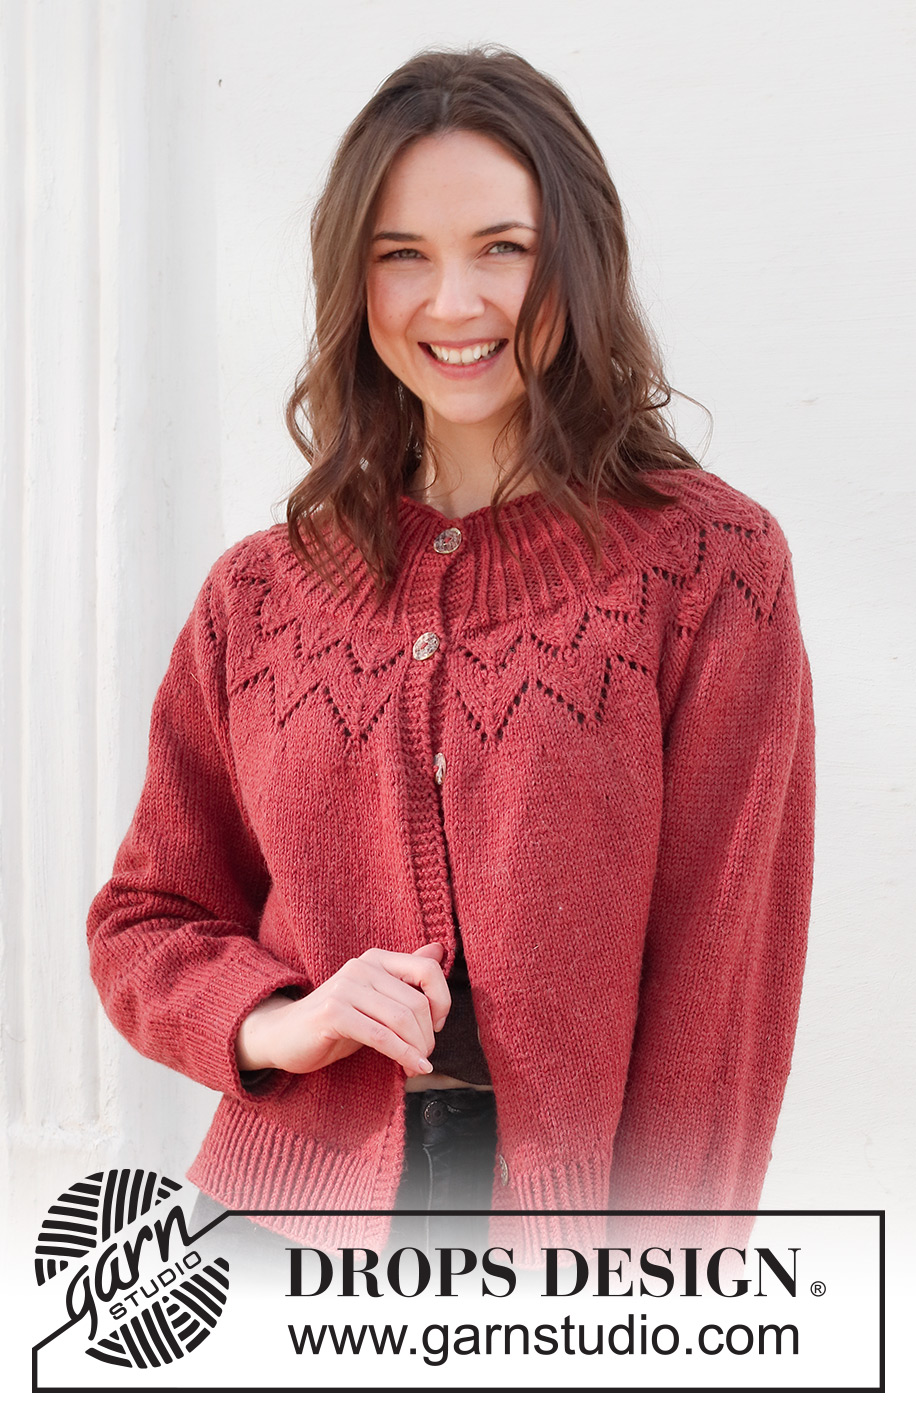
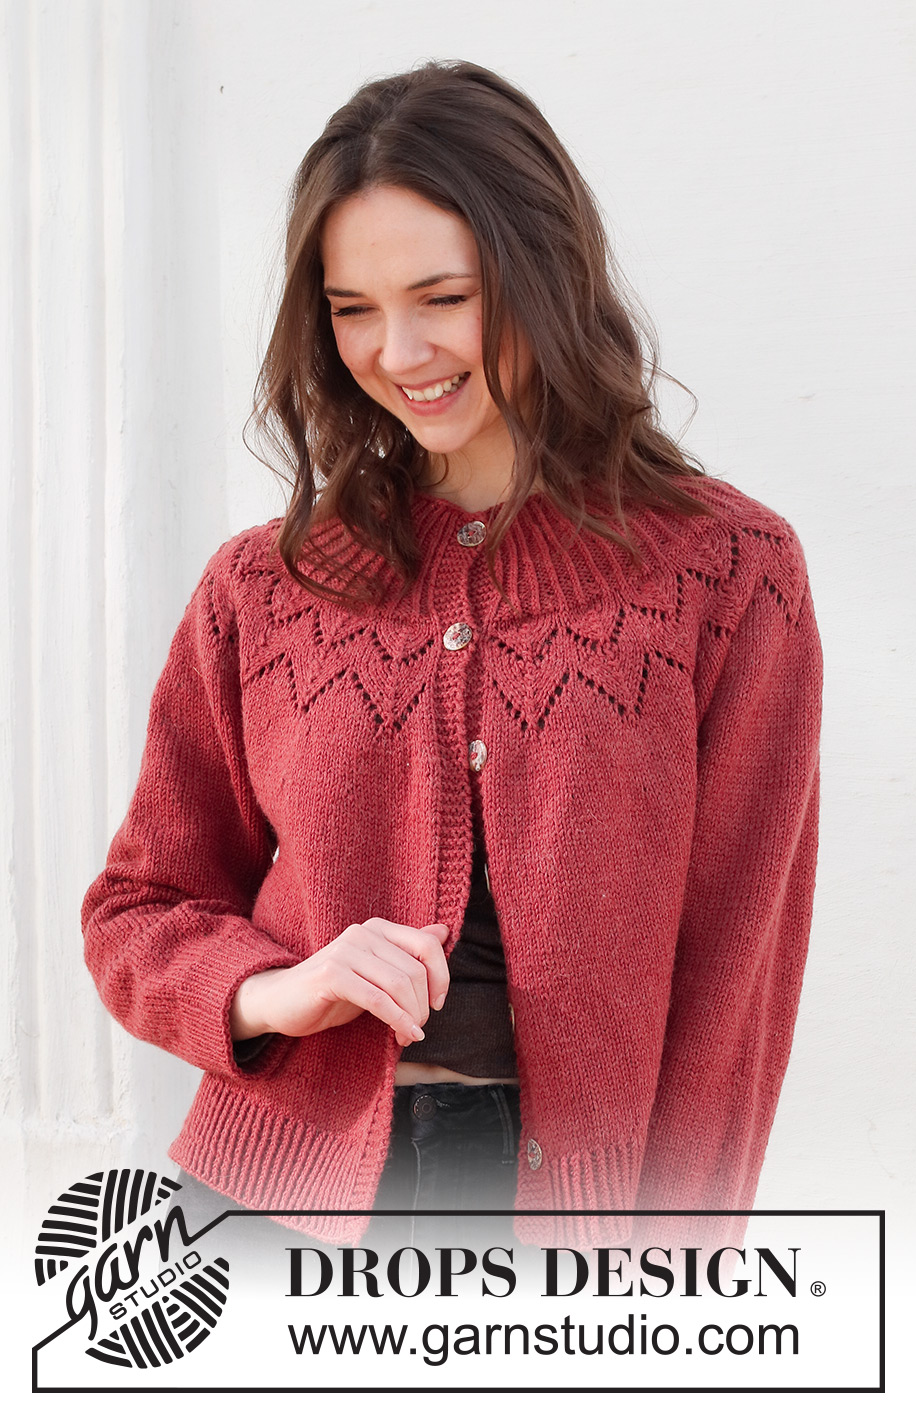
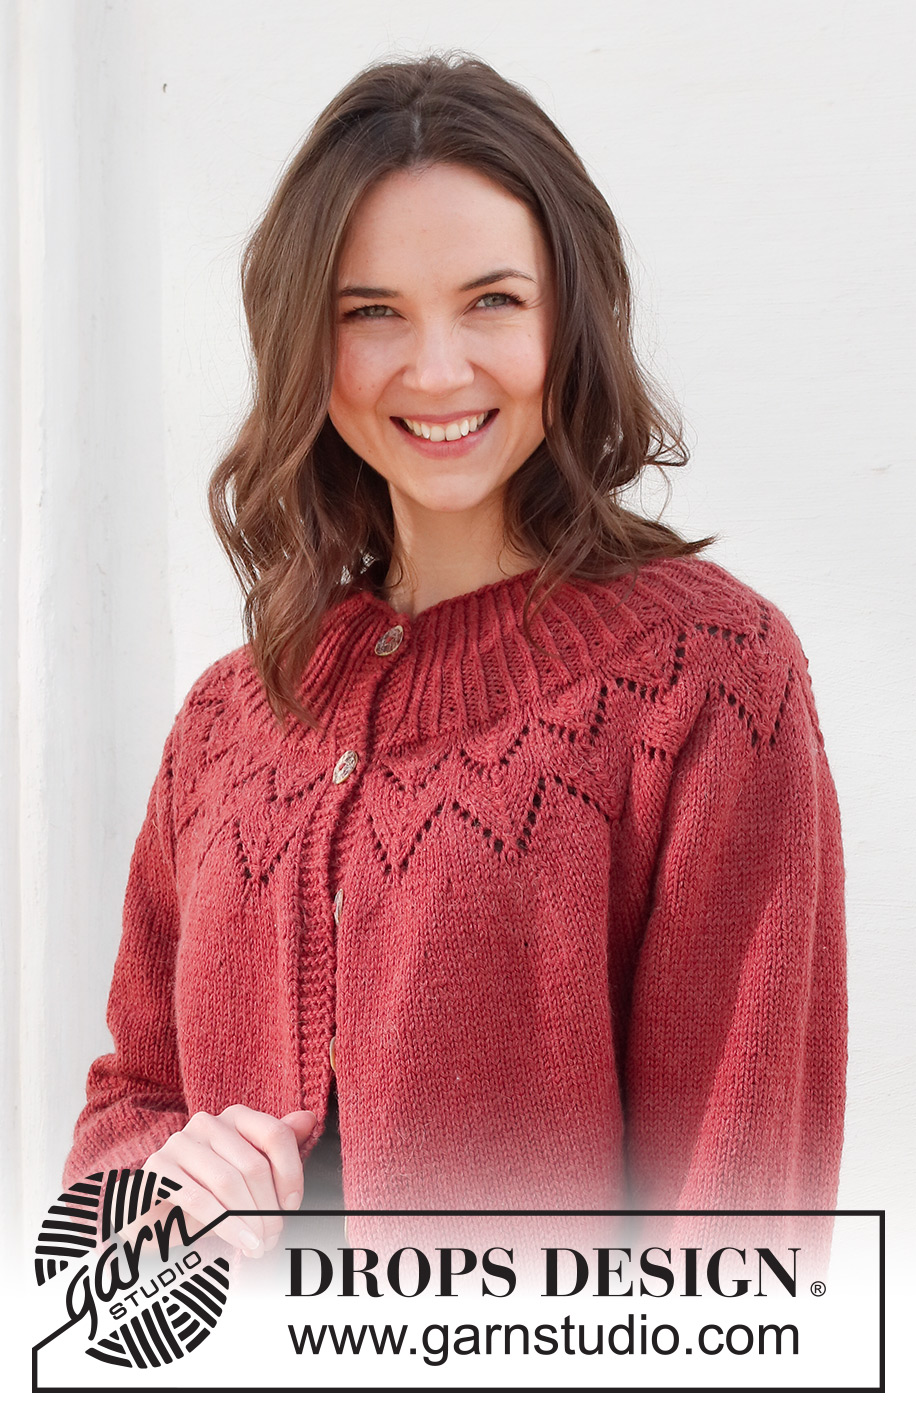
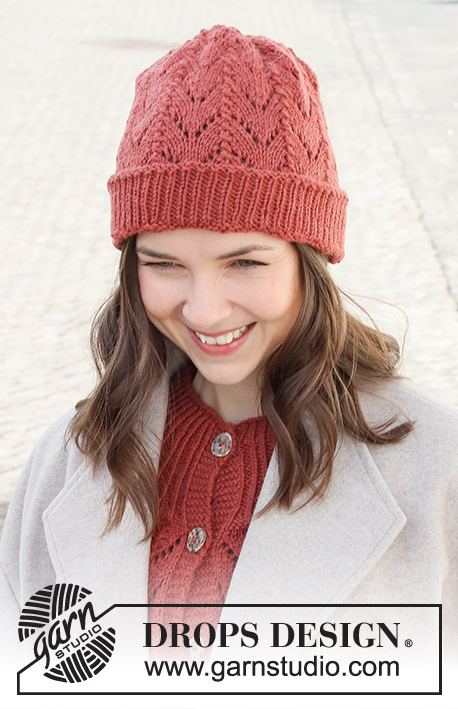
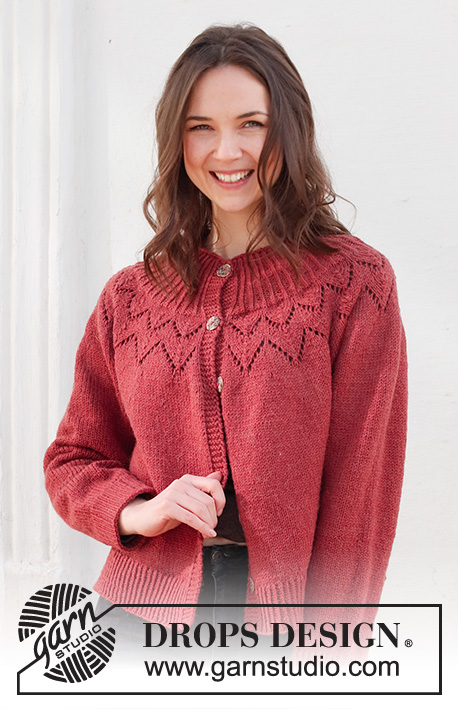
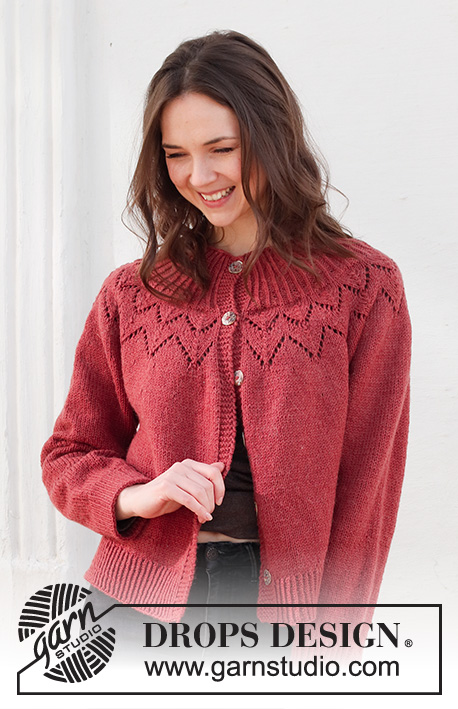
Knitted jacket in DROPS Lima or DROPS Karisma. The piece is worked top down, with round yoke, lace pattern, ribbed edges and split in the sides. Sizes S - XXXL.
DROPS 228-45 |
|||||||||||||
|
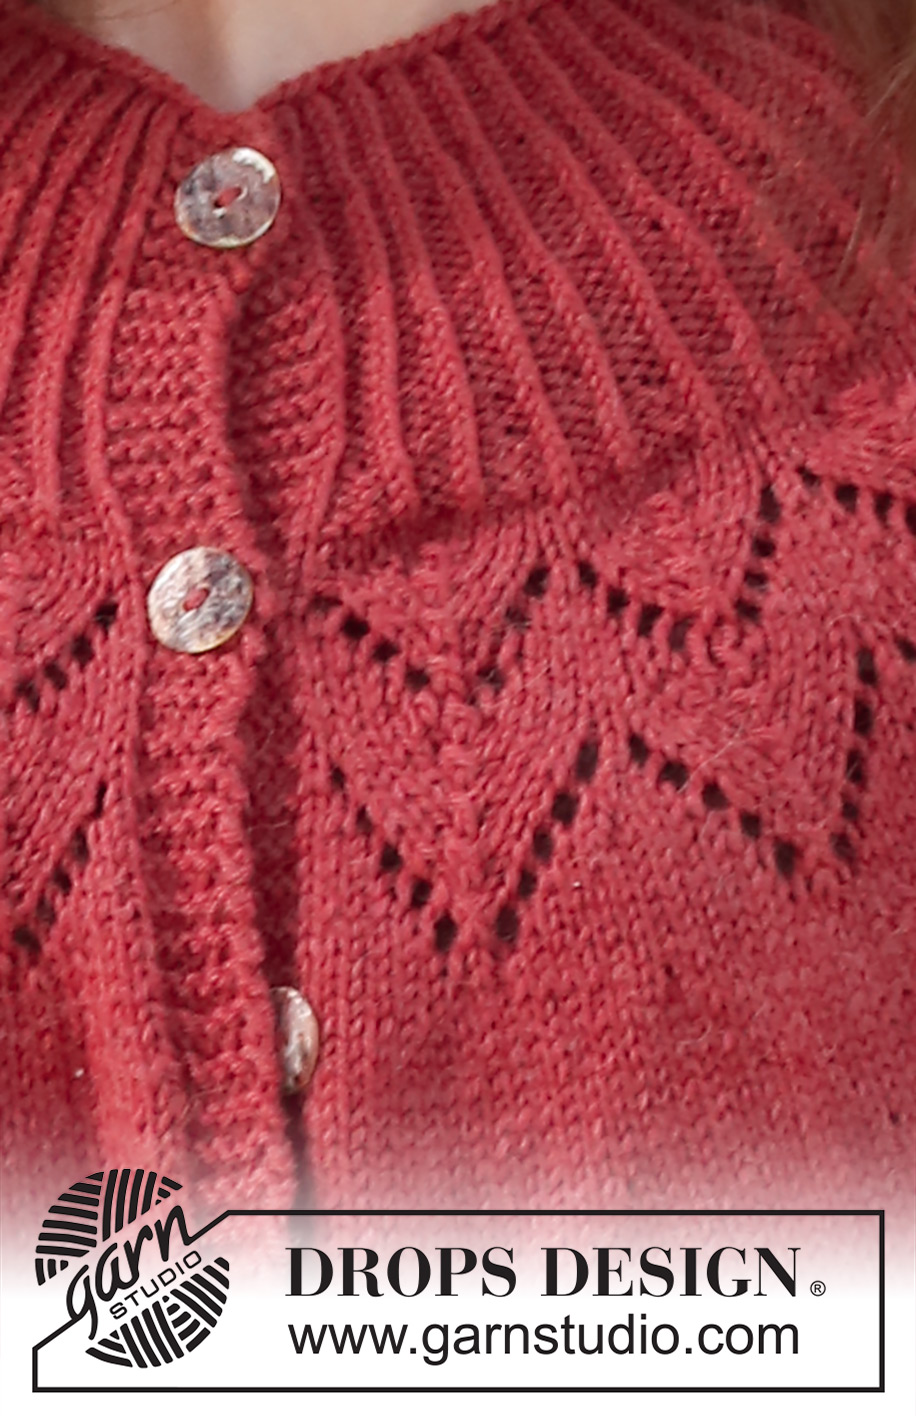
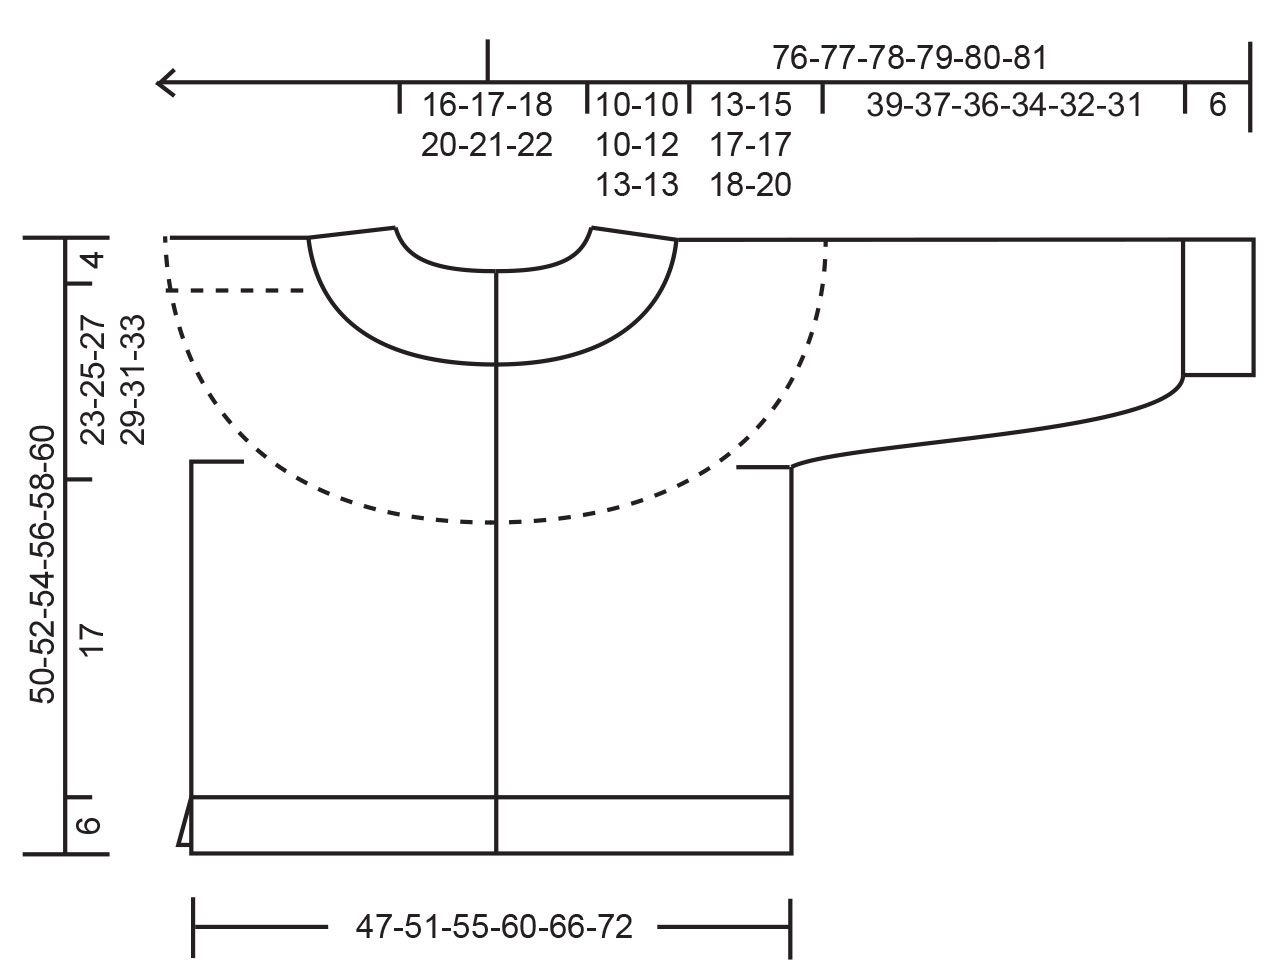
------------------------------------------------------- EXPLANATIONS FOR THE PATTERN: ------------------------------------------------------- RIDGE/GARTER STITCH (worked back and forth): Knit all rows. 1 ridge = knit 2 rows. INCREASE TIP-1: All increases are worked from the right side! Increase by making 1 yarn over after every other purled section. On the next row (wrong side) knit the yarn overs twisted to avoid holes. INCREASE TIP-2 (evenly spaced): To work out how to increase evenly, count the total number of stitches on the needle (e.g. 186 stitches), minus the bands (e.g. 12 stitches) and divide the remaining stitches by the number of increases to be made (e.g. 17) = 10.2. In this example, increase by making 1 yarn over after approx. each 10th stitch. On the next row work the yarn overs twisted to avoid holes. PATTERN: See diagram A.1. Choose diagram for your size. All rows in the pattern are shown from the right side. DECREASE TIP (for sleeves): Decrease 1 stitch on either side of the marker thread as follows: Work until there are 3 stitches left before the marker thread, knit 2 together, knit 2 (marker thread sits between these 2 stitches), slip 1 stitch as if to knit, knit 1 and pass the slipped stitch over the knitted stitch. BUTTONHOLES: Work buttonholes on the right band (when the garment is worn). Work from the right side when there are 4 stitches left on the row as follows: Make 1 yarn over, knit 2 together and knit 2. On the next row (wrong side), knit the yarn over to leave a hole. The first buttonhole is worked when the rib on the neck measures 2-2-3-2-2-3 cm = ¾"-¾"-1⅛"-¾"-¾"-1⅛". Then work the other 5-5-5-6-6-6 buttonholes with approx. 8½-9-9-8-8½-8½ cm = 3¼"-3½"-3½"-3⅛"-3¼"-3¼" between each one. BINDING-OFF TIP: To avoid the bind-off edge being tight you can bind off with a larger size needle. If the edge is still tight, make 1 yarn over after approx. each 6th stitch at the same time as binding off; the yarn overs are bind off as normal stitches. ------------------------------------------------------- START THE PIECE HERE: ------------------------------------------------------- JACKET – SHORT OVERVIEW OF THE PIECE: The neck and yoke are worked back and forth with circular needle, from mid front and top down. The yoke is divided for body and sleeves and the body is continued back and forth with circular needle. The sleeves are worked in the round with short circular needle/double pointed needles, top down. NECK: Cast on 113-117-121-129-133-137 stitches (including 6 band stitches on each side towards mid-front) with circular needle size 3.5 MM = US 4 and DROPS Lima or DROPS Karisma. Purl 1 row (= wrong side). Then work rib as follows: ROW 1 (= right side): 6 band stitches in GARTER STITCH – read description above, * knit 1 twisted, purl 1 *, work from *-* until there are 7 stitches left, knit 1 twisted and 6 band stitches in garter stitch. ROW 2 (= wrong side): 6 band stitches in garter stitch, * purl 1 twisted, knit 1 *, work from *-* until there are 7 stitches left, purl 1 twisted, 6 band stitches in garter stitch. Repeat rows 1 and 2. Remember the BUTTONHOLES on the right band – read description above. When the rib measures 3-3-3-3-4-4 cm = 1⅛"-1⅛"-1⅛"-1⅛"-1½"-1½", increase every other purl-1 (seen from the right side) to purl-2 – read INCREASE TIP-1 = 138-143-148-158-163-168 stitches. When the rib measures 6-6-6-7-8-8 cm = 2⅜"-2⅜"-2⅜"-2¾"-3⅛"-3⅛", increase the remaining purl-1 to purl-2 = 163-169-175-187-193-199 stitches. When the rib measures 9-9-9-11-12-12 cm = 3½"-3½"-3½"-4⅜"-4¾"-4¾", increase every other purl-2 to purl-3 = 188-195-202-216-223-230 stitches. Continue working until the rib measures 10-10-10-12-13-13 cm = 4"-4"-4"-4¾"-5⅛"-5⅛" – finish after a row from the wrong side. YOKE: Change to circular needle size 4 MM = US 6. Start from the right side and work 4 rows of stockinette stitch with 6 band stitches in garter stitch on each side – AT THE SAME TIME on row 3 (right side), increase 15-18-21-25-30-35 stitches evenly spaced – read INCREASE TIP-2 = 203-213-223-241-253-265 stitches. After the 4 rows, work as follows from the right side: 6 band stitches in garter stitch, work A.1 until there are 7 stitches left (= 19-20-21-19-20-21 repeats of 10-10-10-12-12-12 stitches), work the first stitch in A.1 so the pattern is symmetrical and 6 band stitches in garter stitch. Continue this pattern. REMEMBER THE KNITTING GAUGE! When A.1 has been completed in height there are 298-313-328-355-373-391 stitches and the piece measures approx. 19-19-19-23-24-24 cm = 7½"-7½"-7½"-9"-9½"-9½" from the cast-on edge. Continue with stockinette stitch and 6 band stitches in garter stitch on each side. AT THE SAME TIME on the first row from the right side increase 18-24-30-32-34-40 stitches evenly spaced = 316-337-358-387-407-431 stitches. When the piece measures 21-21-21-25-26-26 cm = 8¼"-8¼"-8¼"-9¾"-10¼"-10¼", increase 13-16-19-22-25-28 stitches evenly spaced = 329-353-377-409-432-459 stitches. The increases are finished in S, M and L – go to ALL SIZES. SIZES XL, XXL and XXXL: Continue working until the piece measures 27-28-29 cm = 10⅝"-11"-11⅜". On the next row from the right side increase 8-9-14 stitches evenly spaced = 417-441-473 stitches. The increases are finished in XL, XXL and XXXL – go to ALL SIZES. ALL SIZES: = 329-353-377-417-441-473 stitches. Continue with stockinette stitch and 6 band stitches in garter stitch on each side (but without further increases) until the piece measures 23-25-27-29-31-33 cm = 9"-9¾"-10⅝"-11⅜"-12¼"-13" from the cast-on edge. Now divide the yoke for the body and sleeves on the next row as follows: Work 52-56-59-65-70-76 stitches (= front piece), place the next 66-70-76-84-86-90 stitches on a thread for the sleeve, cast on 6-6-8-8-10-10 stitches (= in side under sleeve), work 93-101-107-119-129-141 stitches (= back piece), place the next 66-70-76-84-86-90 stitches on a thread for the sleeve, cast on 6-6-8-8-10-10 stitches (= in side under sleeve), work 52-56-59-65-70-76 stitches (= front piece). Body and sleeves are finished separately. THE PIECE IS NOW MEASURED FROM HERE! BODY: = 209-225-241-265-289-313 stitches. Insert 1 marker thread 55-59-63-69-75-81 stitches in from each side. There are 99-107-115-127-139-151 stitches between the threads on the back piece. Allow the threads to follow your work onwards; they are used when dividing for the split in each side. Work stockinette stitch with 6 band stitches on each side, back and forth for 17 cm = 6¾". There is approx. 6 cm = 2⅜" left to finished length. Try the jacket on and work to desired length. Now divide for the split in each side. Keep the first 55-59-63-69-75-81 stitches from the left front piece on the needle, place the other stitches on a thread or extra needle. LEFT FRONT PIECE (when the garment is worn): = 55-59-63-69-75-81 stitches. To avoid the following rib being tight, stitches are increased as described below. Knit 1 row from the right side where you increase 17-17-19-21-23-25 stitches evenly spaced = 72-76-82-90-98-106 stitches. Change to circular needle size 3.5 MM = US 4 and work rib from the side as follows: ROW 1 (wrong side): 1 edge stitch in garter stitch, * purl 1 twisted, knit 1 *, work from *-* until there are 7 stitches left, purl 1 twisted and 6 band stitches in garter stitch. ROW 2 (right side): 6 band stitches in garter stitch, * knit 1 twisted, purl 1 *, work from *-* until there are 2 stitches left, knit 1 twisted and 1 edge stitch in garter stitch. Repeat rows 1 and 2 until the rib measures 6 cm = 2⅜". Bind off from the right side with garter stitch over garter stitch, knit twisted over knit twisted and purl over purl – read BINDING-OFF TIP! The jacket measures approx. 50-52-54-56-58-60 cm = 19¾"-20½"-21¼"-22"-22¾"-23⅝" from the shoulder down. RIGHT FRONT PIECE: Place the 55-59-63-69-75-81 stitches from the right front piece on circular needle size 4 MM = US 6. Knit 1 row from the right side where you increase 17-17-19-21-23-25 stitches evenly spaced = 72-76-82-90-98-106 stitches. Change to circular needle size 3.5 MM = US 4 and work rib from mid-front as follows: ROW 1 (wrong side): 6 band stitches in garter stitch, * purl 1 twisted, knit 1 *, work from *-* until there are 2 stitches left, purl 1 twisted and 1 edge stitch in garter stitch. ROW 2 (right side): 1 edge stitch in garter stitch, * knit 1 twisted, purl 1 *, work from *-* until there are 7 stitches left, knit 1 twisted and 6 band stitches in garter stitch. Repeat rows 1 and 2 until the rib measures 6 cm = 2⅜". Bind off from the right side with garter stitch over garter stitch, knit twisted over knit twisted and purl over purl 1 BACK PIECE: Place the remaining 99-107-115-127-139-151 stitches onto circular needle size 4 MM = US 6. Knit 1 row from the right side where you increase 30-32-34-38-42-46 stitches evenly spaced = 129-139-149-165-181-197 stitches. Change to circular needle size 3.5 MM = US 4 and work rib as follows: ROW 1 (wrong side): 1 edge stitch in garter stitch, * purl 1 twisted, knit 1 *, work from *-* until there are 2 stitches left, purl 1 twisted and 1 edge stitch in garter stitch. ROW 2 (right side): 1 edge stitch in garter stitch, * knit 1 twisted, purl 1 *, work from *-* until there are 2 stitches left, knit 1 twisted and 1 edge stitch in garter stitch. Repeat rows 1 and 2 until the rib measures 6 cm = 2⅜". Bind off from the right side with garter stitch over garter stitch, knit twisted over knit twisted and purl over purl. SLEEVES: Place the 66-70-76-84-86-90 stitches from the thread on the one side of the piece on double pointed needles/short circular needle size 4 MM = US 6 and knit up 1 stitch in each of the 6-6-8-8-10-10 stitches cast on under the sleeve = 72-76-84-92-96-100 stitches. Insert a marker thread in the middle of the 6-6-8-8-10-10 stitches under the sleeve. Allow the thread to follow your work onwards; it will be used when decreasing under the sleeve. Start at the marker thread and work stockinette stitch in the round. When the piece measures 2 cm = ¾" from the division in all sizes, decrease 2 stitches under the sleeve – read DECREASE TIP. Decrease like this every 3½-3-2½-1½-1½-1½ cm = 1¼"-1⅛"-1"-½"-½"-½" a total of 11-12-14-18-19-20 times = 50-52-56-56-58-60 stitches. Continue working until the sleeve measures 39-37-36-34-32-31 cm = 15¼"-14½"-14¼"-13⅜"-12½"-12¼" from the division (shorter measurements in larger sizes due to wider neck and longer yoke). There is approx. 6 cm = 2⅜" left to finished length. Try the sweater on and work to desired length. Knit 1 round where you increase 2-4-2-4-4-6 stitches evenly spaced = 52-56-58-60-62-66 stitches. Change to double pointed needles size 3.5 MM = US 4 and work rib (knit 1 twisted, purl 1) for 6 cm = 2⅜". Bind off with knit twisted over knit twisted and purl over purl – remember BINDING-OFF TIP! The sleeve measures approx. 45-43-42-40-38-37 cm = 17¾"-17"-16½"-15¾"-15"-14½" from the division. Work the other sleeve in the same way. ASSEMBLY: Sew the buttons onto the left band. |
|||||||||||||
Diagram explanations |
|||||||||||||
|
|||||||||||||
 |
|||||||||||||
 |
|||||||||||||
Have you finished this pattern?Tag your pictures with #dropspattern #decemberbloomjacket or submit them to the #dropsfan gallery. Do you need help with this pattern?You'll find 34 tutorial videos, a Comments/Questions area and more by visiting the pattern on garnstudio.com. © 1982-2026 DROPS Design A/S. We reserve all rights. This document, including all its sub-sections, has copyrights. Read more about what you can do with our patterns at the bottom of each pattern on our site. |
|||||||||||||


With over 40 years in knitting and crochet design, DROPS Design offers one of the most extensive collections of free patterns on the internet - translated to 17 languages. As of today we count 324 catalogs and 12290 patterns - 12280 of which are translated into English (US/in).
We work hard to bring you the best knitting and crochet have to offer, inspiration and advice as well as great quality yarns at incredible prices! Would you like to use our patterns for other than personal use? You can read what you are allowed to do in the Copyright text at the bottom of all our patterns. Happy crafting!
Post a comment to pattern DROPS 228-45
We would love to hear what you have to say about this pattern!
If you want to leave a question, please make sure you select the correct category in the form below, to speed up the answering process. Required fields are marked *.