
Popular categories
Looking for a yarn?


Comments / Questions (137)
![]() Lindy wrote:
Lindy wrote:
I have 221 stitches (M size), 118 for front and 103 for the back. The next thing I have to do is the 2 rounds of garter stitch. I think I may have messed up my marker threads because there are not an equal number of stitches on either side of A2 - making the front lopsided. How many stitches should there be for the back and how many for the front please? Alternatively, how many stitches should there be on either side of the center pattern - A2? Thank you very much!!!
20.07.2023 - 00:32DROPS Design answered:
Dear Lindy, at the beginning, after the rib you have 205 stitches. 103 for the front and 102 for the back. You will maintain this 1 stitch difference the whole pattern, so the increases should be the same on both sides of the piece. So, with 221 stitches you should have 111 stitches on the front piece and 110 stitches on the back piece. You need to increase at both sides of the markers. The charts are kept as before, you simply increase over the stitches in stocking stitch. Happy knitting!
20.07.2023 - 12:10
![]() Lindy wrote:
Lindy wrote:
I have 221 stitches (M size), 118 for front and 103 for the back. The next thing I have to do is the 2 rounds of garter stitch. I think I may have messed up my marker threads because there are not an equal number of stitches on either side of A2 - making the front lopsided. How many stitches should there be for the back and how many for the front please? Alternatively, how many stitches should there be on either side of the center pattern - A2? Thank you very much!!!
19.07.2023 - 22:27DROPS Design answered:
Dear Lindy, at the beginning, after the rib you have 205 stitches. 103 for the front and 102 for the back. You will maintain this 1 stitch difference the whole pattern, so the increases should be the same on both sides of the piece. So, with 221 stitches you should have 111 stitches on the front piece and 110 stitches on the back piece. You need to increase at both sides of the markers. The charts are kept as before, you simply increase over the stitches in stocking stitch. Happy knitting!
20.07.2023 - 12:10
![]() Lindy wrote:
Lindy wrote:
I get the instructions for the cast off for armholes. I assume I re-attach yarn for the back. What do I do with the stitches for left and right front pieces while working on the back? Thanks. I wonder if there is there a video for these instructions please?
15.07.2023 - 14:59DROPS Design answered:
Hi Lindy, you have to put stithes for front pieces on another needle or scrap yarn (see the video HERE). Happy knitting!
15.07.2023 - 15:26
![]() Nadia wrote:
Nadia wrote:
Bonjour, Que veut dire : tricoter 7 mailles jersey, A1 au dessus des 30 m suivantes..... je ne comprends pas « au-dessus « Merci d’avance
02.07.2023 - 09:52DROPS Design answered:
Bonjour Nadia, vous devez simplement tricoter les 30 mailles suivantes en suivant le diagramme A.1 autrement dit, vous répétez 3 fois les 10 mailles du diagramme. Bon tricot!
03.07.2023 - 10:30
![]() Johanne wrote:
Johanne wrote:
Bonjour, je viens de réaliser l'échantillon, et pour parvenir à 10 cm de large je suis à 30 mailles et non 24 sur aiguille 3mm. Avec 24 mailles j'arrive à 8cm. Comment puis-je faire ? Merci ! Je souhaite réaliser la taille S.
28.06.2023 - 16:20
![]() Alf wrote:
Alf wrote:
Hi, I’m quite confused by the stocking stitches being (large) 9 on each side of the markers, increased 4 times means it should be 13 on each side of the markers - “Work next round as follows: Work 7-2-7-9-6-2 stitches in stocking stitch, ” and then when it’s time to do the garter stitch it says “Now work in 2 ridges in GARTER STITCH - read explanation above, over the middle 8-10-12-16-20-26 stitches in each side” - does this mean on each marker, so 8 on each side of the marker?
26.06.2023 - 10:53DROPS Design answered:
Dear Alf, you worked 16 sts (8 sts on each side of each marker) in garter stitch on each side but you will keep 1 of these stitch as edge stitch under each piece (front and back piece), so that you will cast off only 7 sts, work the remaining stitch in garter stitch, work as before until 7 sts remain before next marker and cast off 14 sts (leaving 1 edge stitch in garter stitch on each side of each piece) and work until 7 sts remain, then cast off these last 7 sts. Happy knitting!
26.06.2023 - 13:17
![]() Lindy wrote:
Lindy wrote:
I am not using circular needles. I am confused as to where to increase after completing 2". Anyone out there who can help please? I have a marker after 103 rd stitch. This seems to be a very complicated pattern.
22.06.2023 - 02:07DROPS Design answered:
Dear Lindy, don't give up! This pattern is not so tricky, it just may seem confusing because you're not knitting in the round. So. You have 2 markers in piece - it marks sides of garment: one of them is at the beginning of round (or row in your case), second one after 103rd st. See Incerease tip above the pattern. By the 1st marker you have to divide increasing for beg and end of row, so at the beg work 2 sts, 1YO, continue as usual, by the 2nd marker inc as written TIP and work till 2 sts remains on row, 1YO, work 2sts. (Do you have additional end sts? If so, don't count them in our numbers - it will be used in side seam.) Happy knitting!
22.06.2023 - 09:00
![]() Lindy wrote:
Lindy wrote:
I finished the rib and deceased stitches to 205 on the knit 1 round. Am I correct in assuming that the next row would be purled. I am using straight needles. Given that, starting chart A.1 on the 5th row up, the Knit 2 tog, y/o would be on the purl (wrong) side? It seems that it should be on the right side? Please advise. Thank you.
20.06.2023 - 22:50DROPS Design answered:
Dear Lindy, if you work in rows instead of in the round, you might even need extra stitches (edge stitches for seam allowance), then you can indeed work 1 row from WS so that you will work the diagrams starting from RS (lace pattern should be worked from RS). Happy knitting!
21.06.2023 - 08:08
![]() Crystal Buchanan Falc wrote:
Crystal Buchanan Falc wrote:
Are there measurements for the sizes? I can not see them on desktop using chrome, and for one day I could see it using mobile, but today that is gone too. The original in Norwegian is also missing the measurements. Thank you!
19.06.2023 - 16:48DROPS Design answered:
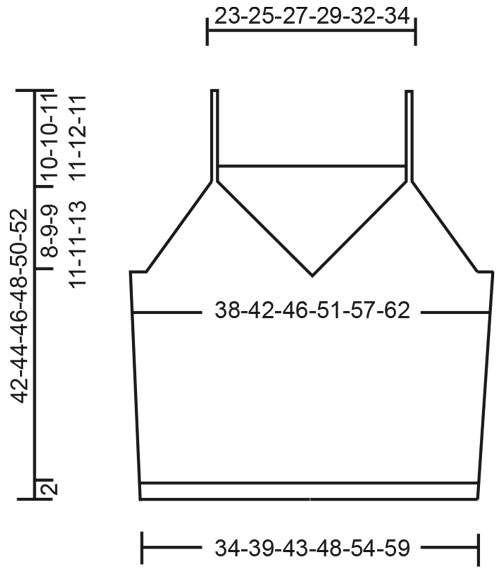
Dear Mrs Buchanan Falc, you will find the measurement chart at the bottom of the page after written pattern and diagrams. These measurements are taken flat from side to side. Measure a similar garment you have and like the shape to find out which size to choose. Read more here. Happy knitting!
20.06.2023 - 07:59
![]() Laura wrote:
Laura wrote:
Hallo, Ik heb een vraagje over het patroon. van dit topje waar ik nu mee bezig ben heb ik het eerste deel van de boord goed kunnen maken. nu zit ik aan het volgende deel waarbij ik eerst 2 tricotsteken moet breien, dan A1 moet volgen, dan A2 enz. Ik vroeg me nu af of dit nog steeds in de rondte moet gemaakt worden en als ik de steken optel die ik moet breien kom ik geen 93 steken uit zoals ik heb moeten aanduiden in mijn breiwerk. Ik snap dus niet wat ik moet doen. Kan u mij helpen?
09.05.2023 - 14:46DROPS Design answered:
Dag Laura,
Je breit na de boordsteek inderdaad door in de hoogte tot de armsgaten. Welke maat brei je en op hoeveel steken kom je uit? Of hoeveel steken houd je over?
17.05.2023 - 17:59
|
||||||||||||||||
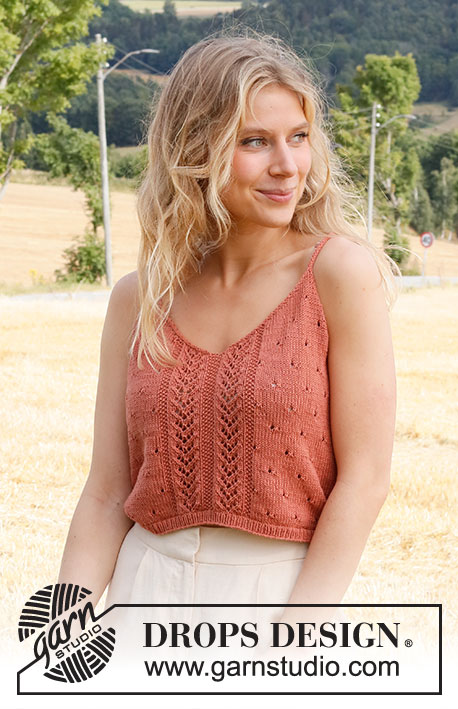
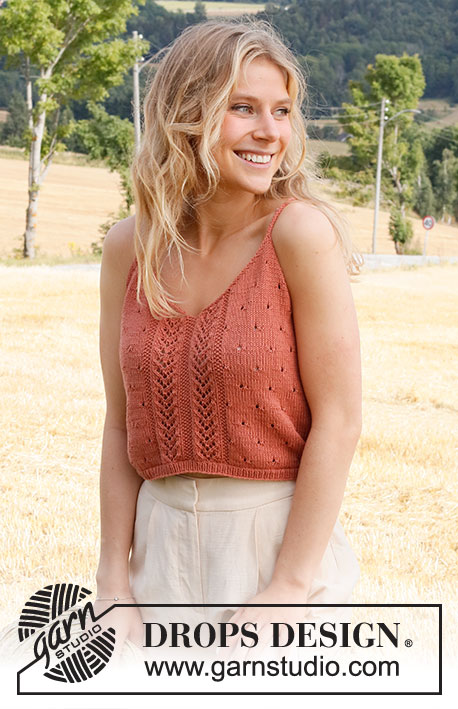
Heart on Fire#heartonfiretop |
||||||||||||||||
 |
 |
|||||||||||||||
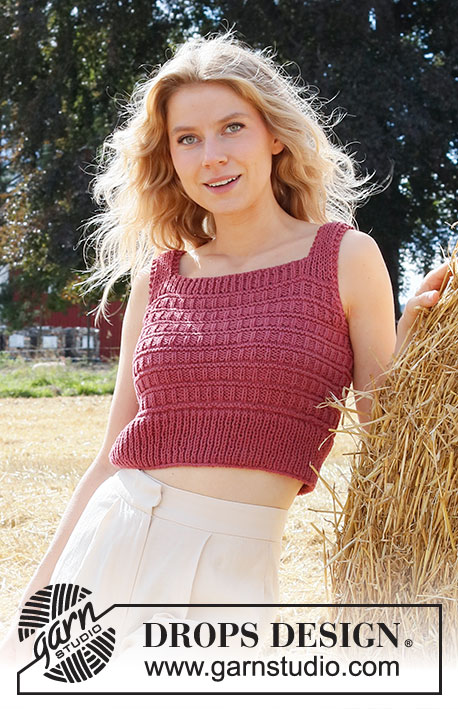
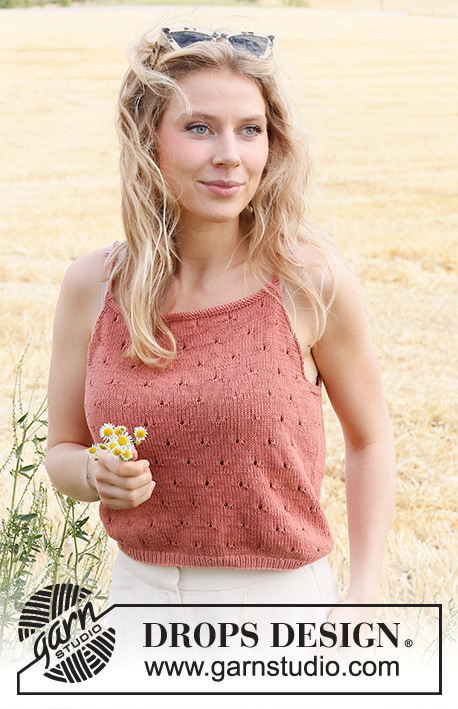
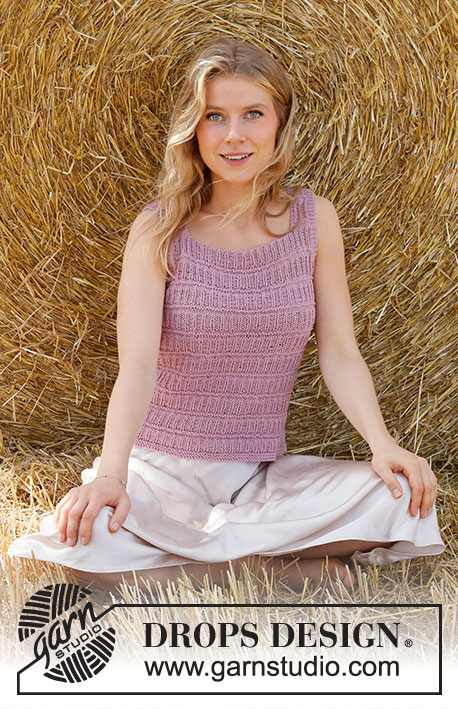
Knitted top in DROPS Safran. Piece is knitted with lace pattern and V-neck. Size: XS - XXL.
DROPS 223-27 |
||||||||||||||||
|
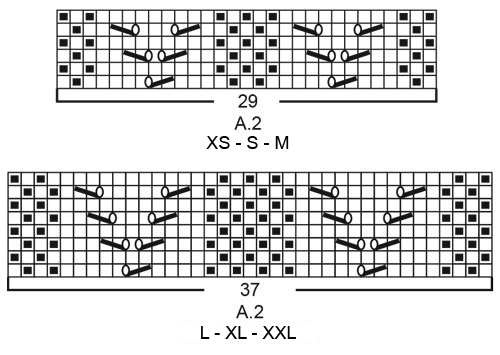
------------------------------------------------------- EXPLANATION FOR THE PATTERN: ------------------------------------------------------- GARTER STITCH (worked in the round): 1 ridge vertically = 2 rounds, i.e. knit 1 round and purl 1 round. GARTER STITCH (back and forth): Knit all rows. 1 ridge vertically = knit 2 rows. PATTERN: See diagrams A.1 to A.4. Choose diagram for your size (applies to A.2). Diagrams show all rows in pattern seen from the right side. DECREASE TIP-1 (evenly spaced): To calculate how to decrease evenly use the total number of stitches on row (e.g. 174 stitches) and divide stitches by number of decreases to be done (e.g. 10) = 17.4. In this example work alternately approx. every 16th and 17th stitch and every 17th and 18th stitch together. DECREASE TIP-2 (applies to the armholes and V-neck): Decrease inside 1 edge stitch in garter stitch. FROM RIGHT SIDE: DECREASE AS FOLLOWS AFTER 1 EDGE STITCH IN GARTER STITCH: Slip 1 stitch knitwise, knit 1, pass slipped stitch over stitch worked DECREASE AS FOLLOWS BEFORE 1 EDGE STITCH IN GARTER STITCH: Work until 2 stitches remain before edge stitch in garter stitch, knit these 2 together. FROM WRONG SIDE: DECREASE AS FOLLOWS AFTER 1 EDGE STITCH IN GARTER STITCH: Purl 2 together. DECREASE AS FOLLOWS BEFORE 1 EDGE STITCH IN GARTER STITCH: Work until 2 stitches remain before edge stitch in garter stitch, purl these 2 twisted together. INCREASE TIP (applies to sides of body): Work until 2 stitches remain before marker thread, make 1 yarn over, knit 4 (marker thread is in the middle of these 4 stitches), make 1 yarn over (= 2 stitches increased at the marker thread and 4 stitches increased on increase round in total). On next round knit yarns over twisted to avoid holes. Then work the new stitches in stockinette stitch until they fit the pattern. ------------------------------------------------------- START THE PIECE HERE: ------------------------------------------------------- TOP - SHORT OVERVIEW OF THE PIECE: Work body in the round on circular needle, from the bottom and up to armholes. Then finish front piece and back piece separately. Divide the front piece mid front for V-neck, and work the two parts back and forth on circular needle separately until finished measurements, then work strap on each front piece. Work back piece back and forth on circular needle until finished measurements. Sew straps from front piece on to back piece. BODY: Cast on 174-196-216-244-272-298 stitches on circular needle size 2.5 MM = US 1.5 with Safran. Knit 1 round. Then work rib in the round (= knit 1/purl 1) for 1½ to 2 cm = ½" to ¾". When rib is done, knit 1 round while decreasing 9-11-11-13-13-15 stitches evenly - read DECREASE TIP-1= 165-185-205-231-259-283 stitches. Switch to circular needle size 3 MM = US 2.5. Insert 1 marker thread at beginning of round and 1 marker thread after 83-93-103-115-129-141 stitches. 82-92-102-116-130-142 stitches remain on round for back piece. Move the marker threads upwards when working; they should be used for increase later in the sides on body. Work next round as follows: Work 7-2-7-9-6-2 stitches in stockinette stitch, work A.1 over the next 20-30-30-30-40-50 stitches (= 2-3-3-3-4-5 repetitions of 10 stitches), work A.2 (= 29-29-29-37-37-37 stitches), work A.3 over the next 20-30-30-30-40-50 stitches (= 2-3-3-3-4-5 repetitions of 10 stitches), work 14-4-14-18-12-4 stitches in stockinette stitch (marker thread is in the middle of these stitches), work A.1 over the next 60-80-80-90-110-130 stitches (= 6-8-8-9-11-13 repetitions of 10 stitches), work A.4 (= 8 stitches), and finish with 7-2-7-9-6-2 stitches in stockinette stitch. Continue pattern like this. REMEMBER THE KNITTING GAUGE! When piece measures 5-5-5-6-6-6 cm = 2"-2"-2"-2⅜"-2⅜"-2⅜", increase 1 stitch on each side of both marker threads – read INCREASE TIP (= 4 stitches increased). Increase like this every 5-5-5-5½-5½-6 cm = 2"-2"-2"-2⅛"-2⅛"-2⅜" 4 times in total in each side = 181-201-221-247-275-299 stitches. Work until piece measures 23-24-25-25-26-27 cm = 9"-9½"-9¾"-9¾"-10¼"-10⅝" - adjust so that next round is an odd numbered round in A.1 (this is important to avoid the lace pattern begin worked from wrong side when piece is divided into front and back piece). Now work in 2 ridges in GARTER STITCH - read explanation above, over the middle 8-10-12-16-20-26 stitches in each side (i.e. work 4-5-6-8-10-13 stitches in garter stitch on each side of both marker threads – work the other stitches as before). After the 2 ridges bind off for armholes and V-neck, i.e. work next round as follows: Bind off 3-4-5-7-9-12 stitches for armhole, work 42-46-50-54-59-62 stitches as before (= left front piece), bind off 1 stitch (= mid front), work 42-46-50-54-59-62 stitches as before (= right front piece), bind off 6-8-10-14-18-24 stitches for armhole, work as before over stitches on back piece until 3-4-5-7-9-12 stitches remain on round, and bind off the last 3-4-5-7-9-12 stitches for armhole. Cut the yarn and pull yarn through last stitch Finish back piece and front pieces separately. BACK PIECE: = 84-92-100-110-120-126 stitches. Begin from wrong side and continue pattern back and forth with 1 edge stitch in garter stitch in each side. AT THE SAME TIME on next row from right side begin decrease for armholes - read DECREASE TIP-2. Decrease for armholes in each side on every other row (i.e. every row from right side) 14-16-18-20-22-22 times in total in each side = 56-60-64-70-76-82 stitches. After last decrease work 1 row from wrong side as before. Switch to circular needle size 2.5 MM = US 1.5. Work 2 ridges back and forth over all stitches. Bind off knitting from right side. LEFT FRONT PIECE (when garment is worn): = 42-46-50-54-59-62 stitches. Begin from wrong side and continue pattern back and forth with 1 edge stitch in garter stitch in each side. AT THE SAME TIME on next row from right side begin decrease for armholes and V-neck and decrease as explained below – read DECREASE TIP-2: ARMHOLE: Decrease 1 stitch on every other row 13-14-15-17-18-20 times in total. V-NECK: Decrease 1 stitch on every row (i.e. from both right and wrong side) 24-27-30-32-36-37 times total. After all decreases for armholes and V-neck, 5 stitches remain on row for strap. Work strap as explained below. STRAP: Switch to 2 double pointed needles 2.5 MM = US 1.5 (slip stitches on one needle and work with the other). * Move stitches to the beginning of row, tighten yarn and knit the 5 stitches from right side *, work from *-* until strap measures approx. 18-18-19-20-21-20 cm = 7"-7"-7½"-8"-8¼"-8" (10-10-11-11-12-11 cm = 4"-4"-4⅜"-4⅜"-4¾"-4⅜" of this length belongs to front piece, the rest belongs to back piece - sew strap to back piece). Cut the yarn and pull yarn through the 5 stitches, tighten together and fasten. RIGHT FRONT PIECE (when garment is worn): = 42-46-50-54-59-62 stitches. Begin from wrong side and continue pattern back and forth with 1 edge stitch in garter stitch in each side. AT THE SAME TIME on next row from right side begin decreases for V-neck and armholes and decrease as explained below – read DECREASE TIP-2: V-NECK: Decrease 1 stitch on every row (i.e. from both right and wrong side) 24-27-30-32-36-37 times total. ARMHOLE: Decrease 1 stitch on every other row 13-14-15-17-18-20 times in total. After all decreases for V-neck and armholes, 5 stitches remain on row for strap. Work strap the same way as on left front piece. ASSEMBLY: Sew straps to back piece at the edge in each side. |
||||||||||||||||
Diagram explanations |
||||||||||||||||
|
||||||||||||||||
 |
||||||||||||||||
 |
||||||||||||||||
 |
||||||||||||||||
Have you finished this pattern?Tag your pictures with #dropspattern #heartonfiretop or submit them to the #dropsfan gallery. Do you need help with this pattern?You'll find 25 tutorial videos, a Comments/Questions area and more by visiting the pattern on garnstudio.com. © 1982-2026 DROPS Design A/S. We reserve all rights. This document, including all its sub-sections, has copyrights. Read more about what you can do with our patterns at the bottom of each pattern on our site. |
||||||||||||||||


With over 40 years in knitting and crochet design, DROPS Design offers one of the most extensive collections of free patterns on the internet - translated to 17 languages. As of today we count 324 catalogs and 12290 patterns - 12280 of which are translated into English (US/in).
We work hard to bring you the best knitting and crochet have to offer, inspiration and advice as well as great quality yarns at incredible prices! Would you like to use our patterns for other than personal use? You can read what you are allowed to do in the Copyright text at the bottom of all our patterns. Happy crafting!
Post a comment to pattern DROPS 223-27
We would love to hear what you have to say about this pattern!
If you want to leave a question, please make sure you select the correct category in the form below, to speed up the answering process. Required fields are marked *.