
Popular categories
Looking for a yarn?



































Comments / Questions (53)
 Aleksandra wrote:
Hello! Can you please tell me from wich side should I start the left front piece, right or wrong? Thank you for your answer!
18.09.2026 - 22:06DROPS Design answered:
Hi Aleksandra, The left front piece is started from the right side (as the last row before casting off for the armholes was from the wrong side). Regards, Drops Team.
20.09.2026 - 08:09
Chrissy wrote:
Dear DropsDesign, thank you, but I’m still confused because the replies seem contradictory. Could you please show the exact first two V-neck decreases on the right front, stitch by stitch? Please list the first 11 stitches in order, identifying the button-band and lace/body stitches, so I can also see how to work the stitches immediately after the decrease. And please confirm if the button band remains 7 or 6 stitches after the first decrease.
17.08.2026 - 22:12DROPS Design answered:
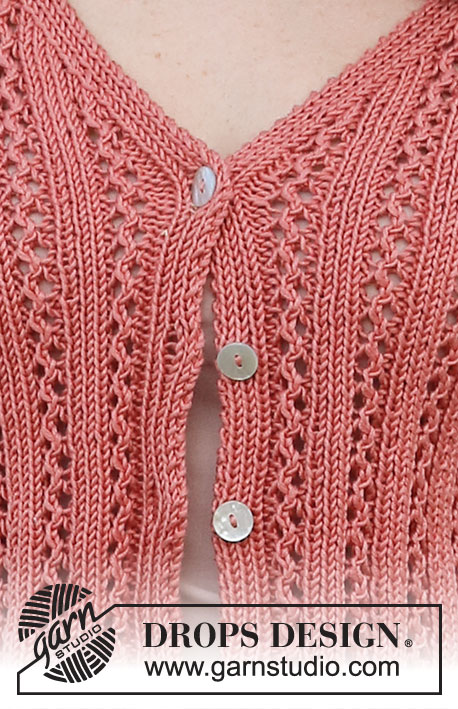
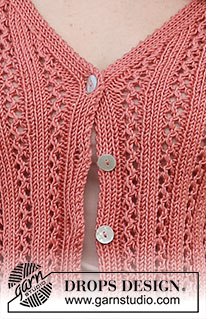
Dear Chrissy, if you look at the last picture you will see that the purl stitch inside the bands disappear, so decrease will be worked just as explained in the pattern inside the 5 front band stitches (the decrease stitch will be the 6th of these front band stitches). The stitches after the decreases are worked as before but if you don't have enough stitches to work the lace pattern (2 sts worked together + 1 yarn over) knit the remaining of these 2 stitches. Happy knitting!
18.08.2026 - 10:02
Chrissy wrote:
Please, can you explain in detail how to do the V-neck decreases as the pattern suggests that the decreases are within the button band and in two of the answers to questions you have said two different thing - one from 27.03.2026 saying the decreases are in the lace pattern and one from 04.05.2026 saying the decreases are within the 7-stich button band. I've made quite a few of Drops Design patterns and have not had any issues, but I have to agree with others that this one is not clear.
15.08.2026 - 14:27DROPS Design answered:
Dear Chrissy, the decreases for V-neck are worked after the first 5 stitches at the beginning of a row from RS on right front piece - you will decrease 15 - 28 times (see size) every row from RS, so that the lace pattern will decrease by and by; when there are not enough stitches to work the lace pattern due to the decreases, work the stitches in stocking stitch instead (there are now only 6 stitches for the front band: the first 5 sts + k1 (as before) = the decrease. Happy knitting!
17.08.2026 - 08:35
 Marie -Hélène wrote:
Pour les 7m de A3 et A4, on commence à la deuxième ligne, donc 1 dim, ensuite on a 6 m. Au troisième rang doit on revenir à la première ligne du diagramme ?
13.07.2026 - 17:52DROPS Design answered:
Bonjour Marie-Hélène, lorsque le 2ème rang de A.3/A.4 est fait (celui avec la flèche), vous tricotez les 6 mailles restantes comme indiqué au dernier rang des diagrammes (le carré noir n'est pas une maille car elle a été diminuée auparavant, sautez simplement cette case). Bon tricot!
03.08.2026 - 07:41
Maisie wrote:
Hello, How do i count the stitches for the front pannel decreasing. should the first 5 stitches be, the purl, yo, slip, knit, slip? or does the slip knit slip count as 2 stitches not 3?
02.05.2026 - 14:09DROPS Design answered:
Dear Maisie, work the first 5 sts as before, ie as shown in A.1 and now work the last 2 sts decreasing 1 st: slip 1 (the 6th st A.1), knit 1 (the last stitch A.1) and psso = there are now only 6 sts in A.1, just continue working these sts as before and decrease the same way all the way (on next decrease you will slip the last st A.1 knit the next stitch front piece/pattern and psso). Happy knitting!
04.05.2026 - 11:48
 Muriel wrote:
Explications incompréhensibles !!! J'ai mis plusieurs heures à comprendre et l'adapter à ma sauce C'est un très joli modele
16.04.2026 - 12:37DROPS Design answered:
Bonjour Muriel, nous sommes désolés de lire que vous n'avez pas compris les explications, dans ces cas-là, n'hésitez pas à poser votre question ici en indiquant la ou les parties que vous ne comprenez pas, ainsi, nous pourrons vous aider. Bonne continuation!
16.04.2026 - 16:42
Selena wrote:
Hi, I have a question about the decreases for the V-neck. The pattern says to decrease after the 5th stitch, but that would make the band more narrow and in the pictures it remains the same width. Do you need to decrease in the button band and move your stitch marker to keep the 7 stitches or decrease in the lace pattern? Thanks!
26.03.2026 - 22:53DROPS Design answered:
Hi Selena, The button bands remain the same throughout (7 stitches) and the decreases for the V-neck are after these stitches, so in the lace pattern. Regards, Drops Team.
27.03.2026 - 06:20
 Sylvi Lian wrote:
Lurer som sagt på hvilke masker som skal strikkes vrangt etter å ha strikket A3 og A4, siste pinne.
20.03.2026 - 20:07DROPS Design answered:
Hei Sylvi. Du strikker da fra vrangen og de 2-6-8-12-20-22 maskene som strikkes i glattstrikk (rett fra retten) 4 steder /på hver side av A.4, strikkes vrang fra vrangen (= de resterende maskene). mvh DROPS Design
23.03.2026 - 08:03
Sylvi Lian wrote:
Lurer også på dette etter å ha byttet til pinne 4: strikk siste pinne i diagrammene over A3 og A4. Strikk vrang over de resterende masker. Hvilke masker?
20.03.2026 - 12:41
Sylvi Lian wrote:
Hva betyr det at A6 strikkes over A4? Fint med en ordentlig forklaring på dette.
19.03.2026 - 22:07DROPS Design answered:
Hei Sylvi, Når A.4 er ferdig er det 6 masker i hver rapport. Da fortsetter du med å strikke A.6 rett ovenfor A.4 (over de samme 6 maskene). Hilsen Drops Team.
20.03.2026 - 05:36
|
||||||||||||||||||||||
Coral Gables Cardigan#coralgablescardigan |
||||||||||||||||||||||
 |
 |
|||||||||||||||||||||
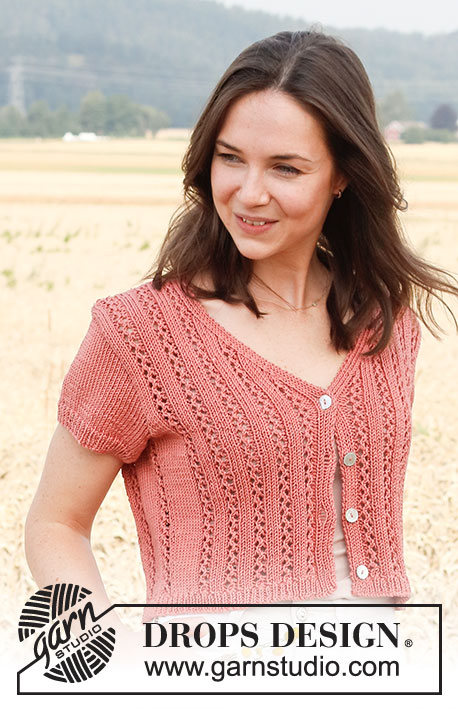
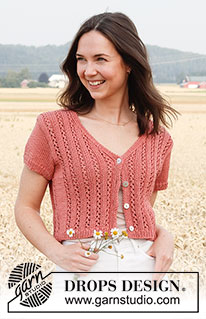
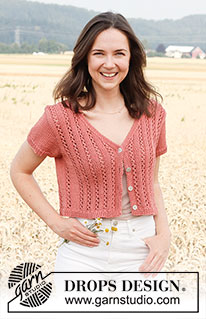
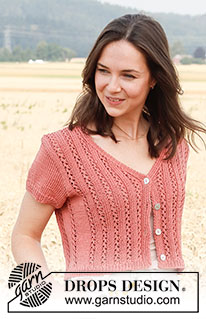
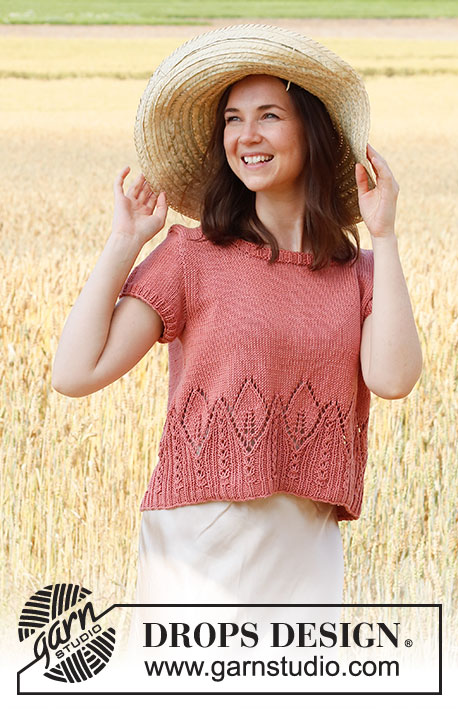
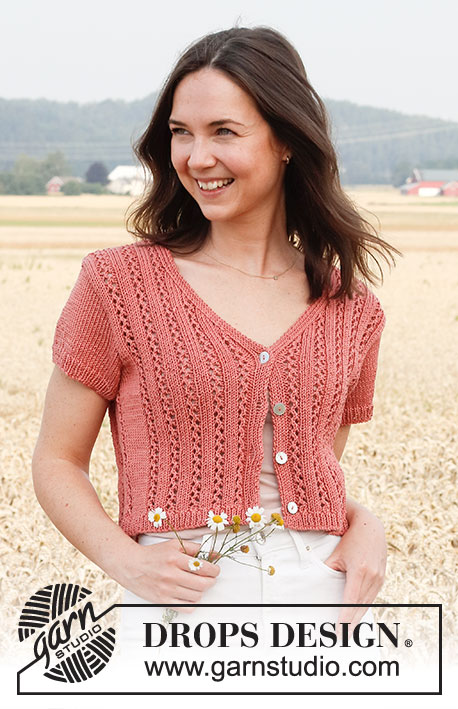
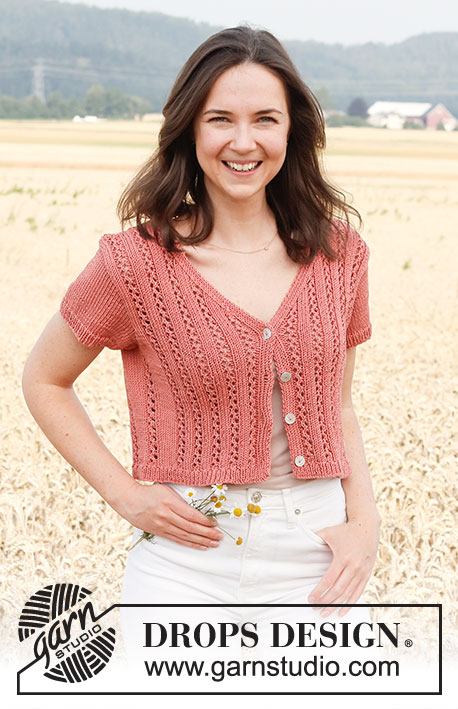
Knitted jacket in DROPS Muskat. The piece is worked with lace pattern, V-neck and short sleeves. Sizes S - XXXL.
DROPS 220-28 |
||||||||||||||||||||||
|
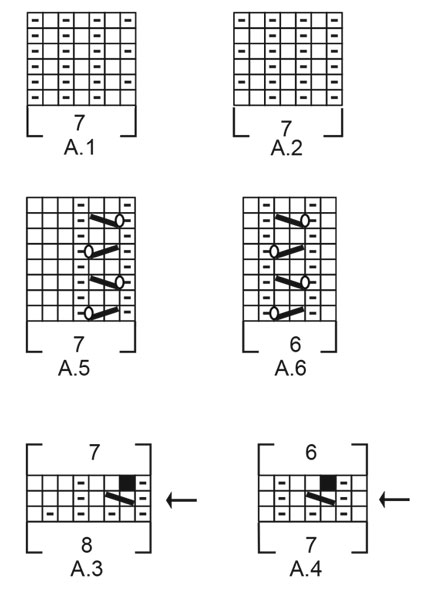
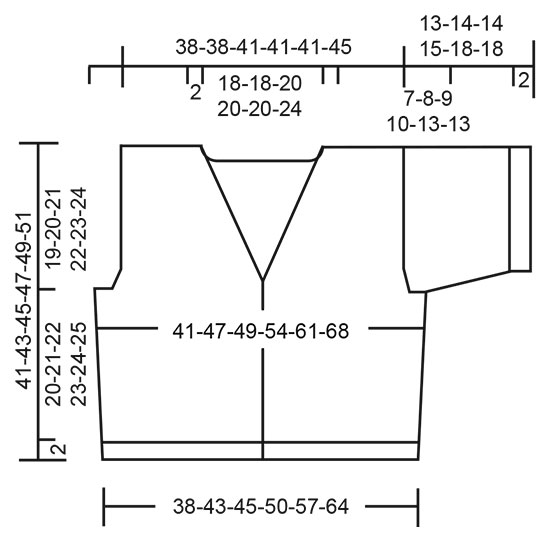
------------------------------------------------------- EXPLANATIONS FOR THE PATTERN: ------------------------------------------------------- PATTERN: See diagrams A.1 to A.6. The diagrams show all rows in the pattern from the right side. INCREASE TIP: Work as far as A.6, make 1 yarn over, work A.6, make 1 yarn over. On the next row work the yarn overs twisted to avoid holes. Then work the new stitches in stockinette stitch. BUTTONHOLES: Work the buttonholes on the right band. 1 BUTTONHOLE = Knit together the third and fourth stitches from the edge and make 1 yarn over. On the next row knit the yarn over to leave a hole. Work the buttonholes when the piece measures: S: 2, 9, 16 and 23 cm = ¾", 3½", 6¼" and 9". M: 3, 10, 17 and 24 cm = 1⅛", 4", 6¾" and 9½". L: 2, 10, 17 and 25 cm = ¾", 4", 6¾" and 9¾". XL: 3, 11, 18 and 26 cm = 1⅛", 4⅜", 7" and 10¼". XXL: 3, 11, 17 and 25 cm = 1⅛", 4⅜", 6¾" and 9¾". XXXL: 2, 11, 19 and 28 cm = ¾", 4⅜", 7½" and 11". ------------------------------------------------------- START THE PIECE HERE: ------------------------------------------------------- JACKET – SHORT OVERVIEW OF THE PIECE. The body is worked back and forth with circular needle, as far as the armholes. Then the front and back pieces are finished separately. The sleeves are worked in the round with double pointed needles/short circular needle as far as the armhole, then the sleeve cap is finished back and forth. The sections are sewn together to finish. BODY: Cast on 195-227-243-259-291-323 stitches (including 7 band stitches on each side) with circular needle size 3 MM = US 2.5 and Muskat. Purl 1 row (= wrong side). Then work rib as follows: A.1 over the first 7 stitches (= band), * knit 1, purl 1 *, work from *-* until there are 8 stitches left, knit 1 and work A.2 over the last 7 stitches (= band). Continue back and forth like this for 2 cm = ¾" – adjust so the next row is from the right side – remember the BUTTONHOLES on the right band – read description above. The next row is worked as follows (start on the rows with arrows in A.3 and A.4): Work A.1 over the first 7 stitches, A.3 over the next 32-40-40-40-40-48 stitches (= 4-5-5-5-5-6 repeats of 8 stitches), work the first 5 stitches in A.3 (= 5-6-6-6-6-7 stitches decreased), stockinette stitch over the next 2-6-8-12-20-22 stitches and decrease 0-2-3-2-3-3 stitches evenly over these stitches, A.4 over the next 7 stitches (= 1 stitch decreased), stockinette stitch over the next 2-6-8-12-20-22 stitches and decrease 0-2-3-2-3-3 stitches evenly over these stitches, A.3 over the next 80-80-88-88-88-96 stitches, work the first 5 stitches in A.3 (= 11-11-12-12-12-13 stitches decreased), stockinette stitch over the next 2-6-8-12-20-22 stitches and decrease 0-2-3-2-3-3 stitches evenly over these stitches, A.4 over the next 7 stitches (= 1 stitch decreased), stockinette stitch over the next 2-6-8-12-20-22 stitches and decrease 0-2-3-2-3-3 stitches evenly over these stitches, A.3 over the next 32-40-40-40-40-48 stitches, work the first 5 stitches in A.3 (= 5-6-6-6-6-7 stitches decreased) and A.2 over the last 7 stitches = 172-194-205-225-253-282 stitches. Change to circular needle size 4 MM = US 6. Work 1 row back from wrong side as follows: Work last row in diagram A.3 and A.4, work A.1 and A.2 as before over the 7 band stitches in each side towards mid front and purl the remaining stitches on row. Now work pattern as follows: Work A.1, A.5 over the next 28-35-35-35-35-42 stitches, work the first 4 stitches in A.5, stockinette stitch over the next 2-4-5-10-17-19 stitches, A.6 over A.4, stockinette stitch over the next 2-4-5-10-17-19 stitches, A.5 over the next 70-70-77-77-77-84 stitches, work the first 4 stitches in A.5, stockinette stitch over the next 2-4-5-10-17-19 stitches, A.6 over A.4, stockinette stitch over the next 2-4-5-10-17-19 stitches, A.5 over the next 28-35-35-35-35-42 stitches, work the first 4 stitches in A.5 and finish with A.2. Continue back and forth like this. REMEMBER THE KNITTING GAUGE! When the piece measures 4-5-5-5-5-5 cm = 1½"-2"-2"-2"-2"-2", increase 1 stitch on each side of A.6 – read INCREASE TIP. Increase like this every 5-5-5-5-5½-6 cm = 2¾"-2"-2"-2"-2⅛"-2⅜" a total of 4-4-4-4-4-4 times = 188-210-221-241-269-298 stitches. When the piece measures 22-23-24-25-26-27 cm = 8¾"-9"-9½"-9¾"-10¼"-10⅝", bind off for the armholes on the next row from the wrong side as follows: Work the first 45-53-53-57-63-71 stitches (= left front piece), bind off 6-8-10-12-14-16 stitches, work the next 86-88-95-103-115-124 stitches (= back piece), bind off 6-8-10-12-14-16 stitches, work the next 45-53-53-57-63-71 stitches (= right front piece). The front and back pieces are finished separately. RIGHT FRONT PIECE: = 45-53-53-57-63-71 stitches. Continue the pattern and bind off for the armhole, AT THE SAME TIME as you decrease for the V-neck as follows: ARMHOLE: At the beginning of each row from the armhole bind off as follows: 2 stitches 1-1-1-2-5-5 times then 1 stitch 0-1-1-3-3-4 times. V-NECK: AT THE SAME TIME when the piece measures 1 cm = ⅜" from the division, decrease for the neck from the right side as follows: Work the first 5 stitches, slip 1 stitch as if to knit, knit 1 and pass the slipped stitch over the knitted stitch (= 1 stitch decreased). Decrease like this every 2nd row (each row from the right side) a total of 15-22-21-21-21-28 times. When there is not enough room to work the yarn over and decrease in the lace pattern, work these stitches in stockinette stitch until the decreases for the neck are finished. When all the decreases for the armhole and neck are finished, there are 28-28-29-29-29-29 stitches on the shoulder. Continue working until the piece measures 41-43-45-47-49-51 cm = 16⅛"-17"-17¾"-18½"-19¼"-20" – adjust so the next row is from the wrong side. Bind off the first 22-22-23-23-23-23 stitches, continue back and forth over the band stitches until the band measures 12-12-14-14-14-15 cm = 4¾"-4¾"-5½"-5½"-5½"-6" from where you bind off on the shoulder. Bind off. LEFT FRONT PIECE: = 45-53-53-57-63-71 stitches. Continue the pattern and bind off for the armhole, AT THE SAME TIME as you decrease for the V-neck as follows: ARMHOLE: At the beginning of each row from the armhole bind off as follows: 2 stitches 1-1-1-2-5-5 times. then 1 stitch 0-1-1-3-3-4 times. V-NECK: AT THE SAME TIME when the piece measures 1 cm = ⅜" from the division, decrease for the neck from the right side as follows: Work until there are 7 stitches left on the row, knit 2 together (= 1 stitch decreased) and work to end of row. Decrease like this every 2nd row (each row from the right side) a total of 15-22-21-21-21-28 times. When there is not enough room to work the yarn over and decrease in the lace pattern, work these stitches in stockinette stitch until the decreases for the neck are finished. When all the decreases for the armhole and neck are finished, there are 28-28-29-29-29-29 stitches on the shoulder. Continue working until the piece measures 41-43-45-47-49-51 cm = 16⅛"-17"-17¾"-18½"-19¼"-20" – adjust so the next row is from the right side. Bind off the first 22-22-23-23-23-23 stitches, continue back and forth over the band stitches until the band measures 12-12-14-14-14-15 cm = 4¾"-4¾"-5½"-5½"-5½"-6" from where you bind off on the shoulder. Bind off. BACK PIECE: = 86-88-95-103-115-124 stitches. Continue the pattern back and forth. AT THE SAME TIME bind off for the armholes on each side at the beginning of each row as follows: 2 stitches 1-1-1-2-5-5 times, then 1 stitch 0-1-1-3-3-4 times on both sides = 82-82-89-89-89-96 stitches. When the back piece measures 17-18-19-20-21-22 cm = 6¾"-7"-7½"-8"-8¼"-8¾" from the bottom of the armhole (the piece measures approx. 39-41-43-45-47-49 cm = 15¼"-16⅛"-17"-17¾"-18½"-19¼" from the cast-on edge), bind off the middle 36-36-41-41-41-48 stitches for the neck and each shoulder is finished separately. Then bind off 1 stitch on the next row from the neck = 22-22-23-23-23-23 stitches on the shoulder. Continue working until the piece measures 41-43-45-47-49-49 cm = 16⅛"-17"-17¾"-18½"-19¼"-19¼". Bind off. Work the other shoulder in the same way. SLEEVES: Cast on 66-70-74-80-84-90 stitches with double pointed needles size 3 MM = US 2.5 and Muskat. Knit 1 round, then work rib (knit 1, purl 1) in the round for 2 cm = ¾". Knit 1 round where you increase 6 stitches evenly spaced in all sizes = 72-76-80-86-90-96 stitches. Change to double pointed needles size 4 MM = US 6, and work in stockinette stitch. When the sleeve measures 6-6-5-5-5-5 cm = 2⅜"-2⅜"-2"-2"-2"-2", bind off 6-8-10-12-14-16 stitches mid-under the sleeve = 66-68-70-74-76-80 stitches. Then work the sleeve cap back and forth, AT THE SAME TIME as casting stitches off at the beginning of each row as follows: 2 stitches 3-3-3-3-2-2 times, 1 stitch 2-3-5-8-14-14 times, 2 stitches 4-4-3-2-1-1 times and 4-3-3-4-3-3 stitches 1 time on each side = 26-28-30-30-30-34 stitches. Bind off. The sleeve measures approx. 13-14-14-15-18-18 cm = 5⅛"-5½"-5½"-6"-7"-7". Work the other sleeve in the same way. ASSEMBLY: Sew the shoulder seams. Sew the sleeves into the body. Sew the buttons onto the left band. Sew the bands together inside the bind-off edge and then sew the bands to the back of the neck. |
||||||||||||||||||||||
Diagram explanations |
||||||||||||||||||||||
|
||||||||||||||||||||||
 |
||||||||||||||||||||||
 |
||||||||||||||||||||||
Have you finished this pattern?Tag your pictures with #dropspattern #coralgablescardigan or submit them to the #dropsfan gallery. Do you need help with this pattern?You'll find 15 tutorial videos, a Comments/Questions area and more by visiting the pattern on garnstudio.com. © 1982-2026 DROPS Design A/S. We reserve all rights. This document, including all its sub-sections, has copyrights. Read more about what you can do with our patterns at the bottom of each pattern on our site. |
||||||||||||||||||||||






With over 40 years in knitting and crochet design, DROPS Design offers one of the most extensive collections of free patterns on the internet - translated to 17 languages. As of today we count 333 catalogs and 12532 patterns - 12522 of which are translated into English (US/in).
We work hard to bring you the best knitting and crochet have to offer, inspiration and advice as well as great quality yarns at incredible prices! Would you like to use our patterns for other than personal use? You can read what you are allowed to do in the Copyright text at the bottom of all our patterns. Happy crafting!
Post a comment to pattern DROPS 220-28
We would love to hear what you have to say about this pattern!
If you want to leave a question, please make sure you select the correct category in the form below, to speed up the answering process. Required fields are marked *.