
Popular categories
Looking for a yarn?


Comments / Questions (46)
![]() Lis Jespersen wrote:
Lis Jespersen wrote:
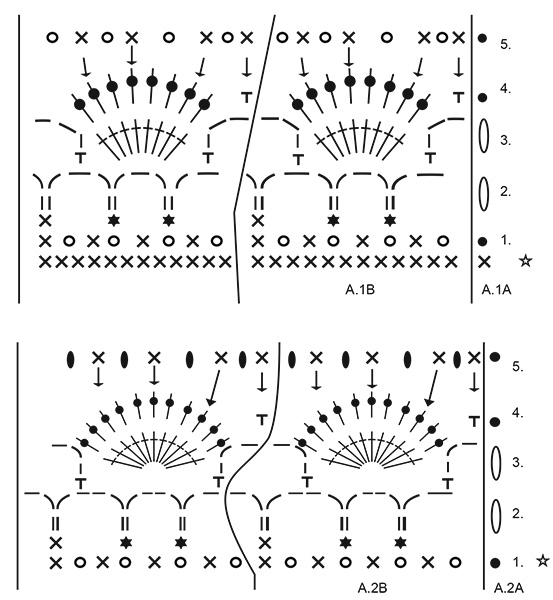
Jeg er i tvivl om signaturer i diagrammet som ikke forklares i video. Det er stjernerne i række 2. Det er stregerne med prik i række 5 og det er de sorte ovale prikker i række 5 på diagram A2B.
10.10.2025 - 22:06DROPS Design answered:
Hei Lis. Hva de ulike diagram symbolene betyr finner du over diagrammene. Stjernerne i række 2 = fastmaske i toppen af picot. Stregerne med prik i række 5 = fastmasken hækles i denne stangmaske . De sorte ovale prikker i række 5 på diagram A2B = 1 picot: 4 luftmasker, 1 stangmaske i første luftmaske som blev hæklet. mvh DROPS Design
20.10.2025 - 11:41
![]() Agata wrote:
Agata wrote:
Co to znaczy: półsłupek w górę pikotki?
17.09.2025 - 21:37DROPS Design answered:
Witaj Agato, to znaczy że wbijasz się w górę pikotki i przerabiasz w nią półsłupek. Pozdrawiamy!
18.09.2025 - 08:40
![]() Katarzyna wrote:
Katarzyna wrote:
Rozpoczęłam pierwsze okrążenie wzoru A1b i nie wiem czy mam zrobić pikotkę pomiędzy dwoma półsłupkami poprzedniego rzędu bo tak odczytuję z wzoru proszę mnie poprawić jeśli się mylę
10.08.2025 - 16:32DROPS Design answered:
Witaj Kasiu, dokładnie: wykonujesz pikotkę między 2 półsłupkami poprzedniego rzędu. Pozdrawiamy!
12.08.2025 - 11:36
![]() Anita Sarre wrote:
Anita Sarre wrote:
Skjønner ikke hvordan jeg skal kunne hekle på retten etter at jeg har festet de 4 trådene/markørene for raglanfelling? Jeg er jo på vrangen.
10.05.2025 - 20:30DROPS Design answered:
Hei Anita. Du hekler x antall luftmasker å starte med, så settes det 4 merketråder uten at det hekles. Deretter skal det hekles fra retten, altså 1. rad = fra retten (de x antall luftmaskene du startet med er opplegg, ikke 1. rad). mvh DROPS Design
19.05.2025 - 12:57
![]() Alison Bell wrote:
Alison Bell wrote:
Sorry- could you explain in a different way. How I have 170 treble crochet then work the next row of dc including working the 2 chain stitch that I will still have 170 stitches. 270 treble crochet plus the 8 stitches in the chain spaces equals 178. I think I need it explained literally. Thanks
11.04.2025 - 19:44DROPS Design answered:
Dear Alison, in the last increase row you will have 170 treble crochet. After this row you work 1 row, where you work double crochets (see TEXTURED ROWS above). As explained in the texture rows and the text above, you only increased in rows with treble crochets. So this row with double crochets will have 170 stitches. Over each of the chain2 spaces you work 2 chains (so you don't increase the number of stitches, since it's the same number of chain stitches). Happy crochetting!
13.04.2025 - 20:43
![]() Alison Bell wrote:
Alison Bell wrote:
At the end of textured pattern 170 stitches next row dc - I am reading that I chain 2 dc in the chain space. That gives me 178 stitches. Next row breaks down for sleeves etc. work 24 skip 37 work 48 skip 37 work 24. = 170 stitches. What am I not understanding please
11.04.2025 - 10:50DROPS Design answered:
Dear Mrs Bell, when all increases are done, you work that row: After the last increase to raglan work 1 row of double crochets from the wrong side as before (with 2 chain stitches over the 2 chain stitches from the previous row). so work the 2 chain stitches as before, you keep 170 dc. Happy crocheting!
11.04.2025 - 13:25
![]() Alison Bell wrote:
Alison Bell wrote:
Just learning to crochet more detailed outfits Q - Textured rows TC - do I 2 x TC chain 2 & 2 x TC into a dc on previous row. on next time of this do I TC into a dc stitch from the chain 2 or into the chain space? I hope this makes sense to you I initially worked 2Tc, 2ch, 2Tc into 2 dc stitch but then I ended up either too many stitches by row 10 - end of yoke. Is there a video I can watch?
08.04.2025 - 01:36DROPS Design answered:
Dear Mrs Bell, the textured pattern is worked with alternately 1 row with double crochets and 1 row with treble crochets, you repeat these both rows. Raglan increases are worked first in the double crochet marked with a marker thread, then in the ch-space from previous increase, see for ex this video (increases are worked the same way but for the dress you will work 1 row with dc between each row with treble crochets). Happy crocheting!
08.04.2025 - 09:42
![]() Mona wrote:
Mona wrote:
For mig er diagrammet meget forvirrende. Er det muligt at få diagrammet som tekst. Har hæklet rigtig meget, og har aldrig tidligere haft problemer med at forstå opskrifter, hvor det bliver beskrevet med tekst.
01.04.2025 - 10:56DROPS Design answered:
Hei Mona. Vi har kun den versjonen du ser på nett. For lettere å skjønne hvordan man hekler etter diagram, ta en titt under: TIPS & HJÆLP - LEKTIONER - Læs en opskrift - Hvordan læses hæklediagrammer? mvh DROPS Design
07.04.2025 - 09:31
![]() Tina Tanner wrote:
Tina Tanner wrote:
How can I download the free patterns?
25.01.2025 - 04:09DROPS Design answered:
Dear Tina, to download the pattern click on the printer button and then, in your printing settings, choose to "Save as PDF" when selecting a printer. Happy knitting!
25.01.2025 - 20:33
![]() Bitten wrote:
Bitten wrote:
Skal de to luftmasker mellem udtagningerne ved raglanærmerne tælles med i antal masker. (186 str 2) jeg har 186 stang masker plus 8 luftmasker
23.01.2025 - 23:26DROPS Design answered:
Hei Bitten. Du har riktig maskeantall (186 staver + 8 luftmasker) før delingen. mvh DROPS Design
27.01.2025 - 09:36
|
|||||||||||||||||||||||||||||||||||||
Spring Fairy#springfairydress |
|||||||||||||||||||||||||||||||||||||
 |
 |
||||||||||||||||||||||||||||||||||||
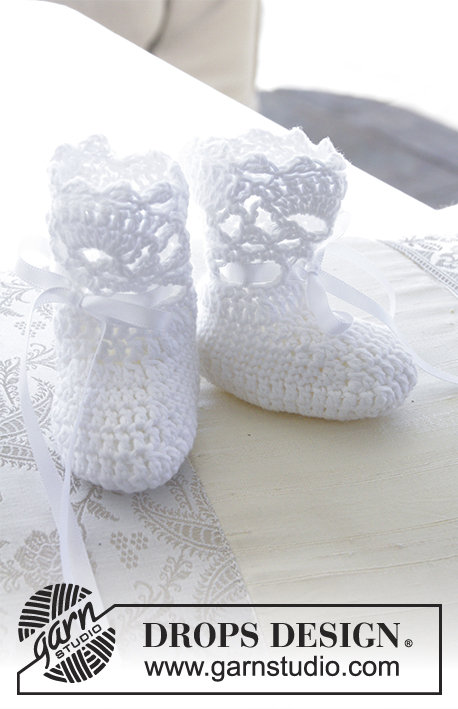
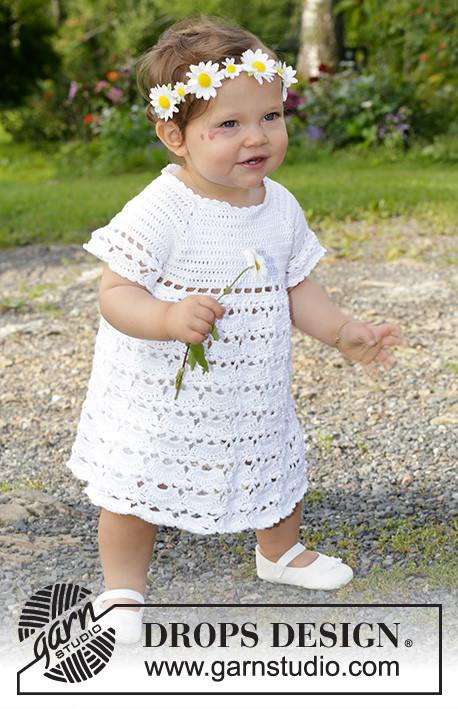
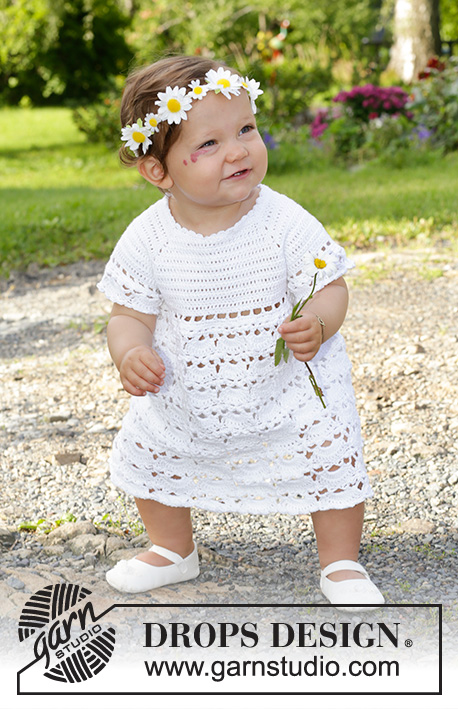
Crocheted dress for babies and children in DROPS Safran. The piece is worked top down with raglan and an open-fan pattern. Sizes 0 – 4 years.
DROPS Baby & Children 38-1 |
|||||||||||||||||||||||||||||||||||||
|
------------------------------------------------------- EXPLANATIONS FOR THE PATTERN: ------------------------------------------------------- CROCHET INFO: At the beginning of each round/row of single crochets, replace the first single crochet with 1 chain stitch. When working in the round, finish the round with 1 slip stitch in this chain stitch. When working back and forth, finish the row with 1 single crochet in the 3rd chain stitch at the beginning of the previous row of double crochets. At the beginning of each round/row of double crochets, replace the first double crochet with 3 chain stitches. When working in the round, finish the round with 1 slip stitch in the 3rd chain stitch at the beginning of the round. When working back and forth, finish the row with 1 double crochet in the chain stitch at the beginning of the previous row of single crochets. TEXTURED ROWS: * 1 row/round of single crochets, 1 row/round of double crochets *, repeat from *-* (i.e. 1 row/round of single crochets + 1 row/round of double crochets = 1 textured row). INCREASE TIP-1: Increase 1 single/double crochet by working 2 single/double crochets in the same stitch. INCREASE TIP-2: To work out how to increase evenly, count the total number of stitches on the round (e.g. 136 stitches) and divide by the number of increases to be made (e.g. 57) = 2.4. In this example, increase in alternately each 2nd and 3rd stitch (approx.). PATTERN: See diagrams A.1 and A.2. ------------------------------------------------------- START THE PIECE HERE: ------------------------------------------------------- DRESS – SHORT OVERVIEW OF THE PIECE: The piece is worked top down. Work back and forth until the split mid-back is finished, then continue in the round. YOKE: Work 94-99-104 (104-115) chain stitches (including 1 chain stitch to turn with) using hook size 3.5 MM = US E/4 and Safran. The first row is worked as follows: 1 single crochet in the 2nd chain stitch from the hook, * 1 single crochet in each of the next 3 chain stitches, skip 1 chain stitch *, repeat from *-* until there are 0-1-2 (2-1) chain stitches left and finish with 1 single crochet in each of the remaining 0-1-2 (2-1) chain stitches = 70-74-78 (78-86) single crochets on the row. Now insert 4 marker threads for raglan as follows (starting mid-back – DO NOT work the stitches while inserting the marker threads): Skip 10-11-12 (12-14) stitches (= right back piece when piece is worn), insert 1 marker thread in the next stitch, skip 13 stitches (= sleeve), insert 1 marker thread in the next stitch, skip 20-22-24 (24-28) stitches (= front piece), insert 1 marker thread in the next stitch, skip 13 stitches (= sleeve) insert 1 marker thread in the next stitch (there are 10-11-12 (12-14) stitches left on the left back piece after the last marker). READ THE WHOLE OF THE NEXT SECTION BEFORE CONTINUING! Read CROCHET INFO and work the next row from the right side as follows: Work 1 double crochet in each single crochet, but in each stitch with a marker thread work 2 double crochets + 2 chain stitches + 2 double crochets = 82-86-90 (90-98) double crochets on the row. Continue with TEXTURED ROWS – read description above (working back and forth with 1 single/double crochet in each stitch from the previous row, but on each row of single crochets from the wrong side work 2 chain stitches over the 2 chain stitches from the previous row in the raglan-line). AT THE SAME TIME on the first row from the right side (i.e. on a row of double crochets) increase to raglan as follows: Work 2 double crochets + 2 chain stitches + 2 double crochets around each chain-space in each raglan-line (= 16 double crochets increased on the row). Repeat this increase on each row from the right side a total of 4-5-5 (6-6) times = 146-166-170 (186-194) stitches. REMEMBER THE CROCHET GAUGE! After the last increase to raglan work 1 row of single crochets from the wrong side as before (with 2 chain stitches over the 2 chain stitches from the previous row). The next row is worked as follows from the right side: Work 1 double crochet in each of the first 20-23-24 (26-28) single crochets (= right back piece), skip the next 33-37-37 (41-41) single crochets (= sleeve), work 8-6-10 (10-10) LOOSE chain stitches, work 1 double crochet in each of the next 40-46-48 (52-56) single crochets (= front piece), skip the next 33-37-37 (41-41) single crochets (= sleeve), work 8-6-10 (10-10) LOOSE chain stitches and 1 double crochet in each of the last 20-23-24 (26-28) single crochets (= left back piece). The yoke is finished. Continue in the round. BODY: THE PIECE IS NOW MEASURED FROM HERE! Start mid-back on the right side and work a round of single crochets (1 single crochet in each double crochet from the previous row and 1 single crochet in each chain stitch under the sleeves – remember CROCHET INFO) = 96-104-116 (124-132) stitches. Now work as follows: ROUND 1: Work 1 double crochet in each single crochet but increase 6-4-4 (8-12) double crochets evenly spaced – read INCREASE TIP-1 and -2 = 102-108-120 (132-144) stitches. ROUND 2: Work 1 single crochet in each double crochet. ROUND 3: * 1 double crochet in the first/next stitch, 2 chain stitches, skip 2 stitches *, repeat from *-* to end of round = 34-36-40 (44-48) double crochets on the round, with 2 chain stitches between each one. ROUND 4: Work 1 single crochet in each double crochet and 3 single crochets around each chain-space = 136-144-160 (176-192) single crochets. ROUND 5: Work single crochets and increase 57-61-57 (53-49) single crochets evenly spaced = 193-205-217 (229-241) single crochets. Continue in the round with pattern according to diagram A.1, i.e. work A.1A over the first stitch, then 16-17-18 (19-20) repeats of A.1B. When rounds 1-5 have been worked once, repeat rounds 2-5 onwards until the piece measures approx. 23-28-32 (37-43) cm = 9"-11"-12½" (14½"-17") from the shoulder – adjust so you finish after a complete repeat in height. Continue as follows: Repeat rounds 2-5 in A.2A and A.2B in the same way until you have worked 3 repeats of A.2 in height (or to desired length). Cut and fasten the strand. The dress measures approx. 35-40-44 (49-55) cm = 13¾"-15¾"-17¼" (19¼"-21⅝") from the shoulder. SHAPING THE NECK: For a better fit, work a small elevation at the back of the neck as follows. Insert 1 marker thread in each "corner" of the neck, i.e. at the beginning of each raglan-line, and 1 marker mid-front. Using hook size 3.5 MM = US E/4 and Safran and starting mid-back, work 1 single crochet in each stitch until there is 1 stitch left before the stitch with the marker thread, work 1 half-double crochet in the next stitch, 1 double crochet in the stitch with the marker thread and 1 half-double crochet in the next stitch, continue with 1 single crochet in each stitch until there is 1 stitch left before the next stitch with the marker thread, work 1 half-double crochet in the next stitch, 1 double crochet in the stitch with the marker thread and 1 half-double crochet in the next stitch and continue with 1 single crochet in each stitch until there are 4-5-5 (5-5) stitches left before the marker mid-front. Turn and work 1 single crochet in each stitch back to mid-back, but at each marker thread work 3 single crochets together, i.e. work 1 single crochet in the half-double crochet, but wait with the last yarn over and pull through, work 1 single crochet in the stitch with the marker thread, but wait with the last yarn over and pull through, work 1 single crochet in the next half-double crochet, and pull the last yarn over through all 4 loops on the hook (= 2 single crochets decreased). Cut the strand and repeat on the other side, from mid-back to mid-front and back again. BUTTON BANDS: Work along the left side of the split mid-back as follows: 1 single crochet around each single-crochet row and 2 single crochets around each double-crochet row. Work a total of 4 rows of single crochets back and forth. Cut and fasten the strand. Work buttonholes along the right side of the split as follows (starting from the right side at the neck): 3 single crochets (1 single crochet in the single-crochet row and 2 single crochets in the double-crochet row), 4 chain stitches (= 1 buttonhole), skip 1 cm = ⅜", continue with single crochets to the middle of the row (approx.), work 4 chain stitches, skip 1 cm = ⅜", work single crochets until there is 1 cm = ⅜" left on the band, 4 chain stitches and 1 single crochet in the last stitch. Cut and fasten the strand. Sew the buttons onto the left band. PICOT-EDGE AROUND THE NECK: Work around the neck as follows: 1 single crochet in the first stitch, * 3 chain stitches, 1 double crochet in the first chain stitch worked, skip 2 stitches, 1 single crochet in the next stitch *, repeat from *-* to end of row. Cut and fasten the strand. FAN-EDGE AROUND THE SLEEVES: Work around each sleeve as follows: 1 single crochet in each of the first 8-6-10 (10-10) stitches mid-under the sleeve and 1 single crochet in each of the 33-37-37 (41-41) single crochets around the sleeve = 41-43-47 (51-51) stitches. Continue as follows: ROUND 1: 1 double crochet in each single crochet, but increase 1-5-1 (0-0) double crochets evenly spaced = 42-48-48 (51-51) stitches. ROUND 2: 1 single crochet in each double crochet. ROUND 3: * 1 double crochet in the first/next stitch, 2 chain stitches, skip 2 stitches *, repeat from *-* to end of round = 14-16-16 (17-17) double crochets with 2 chain stitches between each one. ROUND 4: 1 single crochet in each double crochet and 3 single crochets around each chain-space, but 7-3-3 (7-7) times on the round, work just 2 single crochets around the chain-space = 49-61-61 (61-61) single crochets. Then work pattern in the round according to diagrams A.1A and A.1B in the same way as on the body = 4-5-5 (5-5) fans on the round. When rounds 1-5 have been completed once, cut and fasten the strand. Repeat around the other sleeve. |
|||||||||||||||||||||||||||||||||||||
Diagram explanations |
|||||||||||||||||||||||||||||||||||||
|
|||||||||||||||||||||||||||||||||||||
 |
|||||||||||||||||||||||||||||||||||||
 |
|||||||||||||||||||||||||||||||||||||
Have you finished this pattern?Tag your pictures with #dropspattern #springfairydress or submit them to the #dropsfan gallery. Do you need help with this pattern?You'll find 13 tutorial videos, a Comments/Questions area and more by visiting the pattern on garnstudio.com. © 1982-2026 DROPS Design A/S. We reserve all rights. This document, including all its sub-sections, has copyrights. Read more about what you can do with our patterns at the bottom of each pattern on our site. |
|||||||||||||||||||||||||||||||||||||


With over 40 years in knitting and crochet design, DROPS Design offers one of the most extensive collections of free patterns on the internet - translated to 17 languages. As of today we count 325 catalogs and 12291 patterns - 12281 of which are translated into English (US/in).
We work hard to bring you the best knitting and crochet have to offer, inspiration and advice as well as great quality yarns at incredible prices! Would you like to use our patterns for other than personal use? You can read what you are allowed to do in the Copyright text at the bottom of all our patterns. Happy crafting!
Post a comment to pattern DROPS Baby & Children 38-1
We would love to hear what you have to say about this pattern!
If you want to leave a question, please make sure you select the correct category in the form below, to speed up the answering process. Required fields are marked *.