
Popular categories
Looking for a yarn?


|
|||||||||||||||||||||||||||||||||||||||||||||||||||||||||||||||||||||||||||||||||||||
So Charming |
|||||||||||||||||||||||||||||||||||||||||||||||||||||||||||||||||||||||||||||||||||||
 |
 |
||||||||||||||||||||||||||||||||||||||||||||||||||||||||||||||||||||||||||||||||||||
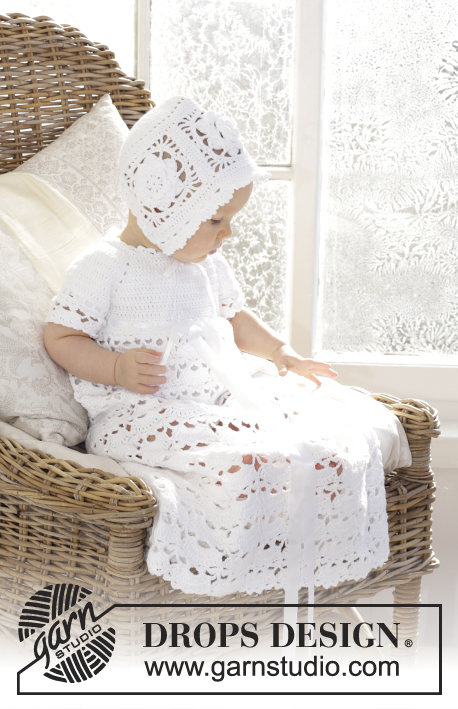
The baby set is made up of: Dress for Christening or special occasions, worked top down with raglan and open fan pattern in DROPS Safran. Crochet hat with flower squares and fan edge in DROPS Safran. Sizes 0 - 2 years.
DROPS Baby 29-3 |
|||||||||||||||||||||||||||||||||||||||||||||||||||||||||||||||||||||||||||||||||||||
|
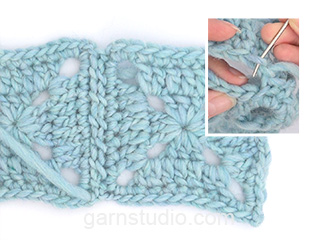
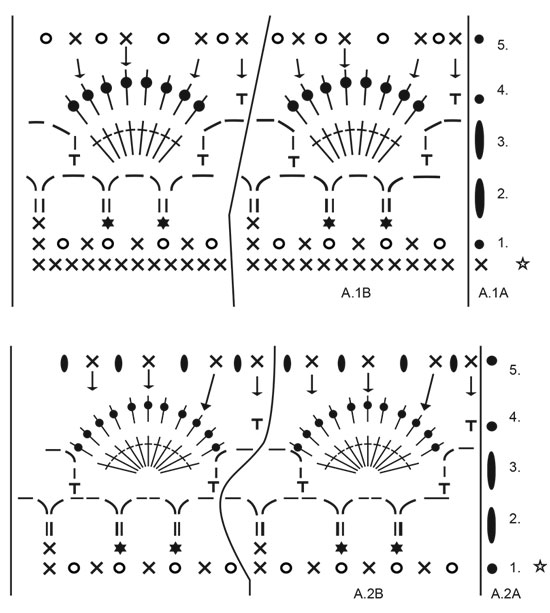
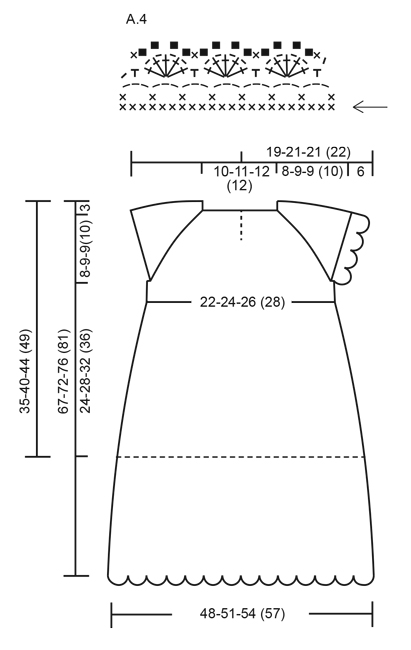
DRESS: CROCHET INFO: At the beginning of each round/row of single crochets, replace the first single crochet with 1 chain stitch. When working in the round, finish with 1 slip stitch in the chain stitch at the beginning of the round. When working back and forth, finish the row with 1 single crochet in the 3rd chain stitch from the beginning of the previous row of double crochets. At the beginning of each round/row of double crochets, replace the first double crochet with 3 chain stitches. When working in the round, finish with 1 slip stitch in the 3rd chain stitch from the beginning of the round. When working back and forth finish the row with 1 double crochet in the chain stitch from the beginning of the previous row of single crochets. TEXTURED ROWS * 1 row/round single crochets, 1 row/round double crochets *, repeat from *-* (1 row/round single crochets + 1 row/round double crochets = 1 textured row). INCREASE TIP-1: Increase 1 single crochet/double crochet by working 2 single crochets/double crochets in the same stitch. INCREASE TIP-2: To work out how often you should increase on the round, count the total number of stitches on the round (e.g. 136 stitches) and divide by the number of increases to be made (e.g. 57) = 2.4. In this example, you increase approx. alternately every 2nd and 3rd stitch. PATTERN: See diagrams A.1 and A.2. ---------------------------------------------------------- DRESS: The piece is worked top down. It is worked back and forth from mid back until after the split mid back, then the piece is continued in the round to desired length (normal dress length or long dress) – see description in text. YOKE: Work 94-99-104 (104) chain stitches (including 1 stitch to turn) with hook size 3.5 mm/E/4 and Safran. The first row is worked as follows: 1 single crochet in the 2nd chain stitch from the hook, * 1 single crochet in each of the next 3 chain stitches, skip 1 chain stitch *, repeat from *-* until there are 0-1-2-2 chain stitches left and finish with 1 single crochet in each of the 0-1-2-2 last chain stitches = 70-74-78 (78) single crochets on the row. Now insert 4 marker threads in the piece to raglan as follows (start mid back – NOTE: Do NOT work while inserting the marker threads): Skip 10-11-12 (12) single crochets (= right back piece when the garment is worn), insert 1 marker thread in the next single crochet, skip 13 single crochets (= sleeve), insert 1 marker thread in the next single crochet, skip 20-22-24 (24) single crochets (= front piece), insert 1 marker thread in the next single crochet, skip 13 single crochets (= sleeve) and insert the last marker thread in the next single crochet (there are now 10-11-12 (12) single crochets on the left back piece after the last marker thread. READ THE WHOLE OF THE NEXT SECTION BEFORE CONTINUING! READ CROCHET INFO and work the next row from the right side as follows: Work 1 double crochet in each single crochet, but in each single crochet with a marker thread work 2 double crochets + 2 chain stitches + 2 double crochets = 82-86-90 (90) double crochets on the row. Continue by working TEXTURED ROWS – see description above (work back and forth with 1 single crochet/double crochet in each stitch from the previous row, but on every row with single crochet from the wrong side work 2 chain stitches over the 2 chain stitches from the previous row in the raglan lines). AT THE SAME TIME on the first row from the right side (i.e. row of double crochets) increase to raglan as follows: Work 2 double crochets + 2 chain stitches + 2 double crochets around each chain-space in each raglan line (= 16 double crochets increased on the row – NOTE: Work around both chain-spaces). Repeat the increase on each row from the right side, a total of 4-5-5 (6) times = 146-166-170 (186) stitches on the row. REMEMBER THE CROCHET GAUGE! After the last increase to raglan work 1 row with single crochets from the wrong side as before (with 2 chain stitches over the 2 chain stitches from the previous row). The next row is worked as follows from the right side: Work 1 double crochet in each of the first 20-23-24 (26) double crochets (= right back piece), skip the next 33-37-37 (41) single crochets (= sleeve), work 8-6-10 (10) LOOSE chain stitches, work 1 double crochet in each of the next 40-46-48 (52) single crochets (= front piece), skip the next 33-37-37 (41) single crochets (= sleeve), work 8-6-10 (10) LOOSE chain stitches and work 1 double crochet in each of the last 20-23-24 (26) single crochets (= left back piece). The yoke is now finished and the piece is continued in the round. BODY: THE PIECE IS NOW MEASURED FROM HERE! Start mid back with the right side out (beginning of the round = mid back) and work 1 round of single crochets (work 1 single crochet in each double crochet from the previous round and 1 single crochet in each chain stitch under each sleeve – remember CROCHET INFO) = 96-104-116 (124) single crochets on the round. Now work as follows: ROUND 1: Work 1 double crochet in each single crochet, but increase 6-4-4 (8) double crochets evenly along the round – READ INCREASE TIP-1 and 2 = 102-108-120 (132) double crochets. ROUND 2: Work 1 single crochet in each double crochet. ROUND 3 (= row of holes for the silk ribbon): * 1 double crochet in the first/next single crochet, 2 chain stitches, skip 2 single crochets *, repeat from *-* the whole round = 34-36-40 (44) double crochets with 2 chain stitches between each. ROUND 4: Work 1 single crochet in each double crochet and 3 single crochets around each chain-space = 136-144-160 (176) single crochets. ROUND 5: Work single crochet and increase 57-61-57 (53) single crochets evenly along the round = 193-205-217 (229) single crochets. Continue by working pattern according to A.1, i.e. work A.1A over the first stitch, then work 16-17-18 (19) repeats of A.1B. When rounds 1-5 have been completed once, repeat rounds 2-5 onwards until the piece measures approx. 23-28-32 (37) cm / 9"-11"-12½" (14½") from the shoulder, if you are making the dress of normal length or until the piece measures approx. 35-40-44 (49) cm / 13"-15¾"-17¼" (19¼") from the shoulder if you are making the long dress – NOTE: Adjust so that you finish after a complete repeat in height. Continue working as follows (follow the description for the dress of normal length or the long dress): DRESS OF NORMAL LENGTH: Now repeat rounds 2-5 in A.2A and A.2B in the same way until you have worked a total of 3 repeats in height of A.2 (or to desired length). Cut and fasten the strand. The dress measures approx. 35-40-44 (49) cm / 13"-15¾"-17¼" (19¼") from the shoulder down. LONG DRESS: Now repeat rounds 2-5 in A.2A and A.2B in the same way until you have worked a total of 8 repeats in height of A.2 (or to desired length). Cut and fasten the strand. The long dress measures approx. 67-72-76 (81) cm / 26½"-28½"-30" (32") from the shoulder down. BOTH DRESSES: SHAPING THE NECKLINE: For a better fit you can work a small elevation at the back of the neck. Insert 1 marker thread in the stitch in each "corner" of the neck, i.e. at the start of each raglan line and insert 1 marker mid front. Work with hook size 3.5 mm/E/4 and Safran as follows: Start mid back and work 1 single crochet in each stitch until there is 1 stitch left before the stitch with the marker thread, work 1 half double crochet in the next stitch, 1 double crochet in the stitch with the marker thread and 1 half double crochet in the next stitch, continue by working 1 single crochet in each stitch until there is 1 stitch left before the stitch with the marker thread, 1 half double crochet in the next stitch, 1 double crochet in the stitch with the marker thread and 1 half double crochet in the next stitch, continue by working 1 single crochet in each stitch until there are 4-5-5 (5) stitches left before the marker mid front. Turn the piece and work 1 single crochet in each single crochet back to mid back, but by each marker thread work 3 single crochets together, i.e. work 1 single crochet in the half double crochet, but wait with the last yarn over and pull through, work 1 single crochet in the double crochet stitch with the marker thread, but wait with the last yarn over and pull through, work 1 single crochet in the next half double crochet, but now pull the last yarn over through all 4 stitches on the hook (= 2 single crochets decreased). Cut the strand and repeat from mid back to mid front and back again to mid back in the other side. BUTTON BANDS AT THE BACK: Work along the left opening mid back as follows: 1 single crochet around each single crochet row and 2 single crochet around each double crochet row. Work a total of 4 rows of single crochets back and forth, cut and fasten the strand. Along the right opening mid back work buttonholes as follows (start from the right side by the neckline): Work 3 single crochets (1 single crochet around the single crochet row and 2 single crochets around the double crochet row), 4 chain stitches (= 1 buttonhole), skip approx. 1 cm / ⅜", work single crochets to approx. the middle of the band, 4 chain stitches, skip approx. 1 cm / ⅜", work single crochets until there is 1 cm / ⅜" left on the band, 4 chain stitches and fasten with 1 single crochet in the last stitch. Cut and fasten the strand. Fasten the buttons to the band on the left side. PICOT EDGE AROUND NECK: Work around the neck as follows: 1 single crochet in the first stitch, * 3 chain stitches, 1 double crochet in the first chain stitch worked, skip 2 stitches, 1 single crochet in the next stitch*, repeat from *-* the whole row, cut and fasten the strand. FAN EDGE AROUND THE SLEEVE: Work around the sleeve opening as follows: 1 single crochet in each of the 8-6-10 (10) stitches mid under the sleeve and 1 single crochet in each of the 33-37-37 (41) single crochets over the sleeve = 41-43-47 (51) single crochets on the round. Continue by working as follows: ROUND 1: Work 1 double crochet in each single crochet, but increase 1-5-1 (0) double crochets evenly along the round = 42-48-48 (51) double crochets. ROUND 2: Work 1 single crochet in each double crochet. ROUND 3 (= row of holes for the silk ribbon): * 1 double crochet in the first/next single crochet, 2 chain stitches, skip 2 single crochets *, repeat from *-* to the end of the round = 14-16-16 (17) double crochets with 2 chain stitches between each. ROUND 4: Work 1 single crochet in each double crochet and 3 single crochets around each chain-space, but 7-3-3 (7) times on the round, work only 2 single crochets around the chain-space = 49-61-61 (61) single crochets. Continue working pattern in the round according to diagrams A.1A and A.1B in the same way as on the body = 4-5-5 (5) fans on the round. When rounds 1-5 have been completed once, cut and fasten the strand. Repeat around the other sleeve. SILK RIBBON: Thread the silk ribbon up and down through the row of holes under the yoke – start and finish mid front and tie a bow mid front. ---------------------------------------------------------- HAT: CROCHET INFO: At the beginning of each round of half double crochets, replace the first half double crochet with 2 chain stitches, the round finishes with 1 slip stitch in the 2nd chain stitch at the beginning of the round. At the beginning of each round of double crochets, replace the first double crochet with 3 chain stitches, the round finishes with 1 slip stitch in the 3rd chain stitch at the beginning of the round. PATTERN: See diagrams A.3 and A.4. DECREASE TIP: Decrease 1 single crochet by working 2 single crochets together as follows: Work 1 single crochet but wait with the last yarn over and pull through (= 2 loops on the hook), then work the next single crochet, but when you make the last pull through, pull the strand through all the loops on the hook – you have now decreased 1 single crochet. INCREASE TIP: Increase 1 half double crochet by working 2 half double crochets in the same stitch. ---------------------------------------------------------- HAT: The hat is made up of 3 flower squares which are sewn together in a row. Then you work a circle which becomes the back of the hat and which is sewn to the hat itself. Then you work an edge at the bottom of the hat before working a fan edge at the front. FLOWER SQUARE: Work 4 chain stitches with hook size 3 mm / C and Safran and form them to a ring with 1 slip stitch in the first chain stitch. Continue working in the round according to diagram A.3 – READ CROCHET INFO AND REMEMBER THE CROCHET GAUGE! When A.3 has been completed there are 22 half double crochets on each of the sides and 2 chain stitches in each corner. The square measures approx. 11 x 11 cm / 4½" x 4½" and is finished now in sizes 0/6 + 6/12 + 12/18 months. Cut and fasten the strand in these sizes. In size 2 years work one more round as described below. SIZE (2) YEARS: Work 2 chain stitches (equivalent to 1 half double crochet), continue by working 1 half double crochet in each half double crochet from the previous round (around the chain-space in the corner work 2 half double crochets + 2 chain stitches + 2 half double crochets), finish the round with 1 slip stitch in the 2nd chain stitch at the beginning of the round. There are now 26 half double crochets along each side and 2 chain stitches in each corner. The square now measures approx.12 x 12 cm / 4¾" x 4¾". Cut and fasten the strand. Work 2 more flower squares for all sizes. Place the 3 squares in a row and sew them together, two and two with small neat stitches – sew with a stitch in each stitch. CIRCLE AT THE BACK OF THE HAT (this part will be sewn onto the squares): Work 4 chain stitches and form them to a ring with 1 slip stitch in the first chain stitch. Continue as follows – READ CROCHET INFO and INCREASE TIP: ROUND 1: 9 half double crochet around the ring. ROUND 2: 2 half double crochets in each stitch = 18 half double crochets. ROUND 3: * 1 half double crochet in the first/next stitch, 2 half double crochets in the next stitch *, repeat from *-* to the end of the round = 27 half double crochets. ROUND 4: * 1 half double crochet in each of the first/next 2 stitches, 2 half double crochets in the next stitch *, repeat from *-* to the end of the round = 36 half double crochets. ROUND 5: * 1 half double crochet in the first/next stitch, 2 chain stitches, skip 1 stitch *, repeat from *-* to the end of the round = 18 half double crochets with 2 chain stitches between each. ROUND 6: * 2 half double crochets around the first/next chain-space, 1 half double crochet in the next stitch *, repeat from *-* to the end of the round = 54 half double crochets. ROUND 7: * 1 half double crochet in each of the first/next 5 stitches, 2 half double crochets in the next stitch *, repeat from *-* to the end of the round = 63 half double crochets. ROUND 8: * 1 half double crochet in each of the first/next 6 stitches, 2 half double crochets in the next stitch *, repeat from *-* to the end of the round = 72 half double crochets. ROUND 9: * 1 half double crochet in each of the first/next 7 stitches, 2 half double crochets in the next stitch *, repeat from *-* to the end of the round = 81 half double crochets. Size 0/6 months finishes here (the piece measures approx. 10 cm / 4" in diameter). ROUND 10: * 1 half double crochet in each of the first/next 8 stitches, 2 half double crochets in the next stitch *, repeat from *-* to the end of the round = 90 half double crochets. ROUND 11: * 1 half double crochet in each of the first/next stitch, 2 chain stitches, skip 1 stitch *, repeat from *-* to the end of the round = 45 half double crochets with 2 chain stitches between each. ROUND 12: Work 2 half double crochets around each chain-space = 90 half double crochets. Sizes 6/12 + 12/18 months finish here (the piece measures approx. 12 cm / 4¾" in diameter). SIZE (2) YEARS: ROUND 13: * 1 half double crochet in each of the first/next 9 stitches, 1 half double crochet in the next stitch *, repeat from *-* to the end of the round = 99 half double crochets. Size (2) years finishes here (the piece measures approx. 13 cm / 5⅛" in diameter). ASSEMBLY: Sew the one long side of the row of squares to the circle, with 1 stitch in each stitch – make sure the seam is not tight. There will be an opening at the bottom of the hat of 9-18-18 (15) stitch. EDGE AT THE BOTTOM OF THE HAT: Start from the right side with 1 slip stitch in the outermost corner of the row of squares and then work along the whole of the bottom edge of the hat with 1 single crochet in each stitch = 57-66-66 (71) single crochets, turn the piece. Continue working 0-0-1 (2) rows of 1 half double crochet in each stitch AT THE SAME TIME as you increase 0-0-0 (1) half double crochet evenly spaced = 57-66-66 (72) half double crochets. Work 1 row of double crochets (work 1 double crochet in each stitch). Finally work 0-0-1 (2) rows of half double crochets and 1 row of single crochet. Cut and fasten the strand. FAN EDGE IN THE FRONT OF THE HAT: Start from the wrong side in the bottom corner at the front of the hat and work as follows – remember CROCHET INFO: ROW 1 (= wrong side): 1 slip stitch in the outermost stitch, 3 chain stitches (equivalent to 1 double crochet), continue by working 1 double crochet in each stitch/row/row of half double crochets, 2 double crochets around each double crochet row at the bottom of the hat and 1 double crochet around each chain-space in the corners of the squares = approx. 80-80-84 (100) stitches, turn the piece. ROW 2 (= right side): Work a row of single crochets where the number of stitches is adjusted to 81-81-81 (99) stitches (divisible by 6 + 3) – READ DECREASE TIP/INCREASE TIP. Then work fan edge according to A.4. When A.4 has been completed, cut the strand and fasten it. Thread the silk ribbon up and down through the row of double crochets at the bottom of the hat and all the way to the fan edge. If you would like further decoration, you can thread silk ribbon up and down through the double crochet row at the front of the hat as well. This silk ribbon is not tied, so the ends need to be folded in and fastened on the wrong side of the piece. |
|||||||||||||||||||||||||||||||||||||||||||||||||||||||||||||||||||||||||||||||||||||
Diagram explanations |
|||||||||||||||||||||||||||||||||||||||||||||||||||||||||||||||||||||||||||||||||||||
|
|||||||||||||||||||||||||||||||||||||||||||||||||||||||||||||||||||||||||||||||||||||
|
|||||||||||||||||||||||||||||||||||||||||||||||||||||||||||||||||||||||||||||||||||||

|
|||||||||||||||||||||||||||||||||||||||||||||||||||||||||||||||||||||||||||||||||||||
|
|||||||||||||||||||||||||||||||||||||||||||||||||||||||||||||||||||||||||||||||||||||
|
Have you made this or any other of our designs? Tag your pictures in social media with #dropsdesign so we can see them! Do you need help with this pattern?You'll find tutorial videos, a Comments/Questions area and more by visiting the pattern on garnstudio.com. © 1982-2024 DROPS Design A/S. We reserve all rights. This document, including all its sub-sections, has copyrights. Read more about what you can do with our patterns at the bottom of each pattern on our site. |
|||||||||||||||||||||||||||||||||||||||||||||||||||||||||||||||||||||||||||||||||||||


With over 40 years in knitting and crochet design, DROPS Design offers one of the most extensive collections of free patterns on the internet - translated to 17 languages. As of today we count 304 catalogs and 11422 patterns - 11417 of which are translated into English (US/in).
We work hard to bring you the best knitting and crochet have to offer, inspiration and advice as well as great quality yarns at incredible prices! Would you like to use our patterns for other than personal use? You can read what you are allowed to do in the Copyright text at the bottom of all our patterns. Happy crafting!
Comments / Questions (80)
Jeg har brug for hjælp til at forstå det første stykke af opskriften på dåbskjolen 29-3 fra drops. Jeg kan bare ikke få maske antal til at være rigtigt.
15.02.2024 - 08:42DROPS Design answered:
Hej Lenette, Hvilken størrelse hækler du, hvor mange masker har du og hvor er du i diagrammet?
23.02.2024 - 10:48När jag ska virka rapporter blir klänningen bara mindre o mindre. Det verkar krångla på Varv 4 När jag gör stolpar i de st från Varv 3 o sen en fm i lm-bågen. Då går klänningen ihop.
11.02.2024 - 11:15DROPS Design answered:
Hej Emma, hvilket diagram jobber du med?
23.02.2024 - 09:39Hej. Jeg er ved kjolen i 0-6 måneder. I diagrammet a1, hvor mange picoer skal jeg ende med efter en omgang på række 1?
10.02.2024 - 01:37DROPS Design answered:
Hej Anna, du skal have 4 picoter over hver rapport (muslinge) i A.1 :)
22.02.2024 - 10:59Viftekanten om ærmet. Fastmasker i alle masker - skal der hækles over stangmaskerne i begge sider så de bliver trukket sammen pga fastmasker på begge sidder af dem eller hækles fastmasker i dem?
16.01.2024 - 21:59I am sorry but I don't understand the first row from FAN EDGE IN THE FRONT OF THE HAT, at all. Can you provide more details about that row? Thank you
03.01.2024 - 20:20DROPS Design answered:
Dear Elena, starting from WS you will work along the squares, start with 1 sl st in the corner, then work 3 chains (to replace 1st treble crochet (UK-English)), then work along the bottom edge previously made / in each stitch along the opening for face - crochet 2 treble crochets in each treble crochet row on each side (bottom edge), and.1 treble crochet in each stitch / around each chain space along the squares / the opening for face. Happy crocheting!
04.01.2024 - 08:22Bærestykke: Der står at 1. Række med stangmasker skal hækles fra retsiden. Jeg har lavet en række lm og en række fm. Er næste række så ikke vrangsiden?
18.12.2023 - 16:07DROPS Design answered:
Hej Michella, rækken med fastmasker hækles fra vrangen, så rækken med st hækles fra retsiden :)
19.12.2023 - 14:52What is the raglan line in cm for this model? I need to calculate a bit different because my gauge swatch is 21 st wide/10 cm and 7 textured rows in height. Thanks
14.12.2023 - 10:23DROPS Design answered:
Dear Elena, you will find all measurements for each size in the chart - you can then calculate froom the your own tension and the written pattern/the measurements for the appropriate size. Happy crocheting!
14.12.2023 - 16:11Kan det passe at på str. 6/12 skal der kun 6 læse lm men på den mindste 8? Næste række hækles således fra retsiden: Hækl 1 stangmaske i hver af de første 20-23-24 (26) stangmasker (= højre rygstk), spring over de næste 33-37-37 (41) fastmasker (= ærme), hækl 8-6-10 (10) LØSE luftmasker, hækl 1 stangmaske i hver af de næste 40-46-48 (52) fastmasker (
04.10.2023 - 08:58DROPS Design answered:
Hei Vibeke. Det kan stemme ja. Det er for at mønstret skal gå opp i de ulike størrelsene. mvh DROPS Design
16.10.2023 - 11:29Hi, Where the pattern says to stitch into the top of the picot for row 2 chart A1b, what is classified as the top? Do you go around the chain stitches?? Also at the start of down 2 chart A1b would.i.be correct that you need to chain 5, including the 2 from A1A,
13.07.2023 - 07:46DROPS Design answered:
Dear Gemma, for the top of the picot you can work in the third chain stitch o between the 3 chain stitches and the treble crochet. On round 2 of the chart A.1, you start with 3 chain stitches in A.1A and 3 chain stitches in A.1B, then 1 double crochet/ single crochet in the top of the picot, 5 chain stitches and 1 double crochet/ single crochet in the top of the picot. Happy crochetting!
17.07.2023 - 14:50Was heißt Maschen überspringen? Zum Beispiel: Die nächsten 34 Maschen überspringen. Dankeschön
01.05.2023 - 05:44DROPS Design answered:
Liebe Frau Reinen, diese 34 Maschen soll man nicht häkeln, deshalb werden sie übersprungen werden - an welche Stelle meinen Sie das? Sollte es für die Teilung der Passe, kann Ihnen dann sicher dieses Video (ab Zeit 09:42) helfen (hier werden aber nur 33 M in die 1. Größe für die Ärmel übersprungen). Viel Spaß beim häkeln!
02.05.2023 - 09:24