
Popular categories
Looking for a yarn?


Comments / Questions (91)
![]() Anne Louise Bellaiche wrote:
Anne Louise Bellaiche wrote:
Hej igen. Hvis man skal undgå udtagning, skal der vel være 4 masker i A1 og 3 masker i A3 på alle 8 omgange. Nu har jeg prøvet at strikke A1-A2-A3, som I siger, uden den første udtagning, men hvis det skal passe med mønstret, vil der komme flere masker. Videoen, som I henviser til, viser kun A2. Jeg kan se på de andre spørgsmål (på tysk og fransk), at andre har samme vanskeligheder som mig. Et diagram af A1 og A3 uden udtagning ville virkelig hjælpe!
20.05.2021 - 23:17DROPS Design answered:
Hej igen Anne Louise, vi skriver en ny video på ønskelistan, som viser hvordan man strikker diagrammerne uden udtagningerne :)
21.05.2021 - 10:26
![]() Anne Louise Bellaiche wrote:
Anne Louise Bellaiche wrote:
Jeg forstår ikke, hvordan man kan strikke A1 og A3 uden at maskeantallet øges. Hvis jeg bare udelader en udtagning på hver omgang, øges maskeantallet jo alligevel, og hvordan kan jeg få mønstret til at passe, hvis jeg udelader nogle udtagninger? Hvordan gør jeg i øvrigt på omg. 3, hvor mønsteret er forskudt i forhold til de omg. 2? Det ville være rart med et diagram, som viser A1 og A3 uden udtagning! Med venlig hilsen Anne Louise
19.05.2021 - 21:41DROPS Design answered:
Hej Anne Louise, Har du set videoen som er lavet til dette mønster? Diagram til 220-3 Det er de yderste omslag (længst til højre i A.1 og længst til venstre i A.3) som bliver til udtagninger/nye masker. Når du undlader dem så tager du heller ikke ud.
20.05.2021 - 14:59
![]() Brigitte wrote:
Brigitte wrote:
Hei! Jeg ser dette er blitt spurt på mange språk :) Når man skal fortsette uten å øke på A1 og A3, betyr det at det hullet ved siden av de to rettstrikkede i raglanen skal utelates? At raglanen nå blir kun glattstrikk? På bildene ser det ut som hullet fortsetter til under armene, så jeg ble veldig i tvil.
18.05.2021 - 09:58DROPS Design answered:
Hei Birgitte. Er litt vanskelig å se på bildene de siste cm som er under ermet, men ja, når man fortsetter med A.1 og A.3 uten å øke blir det ikke hull. mvh DROPS design
19.05.2021 - 09:52
![]() Ann wrote:
Ann wrote:
Vill gärna sticka denna tröja, men det verkar som mönstret inte stämmer Jag har nu försökt flera gånger och kommer inte förbi varv fem, då det verkar fattas två maskor efter sista gången man gjort två rapporter av A2
17.05.2021 - 21:35DROPS Design answered:
Hej Ann, har du set videoen som er lavet til? Hur man stickar enligt diagram A.2 i DROPS 220-3 och 220-4
18.05.2021 - 10:23
![]() Conny wrote:
Conny wrote:
Ik ben bij de 19 cm waar ik niet meer moet meerderen. Ik snap het niet. Als ik niet meer meerder, houdt de raglan op voordat ik bij de onderkant van de mouw (de oksel) ben. Moet ik wel doorgaan met de 2 steken recht van de raglan? Dan wordt het een lelijke rechte verticale balk in plaats van een schuinweglopende raglan. En als ik alleen de patroonsteken 1,2 en 3 doe (zonder meerderingen) houdt ook de raglan opeens op terwijl ik nog niet bij de oksel ben. Ook niet mooi.
15.05.2021 - 16:24DROPS Design answered:
Dag Conny,
Er wordt inderdaad niet meer gemeerderd vanaf 19 cm en je breit nog 2 cm door zonder meerderingen maar wel met de 2 steken recht van de raglan. Je krijgt dus inderdaad een stukje dat verticaal naar beneden loopt. Op het lijf wordt het patroon A.2 weer voortgezet over de hele naald in de rondte. Het aantal steken moet dan deelbaar zijn door 6. Wil je de schuine raglanlijn voortzetten, dan dien je hier rekening mee te houden. Voor de mouw geldt ook dat je een meervoud van 6 steken nodig hebt. Dit is dus inclusief de 9 steken onder de mouw.
19.05.2021 - 10:27
![]() Hallbera wrote:
Hallbera wrote:
Ég næ ekki að láta munstrið passa þegar ég er að byrja á bak og framstykki. Er einhver idiotproof aðferð til að láta það passa?
08.05.2021 - 01:44DROPS Design answered:
Blessuð Hallbera. Þær lykkjur sem ekki ganga jafnt upp í mynstri eru prjónaðar í sléttprjóni þar til þær detta inn í mynstrið. Vona að þetta hjálpi. Gangi þér vel.
08.05.2021 - 13:44
![]() Anny Hummelshøj wrote:
Anny Hummelshøj wrote:
Jeg fatter simpelthen ikke denne opskrift, strikker en str m, og er færdig med udt. men har 312 mønster + de 8 m. retstrik. tror jeg opgiver da jeg snart har pillet op et hav af gange.
03.05.2021 - 18:21
![]() Heidelore Kröger wrote:
Heidelore Kröger wrote:
Modell BS 171 Ich stricke das o.g. Modell. Bin jetzt bein Raglan und muss jetzt noch ohne Zunahmen weiterstricken. Wenn ich ohne Zunahmen weitetstricke wir der 2 Maschige Raglan breiter ..... ist das richtig. Ich verstehe es nich
28.04.2021 - 01:14DROPS Design answered:
Liebe Frau Kröger, wenn Sie noch ein paar Runde ohne Raglanzunahmen stricken sollen, dann stricken Sie jetzt nicht mehr die 1/2 Umschläge am Anfang A.1/am Ende A.3, dh für jeden Umschlag sollen Sie jetzt 1 Abnahmen stricken damit die Maschenanzahl nicht mehr aufnimmt. Viel Spaß beim stricken!
28.04.2021 - 08:09
![]() Caroline Comacle wrote:
Caroline Comacle wrote:
Je ne comprends pas bien ce passage : "À chaque fois que A.1 et A.3 sont tricotés en hauteur, on a suffisamment de mailles pour tricoter 2 motifs de A.2 en plus en largeur" cela veut dire qu'une fois A1 et A3 tricotés, on ne fait plus 2x A2 mais 4x puis 6x etc. entre A1 et A3 ?
22.04.2021 - 01:21DROPS Design answered:
Bonjour Mme Comacle, tout à fait, à chaque fois que vous tricotez les diagrammes en hauteur, vous avez augmenté 6 mailles, autrement dit, au-dessus des 10 m du A.1 précédent, vous tricoterez un nouveau A.1 (= 4 m) et une fois A.6 (= 6 m). De même au-dessus des 9 m de A.3, vous tricoterez A.6 (= 6 m) et les 3 m d'un nouveau A.3. Et entre les 2, continuez A.2 comme avant. Bon tricot!
22.04.2021 - 07:52
![]() Lucie wrote:
Lucie wrote:
Bonjour, Je tricote ce pull en taille M et je suis bloquée à ce niveau : « continuer en point fantaisie mais sans augmenter : tricoter en Jersey les mailles des côtés qui ne peuvent plus se tricoter en point fantaisie. ». Quelles mailles exactement doivent être tricotées en jersey? Et surtout combien de mailles se tricotent ainsi?
20.04.2021 - 14:24DROPS Design answered:
Bonjour Lucie, si la hauteur de l'empiècement n'est pas atteinte à la fin des augmentations, vous continuez le point ajouré comme avant, mais côté raglan, tricotez en jersey les mailles du point ajouré qui ne peuvent être tricotées dans un motif complet pour éviter de modifier le nombre de mailles, autrement dit, chaque diminution doit être compensée par 1 jeté, si vous ne pouvez pas faire la diminution/le jeté, alors tricotez ces mailles en jersey. Bon tricot!
20.04.2021 - 15:11
|
|||||||||||||||||||
Galatea#galateasweater |
|||||||||||||||||||
 |
 |
||||||||||||||||||
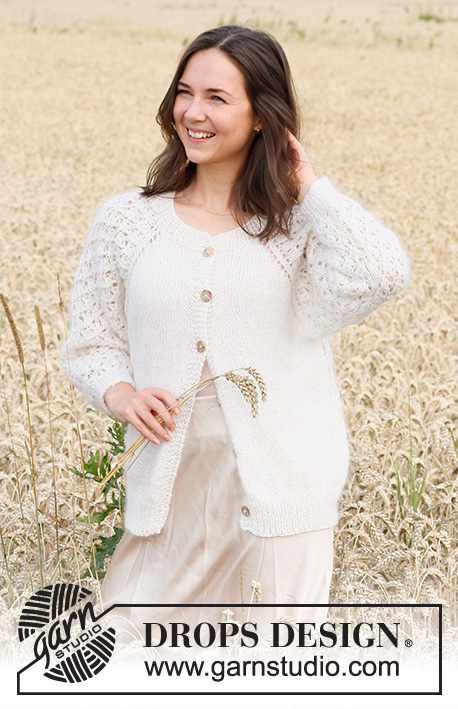
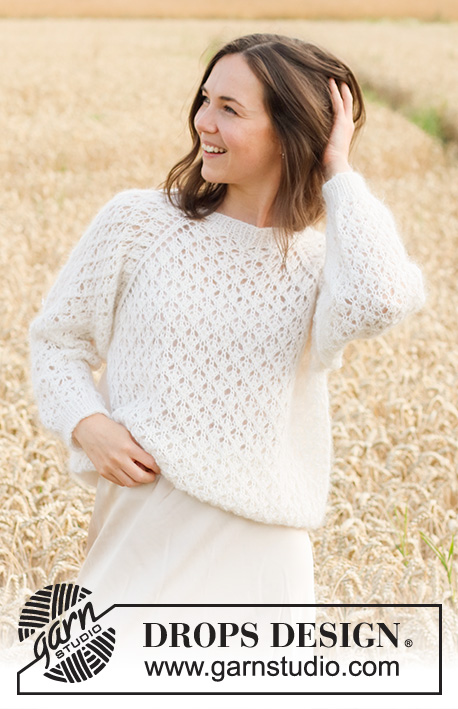
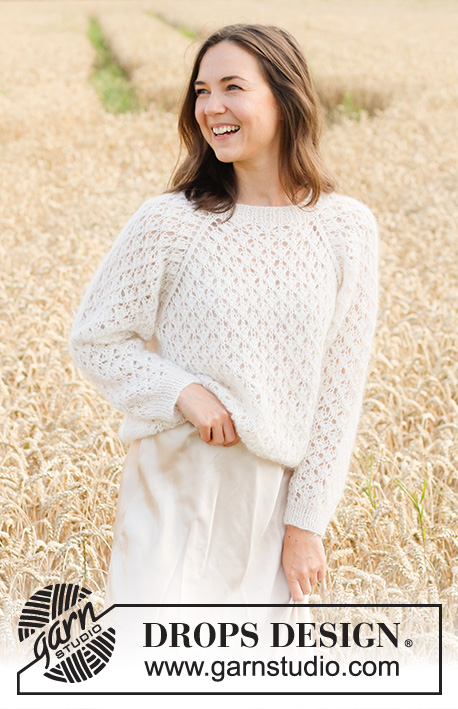
Knitted sweater in 1 strand DROPS Kid-Silk and 1 strand DROPS BabyAlpaca Silk. The piece is worked top down with raglan and lace pattern. Sizes S - XXXL.
DROPS 220-3 |
|||||||||||||||||||
|
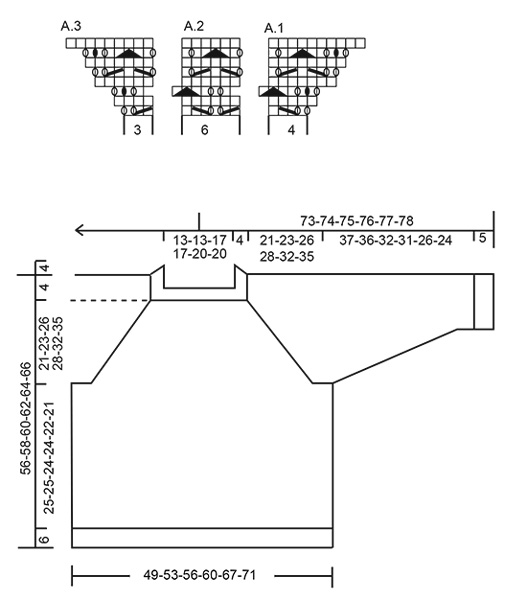
------------------------------------------------------- EXPLANATIONS FOR THE PATTERN: ------------------------------------------------------- PATTERN: See diagrams A.1 to A.3 DECREASE TIP-1 (for sleeves): Decrease 1 stitch on either side of the marker thread as follows: Work until there are 3 stitches left before the marker-stitch, knit 2 together, knit 3 (marker thread sits in the middle of these stitches), slip 1 stitch as if to knit, knit 1 and pass the slipped stitch over the knitted stitch (2 stitches decreased). DECREASE TIP-2 (evenly spaced): To work out how to decrease evenly, count the total number of stitches on the needle (e.g. 50 stitches) and divide by the number of decreases to be made (e.g. 8) = 6.25. In this example knit approx. each 5th and 6th stitch together. BINDING-OFF TIP: To avoid the bind-off edge being tight you can bind off with a larger size needle. If the edge is still tight, make 1 yarn over after approx. each 4th stitch at the same time as binding off; the yarn overs are bind off as normal stitches. ------------------------------------------------------- START THE PIECE HERE: ------------------------------------------------------- SWEATER – SHORT OVERVIEW OF THE PIECE: The neck and yoke are worked in the round with circular needle, top down. The round starts between the left sleeve and the back piece. The yoke is divided for body and sleeves and the body continued in the round with circular needle. The sleeves are worked in the round with short circular needle/double pointed needles, top down. The piece is worked with 1 strand Baby Alpaca Silk and 1 strand Kid-Silk (= 2 strands). NECK: Cast on 72-72-84-84-96-96 stitches with circular needle size 4 MM = US 6 and 1 strand Kid-Silk and 1 strand Baby Alpaca Silk (= 2 strands). Knit 1 round. Then work rib (knit 1, purl 1) for 4 cm = 1½". Insert 1 marker at the beginning of the round. The yoke is measured from this marker. Change to circular needle size 5 MM = US 8. REMEMBER THE KNITTING GAUGE! YOKE: Continue as follows: Work 1 stitch in stockinette stitch, work A.1 (= 4 stitches), A.2 over the next 12-12-18-18-24-24 stitches (= 2-2-3-3-4-4 repeats of 6 stitches), A.3 (= 3 stitches), 2 stitches in stockinette stitch, A.1, A.2, A.3, 2 stitches in stockinette stitch, A.1, A.2 over the next 12-12-18-18-24-24 stitches (= 2-2-3-3-4-4 repeats of 6 stitches), A.3, 2 stitches in stockinette stitch, A.1, A.2, A.3, 1 stitch in stockinette stitch. Continue this pattern; all increases are drawn in A.1 and A.3. You increase 8 and 16 stitches alternately, every 2nd round. Each time A.1 and A.3 are completed in height, there will be 2 more repeats of A.2 in width. Increase every 2nd round a total of 18-20-20-22-24-26 times = 288-312-324-348-384-408 stitches. The piece measures approx. 16-18-19-20-21-24 cm = 6¼"-7"-7½"-8"-8¼"-9½". Continue the pattern but without further increases; stitches which do not fit into the pattern in the sides are worked in stockinette stitch. Continue working until the piece measures 21-23-26-28-32-35 cm = 8¼"-9"-10¼"-11"-12½"-13¾" from the marker on the neck. Now divide the yoke for the body and sleeves on the next round as follows (continuing the pattern): Work 75-81-87-93-105-111 stitches (= back piece), place the next 69-75-75-81-87-93 stitches on 1 thread for the sleeve, cast on 9 stitches (in side under the sleeve), work 75-81-87-93-105-111 stitches as before (= front piece), place the next 69-75-75-81-87-93 stitches on 1 thread for the sleeve, cast on 9 stitches. Body and sleeves are finished separately. Cut the strand. BODY: = 168-180-192-204-228-240 stitches. Continue with A.2 over all stitches; make sure the pattern matches the pattern on the yoke. Continue working until the piece measures 25-25-24-24-22-21 cm = 9¾"-9¾"-9½"-9½"-8¾"-8¼" from the division (there is approx. 6 cm = 2⅜" left to finished length, you can try the sweater on and work to desired length). Change to circular needle size 4 MM = US 6 and work rib (knit 1, purl 1) for 6 cm = 2⅜". Bind off with knit over knit and purl over purl – read BINDING-OFF TIP! The sweater measures approx. 56-58-60-62-64-66 cm = 22"-22¾"-23⅝"-24⅜"-25¼"-26" from the shoulder down. SLEEVES: Place the 69-75-75-81-87-93 stitches from the thread on the one side of the piece on double pointed needles/short circular needle size 5 MM = US 8 and knit up 1 stitch in each of the 9 stitches cast on under the sleeve = 78-84-84-90-96-102 stitches. Insert a marker in the middle of the 9 stitches under the sleeve. Allow the marker to follow your work onwards; it will be used when decreasing under the sleeve. Continue pattern A.2 in the round, making sure the pattern matches the pattern on the yoke. When the sleeve measures 3 cm = 1⅛" from the division in all sizes, decrease 2 stitches under the sleeve – read DECREASE TIP-1. Decrease like this every 2½-2-1½-1½-1-1 cm = 1"-¾"-½"-½"-⅜"-⅜" a total of 14-16-16-17-19-20 times = 50-52-52-56-58-62 stitches; stitches which do not fit into the pattern under the sleeve are worked in stockinette stitch. Continue working until the sleeve measures 37-36-32-31-26-24 cm = 14½"-14¼"-12½"-12¼"-10¼"-9½" from the division (there is approx. 5 cm = 2" left to finished length, you can try the sweater on and work to desired length). NOTE: Shorter measurements in larger sizes due to wider neck and longer yoke. Knit 1 round where you decrease 10 stitches evenly spaced in all sizes – read DECREASE TIP-2 = 40-42-42-46-48-52 stitches. Change to double pointed needles size 4 MM = US 6 and work rib (knit 1, purl 1) for 5 cm = 2". Bind off with knit over knit and purl over purl – remember BINDING-OFF TIP! The sleeve measures approx. 42-41-37-36-31-29 cm = 16½"-16⅛"-14½"-14¼"-12¼"-11⅜" from the division. Work the other sleeve in the same way. |
|||||||||||||||||||
Diagram explanations |
|||||||||||||||||||
|
|||||||||||||||||||
 |
|||||||||||||||||||
Have you finished this pattern?Tag your pictures with #dropspattern #galateasweater or submit them to the #dropsfan gallery. Do you need help with this pattern?You'll find 27 tutorial videos, a Comments/Questions area and more by visiting the pattern on garnstudio.com. © 1982-2026 DROPS Design A/S. We reserve all rights. This document, including all its sub-sections, has copyrights. Read more about what you can do with our patterns at the bottom of each pattern on our site. |
|||||||||||||||||||


With over 40 years in knitting and crochet design, DROPS Design offers one of the most extensive collections of free patterns on the internet - translated to 17 languages. As of today we count 324 catalogs and 12245 patterns - 12235 of which are translated into English (US/in).
We work hard to bring you the best knitting and crochet have to offer, inspiration and advice as well as great quality yarns at incredible prices! Would you like to use our patterns for other than personal use? You can read what you are allowed to do in the Copyright text at the bottom of all our patterns. Happy crafting!
Post a comment to pattern DROPS 220-3
We would love to hear what you have to say about this pattern!
If you want to leave a question, please make sure you select the correct category in the form below, to speed up the answering process. Required fields are marked *.