
Popular categories
Looking for a yarn?


Comments / Questions (91)
![]() Luci Harris wrote:
Luci Harris wrote:
Hi, Do you have a size guide for this pattern? It says S-XXL but there are no actual measurements to tell what the finished garment will be in each size. There's also no gauge given so far as I can tell. Thanks
24.12.2023 - 21:56DROPS Design answered:
Dear Luci, you can find the size chart after the pattern instructions, after the charts. You can read more information on the size charts here: https://www.garnstudio.com/lesson.php?id=24&cid=19. The gauge is the KNITTING TENSION indicated in the materials section. Happy knitting!
28.12.2023 - 23:03
![]() Mieke Baras wrote:
Mieke Baras wrote:
Baby alpaca silk is uit het assortiment. Door welke andere kwaliteit kan ik die ook vervangen, liefst ook garencategorie A?
18.06.2023 - 20:35DROPS Design answered:
Dag Mieke,
In plaats daar van zou je DROPS Alpaca, DROPS Nord, DROPS Fabel of DROPS Flora kunnen gebruiken.
21.06.2023 - 20:55
![]() Holly wrote:
Holly wrote:
Hello. I'm confused as to how you continue the pattern without further increases. Which yarnovers do we omit on each round? Also when you say "Continue with A.2 over all stitches; make sure the pattern matches the pattern on the yoke" do you mean to knit every round as A.2. This goes for the sleeves as well. Thank you
29.05.2023 - 16:49DROPS Design answered:
Dear Holly, note in the diagrams A.1 and A.3 which is the last stitch worked when all your increases are done, then just make sure to work A.1 and A.3 as before but with the same number of stitches decreased as yarn overs (don't make the extra yarn overs to increase as before). And work A.2 as before. After dividing piece, you will be able to work A.2 over all stitches in the round, just make sure to line up A.2 from yoke/sleeve. Happy knitting!
30.05.2023 - 11:50
![]() Anne-Lene Solberg wrote:
Anne-Lene Solberg wrote:
Etter at økningene er ferdig, så får jeg ikke maske antallet til å stemme. Hvilke kast er det ikke som skal være med på A1 og A3. Hvor mange rette blir det mellom A1 og A3 tilslutt. Er der bare A2 som skal strikkes videre for å få 26 cm lengde på bæresrykket. Jeg er en erfaren strikker men dette mønsteret er dårlig forklart. Har rekt opp så mange ganger.
24.05.2023 - 09:31DROPS Design answered:
Hej Anne-Lene, alle økninger er tegnet ind i diagrammet, så alle raglanøkninger skal være med ifølge A.1 og A.3 til du har 324 m (gætter at du strikker M) og arb måler 19 cm. Ja mønster A.2 fortsættes ned over hele genseren, hvis du ikke har nok masker til A.2 i siderne, strikker du maskerne mod siden i glatstrik.
24.05.2023 - 14:07
![]() Pascale NORBLIN wrote:
Pascale NORBLIN wrote:
Bonjour Très joli modèle, auriez-vous les explications du point fantaisie pour aiguilles droites, merci beaucoup
23.03.2023 - 17:49DROPS Design answered:
Bonjour Mme Norblin et merci. Tricotez le point fantaisie en allers et retours en commençant sur l'endroit (tous les rangs impairs se tricotent sur l'endroit) et en tricotant tous les rangs pairs à l'envers sur l'envers. Bon tricot!
24.03.2023 - 08:17
![]() C Krage wrote:
C Krage wrote:
Hvorfor er der ikke lyd på YouTube videoerne?
04.01.2023 - 13:41DROPS Design answered:
Hej, det er fordi vi har strikkere og hæklere fra hele verden, men husk at du kan justere så videoen vises langsommere og så skal du altid læse teksten som passer til :)
05.01.2023 - 10:16
![]() Line wrote:
Line wrote:
Så vidt jeg kan se er der ingen video der forklarer hvordan man skal gennemskue hvilke udtagninger det er der ikke skal laves efter afslutninf af raglan stykket.
01.12.2022 - 03:43DROPS Design answered:
Hej Line, vi forstår ikke rigtig dit spørgsmål. Hvis du følger A.2, så er der ingen udtagninger og hele blusen er strikket med samme hulmønster :)
01.12.2022 - 14:27
![]() Line wrote:
Line wrote:
Hej Drops Jeg er langt om længe kommet igennem raglan stykket, men er nu ved næste sektion og det forstår jeg slet ikke hvordan jeg skal kunne gøre. Fortsæt med mønster som før, men der strikkes nu uden udtagninger i siden på A.1 og A.3, de masker som ikke går op i mønsteret i siden strikkes i glatstrik. Fortsæt til arbejdet måler ca 21-23-26-28-32-35 cm fra mærket i halsen. Håber I kan forklare det så jeg ikke skal opgive og pille op.
26.11.2022 - 18:30DROPS Design answered:
Hej Line, vi har lavet en video som viser hvordan man strikker diagrammet rundt (den ligger nederst i opskriften, under måleskitsen) :)
30.11.2022 - 14:36
![]() Line wrote:
Line wrote:
Hej Drops Jeg er langt om længe kommet igennem raglan stykket, men er nu ved næste sektion og det forstår jeg slet ikke hvordan jeg skal kunne gøre. Fortsæt med mønster som før, men der strikkes nu uden udtagninger i siden på A.1 og A.3, de masker som ikke går op i mønsteret i siden strikkes i glatstrik. Fortsæt til arbejdet måler ca 21-23-26-28-32-35 cm fra mærket i halsen. Håber I kan forklare det så jeg ikke skal opgive og pille op.
17.11.2022 - 03:09
|
|||||||||||||||||||
Galatea#galateasweater |
|||||||||||||||||||
 |
 |
||||||||||||||||||
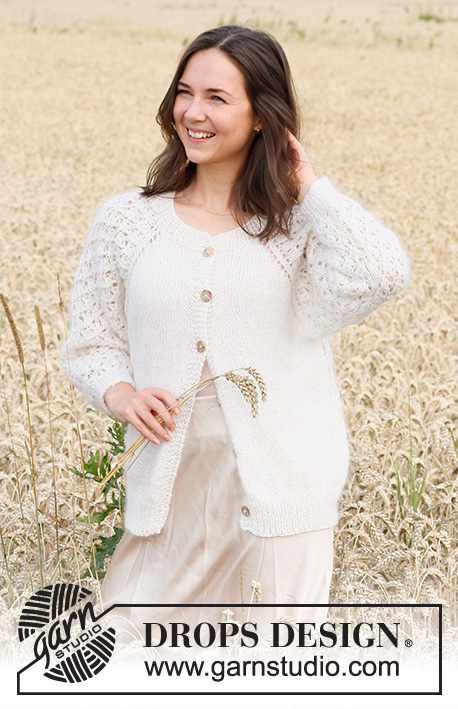
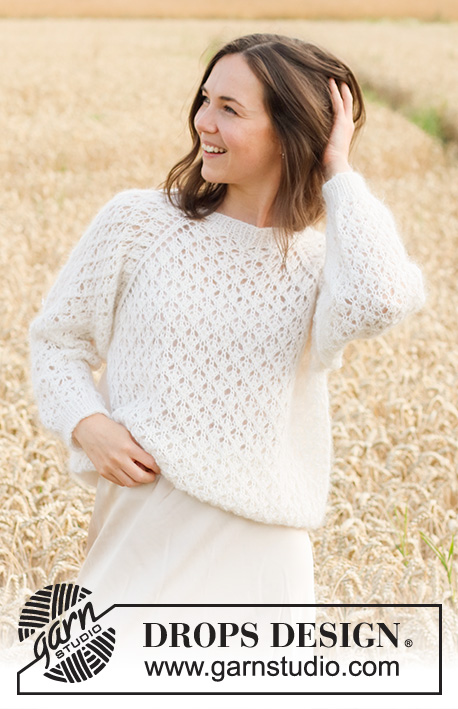
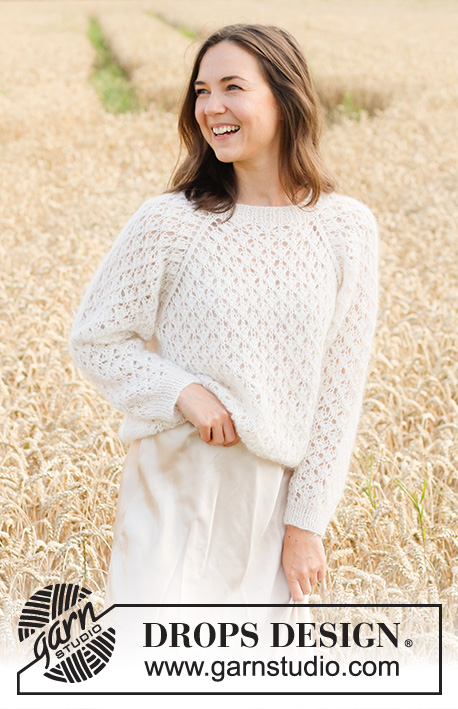
Knitted sweater in 1 strand DROPS Kid-Silk and 1 strand DROPS BabyAlpaca Silk. The piece is worked top down with raglan and lace pattern. Sizes S - XXXL.
DROPS 220-3 |
|||||||||||||||||||
|
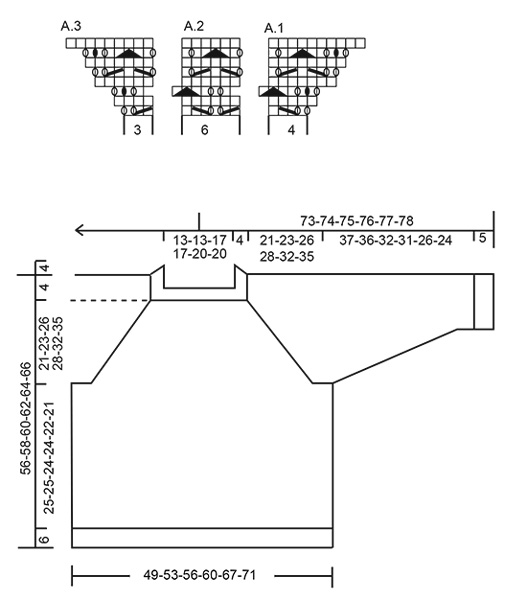
------------------------------------------------------- EXPLANATIONS FOR THE PATTERN: ------------------------------------------------------- PATTERN: See diagrams A.1 to A.3 DECREASE TIP-1 (for sleeves): Decrease 1 stitch on either side of the marker thread as follows: Work until there are 3 stitches left before the marker-stitch, knit 2 together, knit 3 (marker thread sits in the middle of these stitches), slip 1 stitch as if to knit, knit 1 and pass the slipped stitch over the knitted stitch (2 stitches decreased). DECREASE TIP-2 (evenly spaced): To work out how to decrease evenly, count the total number of stitches on the needle (e.g. 50 stitches) and divide by the number of decreases to be made (e.g. 8) = 6.25. In this example knit approx. each 5th and 6th stitch together. BINDING-OFF TIP: To avoid the bind-off edge being tight you can bind off with a larger size needle. If the edge is still tight, make 1 yarn over after approx. each 4th stitch at the same time as binding off; the yarn overs are bind off as normal stitches. ------------------------------------------------------- START THE PIECE HERE: ------------------------------------------------------- SWEATER – SHORT OVERVIEW OF THE PIECE: The neck and yoke are worked in the round with circular needle, top down. The round starts between the left sleeve and the back piece. The yoke is divided for body and sleeves and the body continued in the round with circular needle. The sleeves are worked in the round with short circular needle/double pointed needles, top down. The piece is worked with 1 strand Baby Alpaca Silk and 1 strand Kid-Silk (= 2 strands). NECK: Cast on 72-72-84-84-96-96 stitches with circular needle size 4 MM = US 6 and 1 strand Kid-Silk and 1 strand Baby Alpaca Silk (= 2 strands). Knit 1 round. Then work rib (knit 1, purl 1) for 4 cm = 1½". Insert 1 marker at the beginning of the round. The yoke is measured from this marker. Change to circular needle size 5 MM = US 8. REMEMBER THE KNITTING GAUGE! YOKE: Continue as follows: Work 1 stitch in stockinette stitch, work A.1 (= 4 stitches), A.2 over the next 12-12-18-18-24-24 stitches (= 2-2-3-3-4-4 repeats of 6 stitches), A.3 (= 3 stitches), 2 stitches in stockinette stitch, A.1, A.2, A.3, 2 stitches in stockinette stitch, A.1, A.2 over the next 12-12-18-18-24-24 stitches (= 2-2-3-3-4-4 repeats of 6 stitches), A.3, 2 stitches in stockinette stitch, A.1, A.2, A.3, 1 stitch in stockinette stitch. Continue this pattern; all increases are drawn in A.1 and A.3. You increase 8 and 16 stitches alternately, every 2nd round. Each time A.1 and A.3 are completed in height, there will be 2 more repeats of A.2 in width. Increase every 2nd round a total of 18-20-20-22-24-26 times = 288-312-324-348-384-408 stitches. The piece measures approx. 16-18-19-20-21-24 cm = 6¼"-7"-7½"-8"-8¼"-9½". Continue the pattern but without further increases; stitches which do not fit into the pattern in the sides are worked in stockinette stitch. Continue working until the piece measures 21-23-26-28-32-35 cm = 8¼"-9"-10¼"-11"-12½"-13¾" from the marker on the neck. Now divide the yoke for the body and sleeves on the next round as follows (continuing the pattern): Work 75-81-87-93-105-111 stitches (= back piece), place the next 69-75-75-81-87-93 stitches on 1 thread for the sleeve, cast on 9 stitches (in side under the sleeve), work 75-81-87-93-105-111 stitches as before (= front piece), place the next 69-75-75-81-87-93 stitches on 1 thread for the sleeve, cast on 9 stitches. Body and sleeves are finished separately. Cut the strand. BODY: = 168-180-192-204-228-240 stitches. Continue with A.2 over all stitches; make sure the pattern matches the pattern on the yoke. Continue working until the piece measures 25-25-24-24-22-21 cm = 9¾"-9¾"-9½"-9½"-8¾"-8¼" from the division (there is approx. 6 cm = 2⅜" left to finished length, you can try the sweater on and work to desired length). Change to circular needle size 4 MM = US 6 and work rib (knit 1, purl 1) for 6 cm = 2⅜". Bind off with knit over knit and purl over purl – read BINDING-OFF TIP! The sweater measures approx. 56-58-60-62-64-66 cm = 22"-22¾"-23⅝"-24⅜"-25¼"-26" from the shoulder down. SLEEVES: Place the 69-75-75-81-87-93 stitches from the thread on the one side of the piece on double pointed needles/short circular needle size 5 MM = US 8 and knit up 1 stitch in each of the 9 stitches cast on under the sleeve = 78-84-84-90-96-102 stitches. Insert a marker in the middle of the 9 stitches under the sleeve. Allow the marker to follow your work onwards; it will be used when decreasing under the sleeve. Continue pattern A.2 in the round, making sure the pattern matches the pattern on the yoke. When the sleeve measures 3 cm = 1⅛" from the division in all sizes, decrease 2 stitches under the sleeve – read DECREASE TIP-1. Decrease like this every 2½-2-1½-1½-1-1 cm = 1"-¾"-½"-½"-⅜"-⅜" a total of 14-16-16-17-19-20 times = 50-52-52-56-58-62 stitches; stitches which do not fit into the pattern under the sleeve are worked in stockinette stitch. Continue working until the sleeve measures 37-36-32-31-26-24 cm = 14½"-14¼"-12½"-12¼"-10¼"-9½" from the division (there is approx. 5 cm = 2" left to finished length, you can try the sweater on and work to desired length). NOTE: Shorter measurements in larger sizes due to wider neck and longer yoke. Knit 1 round where you decrease 10 stitches evenly spaced in all sizes – read DECREASE TIP-2 = 40-42-42-46-48-52 stitches. Change to double pointed needles size 4 MM = US 6 and work rib (knit 1, purl 1) for 5 cm = 2". Bind off with knit over knit and purl over purl – remember BINDING-OFF TIP! The sleeve measures approx. 42-41-37-36-31-29 cm = 16½"-16⅛"-14½"-14¼"-12¼"-11⅜" from the division. Work the other sleeve in the same way. |
|||||||||||||||||||
Diagram explanations |
|||||||||||||||||||
|
|||||||||||||||||||
 |
|||||||||||||||||||
Have you finished this pattern?Tag your pictures with #dropspattern #galateasweater or submit them to the #dropsfan gallery. Do you need help with this pattern?You'll find 27 tutorial videos, a Comments/Questions area and more by visiting the pattern on garnstudio.com. © 1982-2026 DROPS Design A/S. We reserve all rights. This document, including all its sub-sections, has copyrights. Read more about what you can do with our patterns at the bottom of each pattern on our site. |
|||||||||||||||||||


With over 40 years in knitting and crochet design, DROPS Design offers one of the most extensive collections of free patterns on the internet - translated to 17 languages. As of today we count 324 catalogs and 12245 patterns - 12235 of which are translated into English (US/in).
We work hard to bring you the best knitting and crochet have to offer, inspiration and advice as well as great quality yarns at incredible prices! Would you like to use our patterns for other than personal use? You can read what you are allowed to do in the Copyright text at the bottom of all our patterns. Happy crafting!
Post a comment to pattern DROPS 220-3
We would love to hear what you have to say about this pattern!
If you want to leave a question, please make sure you select the correct category in the form below, to speed up the answering process. Required fields are marked *.