
Looking for a yarn?


Comments / Questions (53)
![]() Jimena wrote:
Jimena wrote:
Problem solved! Thanks!
03.01.2025 - 18:36
![]() Jimena wrote:
Jimena wrote:
Hi! I'm starting the lace part. I don't understand the chart. I have 8 stitches between markers and I ended up with 33 repeats of the pattern in total. I do a yo then 2 stitches at the edge , then I start the pattern with: 1p, 2k, yo, 2p and repeat. What am I missing? Also do I knitbthe stitches as they com in the pair rows? Thanks
03.01.2025 - 15:05DROPS Design answered:
Dear Jimena, you should have 237 stitches before starting the lace pattern. Start the row with 1 edge stitch in garter stitch, then work row 1 of chart A.1 once (over 2 stitches). Now repeat row 1 of A.2 over the next 224 stitches (a total of 28 times), work chart A.3 over 9 stitches and finish with 1 edge stitch in garter stitch = 237 stitches. The charts show all rows in the pattern as seen from the right side, so the chart shows the wrong side rows but opposite to how they are worked. For more information regarding knitting charts please check the following lesson:https://www.garnstudio.com/lesson.php?id=68&cid=19. Happy knitting!
05.01.2025 - 18:26
![]() Ada wrote:
Ada wrote:
Proszę o rozjaśnienie symbolu x nad kropką i pod truskawek . Opis jest niejasnymi jak wykonać 3 oczka dzersejem aby równały się 1 oczku lewemu na lewej stronie.
02.12.2024 - 17:05DROPS Design answered:
Witaj Ado, skorygowałam opis w schemacie. Symbol x oznacza 3 oczka lewe na lewej stronie robótki. W następnym rzędzie czyli na prawej stronie robótki te 3 oczka przerabiamy następująco: zdjąć 2 oczka jak do ich przerobienia razem na prawo, 1 oczko prawe i przełożyć 2 oczka zdjęte ponad przerobionym oczkiem (= zostają zamknięte 2 oczka). W ten sposób z 3 oczek ponowie przejdziemy do 1 oczka w tym miejscu. Pozdrawiamy!
03.12.2024 - 13:10
![]() Zaza wrote:
Zaza wrote:
Bonjour, je suis a la 3eme partie, apres les 237m. Je suis au rang 7 des diagrammes A1 A2 A3. Le rang 7 du diagramme A2, (le rond noir au centre, la légende dit : en piquant sous le maille double... , tricoter 1 m endroit, 1 jeté, 1 maille endroit, Je me demande s'il ne faut pas faire 1 jeté, 1 m endroit (en piquant sous la maille suivante) 1 jeté. En attendant votre réponse, je laisse mon ouvrage en suspens. Cordialement zaza
11.05.2024 - 15:00DROPS Design answered:
Bonjour Zaza, les rangs 7, 8 et 9 de A.2/A.3 se tricotent comme on le montre dans cette vidéo, aux rangs 5, 6 et 7 (car diagramme légèrement différent, mais ces 3 symboles vont se tricoter de la même façon: on va augmenter 2 mailles, puis tricoter ces 3 m en jersey = à l'envers sur l'envers et enfin diminuer ces 2 mailles pour qu'il n'en reste qu'une. Bon tricot!
13.05.2024 - 07:42
![]() Marit wrote:
Marit wrote:
Jeg blir forvirret av økningene og kantmaskene. Kan dere skrive her nøyaktig hvordan de to første pinnene av 2. rapport skal strikkes, maske for maske?
07.05.2024 - 20:44DROPS Design answered:
Hei Marit. 1. pinne / 2. rapport / fra retten: Kast - 1 kantmaske i rille (rett fra retten) - 1 kast - strikk glatttstrikk pinnen ut (rett) - 1 kantmaske i rille (rett fra retten) = det er økt 2 masker som tidligere. 2. pinne / 2. rapport / fra vrangen: Kast - 1 kantmaske i rille (rett fra vrangen) - 1 kast - strikk glatttstrikk pinnen ut (vrang) - 1 kantmaske i rille (rett fra retten) = det er økt 2 masker som tidligere. Pass på at de ytterste kastet alltid er løst, slik at det ikke strammer kanten på sjalet, kastene strikkes rett på neste pinne. Kastene innenfor kantmaske strikkes vrang fra vrangen og rett fra retten – de skal lage hull. mvh DROPS Design
13.05.2024 - 08:47
![]() Zaza wrote:
Zaza wrote:
Bo jour j ai commencé les côtes anglaises j ai fait les rangs 1 et 2, quand je suis arrivée à la fin du rang 3 (avant le marqueur) c est dit jusqu a ce qu il reste 4 m, et je me trouve avec 3 mailles après le marqueur. Est ce que je me suis trompée quelque part, pourtant j ai vérifié le début et la fin des rangs 1 et 2. Quelle est mon erreur. Cordialement zaza
07.05.2024 - 14:05DROPS Design answered:
Bonjour Zaza, répétez de *à* au rang 3 jusqu'à ce qu'il reste 4 mailles (soit 1 maille + son jeté, le marqueur et les 3 dernières mailles); tricotez ensemble à l'endroit la maille et son marqueur, glissez le marqueur, et tricotez 2 m end, 1 jeté, 1 m end. Au début du rang 4, vous avez 4 mailles avant le marqueur. Bon tricot!
07.05.2024 - 15:50
![]() Zaza wrote:
Zaza wrote:
Bonsoir j ai les 179m de la 2ème partie. Dans quel ordre dois je tricoter les 16 rangs de cotes anglaises.cordialement zaza
07.05.2024 - 01:43DROPS Design answered:
Bonjour Zaza, vous tricotez d'abord les rangs 1 à 5 puis vous répétez les rangs 2 à 5 jusqu'à ce que vous ayez tricoté 16 rangs en côtes anglaises au total. Bon tricot!
07.05.2024 - 07:59
![]() Zaza wrote:
Zaza wrote:
Rebonsoir, je suis desolée, mais j'ai mal compté les mailles, et pour les 4 rangs jersey tout est ok pour moi. Cordialement zaza
06.05.2024 - 19:32
![]() Zaza wrote:
Zaza wrote:
Bonsoir je suis arrivée aux 4 rangs Jersey. Je dois faire 1 m endroit (maille lisière) 1 jeté, 1 m endroit, 1 jeté, le reste des mailles à l endroit pour le 1er rang, mais si l on compte la maille lisière on a 1 maille en trop. Ou bien on ne compte pas la maille lisière. Merci de me dire si mes explications sont bonnes. Cordialement zaza
06.05.2024 - 18:27DROPS Design answered:
Bonjour Zaza, vous aviez 135 mailles et vous augmentez maintenant 2 mailles à chacun des 4 rangs suivants, soit 8 mailles au total, vous avez ainsi 135+8=143. Vous augmentez comme avant: 1 maille au début du rang (future maille lisière), vous tricotez ensuite 1 maille lisière et vous augmentez encore 1 maille = à tricoter en jersey. Bon tricot!
07.05.2024 - 07:45
![]() Zaza wrote:
Zaza wrote:
Bonsoir je suis au tout début et je suis arrivée aux 57 mailles le rang 3 j avoue ne pas comprendre on doit arriver à 89 m en insérant 30 augmentations (des jetés) + les 2jetes du début du rang. Pourriez vous m éclairer sur ce rang merci d avance cordialement zaza
04.05.2024 - 22:37DROPS Design answered:
Bonjour Zaza, vous augmentez 2 mailles au début du rang (comme au début du rang 2) et vous augmentez en même temps 30 m à intervalles réguliers (cf cette leçon), vous avez 57 mailles + 2 mailles augmentées au début du rang + 30 = 89 mailles. Bon tricot!
06.05.2024 - 08:14
|
||||||||||||||||||||||||||||
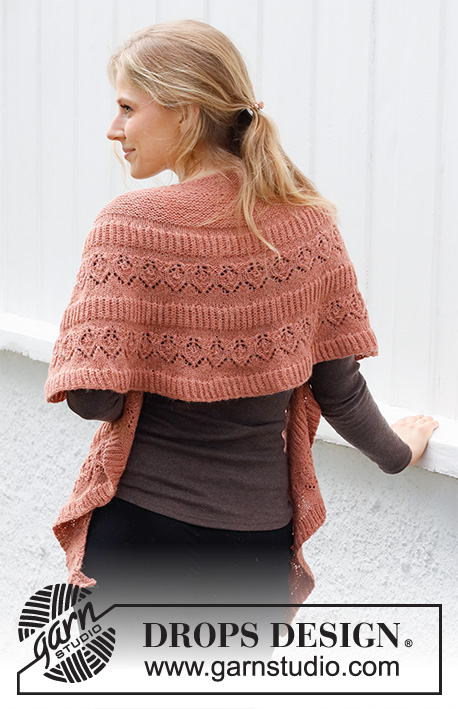
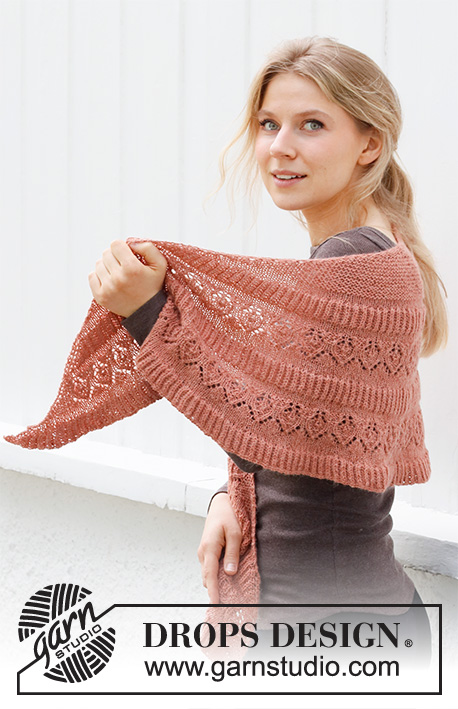
Sienna Wrap#siennawrap |
||||||||||||||||||||||||||||
 |
 |
|||||||||||||||||||||||||||
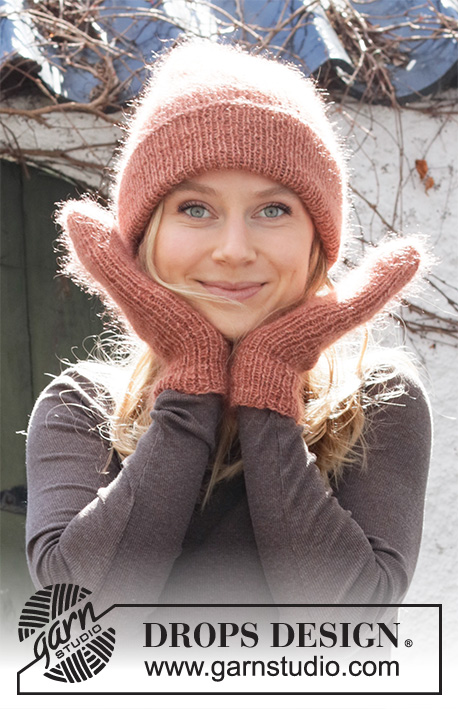
Knitted shawl with lace pattern and English rib in DROPS Alpaca. The piece is worked top down.
DROPS 214-3 |
||||||||||||||||||||||||||||
|
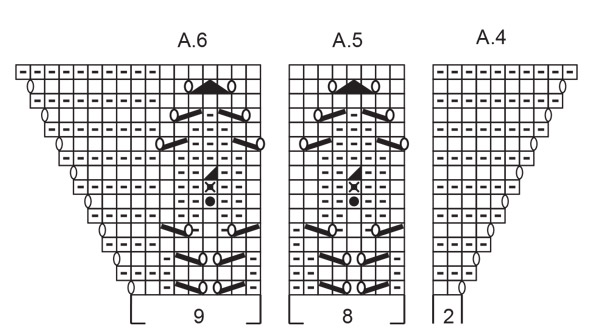
------------------------------------------------------- EXPLANATIONS FOR THE PATTERN: ------------------------------------------------------- RIDGE/GARTER STITCH (worked back and forth): Knit all rows. 1 ridge in height = Knit 2 rows. INCREASE TIP-1 (evenly spaced): To work out how to increase evenly, count the total number of stitches on the needle (e.g. 57 stitches) minus edge stitches (e.g. 4 stitches) and divide the remaining stitches by the number of increases to be made (e.g. 30) = 1.7. In this example, increase by making 1 yarn over after alternately each 1st and 2nd stitch. On the next row work the yarn overs twisted to avoid holes. ENGLISH RIB: 1st ROW (right side): Knit 1, 1 yarn over, knit 1, insert a marker here, * knit 1, 1 yarn over, slip the next stitch onto the right needle as if to purl *, work from *-* until 3 stitches remain on row, knit 1, insert a marker here, knit 1, 1 yarn over and knit 1 (= 2 stitches increased). 2nd ROW (wrong side): Knit 3 (marker here), * 1 yarn over, slip the next stitch onto the right needle as if to purl, knit the next stitch and yarn over together *, work from *-* until 4 stitches remain on row, 1 yarn over, slip the next stitch onto the right needle as if to purl (marker here), knit 3. 3rd ROW (right side): Knit 1, 1 yarn over, knit 2 (marker here), * knit the next stitch and yarn over together, 1 yarn over, slip the next stitch onto the right needle as if to purl *, work from *-* until 4 stitches remain on row, knit the next stitch and yarn over together (marker here), knit 2, 1 yarn over and knit 1 (= 2 stitches increased). 4th ROW (= wrong side): Knit 4 (marker here), * 1 yarn over, slip the next stitch onto the right needle as if to purl, knit the next stitch and yarn over together *, work from *-* until 5 stitches remain on row, 1 yarn over, slip the next stitch onto the right needle as if to purl (marker here), knit 4. After the 1st – 4th ROW you have increased 4 stitches in total (2 stitches on each side). Now these stitches are worked into the English rib as follows. 5th ROW (= right side): Knit 1, 1 yarn over, knit 1. There are 2 stitches left before the marker, move the marker here and work the 2 stitches in English rib as follows: Knit 1, 1 yarn over and slip the next stitch onto the right needle as if to purl. Work as follows over the next stitches: * knit the next stitch and yarn over together, 1 yarn over, slip the next stitch onto the right needle as if to purl *, work from *-* until 4 stitches remain on row (at the marker). Remove the marker and work the first 2 stitches in English rib as follows: 1 yarn over and slip the next stitch onto the right needle as if to purl, knit 1. Now the 2 increased stitches have been worked into the pattern. Insert the marker here. Knit 1, 1 yarn over and knit 1 (= 2 stitches increased). Repeat 2nd – 5th ROW onwards (= 4 stitches increased in each repeat). PATTERN: See diagrams A.1 to A.6. The diagrams show all rows from the right side. ------------------------------------------------------- START THE PIECE HERE: ------------------------------------------------------- SHAWL – SHORT OVERVIEW OF THE PIECE: The piece is worked back and forth with circular needle. SHAWL: Cast on 13 stitches with circular needle size 3.5 mm = US 4 and Alpaca. Knit 1 row from the wrong side. 1st SECTION: 1st ROW (= right side): 1 yarn over, knit 1, 1 yarn over, knit to end of row (= 2 stitches increased). The yarn overs are knitted on the next row; make sure the outermost yarn over is loose so the edge of the shawl is not tight. 2nd ROW (= wrong side): 1 yarn over, knit 1, 1 yarn over, knit to end of row (= 2 stitches increased). Work like 1st and 2nd ROW until you have worked 11 ridges (the piece measures approx. 5 cm = 2" down the middle), there are 57 stitches on the needle. REMEMBER THE KNITTING GAUGE! 3rd ROW (= right side): Knit 1 row and increase 2 stitches as before, but also increase 30 stitches evenly spaced – read INCREASE TIP in explanations above. There are 89 stitches on the needle. 4th ROW (= wrong side): Knit 1 row and increase 2 stitches as before. There are 91 stitches on the needle. Continue with garter stitch and increase as described in 1st and 2nd ROW until you have worked 11 more ridges. There are 135 stitches on the needle and the piece measures approx. 10-11 cm = 4"-4⅜" down the middle. The next row is from the right side. 2nd SECTION: Work 4 rows of stockinette stitch with 1 edge stitch in garter stitch on each side. Increase 2 stitches on each row as before; the yarn over inside the edge stitch is purled from the wrong side and knitted from the right side to leave a hole. There are 143 stitches. Knit 1 row with 1 edge stitch in garter stitch on each side – increase in the side as before but also increase 32 stitches evenly spaced = 177 stitches. Purl 1 row from the wrong side with 1 edge stitch in garter stitch on each side and increase in the side as before – REMEMBER that the yarn overs made when increasing evenly spaced are worked twisted on the next row. There are 179 stitches and the piece measures approx. 12-13 cm = 4¾"-5⅛" down the middle. Now work 16 rows of ENGLISH RIB – see description above, (i.e. 8 knitted stitches are visible on the right side). The English rib section measures approx. 4 cm = 1½" and the piece measures approx. 16 cm = 6¼" down the middle. 16 stitches have been increased = 195 stitches. The next row is from the right side. 3rd SECTION: Work 4 rows of stockinette stitch with 1 edge stitch in garter stitch on each side (on the first row, knit together the knitted stitches with their respective yarn overs) and increase 2 stitches on each row as before; the yarn overs inside the edge stitches are purled from the wrong side and knitted from the right side to leave holes. There are 203 stitches. Knit 1 row with 1 edge stitch in garter stitch on each side – increase in the side as before but also increase 30 stitches evenly spaced = 235 stitches. Purl 1 row from the wrong side with 1 edge stitch in garter stitch on each side and increase in the side as before. There are 237 stitches and the piece measures 18 cm = 7" down the middle. Now work lace pattern according to diagrams A.1, A.2 and A.3, with 1 edge stitch in garter stitch on each side and starting from the right side as follows: Work 1 edge stitch in garter stitch, A.1 over 2 stitches, A.2 over the next 224 stitches (28 times in width), A.3 over 9 stitches and finish with 1 edge stitch in garter stitch. When the diagrams have been completed in height you have increased 32 stitches and have 269 stitches on the needle. The piece measures approx. 23 cm = 9" down the middle. The next row is from the right side. 4th SECTION: NOTE! The increase in the side will change from here. Work 4 rows of stockinette stitch with 1 edge stitch in garter stitch on each side and increase 1 stitch by making 1 yarn over after the edge stitch at the beginning of each row (= 1 stitch increased per row); the yarn over is purled from the wrong side and knitted from the right side to leave a hole. There are 273 stitches. Knit 1 row with 1 edge stitch in garter stitch on each side and increase 1 stitch after the first edge stitch but also increase 32 stitches evenly spaced = 306 stitches. Purl 1 row with 1 edge stitch in garter stitch on each side and increase 1 stitch after the first edge stitch. There are 307 stitches and the piece measures approx. 25 cm = 9¾" down the middle. Now work 16 rows of English rib (i.e. 8 knitted stitches are visible on the right side). The English rib section measures approx. 4 cm = 1½", 16 stitches are increased = 323 stitches on the needle and the piece measures approx. 29 cm = 11⅜" down the middle. The next row is from the right side. 5th SECTION: Work 4 rows of stockinette stitch with 1 edge stitch in garter stitch on each side (on the first row, knit together the knitted stitches with their respective yarn overs) and increase 1 stitch by making 1 yarn over after the 1 edge stitch at the beginning of each row (= 1 stitch increased per row); the yarn over is purled from the wrong side and knitted from the right side to leave a hole. There are 327 stitches. Knit 1 row with edge stitch in garter stitch on each side and increase 1 stitch after the first edge stitch but also increase 36 stitches evenly spaced = 364 stitches. Purl 1 row with edge stitch in garter stitch on each side and increase 1 stitch after the first edge stitch. There are 365 stitches and the piece measures approx. 31 cm = 12¼" down the middle. Now work lace pattern according to diagrams A.4, A.5 and A.6, with 1 edge stitch in garter stitch on each side and from the right side as follows: Work 1 edge stitch in garter stitch, A.4 over 2 stitches, A.5 over the next 352 stitches (44 times in width), A.6 over 9 stitches and finish with 1 edge stitch in garter stitch. When the diagrams have been completed in height you have increased 16 stitches, there are 381 stitches on the needle and the piece measures approx. 36 cm = 14¼" down the middle. The next row is from the right side. 6th SECTION: Work 4 rows of stockinette stitch with 1 edge stitch in garter stitch on each side and increase 1 stitch by making 1 yarn over after the edge stitch at the beginning of each row (= 1 stitch increased per row); the yarn over is purled from the wrong side and knitted from the right side to leave a hole. There are 385 stitches. Knit 1 row with 1 edge stitch in garter stitch on each side and increase 1 stitch after the first edge stitch but also increase 32 stitches evenly spaced = 418 stitches. Purl 1 row with 1 edge stitch in garter stitch on each side and increase 1 stitch after the first edge stitch. There are 419 stitches and the piece measures approx. 38 cm = 15" down the middle. Now work 16 rows of English rib (i.e. 8 knitted stitches are visible on the right side). The English rib section measures approx. 4 cm = 1½", 16 stitches are increased, there are 435 stitches on the needle and the piece measures approx. 42 cm = 16½" down the middle. The next row is from the right side. BINDING OFF: To avoid the bind-off edge being tight, bind off the stitches and yarn overs separately with knit. If the edge is still tight, bind off with a larger needle size. |
||||||||||||||||||||||||||||
Diagram explanations |
||||||||||||||||||||||||||||
|
||||||||||||||||||||||||||||

|
||||||||||||||||||||||||||||
|
||||||||||||||||||||||||||||
Have you finished this pattern?Tag your pictures with #dropspattern #siennawrap or submit them to the #dropsfan gallery. Do you need help with this pattern?You'll find 24 tutorial videos, a Comments/Questions area and more by visiting the pattern on garnstudio.com. © 1982-2025 DROPS Design A/S. We reserve all rights. This document, including all its sub-sections, has copyrights. Read more about what you can do with our patterns at the bottom of each pattern on our site. |
||||||||||||||||||||||||||||


With over 40 years in knitting and crochet design, DROPS Design offers one of the most extensive collections of free patterns on the internet - translated to 17 languages. As of today we count 314 catalogs and 11822 patterns - 11812 of which are translated into English (US/in).
We work hard to bring you the best knitting and crochet have to offer, inspiration and advice as well as great quality yarns at incredible prices! Would you like to use our patterns for other than personal use? You can read what you are allowed to do in the Copyright text at the bottom of all our patterns. Happy crafting!
Post a comment to pattern DROPS 214-3
We would love to hear what you have to say about this pattern!
If you want to leave a question, please make sure you select the correct category in the form below, to speed up the answering process. Required fields are marked *.