
Looking for a yarn?


Comments / Questions (20)
![]() Juani wrote:
Juani wrote:
Czy po zamknięciu oczek na piętę dalej przerabiamy sciagaczem (do palców) i tam przechodzimy na dżersej dookoła?
11.11.2024 - 12:01DROPS Design answered:
Witaj, po zamknięciu oczek na piętę, spód stopy przerabiasz ściągaczem, a wierzch dżersejem, zobacz zdjęcie. Palce przerabiasz już tylko dżersejem. Pozdrawiamy!
11.11.2024 - 18:12
![]() Alicja wrote:
Alicja wrote:
Dzień dobry, dziergam trzy różne pary skarpet z włóczki Fabel i zastanawia mnie czemu w tym wzorze długość pięty w roz 35/37 ma aż 8cm skoro w innych ma ona mieć tylko 5 lub 6cm? Serdecznie pozdrawiam.
22.10.2024 - 18:46DROPS Design answered:
Witaj Alicjo, jest tak ze względu na ściągacz, gdy rozciągnie się na szerokość po nałożeniu na stopę, skróci się na długość. Pozdrawiamy!
23.10.2024 - 09:56
![]() Susanne Lihl wrote:
Susanne Lihl wrote:
Was für ein schönes Muster
01.08.2024 - 15:13
![]() Hege wrote:
Hege wrote:
Hei Jeg strikker30/40. Det er når hæl er strikket, tatt opp masker på begge sider og skal felle 2 masker på hver side ved å strikke 3 masker sammen. Blir ikke vrang masker som på bildet..
25.06.2024 - 12:41
![]() Hege wrote:
Hege wrote:
Hei. Langs fellingen er det på bildet 1 eller 2 vrangmasker. Får ikke dette til å stemme. Når en skal strikke 2 fra vrangbord og en vrangmaske…
19.06.2024 - 20:43DROPS Design answered:
Hej Hege, hvilken størrelse strikker du og hvor er du mere nøjagtig i opskriften, så skal vi prøve at hjælpe dig :)
25.06.2024 - 12:23
![]() Tone wrote:
Tone wrote:
Litt vrient når en skal felle 3 masker, endrer jo om det er 2 r eller 2 vrange masker, men burde vel stått at det skal være 26 rette masker til tåfellinga , litt knotete ved felling
14.02.2024 - 16:45
![]() Natasja Den Blaauwen wrote:
Natasja Den Blaauwen wrote:
Bij de regel ' minder zo iedere 2e naald in totaal 10-12-12 keer = 52-56-60 steken. (Zo halverwege het patroon). Dit is verwarrend. Er kan beter staan: Er staan nu nog 52-56-60 steken op de naalden.
20.01.2024 - 18:45
![]() Pat Bridger wrote:
Pat Bridger wrote:
I’m making the White Dunes socks and I’m a little confused about the decreases after the heel turn. If you have to decreases two stitches either end of the rib heel stitches, along with a stitch fir either side of the Instep, the Instep will not keep in a straight piece, it will narrow down with each of the stitches decreased? I’ve made socks for years so I understand the gusset decreaseds on a normal sock, do you not have to increase a stitch to compensate?
14.01.2023 - 21:48DROPS Design answered:
Dear Pat, the pattern is correct. Because of the combination of the stocking stitch and the rib in the foot, you simply decrease the 2 stitches on each side of the instep, starting to narrow towards the toes. Happy knitting!
15.01.2023 - 12:10
![]() Zsuzsa wrote:
Zsuzsa wrote:
Just a remark: the hungarian translation is about a totally different sock pattern with 3 colours.
03.10.2021 - 21:35
![]() Lisbeth Kure wrote:
Lisbeth Kure wrote:
Indtagningerne i begge sider vil reducere glatmaskerne med 2 masker ved hver indtagning og det ser ikke ud som om det er meningen hvis man ser billedet.
25.02.2021 - 08:23DROPS Design answered:
Hej Lisbeth, hvilken størrelse strikker du, hvor mange masker har du og hvor langt er du kommet i opskriften ? :)
25.02.2021 - 14:13
|
|
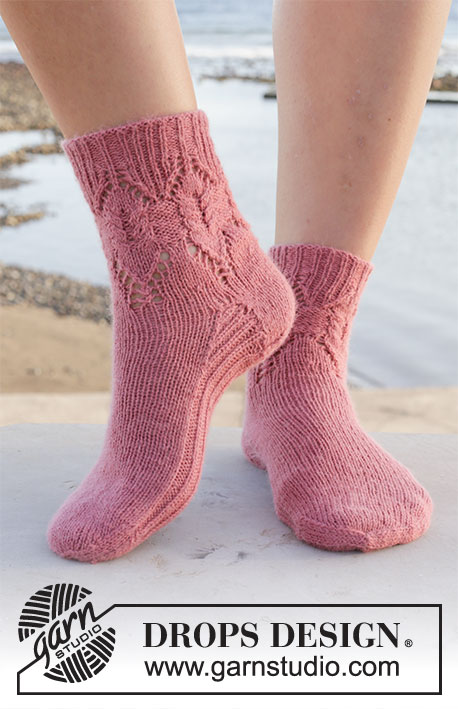
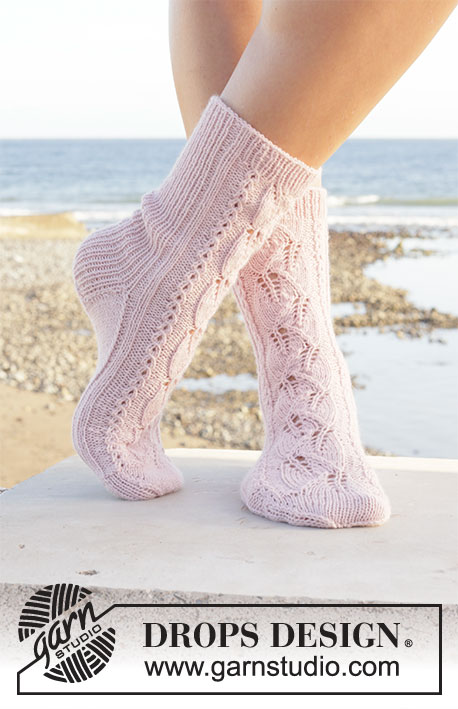
White Dunes#whitedunessocks |
|
|
|
|
Knitted socks in DROPS Fabel. The piece is worked top down with stockinette stitch and rib. Sizes 35 – 43 = 5 – 10 1/2.
DROPS 209-22 |
|
|
------------------------------------------------------- EXPLANATIONS FOR THE PATTERN: ------------------------------------------------------- HEEL DECREASE: ROW 1 (= right side): Work rib until there are 7-7-7 stitches left, slip 1 stitch as if to knit, knit 1 and pass the slipped stitch over the knitted stitch, turn the piece. ROW 2 (= wrong side): Work rib until there are 7-7-7 stitches left, slip 1 stitch as if to purl, purl 1 and pass the slipped stitch over the purled stitch, turn the piece. ROW 3 (= right side): Work rib until there are 6-6-6 stitches left, slip 1 stitch as if to knit, knit 1 and pass the slipped stitch over the knitted stitch, turn the piece. ROW 4 (= wrong side): Work rib until there are 6-6-6 stitches left, slip 1 stitch as if to purl, purl 1 and pass the slipped stitch over the purled stitch, turn the piece. Continue to decrease like this, working until there is 1 stitch less each time before slipping a stitch and until there are 22-26-26 stitches left on the needle. ------------------------------------------------------- START THE PIECE HERE: ------------------------------------------------------- SOCKS – SHORT OVERVIEW OF THE PIECE: The socks are worked in the round with double pointed needles, top down. SOCK: Cast on 64-68-72 stitches with double pointed needles size 2.5 mm = US 1,5 and Fabel. Knit 1 round. The next round is worked as follows (beginning of round = mid back): Size 35/37 = 5/6 1/2: Purl 1, * knit 2, purl 2 *, work from *-* until there are 3 stitches left on the round, knit 2 and finish with purl 1. Sizes 38/40 = 7 1/2/9 and 41/43 = 9 1/2/10 1/2: Knit 1, * purl 2, knit 2 *, work from *-* until there are 3 stitches left on the round, purl 2 and finish with knit 1. Continue this rib for 3 cm = 1⅛". The next round is worked as follows: Work 17-19-19 stitches in rib as before, knit 30-30-34 and decrease 4 stitches evenly spaced over these 30-30-34 stitches (neatest to decrease on purled stitches), work 17-19-19 stitches in rib as before = 60-64-68 stitches on the needles. Continue in the round with 34-38-38 stitches in rib mid-back and stockinette stitch over the other stitches. REMEMBER THE KNITTING GAUGE! Continue until the piece measures 12-13-14 cm = 4¾"-5⅛"-5½". Now work the heel. Keep the first 17-19-19 stitches on the needle, place the next 26-26-30 stitches on 1 thread (= top of foot) and keep the last 17-19-19 stitches on the needle = 34-38-38 stitches on the needle for the heel. Cast on 1 new stitch at the beginning and end of the row for edge stitches = 36-40-40 stitches. Continue with rib back and forth over the heel stitches and with 1 edge stitch in garter stitch on each side. When there is 1 row left before the heel measures 8-9-10 cm = 3⅛"-3½"-4", bind off both edge stitches = 34-38-38 stitches on the needle. Insert 1 marker in the middle of the last row – it will be used when measuring the foot-length. Work HEEL DECREASE – read description above! After the heel decrease work the next round as follows: Work rib as before over the 22-26-26 heel stitches, knit up 22-26-26 stitches along the side of the heel, stockinette stitch as before over the 26-26-30 stitches from the thread and knit up 22-26-26 stitches along the other side of the heel = 92-104-108 stitches on the round. Continue with rib (= knit 2 / purl 2) over the 66-78-78 stitches under the foot (start and finish with purl 2 on each side of the stockinette stitches on the top of the foot), and stockinette stitch as before over the 26-26-30 stitches on top of foot. AT THE SAME TIME decrease on each side of the 26-26-30 stitches on top of foot as follows: Knit together the last 2 ribbed stitches before the 26-26-30 stitches on top of foot with the first of the stockinette stitches (i.e. knit 3 together = 2 stitches decreased) and knit twisted together the last stockinette stitch and the first 2 ribbed stitches after the stitches on top of foot (i.e. knit 3 stitches twisted together = 2 stitches decreased). In this way the outermost knitted stitch on each side of the top of the foot will be carried neatly down the foot. Decrease like this every 2nd round a total of 10-12-12 times = 52-56-60 stitches. Continue working until the piece measures 18-19-21 cm = 7"-7½"-8¼" from the marker on the heel – measured under the foot (there are approx. 4-5-6 cm = 1½"-2"-2⅜" left to finished length; you can try the sock on and continue to desired length). Remove the old marker. Insert 1 new marker on each side of the sock, with 26-28-30 stitches both on top of and under the foot. These markers will be used when decreasing for the toe. Work stockinette stitch in the round over all stitches and decrease for the toe on each side of both markers as follows: Work until there are 3 stitches left before the marker, knit 2 together, knit 2 (marker sits between these 2 stitches), knit 2 twisted together. Repeat at the second marker (= 4 stitches decreased on the round). Decrease like this on both sides every 2nd round a total of 4-6-8 times, then every round a total of 7-6-5 times = 8 stitches left in all sizes. Cut the strand, pull it through the remaining stitches, tighten and fasten well. The foot measures approx. 22-24-27 cm = 8¾"-9½"-10⅝". Work the other sock in the same way. |
|
Have you finished this pattern?Tag your pictures with #dropspattern #whitedunessocks or submit them to the #dropsfan gallery. Do you need help with this pattern?You'll find 22 tutorial videos, a Comments/Questions area and more by visiting the pattern on garnstudio.com. © 1982-2025 DROPS Design A/S. We reserve all rights. This document, including all its sub-sections, has copyrights. Read more about what you can do with our patterns at the bottom of each pattern on our site. |


With over 40 years in knitting and crochet design, DROPS Design offers one of the most extensive collections of free patterns on the internet - translated to 17 languages. As of today we count 314 catalogs and 11822 patterns - 11812 of which are translated into English (US/in).
We work hard to bring you the best knitting and crochet have to offer, inspiration and advice as well as great quality yarns at incredible prices! Would you like to use our patterns for other than personal use? You can read what you are allowed to do in the Copyright text at the bottom of all our patterns. Happy crafting!
Post a comment to pattern DROPS 209-22
We would love to hear what you have to say about this pattern!
If you want to leave a question, please make sure you select the correct category in the form below, to speed up the answering process. Required fields are marked *.