
Looking for a yarn?


Comments / Questions (34)
![]() Uschi Warzecha wrote:
Uschi Warzecha wrote:
Gibt es einen Grund warum man die Armausschnitte in einer Hin-Reihe abketten soll? In den angegebenen Hilfsvideos werden die Arme und die Jackenteile mit bereits getätigten Armausschnitten in der Hinreihe auf eine Nadel gestrickt, das funktioniert hier nicht. Soll man die Ärmel auf links drehen damit man sie links auf die Nadel stricken kann?
20.08.2023 - 09:10DROPS Design answered:
Liebe Frau Warzecha, bei einer Hinreihe wird man beim Rumpf die Maschen für die Armlöcher abketten, dann stilllegen; die Ärmel werden dann in der Runde gestrickt und die Maschen abgekettet, dann werden alle Maschen für die Passe zusammengelegt, die 1. Reihe kann eine Rückreihe sein, so strickt man alle Maschen mit dem Faden von der Passe. Oder vielleicht missverstehe ich Ihre Frage?
21.08.2023 - 08:51
![]() Jacqueline wrote:
Jacqueline wrote:
Jai placé toutes les mailles sur une aiguille et veut commencer l'empiėcement. J'ai 37 mailles pour le devant et je dois mettre le marqueur pour le raglan à41 mailles: j'empiète ainsi 4 mailles sur la manche: pourquoi? Pareil pour le dos: j'ai 80 mailles alors que avant j'en avais 72.
13.06.2023 - 23:18DROPS Design answered:
Bonjour Jacqueline, effectivement, les mailles de chaque côté de chacune des manches vont être affectées au dos et à chacun des devants; placez bien vos marqueurs comme indiqué pour diminuer pour le raglan de sorte que les manches sont un peu plus étroites et le dos/les devants un peu plus large. Bon tricot!
14.06.2023 - 07:49
![]() Denise wrote:
Denise wrote:
Jacket size 6/9 mth. Problem with raglan dec: Stitch count & marker placement are correct, but raglan decreases fall only on sleeve; 1st four stitches on the sleeve is a marker and before the last 4 stitches of the sleeve a marker. Thought raglan dec marker should be in middle where each sleeve side joins the sides. As per pattern, decreases are only on the sleeve and look wrong, also look like they are going in wrong direction. Followed pattern dec instruction. Can you please advise
18.09.2022 - 20:44DROPS Design answered:
Dear Denise, the first 4 and the last 4 stitches on each sleeve will belong the front/back pieces according to markers/division, so that you should have: front piece: 32 sts, sleeve: 42 sts, back piece: 62 sts, sleeve: 42 sts, left front piece: 32 sts. This video shows (for a pullover) how to decrease for the raglan as in this pattern. Happy knitting!
19.09.2022 - 11:16
![]() Anne wrote:
Anne wrote:
Bonjour! Seriez-vous d'accord d'ajouter les explications de rangs raccourcis pour surélever le col dos de ce gilet? Ou existe-t'il un principe de base pour savoir comment répartir les mailles avant de tourner? ( 1/3 2/3.... j'espère m'être fait bien comprendre) Merci beaucoup pour ce modèle que je tricote beaucoup et pour tous les autres!
13.09.2021 - 15:12DROPS Design answered:
Bonjour Anne, nous ne sommes malheureusement pas en mesure de pouvoir adapter chacun de nos modèles à chaque demande; vous pouvez tout à fait vous inspirer d'un modèle de tension égale pour ajouter des rangs raccourcis et ainsi former une réhausse, ou bien choisir de rabattre des mailles pour l'encolure. Votre magasin saura vous aider si besoin, même par mail ou téléphone. Bon tricot!
14.09.2021 - 07:40
![]() Pin wrote:
Pin wrote:
Bonjour, vous avez tout à fait répondu à ma question. Simplement l'explication est différente donc je préférais avoir des précisions avant de poursuivre mon tricot. Merci beaucoup
09.09.2021 - 23:03
![]() Pin wrote:
Pin wrote:
Les mailles des emmanchures sont rabattues à l'endroit. Pour assembler les dos, devants et manches, il faut donc tricoter à l'envers. Pourtant vous dites que le premier rang après ça se tricote sur l'envers. Mme Auffret a posé la même question mais votre réponse n'est pas claire pour moi. J'ai besoin de vos explications, je ne comprends pas comment faire. Merci d'avance
08.09.2021 - 23:42DROPS Design answered:
Bonjour Mme Pin, le dernier rang du dos/devants se tricote sur l'endroit (= on rabat les mailles des emmanchures sur l'endroit); le premier rang de l'empiècement se continue logiquement sur l'envers: on tricote sur l'envers les mailles du 1er devant, puis celles de la manche, celles du dos, celles de la 2ème manche et celles du 2ème devant = toutes les mailles sont sur l'aiguille, vous tricotez (ou non en fonction de la taille) quelques rangs jersey, et, au rang suivant = sur l'endroit, vous commencez à diminuer pour le raglan. Est-ce que ceci vous aide ou ai-je mal compris votre question?
09.09.2021 - 08:51
![]() Guðrún Bachmann wrote:
Guðrún Bachmann wrote:
DROPS BABY / 31 / 9 Baby Duck by DROPS Design eru einhvers staðar til leiðbeiningar um hvernig ég færi ermar upp á hringprjóninn, sbr: BERUSTYKKI: Setjið ermar á sama hringprjón og fram- og bakstykki þar sem lykkjur voru felldar af fyrir handveg = (150) 174-190-210-230 (246-274) lykkjur. Í fyrstu umferð eru sett 4 prjónamerki í stykkið þannig, umferðin er prjónuð frá röngu
12.04.2021 - 12:43DROPS Design answered:
Blessuð Guðrún. Ef þú ferð neðar í uppskriftina þá eru 32 viðeigandi myndbönd sem þú getur skoðað til aðstoðar. Þar á meðal er eitt sem er: Hvernig á að setja ermar (prjónaðar í hring) saman við fram- og bakstykki. Gangi þér vel.
13.04.2021 - 10:22
![]() Nora wrote:
Nora wrote:
Vielen Dank für die Hilfe. Die Jacke ist nun fertig und ganz wunderbar geworden. Ich werde direkt eine zweite stricken.
05.03.2021 - 12:30
![]() Nora wrote:
Nora wrote:
Guten Tag, ich habe folgende Frage. Für Größe 68/74 soll ich 126 Maschen anschlagen. Beim Stricken des Bündchen nach dem angegebenen Muster soll man wenn noch 4 Maschen übrig sind mit zwei linken Maschen enden. Das ergibt dann bei mir allerdings 4 linke Maschen hintereinander (danach kommt die 1 re und kraus re Randmasche). Was mache ich falsch oder soll das so sein? Vielen Dank für Ihre Hilfe!
10.02.2021 - 12:15DROPS Design answered:
Liebe Nora, in 68/74 stricken Sie die 126 Maschen so: 1 Rand-Masche kraus rechts, 1 Masche rechts, * 2 Maschen links, 2 Maschen rechts *, von *-* insgesamt 30 Mal stricken (= über die nächsten 120 Maschen), es bleiben noch 4 Maschen übrig, diese 4 Maschen stricken Sie so: 2 Maschen links, 1 Masche rechts und 1 Rand-Masche kraus rechts, dh : 1+1 + 120 + 2+1+1= 126 Maschen. Viel Spaß beim stricken!
10.02.2021 - 14:41
![]() AUFFRET Marie wrote:
AUFFRET Marie wrote:
Bonjour, j'ai toujours réussi à réaliser vos modèles(parfois grâce à vos bons conseils). J'ai réussi le gilet Baby duck mais je bloque pour les chaussettes quand il faut rabattre les mailles après le rang 3. Faut-il que je me réfère à la vidéo pour tricoter un talon à l'ancienne? Merci d'avance
13.11.2020 - 09:47DROPS Design answered:
Bonjour Marie, non, il vous faut suivre les explications. Apres avoir rabattu les mailles du tallon, vous avez une forme de losange, vous devez monter les mailles de 3 de ses côtés. Ensuite vous travailles en rond pour le pied. Bon tricot!
05.01.2021 - 15:00
|
|
Baby Duck#babyduckjacket |
|
 |
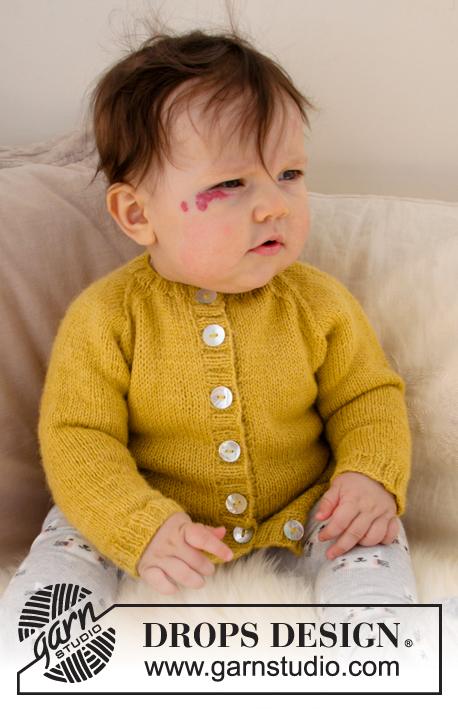 |
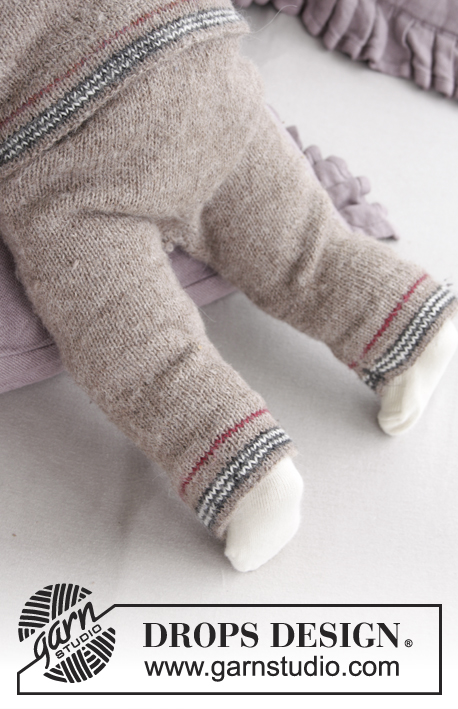
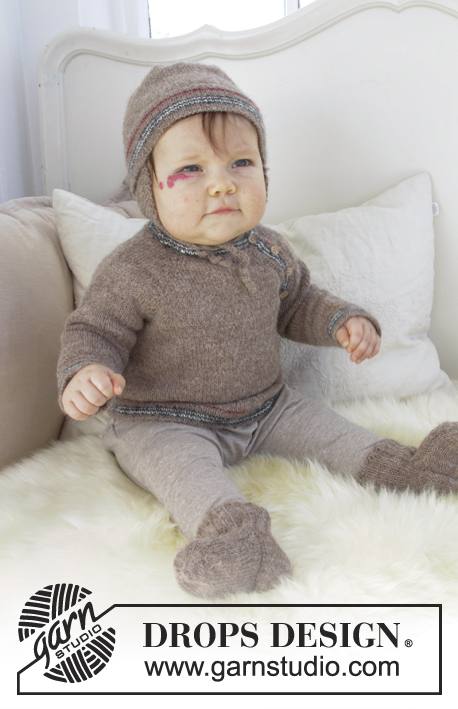
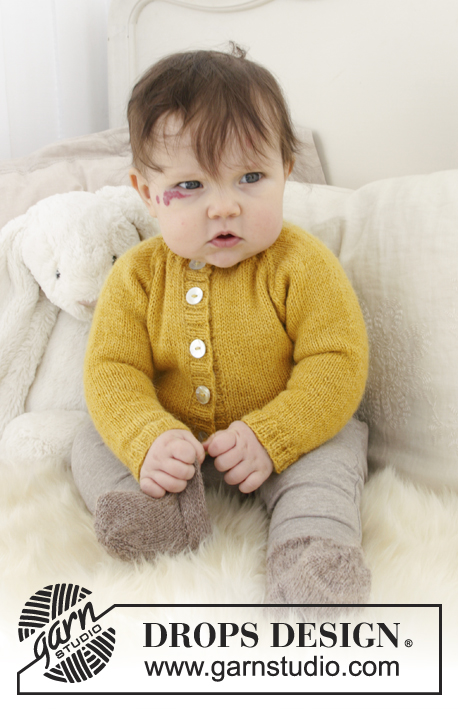
The set consists of: Knitted baby jacket with raglan and socks. Sizes premature - 4 years. The piece is worked in DROPS Alpaca.
DROPS Baby 31-9 |
|
|
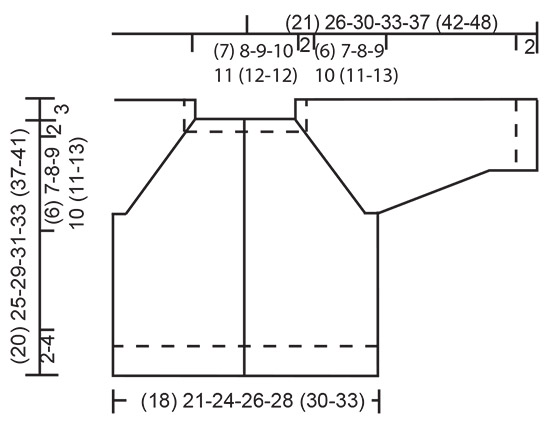
INFORMATION FOR THE PATTERN: RIDGE/GARTER STITCH (worked back and forth): 1 ridge = Knit 2 rows. INCREASE TIP (for sleeves): Work until there is 1 stitch left before the marker, 1 yarn over, knit 2 stitches (the marker sits in the middle of these 2 stitches), 1 yarn over (= a total of 2 stitches increased). The yarn overs are knitted twisted on the next round to avoid holes. DECREASE TO RAGLAN (for jacket): All decreases are made from the right side! Work until there are 3 stitches left before the marker, knit 2 stitches together (= 1 stitch decreased), knit 2 (the marker sits in the middle of these 2 stitches), slip 1 stitch as if to knit, knit 1, pass the slipped stitch over (= 1 stitch decreased). Decrease like this at each marker (= 2 stitches decreased at each marker and a total of 8 stitches decreased on the row). DECREASE TIP-1 (for socks): Decrease 1 stitch before 1 purled stitch as follows: Work until there are 2 stitches left before the 1 purled stitch, knit 2 stitches together. Decrease 1 stitch after the 1 purled stitch as follows: Slip 1 stitch as if to knit, knit 1, pass the slipped stitch over. TOE DECREASE (for socks): Decrease as follows 3 stitches before the marker: Knit 2 stitches together, knit 1. Decrease as follows after the marker: Knit 1, slip 1 stitch as if to knit, knit 1, pass the slipped stitch over. ---------------------------------------------------------- JACKET: The piece is worked bottom up. The body is first worked back and forth. Then the sleeves are worked in the round with double pointed needles before the sleeves and body are continued together back and forth. The bands are then worked and the neck to finish. BODY: The piece is worked back and forth. Cast on (90) 102-118-126-138 (146-162) stitches (including 1 edge stitch in each side of the piece; the bands will be worked later inside this stitch) with circular needle size 2.5 mm/ US 1.5 and Alpaca. Work rib as follows: Knit 1 edge stitch in GARTER STITCH – see description above, knit 1, * purl 2, knit 2 *, work from *-* until there are 4 stitches left, finish with purl 2, knit 1 and 1 edge stitch in garter stitch. Continue like this until the piece measures (2) 2-3-3-3 (4-4) cm = (3/4") ¾"-1⅛"-1⅛"-1⅛" (1½"-1½"). Change to circular needle size 3 mm/ US 2.5. Continue with stocking stitch and 1 edge stitch in garter stitch in each side of the piece. REMEMBER THE KNITTING TENSION! When the piece measures (9) 13-16-17-18 (21-23) cm = (3½") 5⅛"-6¼"-6¾"-7" (8¼"-9") cast off stitches for the armholes on the next row from the right side as follows: Work 1 edge stitch in garter stitch, (19) 22-25-27-30 (32-36) stitches stocking stitch (= right front piece), cast off the next (6) 6-8-8-8 (8-8) stitches, work (38) 44-50-54-60 (64-72) stitches stocking stitch (= back piece), cast off the next (6) 6-8-8-8 (8-8) stitches, work (19) 22-25-27-30 (32-36) stitches stocking stitch and finish with 1 edge stitch in garter stitch (= left front piece) = (78) 90-102-110-122 (130-146) stitches. Lay the piece to one side and work the sleeves. SLEEVE: The piece is worked in the round. Cast on (36) 36-36-36-40 (40-44) stitches with double pointed needles size 2.5 mm/ US 1.5 and Alpaca. Work rib (= knit 2 / purl 2). When the rib measures 2 cm = ¾", change to double pointed needles size 3 mm/ US 2.5, insert 1 marker at the beginning of the round (= mid under sleeve) and continue with stocking stitch. When the piece measures 4 cm = 1 ½" increase 1 stitch on each side of the marker mid under the sleeve – read INCREASE TIP. Increase like this every (2) 1½-1½-1-1 (1½-1½) cm = (¾") ½"- ½"-⅜"-⅜" (½"- ½") a total of (3) 6-8-11-11 (13-14) times = (42) 48-52-58-62 (66-72) stitches. When the piece measures (9½) 13-15½-17-19½ (23-27) cm = (3 ¾") 5⅛"-6⅛"-6 ¾"-7 ¾" (9"-10⅝") cast off the first and last (3) 3-4-4-4 (4-4) stitches (= a total of (6) 6-8-8-8 (8-8) stitches cast off) = (36) 42-44-50-54 (58-64) stitches. Lay the piece to one side and work the other sleeve. YOKE: Place the sleeves on the same circular needle as the body, where you cast off stitches for the armholes = (150) 174-190-210-230 (246-274) stitches. On the first row, insert 4 markers in the piece as follows, the row is worked from the wrong side: Work 1 edge stitch in garter stitch, (22) 25-28-31-34 (36-40) stitches stocking stitch, insert 1 marker, (30) 36-38-42-46 (50-56) stitches stocking stitch, insert 1 marker, (44) 50-56-62-68 (72-80) stitches stocking stitch, insert 1 marker, (30) 36-38-42-46 (50-56) stitches stocking stitch, insert 1 marker and finish with (22) 25-28-31-34 (36-40) stitches stocking stitch and 1 edge stitch in garter stitch. Work (3) 0-0-0-0 (0-0) rows stocking stitch with 1 edge stitch in garter stitch in each side of the piece. On the next row from the right side decrease to raglan on each side of each marker – read DECREASE TO RAGLAN! Decrease like this on each row from the right side (= every 2nd row) a total of (8) 11-12-14-16 (18-21) times = (86) 86-94-98-102 (102-106) stitches. On the next row from the right side decrease (10) 10-10-14-14 (14-14) stitches evenly on row = (76) 76-84-84-88 (88-92) stitches. Leave the stitches on the needle; you will now work the bands on each front piece, then work the neck over these stitches. LEFT BAND: The piece is worked back and forth. Knit up (42) 58-70-74-78 (90-102) stitches from the right side inside the 1 edge stitch in garter stitch mid front with circular needle size 2.5 mm/ US 1.5 and Alpaca. Work rib (= knit 2 / purl 2) until there are 2 stitches left, finish with knit 2. When the band measures approx. 2 cm = ¾", cast off all stitches, make sure that the cast-off edge is not tight; you can use a needle size larger if necessary. RIGHT BAND: Work as for the left band but work (4) 5-6-6-6 (6-7) buttonholes evenly spread along the band when it measures approx. 1 cm = ⅜" (later you will work 1 buttonhole on the neck so the first buttonhole on the band is worked approx. 3-4 cm = 1⅛"-1½" down from the neck. Make the buttonholes approx. 4-5 cm = 1 ½"-2" apart, make them in the purl sections). 1 buttonhole = purl 2 together and make 1 yarn over. NECK: Knit up 5 stitches in each of the bands in each side of the piece, inside 1 stitch and place all stitches on circular needle size 2.5 mm/ US 1.5 = (86) 86-94-94-98 (98-102) stitches. Work rib (= knit 2 / purl 2) for 2 cm = ¾" - cast off for buttonholes by purling the 2 first stitches together and making 1 yarn over on 1st row (= from right side). Cast off, and make sure that the cast-off edge is not tight; you can use a needle size larger if necessary. ASSEMBLY: Sew the openings under each sleeve. Sew buttons onto the left band. ---------------------------------------------------------- SOCK: Cast on 40-44-48 (52-56) stitches with double pointed needles size 2.5 mm/ US 1.5 and light beige. Work rib in the round (= knit 2 /purl 2) until the piece measures 5-6-7 (9-10) cm = 2"-2⅜"-2¾" (3½"-4"). Place the last stitch worked on the same needle as the first 19-19-23 (23-27) stitches on the round = 20-20-24 (24-28) stitches on needle for heel. The other 20-24-24 (28-28) stitches (= top of foot) are placed on 1 thread - the rib on top of the foot will now start and finish with purl 1. Work stocking stitch back and forth over the heel stitches for 3-3-4 (4-4) cm = 1⅛"-1⅛"-1½" (1½"-1½"). REMEMBER THE KNITTING TENSION! Insert 1 marker in the middle of these stitches (= 10-12-12 (14-14) stitches on each side of the marker). On the next row from the right side decrease as follows: ROW 1 (= from the right side): Knit until there are 4 stitches left before the marker, slip 1 stitch as if to knit, knit 1, pass the slipped stitch over (= 1 stitch decreased), knit 4, knit the next 2 stitches together (= 1 stitch decreased), knit to end of row = 18-18-22 (22-26) stitches. ROW 2 (= from wrong side): Purl. ROW 3: Knit until there are 3 stitches left before the marker, slip 1 stitch as if to knit, knit 1, pass the slipped stitch over (= 1 stitch decreased), knit 2, knit the next 2 stitches together (= 1 stitch decreased), knit to end of row = 16-16-20 (20-24) stitches. Cast off the remaining stitches and sew them together in the outermost loop of the outermost stitch (= mid under the foot). Then knit up 24-24-28 (28-32) stitches in the outermost loop of the outermost stitch over the heel. Place the stitches from the thread back on the needles = 44-48-52 (56-60) stitches. Continue working in the round. NOTE: Work rib over the 20-24-24 (28-28) stitches on top of foot and stocking stitch over the 24-24-28 (28-32) stitches under the foot. AT THE SAME TIME on every 2nd round decrease 1 stitch on each side of the rib on top of foot – read DECREASE TIP-1! Decrease like this a total of 2 times = 40-44-48 (52-56) stitches. When the sock measures 7½-8½-9 (11-12) cm = 3"-3¼"-3½" (4⅜"-4¾") from the back of the heel, (there is now approx. 2½-2½-3 (3-4) cm = 1"-1"-1⅛" (1⅛"-1½") left to finished length) divide the stitches so that there are 20-22-24 (26-28) stitches both on top of and under the foot. Insert 1 marker in each side. Work stocking stitch in the round over all stitches - AT THE SAME TIME decrease 1 stitch on each side of each marker – read TOE DECREASE! Decrease like this every 2nd round a total of 5-5-6 (6-7) times = 20-24-24 (28-28) stitches. Work all stitches together 2 and 2 = 10-12-12 (14-14) stitches. Cut the strand, pull it through the remaining stitches, pull tight and fasten well. The sock measures approx. 10-11-12 (14-16) cm = 4"-4⅜"-4¾" (5½"-6¼"). Work the other sock in the same way. |
|
|
|
Have you finished this pattern?Tag your pictures with #dropspattern #babyduckjacket or submit them to the #dropsfan gallery. Do you need help with this pattern?You'll find 34 tutorial videos, a Comments/Questions area and more by visiting the pattern on garnstudio.com. © 1982-2025 DROPS Design A/S. We reserve all rights. This document, including all its sub-sections, has copyrights. Read more about what you can do with our patterns at the bottom of each pattern on our site. |
|


With over 40 years in knitting and crochet design, DROPS Design offers one of the most extensive collections of free patterns on the internet - translated to 17 languages. As of today we count 314 catalogs and 11822 patterns - 11812 of which are translated into English (US/in).
We work hard to bring you the best knitting and crochet have to offer, inspiration and advice as well as great quality yarns at incredible prices! Would you like to use our patterns for other than personal use? You can read what you are allowed to do in the Copyright text at the bottom of all our patterns. Happy crafting!
Post a comment to pattern DROPS Baby 31-9
We would love to hear what you have to say about this pattern!
If you want to leave a question, please make sure you select the correct category in the form below, to speed up the answering process. Required fields are marked *.