
Looking for a yarn?


Comments / Questions (17)
![]() Jeannine Rousseau wrote:
Jeannine Rousseau wrote:
Bonjour, merci pour la réponse, j'ai hâte de voir le résultat.
29.01.2024 - 16:29
![]() Jeannine Rousseau wrote:
Jeannine Rousseau wrote:
PS, je le commence. 1er bonjour, je sais tricoter avec aiguilles circulaire quand il y a beaucoup de mailles, mais avec 9 mailles ,peut-on tricoter pour rejoindre les deux bouts pour tricoter en circulaire. 2er. votre assiette on le mets en dedans . 3er. pour le rembourrage, on commence par le haut?
27.01.2024 - 20:06DROPS Design answered:
Bonjour Mme Rousseau, on tricote le bonhomme de neige en allers et retours sur aiguille circulaire, autrement dit, on va tourner à la fin de chaque rang pour tricoter alternativement sur l'endroit et sur l'envers. On met effectivement l'assiette dedans; vous pouvez au choix coudre par le haut en rembourrer par le haut ou coudre par le bas et rembourrer par le bas. Bon tricot!
29.01.2024 - 11:58
![]() Jenny Carlier wrote:
Jenny Carlier wrote:
Est t'il possible d'avoir part courrierpostalles explication du bonhomme de neige au tricot
09.11.2022 - 00:46DROPS Design answered:
Bonjour Mme Carlier, vous pouvez imprimer directement les explications de ce modèle via notre site ou bien demander à votre magasin DROPS de vous l'imprimer. Bon tricot!
09.11.2022 - 08:27
![]() Joan Burø wrote:
Joan Burø wrote:
Jeg har brugt 3 nøgler sort og ikke 2 som der står. Er der fejl i opskriften? Har overholdt strikkefastheden.
06.11.2022 - 09:14DROPS Design answered:
Hei Joan Denne snømannen har blitt strikket mye de siste 6-7 årene, men vi har ingen tilbakemelding på at det er for lite sort garn. Strikkefastheten i oppskriften er oppgitt i rillestrikk, mens toppen av luen og ermene strikkes i glattstrikk (da går det litt mindre garn enn om det er blitt strikket i rillestrikk). mvh DROPS Design
07.11.2022 - 11:51
![]() Bärbel Bischoff wrote:
Bärbel Bischoff wrote:
Gibt es auch eine Anleitung für einen Weihnachtsmann/Nikolaus in der Grösse wie der Schneemann #Drops Extra 0-1056.Das wäre super,die Anleitung für den Schneemann ist prima. Vielen Dank
01.11.2021 - 17:00DROPS Design answered:
Liebe Frau Bischoff, so groß haben wir leider keine, aber hier finden Sie einigen, vielleicht können Ihnen diese Modelle inspirieren. Viel Spaß beim stricken!
03.11.2021 - 07:42
![]() Susan wrote:
Susan wrote:
I am making the knitted Drops snowman with hat & scarf. I need to know how big a “regular” plastic plate is. Thank you in advance for providing me with the answer. Susan
23.12.2019 - 03:31DROPS Design answered:
Dear Susan, a "regular" plastic plate is about the size of an average dinner plate, but you should just use a plate that would fit into the bottom of your snowman. Happy Knitting!
24.12.2019 - 17:49
![]() Hilde Van Durpe wrote:
Hilde Van Durpe wrote:
Bestaat dit patroon ook in haakpatroon
03.12.2019 - 11:06DROPS Design answered:
Dag Hilde,
Nee, hier is helaas alleen een breipatroon van.
07.12.2019 - 10:40
![]() Trine Lill Hestvik wrote:
Trine Lill Hestvik wrote:
Modell nr ee-519\r\nHei, har strikket 20 cm på snømannen som det står. (Deretter fortsettes det med riller over alle m til arb måler 20 cm (avpass at neste p er fra retten).) hvordan gjør jeg dette? Kutter jeg av tråden og beg på nytt på rettsida, eller? Da blir det jo to omg med rett over hverandre og ikke rillestrikk? Ser frem til svar
10.01.2019 - 11:25
![]() Susan wrote:
Susan wrote:
Hej. Hvordan strikker man på rundpind, når man skal starte med 9 masker?
08.11.2018 - 11:23DROPS Design answered:
Hej Susan, du strikker frem og tilbage på rundpind ifølge opskriften.
09.11.2018 - 10:35
![]() Carla De Graaf wrote:
Carla De Graaf wrote:
Goedenavond, is er ook een haak versie van deze sneeuwman ?? hier is vast belangstelling voor !! m vr gr carla de graaf
17.11.2016 - 17:34DROPS Design answered:
Hoi Carla. Nee, op dit moment hebben wij geen gehaakte versie.
21.11.2016 - 15:16
|
|
Frank |
|
|
|
|
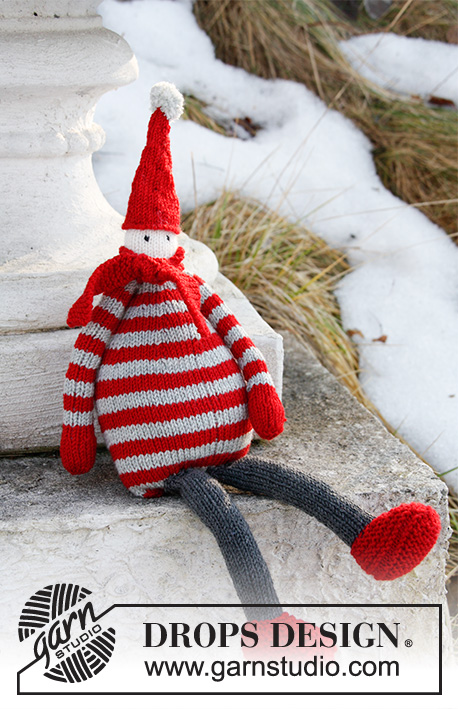
DROPS Christmas: Knitted DROPS snowman with scarf and hat in "Snow".
DROPS Extra 0-1056 |
|
|
GARTER ST (back and forth): K all rows. 1 ridge = K2 rows. ---------------------------------------------------------- SNOWMAN: Work back and forth in GARTER ST - see explanation above - on circular needle. First work the bottom then work the body and head. Cast on 9 sts on circular needle size 8 mm / US 11 with off white. ROW 1: K all sts. ROW 2 (= RS): * K 1, 1 YO *, repeat from *-* until 1 st remains, finish with K 1. ROW 3: K all sts - K the YOs twisted (i.e. work in the back loop of sts instead of front) to avoid holes (= 17 sts). ROW 4: * K 2, 1 YO *, repeat from *-* until 1 st remains, finish with K 1. ROW 5: As 3rd row (= 25 sts). REMEMBER THE GAUGE! ROW 6: * K 3, 1 YO *, repeat from *-* until 1 st remains, finish with K 1. Repeat 5th and 6th row upwards but on every inc, there is 1 st more between inc. When there are 121 sts on row, stop inc. The bottom is done. Insert 1 marker. NOW MEASURE PIECE FROM HERE! Then continue on garter st over all sts until piece measures 20 cm / 8'' (adjust so that next row is from RS). On next row, dec 29 sts evenly (i.e. approx. every 4th st) = 90 sts. Work in garter st until piece measures 30 cm / 11 3/4'' (adjust so that next row is from RS). On next row, dec 18 sts evenly (i.e. approx. every 5th st) = 72 sts. Work in garter st until piece measures 34 cm / 13½" (adjust so that next row is from RS). Work as follows: * K 2, K 2 tog *, repeat from *-* = 54 sts. On next row from RS, dec 12 sts evenly = 42 sts. The body is finished. Insert 1 marker here. NOW MEASURE PIECE FROM HERE! On next row from RS, inc 24 sts evenly for head = 66 sts. When piece measures 15 cm / 6'' from marker (adjust so that next row is from RS), dec 8 sts evenly = 58 sts. Repeat dec on every row from RS 6 more times = 10 sts. Cut the yarn and pull it through the remaining sts, tighten tog and fasten. ARMS: Worked back and forth on needle. Cast on 12 sts on needle size 5 mm / US 8 with black. Work in stockinette st until piece measures 13 cm / 5''. Switch to light blue. Work 1 ridge in garter st AT THE SAME TIME inc 6 sts evenly = 18 sts. Work in garter st until piece measures 18 cm / 7''. Work all sts K 2 tog = 9 sts. Work 1 row. On next row K 2 and 2 tog until 1 st remains, 1 st in garter st = 5 sts. Cut the yarn and pull it through the remaining sts (NOTE: Adjust so that yarn is long enough for assembly). Sew arm tog in outer loops of edge sts with light blue, then black. Make another arm. EYES: Cast on 1 st on needle size 5 mm / US 8 with black. In same st work * K 1, 1 YO *, repeat from *-* 3 times in total, finish with K 1 in same st = 7 sts. On next row, P all sts tog. Cut the yarn. Pull yarn through the last st. Tie the 2 strands tog. Make another eye. BUTTONS: Cast on 1 st on needle size 5 mm / US 8 with black. In same st work * K 1, 1 YO *, repeat from *-* 4 times in total, finish with K 1 in same st = 9 sts. On next row, P all sts. Then K 2 and 2 tog until 1 st remains, K 1 = 5 sts. P all sts tog. Cut the yarn. Pull yarn through the last st. Tie the 2 strands tog. Make 2 buttons more. NOSE: Worked back and forth in stockinette st. Cast on 2 sts on needle size 5 mm / US 8 with orange. P 1 row (= WS). On next row from RS work 2 sts in each of the 2 sts = 4 sts. Then inc on every row from RS by working 2 sts in the outermost st in each side of piece (= 2 sts inc). Continue inc until there are 12 sts on the needle. Bind off with K from WS. SCARF: Worked back and forth on needle. Cast on 16 sts on circular needle size 8 mm / US 11 with light blue. Work in garter st. Bind off when piece measures approx. 90 cm / 35½''. Fringes: 1 fringe = 1 strand orange of approx. 18 cm / 7''. Place yarn double, thread loop at the edge through st along cast-on edge and pull ends through loop. Insert loops in every other st along cast-on and bind-off edge. HAT: Worked back and forth in garter st on needle. Cast on 9 sts on needle size 8 mm / US 11 with black. ROW 1: K all sts. ROW 2 (= RS): * K 1, 1 YO *, repeat from *-* until 1 st remains, finish with K 1. ROW 3: K all sts - K the YOs twisted (i.e. work in the back loop of sts instead of front) to avoid holes (= 17 sts). ROW 4: * K 2, 1 YO *, repeat from *-* until 1 st remains, finish with K 1. ROW 5: As 3rd row (= 25 sts). ROW 6: * K 3, 1 YO *, repeat from *-* until 1 st remains, finish with K 1. Repeat 5th and 6th row upwards but on every inc, there is 1 st more between inc. When there are 57 sts on row, stop inc. Insert 1 marker in piece. NOW MEASURE PIECE FROM HERE! Then work in stockinette st over all sts until piece measures 10 cm / 4''. Now continue piece in garter st AT THE SAME TIME on 1st row inc 4 sts evenly = 61 sts. Repeat inc when piece measures 14 cm / 5½'' = 65 sts. Work in garter st until piece measures 18 cm / 7''. Loosely bind off. ASSEMBLY: Sew body tog in outer loops of edge sts. Before sewing it entirely tog place a regular plastic plate in the bottom so that the snowman has something to stand on. Fill the body and head with cotton wool (or use an old pillow) before sewing it tog. Tighten snowman tog in the bottom. Sew hat tog in outer loops of edge sts. Tighten tog the top of hat. Sew on eyes and buttons. Sew nose tog in outer loops of edge sts. Fill nose with some poly stuffing and fasten on face. Fill arms with some cotton wool and fasten on body. Tie scarf around the neck and put the hat on the head. |
|
Have you finished this pattern?Tag your pictures with #dropspattern or submit them to the #dropsfan gallery. Do you need help with this pattern?You'll find 19 tutorial videos, a Comments/Questions area and more by visiting the pattern on garnstudio.com. © 1982-2025 DROPS Design A/S. We reserve all rights. This document, including all its sub-sections, has copyrights. Read more about what you can do with our patterns at the bottom of each pattern on our site. |


With over 40 years in knitting and crochet design, DROPS Design offers one of the most extensive collections of free patterns on the internet - translated to 17 languages. As of today we count 314 catalogs and 11821 patterns - 11811 of which are translated into English (US/in).
We work hard to bring you the best knitting and crochet have to offer, inspiration and advice as well as great quality yarns at incredible prices! Would you like to use our patterns for other than personal use? You can read what you are allowed to do in the Copyright text at the bottom of all our patterns. Happy crafting!
Post a comment to pattern DROPS Extra 0-1056
We would love to hear what you have to say about this pattern!
If you want to leave a question, please make sure you select the correct category in the form below, to speed up the answering process. Required fields are marked *.