
Looking for a yarn?


Comments / Questions (5)
![]() Klub wrote:
Klub wrote:
Franchement il y a mieux
06.12.2018 - 16:09
![]() Margareta wrote:
Margareta wrote:
Jak należy prać/czyścić lalki robione na szydełku z akrylu i bawełny, żeby ich nie zdeformować?
20.11.2018 - 21:46
![]() Sylvie Papineau wrote:
Sylvie Papineau wrote:
Bonjour, je m'apprête à faire le Santa's Buddy mais il y a quelque chose que je comprend pas. Au bonnet, on dit après les tours 25-26 de crocheter à partir du tour 23 dans le brin restant, mais c'est indiqué au tour 24 et non 23 de crocheter dans un seul brin ! Merci de me répondre ;)
06.08.2017 - 14:41DROPS Design answered:
Bonjour Mme Papineau, au tour 24, on a crocheté dans le brin arrière des ms du tour 23, c'est dans le brin resté libre du tour 23 que l'on va continuer. La vidéo ci-dessous montre comment réaliser cette partie. Bon crochet!
07.08.2017 - 12:05
![]() Mary wrote:
Mary wrote:
I am one of those people that do not read a pattern but go by the diagram. Does this pattern provide a diagram?
31.07.2017 - 10:56DROPS Design answered:
Dear Mary, this pattern is only written, but there is a video showing from round 24 how to work from round 24 the hat, head and ears. Happy crocheting!
31.07.2017 - 11:24
![]() Adele wrote:
Adele wrote:
Are these instructions complete? I don't get the pattern. where are the body instructions? where are the hat instructions? it seems like it begins in the head. please help!
24.12.2015 - 14:14DROPS Design answered:
Dear Adele, the santa is worked from top of hat down to neck (start on top of hat, then work head top down) - then work body from bottom up. Happy crocheting!
02.01.2016 - 13:35
|
|
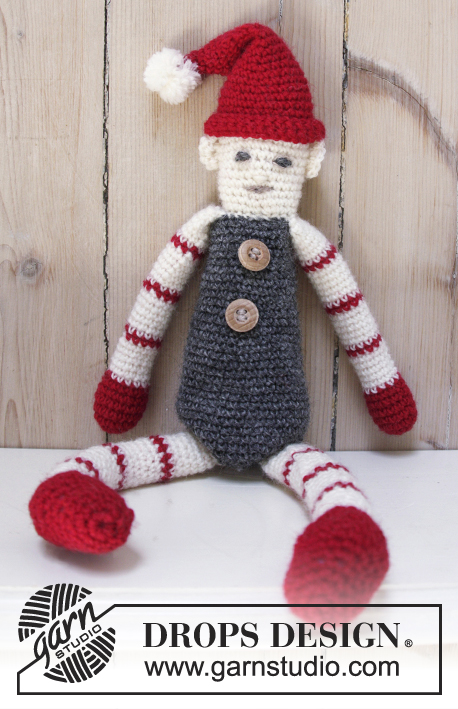
Santa's Buddy |
|
 |
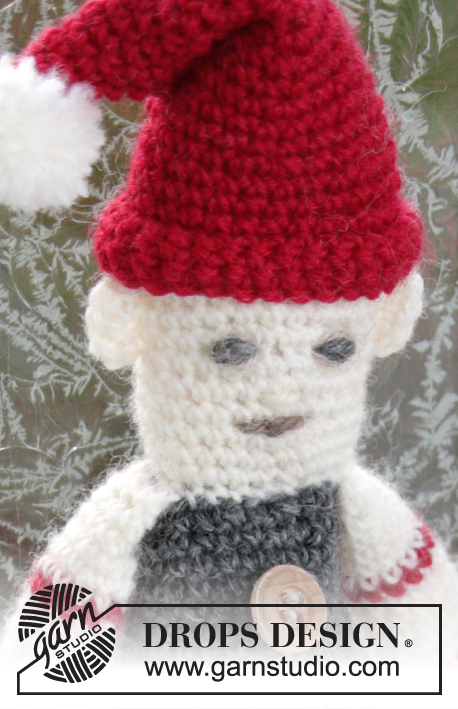 |
Crochet Santa Claus doll for baby and children in DROPS Fabel. Piece is worked with stripes. Theme Christmas
DROPS Extra 0-1198 |
|
|
CROCHET INFO: Beg every round with 1 ch and finish with 1 sl st in first ch. 2 SC TOG: Insert hook in first sc and pull yarn through, insert hook in next sc and pull yarn through, make a YO and pull yarn through all 3 loops on hook. ---------------------------------------------------------- SANTA: Work in one from top of hat and down to neck. then work body bottom up. Work legs (with shoes) and arms separately and sew on when finished. HAT: The piece is worked top down. Work 3 ch on hook size 3.5 mm/E/4 with red and form a ring with 1 sl st in first ch. ROUND 1: READ CROCHET INFO! Work 3 sc in ch-ring. ROUND 2: Work 2 sc in every sc = 6 sc. ROUND 3-4: Work 1 sc in every sc. ROUND 5: Work * 1 sc in first sc, 2 sc in next sc *, repeat from *-* the rest of round. = 9 sc. REMEMBER THE CROCHET GAUGE! ROUND 6-7:Work 1 sc in every sc. ROUND 8: Work * 1 sc in each of the first 2 sc, 2 sc in next sc *, repeat from *-* the entire round = 12 sc. ROUND 9-10: Work 1 sc in every sc. ROUND 11: * 1 sc in each of the first 3 sc, 2 sc in next sc *, repeat from *-* the entire round = 15 sc. ROUND 12-13: 1 sc in every sc. ROUND 14: * 1 sc in each of the first 4 sc, 2 sc in next sc *, repeat from *-* the entire round = 18 sc. ROUND 15-16: 1 sc in every sc. ROUND 17: * 1 sc in each of the first 5 sc, 2 sc in next sc *, repeat from *-* the entire round = 21 sc. ROUND 18-19: Work 1 sc in every sc. ROUND 20: * 1 sc in each of the first 6 sc, 2 sc in next sc *, repeat from *-* the entire round = 24 sc. ROUND 21-22: Work 1 sc in every sc. ROUND 23: Work * 1 sc in each of the first 5 sc, 2 sc in next sc *, repeat from *-* the entire round = 28 sc. ROUND 24 (beg a loose edge on hat here): Turn and work the opposite way as follows: Work 1 sc in back loop of every sc. ROUND 25-26: Work 1 sc in every sc. Fasten off. Now work head from 23rd round (work in the other loop in same direction as 23rd round). HEAD: ROUND 1: Switch to off white (turn piece in correct direction according to round 23). Work * 1 sc in back loop of each of the next 5 sc, work 2 SC TOG - read explanation above *, repeat from *-* the entire round = 24 sc. ROUND 2-10: Work 1 sc in every sc. ROUND 11: Work * 1 sc in each of the next 4 sc, work 2 sc tog *, repeat from *-* the entire round = 20 sc. Fasten off. Fill the head with some poly stuffing, but do not fill the hat. EARS: Work ears on each side of head, beg in first row of head and in a vertical line down half the head with off white. Work 1 ear as follows: Work * 1 sc in first/next row, 2 ch *, repeat from *-* 3 times in total, 1 sc in next row, turn with ch 1, work * 1 sc + 2 hdc around first/next ch-space *, repeat from *-* 3 times in total, finish with 1 sl st in sc at beg of 1st row. Work another ear on opposite side of head. Then work the body. BODY: Crochet in the round from bottom up. Work 3 ch on hook size 3.5 mm/E/4 with gray and form a ring with 1 sl st in first ch. ROUND 1: Remember CROCHET INFO! Work 6 sc in ch-ring. ROUND 2: Work 2 sc in every sc = 12 sc. Work * 1 sc in first sc, 2 sc in next sc *, repeat from *-* the entire round = 18 sc. ROUND 3: Work * 1 sc in each of the first 2 sc, 2 sc in next sc *, repeat from *-* the entire round = 24 sc. ROUND 4: Work * 1 sc in each of the first 3 sc, 2 sc in next sc *, repeat from *-* the entire round = 30 sc. ROUND 5: Work * 1 sc in each of the first 4 sc, 2 sc in next sc *, repeat from *-* the entire round = 36 sc. ROUND 6-9 (body beg here): Work 1 sc in every sc. ROUND 10: Work * 1 sc in each of the first 10 sc, work 2 sc tog *, repeat from *-* the entire round = 33 sc. ROUND 11-15: Work 1 sc in every sc. ROUND 16: Work * 1 sc in each of the first 9 sc, work 2 sc tog *, repeat from *-* the entire round = 30 sc. ROUND 17-20: Work 1 sc in every sc. ROUND 21: Work * 1 sc in each of the first 8 sc, work 2 sc tog *, repeat from *-* the entire round = 27 sc. ROUND 22-25: Work 1 sc in every sc. ROUND 26: Work * 1 sc in each of the first 7 sc, work 2 sc tog *, repeat from *-* the entire round = 24 sc. ROUND 27-31: Work 1 sc in every sc. ROUND 32: Work * 1 sc in each of the first 4 sc, work 2 sc tog *, repeat from *-* the entire round = 20 sc. Fasten off. LEG: Crochet in the round from bottom up. Work 4 ch on hook size 3.5 mm/E/4 with red and form a ring with 1 sl st in first ch. ROUND 1: Remember CROCHET INFO! Work 6 sc in ch-ring. ROUND 2: Work 2 sc in every sc = 12 sc. ROUND 3-4: Work 1 sc in every sc. ROUND 5: Work 1 sc in each of the first 5 sc, 2 sc in each if the next 2 sc, 1 sc in each of the next 5 sc = 14 sc. ROUND 6: Work 1 sc in each of the first 5 sc, 2 sc in next sc, 1 sc in each of the next 2 sc, 2 sc in next sc, 1 sc in each of the next 5 sc = 16 sc. ROUND 7: Work 1 sc in each of the first 5 sc, * 2 sc in next sc, 1 sc in next sc, 2 sc in next sc *, repeat from *-* 1 more time, 1 sc in each of the next 5 sc = 20 sc. ROUND 8: Work 1 sc in each of the first 4 sc, 2 sc tog, 1 sc in each of the next 8 sc, 2 sc tog, 1 sc in each of the next 4 sc = 18 sc. ROUND 9: Work 1 sc in each of the first 4 sc, 2 sc tog, 1 sc in each of the next 6 sc, 2 sc tog, 1 sc in each of the next 4 sc = 16 sc. ROUND 10: Work 1 sc in each of the first 4 sc, 2 sc tog, 1 sc in each of the next 4 sc, 2 sc tog, 1 sc in each of the next 4 sc = 14 sc. ROUND 11: Work 1 sc in each of the first 4 sc, 2 sc tog, 1 sc in each of the next 2 sc, 2 sc tog, 1 sc in each of the next 4 sc = 12 sc. ROUND 12: Work 1 sc in every sc. ROUND 13-18: Switch to off white, work 1 sc in every sc. ROUND 19: Switch to red, work 1 sc in every sc. Repeat rounds 13 to 19 2 more times. Then repeat rounds 13 to 18 1 more time. Fasten off. Work another leg the same way. Fill the legs with some poly stuffing and fasten one leg on each side of bottom of body. ARM: Crochet in the round from bottom up. Work 4 ch on hook size 3.5 mm/E/4 with red and form a ring with 1 sl st in first ch. ROUND 1: Work 6 sc in ch-ring. ROUND 2: Work 2 sc in every sc = 12 sc. ROUND 3: Work * 1 sc in each of the first 2 sc, 2 sc in next sc *, repeat from *-* the entire round = 16 sc. ROUND 4-5: Work 1 sc in every sc. ROUND 6: Work * 1 sc in each of the first 2 sc, 2 sc tog *, repeat from *-* the entire round = 12 sc. ROUND 7: Work 1 sc in every sc. ROUND 8-13: Switch to off white, work 1 sc in every sc. ROUND 14: Switch to red, work 1 sc in every sc. Repeat rounds 8 to 14 2 more times. Then repeat rounds 8 to 13 1 more time. Fasten off. Work another arm the same way. Fill the arms with some poly stuffing and fasten them on each side of neck on body (place each arm edge to edge with last round on body). ASSEMBLY: Make a pompom, approx. 2 cm / 3/4'' in diameter with off white and fasten it at the top of hat. Bend the hat down to the side and fasten with a small stitch. Sew on eyes with a stitch for each eye in gray. Sew 1 stitch around same st with some left-over brown, sew on mouth with some stitches in the same color. Sew on nose with off white, sew 3 stitches on top of each other. Sew on 2 button placed approx. 2 and 5 cm / 3/4" and 2'' down from the neck. Fill the body with some poly stuffing and fasten head to body with neat little stitches. |
|
Have you finished this pattern?Tag your pictures with #dropspattern or submit them to the #dropsfan gallery. Do you need help with this pattern?You'll find 12 tutorial videos, a Comments/Questions area and more by visiting the pattern on garnstudio.com. © 1982-2025 DROPS Design A/S. We reserve all rights. This document, including all its sub-sections, has copyrights. Read more about what you can do with our patterns at the bottom of each pattern on our site. |
|


With over 40 years in knitting and crochet design, DROPS Design offers one of the most extensive collections of free patterns on the internet - translated to 17 languages. As of today we count 314 catalogs and 11822 patterns - 11812 of which are translated into English (US/in).
We work hard to bring you the best knitting and crochet have to offer, inspiration and advice as well as great quality yarns at incredible prices! Would you like to use our patterns for other than personal use? You can read what you are allowed to do in the Copyright text at the bottom of all our patterns. Happy crafting!
Post a comment to pattern DROPS Extra 0-1198
We would love to hear what you have to say about this pattern!
If you want to leave a question, please make sure you select the correct category in the form below, to speed up the answering process. Required fields are marked *.