
Popular categories
Looking for a yarn?


Comments / Questions (40)
![]() Camilla wrote:
Camilla wrote:
Hi! I'm about to start the right front piece but I don't really understand how I should go about doing it. On the pattern it says I should cast on 5 stitches. Are we talking about new stitches? on the video it shows 5 stitches as if they were picked up from the TOP part, but I don't seem to understand from where.
28.06.2025 - 23:26DROPS Design answered:
Dear Camilla, yes, you cast on 5 new stitches, not the previous stitches from the top, which form the edge of the armhole. Later on, pick up the stitches from the armhole from the TOP section and then work over the front piece stitches, with A.2 over the 5 stitches on the neck edge. In this video we work a very similar technique. Happy knitting!
29.06.2025 - 20:26
![]() Marilyn S wrote:
Marilyn S wrote:
Can sleeves be added to the “Tangerine Twist Top” pattern?
12.05.2025 - 13:55DROPS Design answered:
Dear Marilyn, you could add sleeves, but the cable in the straps and the top shape doesn't let you add the sleeves directly. You could work a sweater, like this one instead, but with DROPS Paris, and adjusting the sleeve length to your desired length. Happy knitting!
18.05.2025 - 14:05
![]() Patrycja wrote:
Patrycja wrote:
Dzień dobry, jaka jest ostateczna długość szelki dla rozmiaru S? Chciałabym zrobić szelkę w 1 kawałku bez łączenia ale nie mogę wyczytać z wymiarów na obrazku jaka jest długość ramiączek. Dziękuję, pozdrawiam!
29.12.2024 - 10:48DROPS Design answered:
Witaj Patrycjo, w rozmiarze S długość szelki wynosi 14 cm (8 cm na przodzie i 6 na tyle). Oczywiście możesz dopasować długość szelek do swoich potrzeb. Pozdrawiamy!
30.12.2024 - 09:12
![]() Isabelle Van Tittelboom wrote:
Isabelle Van Tittelboom wrote:
Hey Ik ben aan het begin voor linkerkant en rechter kan te splitsen. Ik kan er niet tellen hoeveel steken ik tesamen heb En de achter kan ik niets van maakten. Hoeveel steken heb je daar? Moet het in een stuk gebreide worden of ook in twee stukken. Kan ik en foto van de achterkant eens zien? Sorry voor de stomme vraagen. Beginner Gr Isabelle van Tittelboom
21.08.2024 - 09:31DROPS Design answered:
Dag Isabelle,
Het achterpand brei je apart heen en weer en de beide voorpanden ook. Maar eerst brei je het deel van de rand voor langs het armsgat, waarbij je de steken van het armsgat samen breit met de steken van de rand. Daarna brei je ook weer verder over de steken van de panden. In een van de video's (volgens mij staat die bovenaan bij de video's wordt uitgelegd hoe je de rand langs het armsgat maakt. Deze video is voor een ander patroon, maar is ook toe te passen op dit patroon. Volg wel steeds het aantal steken en naalden in het patroon dat je aan het breien bent.
21.08.2024 - 18:12
![]() Nettan wrote:
Nettan wrote:
Frågar igen! Varför kan ni inte ta mer ingående bilder så som tex under ärm, bakifrån mm Istället tar ni på modellen framifrån med olika sätt att hålla huvudet? Jag och säkert många med mig vill se mer av själva plagget Och gärna storleken som modellen har på sig vore toppen! Mvh
14.07.2024 - 10:00
![]() Nettan wrote:
Nettan wrote:
Tror ni skrivit fel i mönstret där man ska lägga maskor på tråd och sedan sticka vidare med 5maskor och plocka upp 2maskor i taget När alla maskor är upplockade står det att man ska sticka från avigsidan över de 28 maskorna som sitter på tråd, men dessa maskor ligger ju kvar på stickan!! Blev lite förbryllande ett tag!! Trodde jag gjort fel någonstans, men det hade jag inte utan det står fel i mönstret vad jag kan se!?
10.07.2024 - 22:14DROPS Design answered:
Hei Nettan. Takk for din tilbakemelding, men fint om du kan opplyse litt mer nøyaktig hvor du mener det er feil i oppskriften (og gjerne hvilken str. du strikker), så skal vi ta en titt. mvh DROPS Design
11.07.2024 - 09:29
![]() Lorella wrote:
Lorella wrote:
Dopo il primo giro a diritto, dopo le prime 33 maglie a coste 2/2, credo debba esserci un rovescio prima dei tre diritti. Le spiegazioni riportano un diritto, tre diritti. Mi potete confermare se si tratta di un errore di stampa o se sto sbagliando io? Grazie!
22.06.2024 - 12:29DROPS Design answered:
Buongiorno Lorella, grazie per la segnalazione: abbiamo corretto il testo. Buon lavoro!
23.06.2024 - 11:21
![]() Jo wrote:
Jo wrote:
Bij het einde van het achterpand ben ik op het punt om de bandjes te maken. Bij welke naald van patroon A4 en A5 moet je inspringen?
29.05.2024 - 17:53DROPS Design answered:
Dag Jo,
Wat bedoel je met inspringen? Op het het moment dat je met A4 en A5 begint, dan kan je ook het stuk er tussenin af.
30.05.2024 - 18:42
![]() Gaetan wrote:
Gaetan wrote:
Bonjour! J ai tout saisi merci 🙏! Lorsque vous dites (ajuster sur rang envers) on tricotes tu ce rang ou on le laisse sur endroit? Autre chose ( diminuer au 2 rang ou au 4 rang ) ça veut tu dire je diminue à l’endroit et à l envers sans diminution et à l endroit je diminue ? Est-ce tel quel ? Merci 🙏
27.05.2024 - 13:43DROPS Design answered:
Bonjour Gaetane, je ne vois malheureusement pas où vous en êtes; mais pour le dos, on ajuste la hauteur des côtes du haut du dos, autrement dit, on tricote 2 cm de côtes, le dernier rang de ces 2 cm sera un rang sur l'envers, ainsi le rang suivant est à tricoter sur l'endroit (on rabat les mailles centrales sur l'endroit). Pour les bretelles, on ajuste la hauteur de la même façon (à quelques rangs près si besoin) pour arrêter par l'avant dernier rang du diagramme (1 rang sur l'endroit) et rabattre ainsi au rang suivant sur l'envers. Bon tricot!
27.05.2024 - 16:22
![]() Gaetane wrote:
Gaetane wrote:
Bonjour ! Là je suis rendu au dos je n y comprends rien ! Y a t il un vidéo svp merci !
27.05.2024 - 00:49DROPS Design answered:
Bonjour Gaetane, le dos se commence de la même façon de chacun des devants: avec A.2 côté emmanchure gauche et A.3 côté emmanchure droite, quand les 2 bordures sont terminées, vous allez alors tricoter toutes les mailles du dos: A.3, jersey et A.2 (vu sur l'endroit). Diminuez en même temps pour les emmanchures de chaque côté. Bon tricot!
27.05.2024 - 08:55
|
|||||||||||||||||||||||||
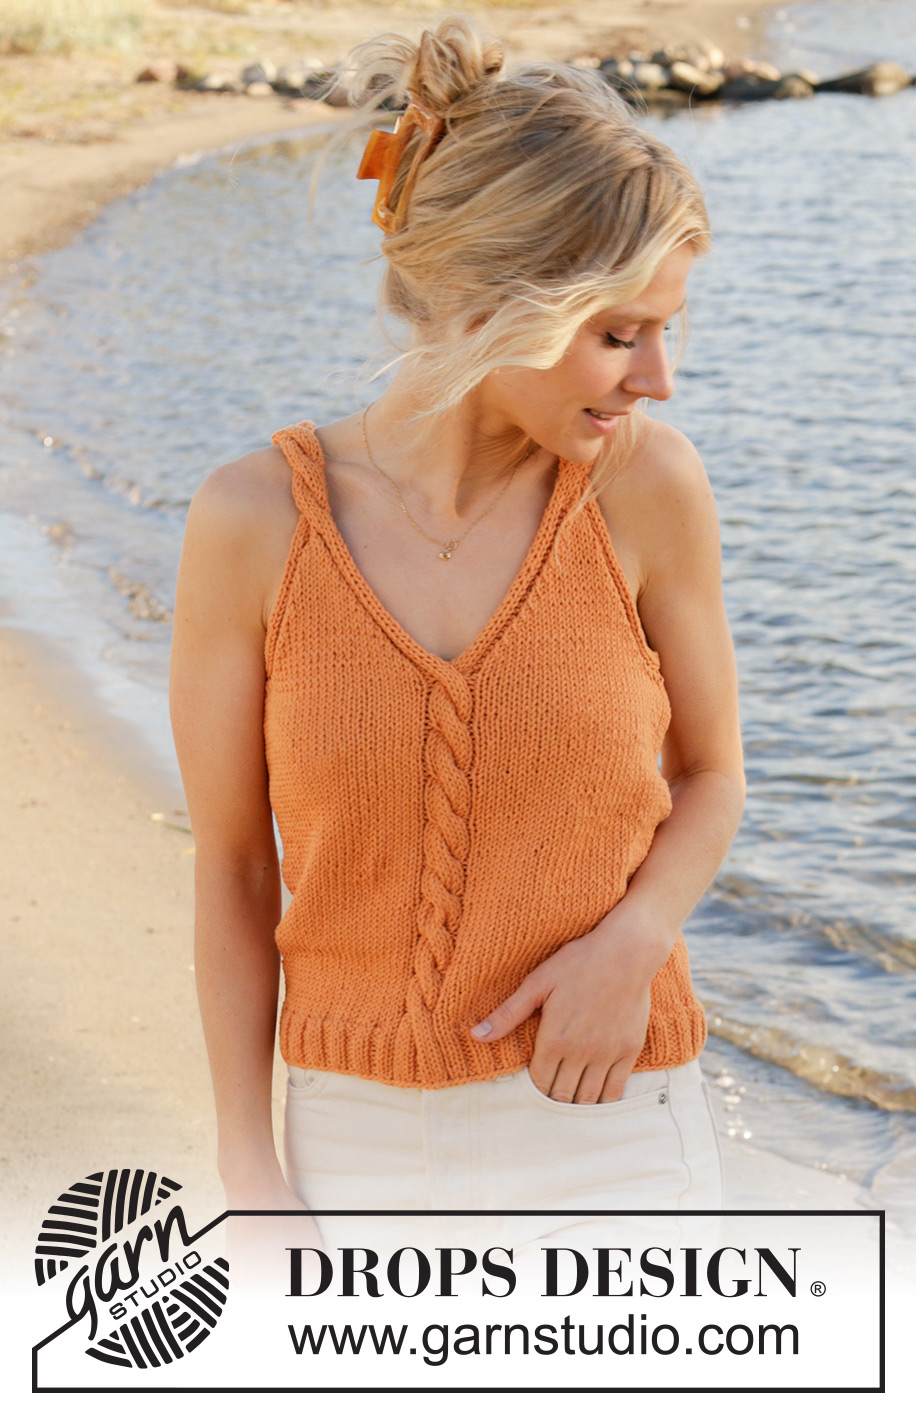
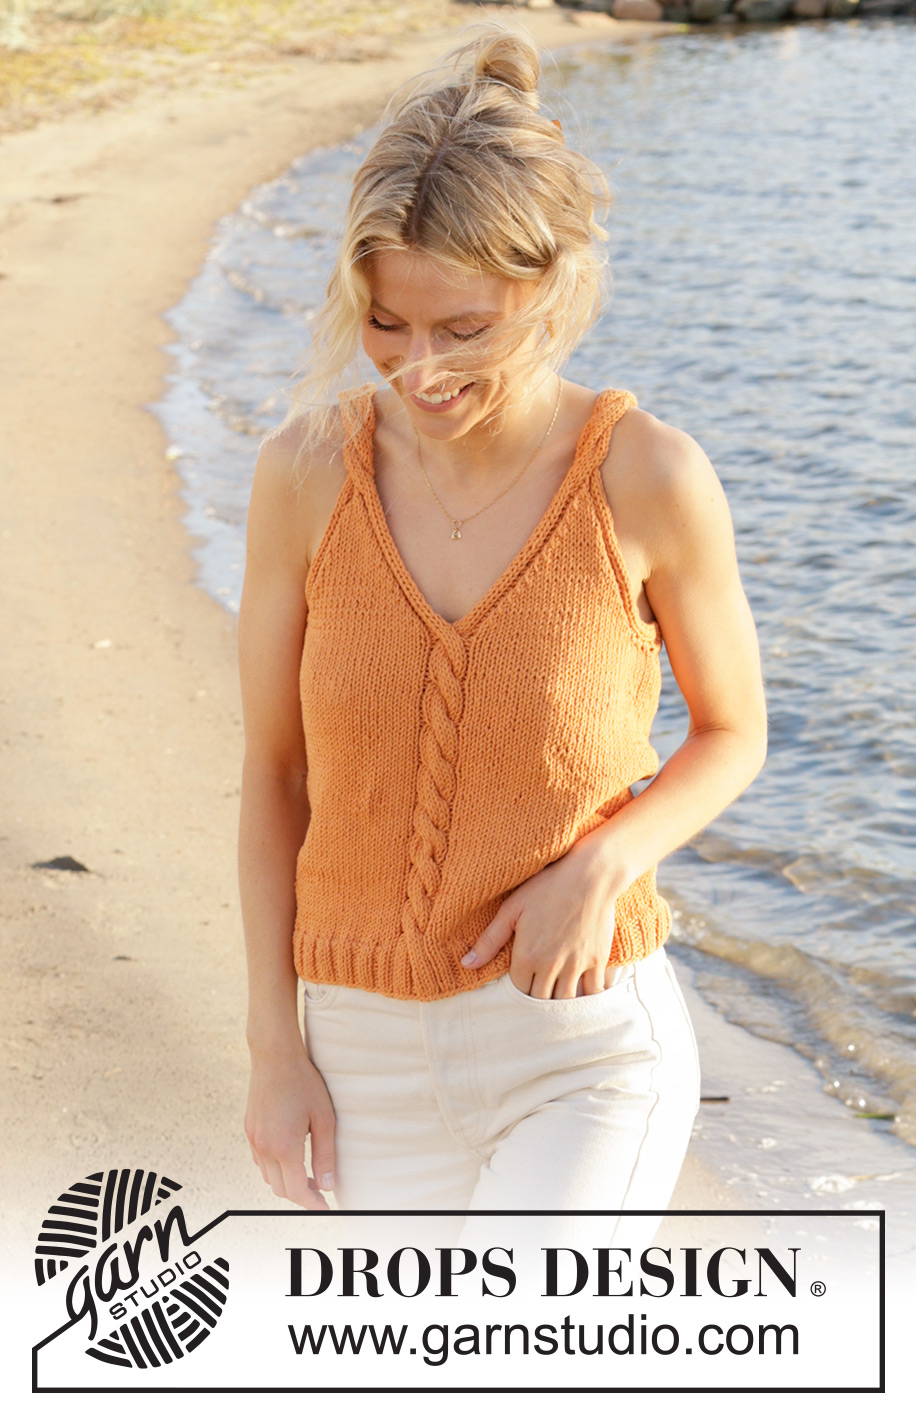
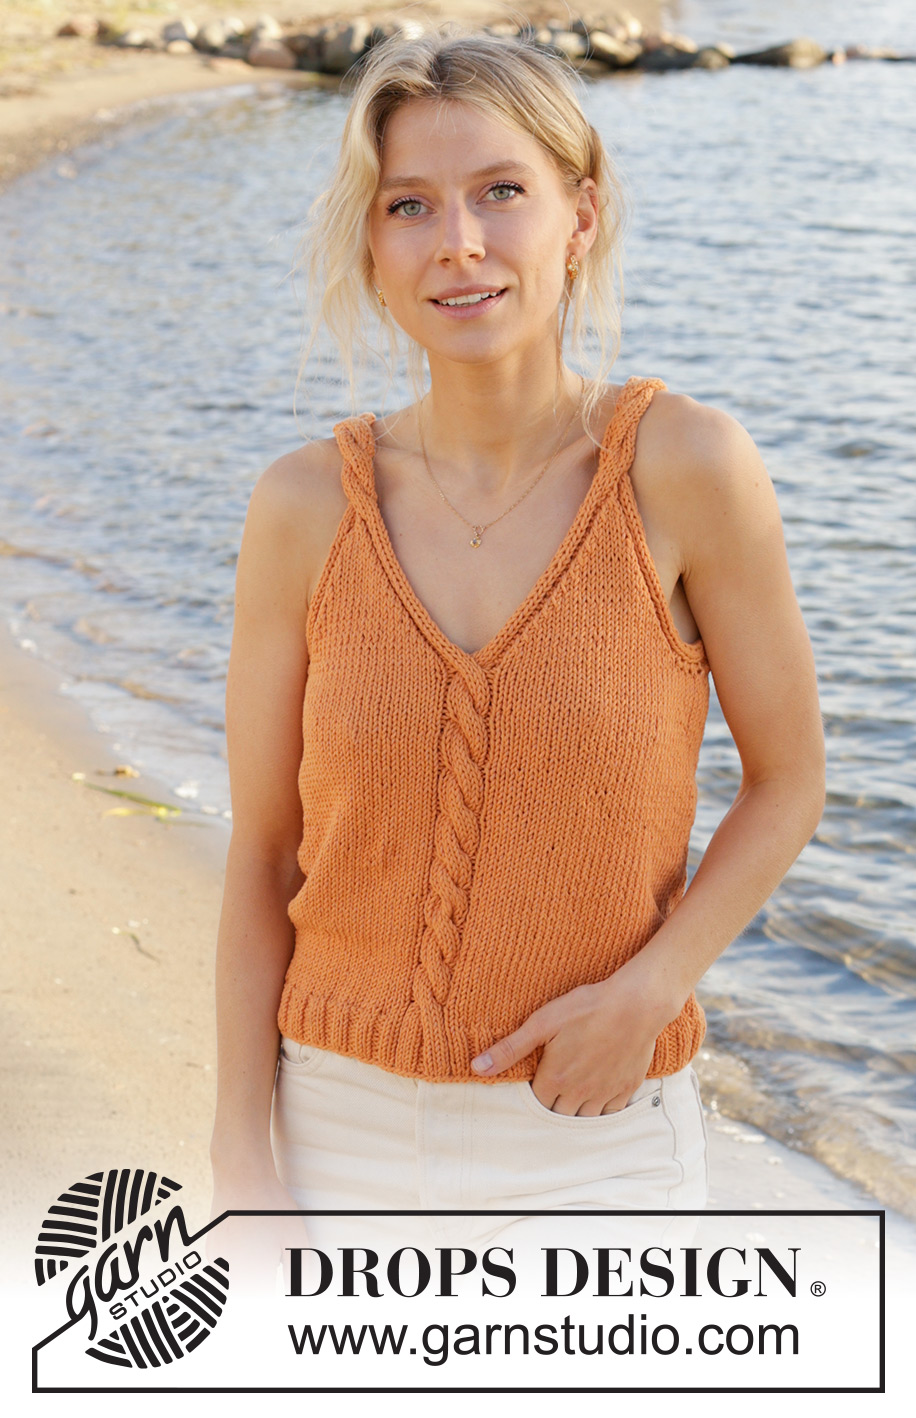
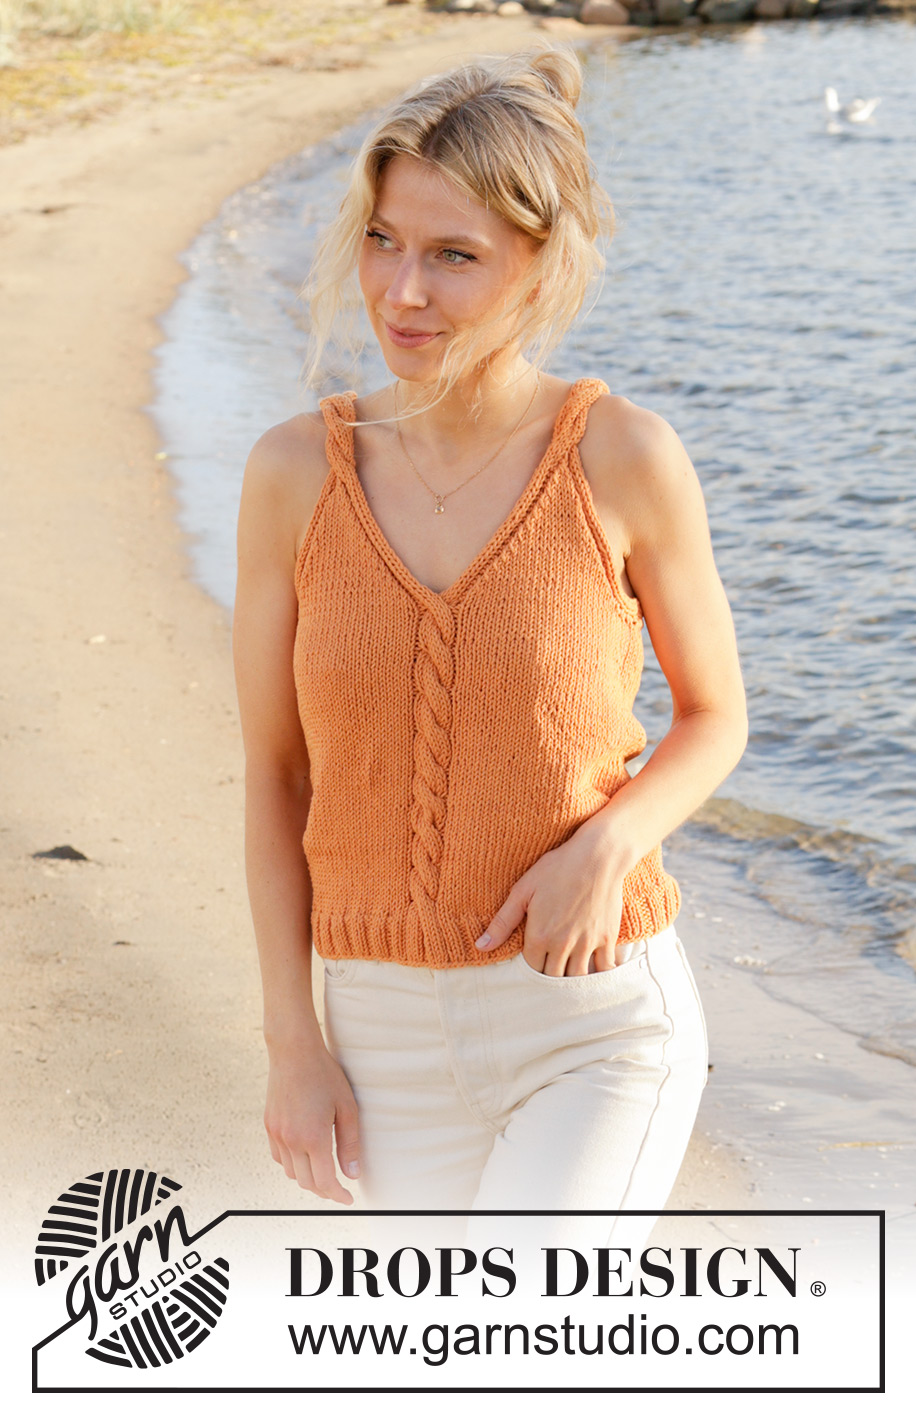
Tangerine Twist Top#tangerinetwisttop |
|||||||||||||||||||||||||
 |
 |
||||||||||||||||||||||||
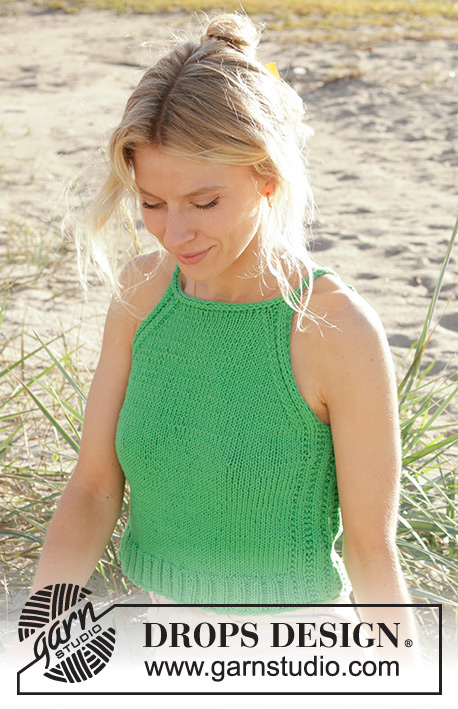
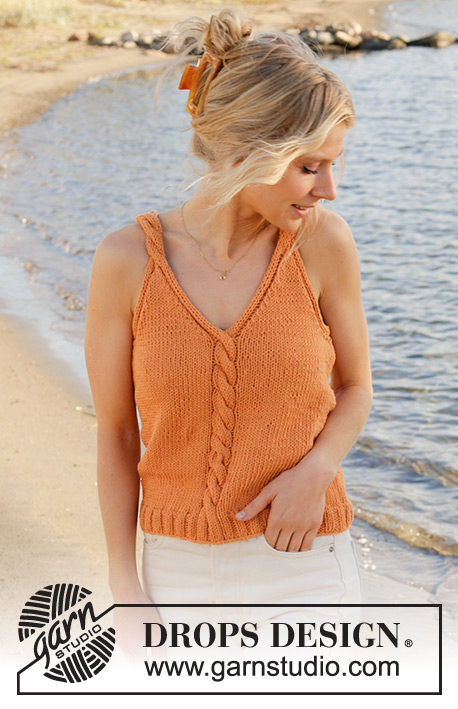
Knitted top in DROPS Paris. Piece is knitted bottom up with cables and V-neck. Size XS – XXL.
DROPS 240-19 |
|||||||||||||||||||||||||
|
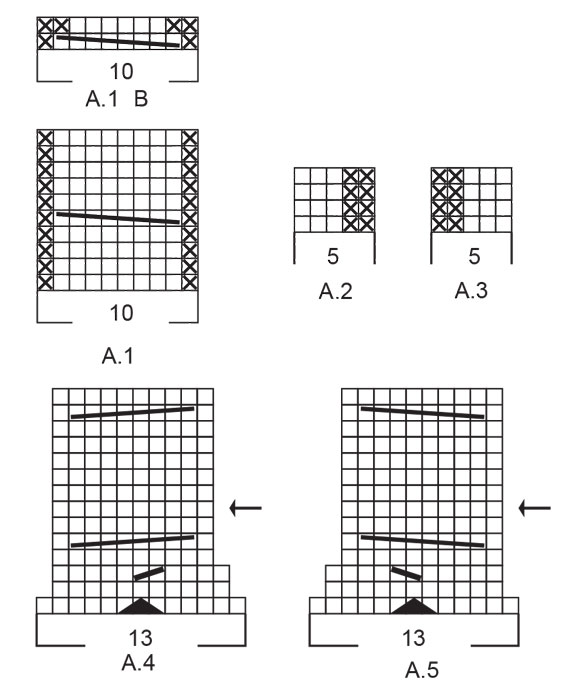
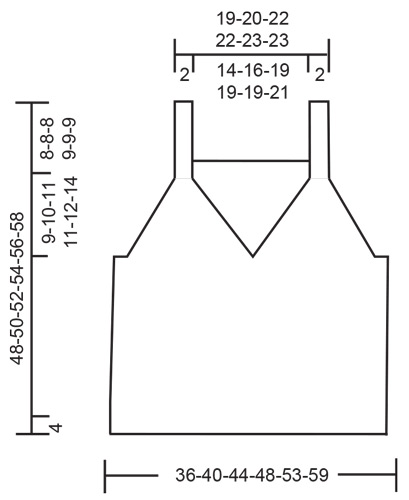
---------------------------------------------------------- EXPLANATION FOR THE PATTERN: ---------------------------------------------------------- PATTERN: See diagrams A.1 to A.5. Diagrams show all rows in pattern seen from the right side. DECREASE TIP: Decrease as follows after A.3: Knit 2 together. Decrease as follows before A.2: Slip 1 stitch knitwise, knit 1, pass slipped stitch over. ---------------------------------------------------------- START THE PIECE HERE: ---------------------------------------------------------- TOP - SHORT OVERVIEW OF THE PIECE: Worked in the round on circular needle, from the bottom and up to V-neck and armholes. Then divide the piece into back piece and right and left front pieces, and finish each part separately. TOP: Cast on 120-132-148-152-168-192 stitches on circular needle size 4.5 MM = US 7 with DROPS Paris. Knit 1 round, then work rib as follows: Knit 1, * purl 2, knit 2 *, work from *-* over the next 24-28-32-32-36-40 stitches, purl 1, knit 3, purl 2, knit 3, purl 1, * knit 2, purl 2 *, work from *-* stitch until 1 stitch remain, knit 1. Continue rib like this for 4 cm = 1½". Switch to circular needle size 5.5 MM = US 9, and work next round as follows. Insert 1 marker thread at the beginning of round, knit over the first 25-29-33-33-37-41 stitches and decrease 1-2-3-0-0-1 stitch evenly over these stitches, work A.1 (work A.1 over 1 purl, 3 knit, 2 purl, 3 knit, 1 purl from rib), knit the next 25-29-33-33-37-41 stitches and decrease 1-2-3-0-0-1 stitches evenly over these stitches, insert 1 marker thread here, knit the last 60-64-72-76-84-96 stitches, and decrease 2-0-2-0-0-2 evenly over these stitches = 116-128-140-152-168-188 stitches. There is now 1 marker thread in each side of piece. Move the marker threads upwards when working – they should be used later. When piece measures 30-31-32-33-34-34 cm = 11¾"-12¼"-12½"-13"-13⅜"-13⅜" from cast-on edge, adjust so that next round is an cable round in A.1, work A.1B over stitches in A.1. Work A.1B 1 time vertically. Cut the yarn. Now slip stitches on thread, this is done without working the stitches. Slip the first 8-8-8-10-10-12 stitches at the beginning of round on a thread for armhole, slip the next 21-24-27-28-32-35 stitches on another thread for left front piece, keep the next 21-24-27-28-32-35 stitches on needle for right front piece, slip the next 8-8-8-10-10-12 stitches on a thread for armhole, slip the next 8-8-8-10-10-12 stitches on a thread for armhole, slip the next 42-48-54-56-64-70 stitches on another thread for back piece, and slip the last 8-8-8-10-10-12 stitches on another thread for armhole. Finish each part separately. RIGHT FRONT PIECE: Cast on 5 stitches on circular needle size 5.5 MM = US 9 with a new ball DROPS Paris. ROW 1 (= right side): Work A.2 over these 5 stitches, turn. ROW 2 (= wrong side): Work A.2 over the first 4 stitches, knit last stitch together with 1st and 2nd stitch after marker thread in the side (i.e. of the 8-8-8-10-10-12 stitches on thread), so that the 5 stitches in A.2 is worked together with stitch on thread for armhole, turn. ROW 3: Work A.2 over these 5 stitches, turn. ROW 4: Work A.2 over the first 4 stitches, knit last stitch together with 3rd and 4th stitch after marker thread, so that the 5 stitches in A.2 is worked together with stitch on thread for armhole, turn. Continue back and forth like this by working last stitch in A.2 together with the next 2 stitches along armhole until all the 8-8-8-10-10-12 stitches along armhole have been worked together with A.2. Finish after a row from wrong side, and work as before (from the wrong side) over the 21-24-27-28-32-35 stitches on thread for right front piece (i.e. work from armhole and until middle of cable = in the middle of A.1B) = 26-29-32-33-37-40 stitches on row. Now work pattern from the right side, and decrease for V-neck and armhole as follows: Work A.3 over the first 5 stitches, knit until 5 stitches remain, A.2 over the last 5 stitches. Continue back and forth like this, AT THE SAME TIME on first row from right side decrease for V-neck and armhole as explained below - read DECREASE TIP. V-NECK: Decrease for V-neck every other row 9-10-11-11-12-13 times in total. ARMHOLES: Decrease for armhole every other row 0-2-5-7-12-14 times, then every 4th row 4-4-3-2-0-0 times. After all decreases are done there are 13 stitches on needles. Now work A.4 over the last 13 stitches. When A.4 has been worked vertically, 10 stitches remain on needle. Repeat the last 8 rows in diagram (from row with arrow) until piece measures 17-18-19-20-21-23 cm = 8"-8¼"-9" from the first decrease for V-neck - adjust to finish after a row with cable. Bind off from wrong side with purl, at the same time purl 2 and 2 stitches together. The top measures total approx. 48-50-52-54-56-58 cm = 19"-19¾"-20½"-21¼"-22"-22¾" in total from cast-on edge. LEFT FRONT PIECE: Cast on 5 stitches on circular needle size 5.5 MM = US 9 with DROPS Paris. ROW 1 (= right side): Work A.3 over the first 4 stitches, purl last stitch together with 1st and 2nd stitch after marker thread in the side (i.e. of the 8-8-8-10-10-12 stitches on thread), so that the 5 stitches in A.3 is worked together with stitch on thread for armhole, turn. ROW 2 (= wrong side): Work A.3 over these 5 stitches, turn. ROW 3: Work A.3 over the first 4 stitches, purl last stitch together with 3rd and 4th stitch after marker thread, so that the 5 stitches in A.3 is worked together with stitch on thread for armhole, turn. Continue back and forth like this by working last stitch in A.3 together with the next 2 stitches along armhole until all the 8-8-8-10-10-12 stitches along armhole have been worked together with A.3. Finish with a row from wrong side. Now work pattern from the right side, and decrease for V-neck and armhole as follows: Work A.3 over the first 5 stitches, until 5 stitches remain, A.2 over the last 5 stitches. Continue back and forth like this, AT THE SAME TIME on first row from right side decrease for V-neck and armhole as explained below - read DECREASE TIP. V-NECK: Decrease for V-neck every other row 9-10-11-11-12-13 times in total. ARMHOLES: Decrease for armhole every other row 0-2-5-7-12-14 times, then every 4th row 4-4-3-2-0-0 times. After all decreases are done there are 13 stitches on needles. Now work A.5 over the last 13 stitches. When A.5 has been worked vertically, 10 stitches remain on needle. Repeat the last 8 rows in diagram (from row with arrow) until piece measures 17-18-19-20-21-23 cm = 6¾"-7"-7½"-8"-8¼"-9" from the first decrease for neck - adjust to finish after a row with cable. Bind off from wrong side with purl, at the same time purl 2 and 2 stitches together. The top measures approx. 48-50-52-54-56-58 cm = 19"-19¾"-20½"-21¼"-22"-22¾" in total. BACK PIECE: Edge on left armhole: Cast on 5 stitches on circular needle size 5.5 MM = US 9 with a new ball DROPS Paris. ROW 1 (= right side): Work A.2 over all stitches, turn. ROW 2 (= wrong side): Work A.2 over the first 4 stitches, knit last stitch together with 1st and 2nd stitch after marker thread in the side (i.e. of the 8-8-8-10-10-12 stitches on thread), so that the 5 stitches in A.2 is worked together with stitch on thread for armhole, turn. ROW 3: Work A.2 over these 5 stitches, turn. ROW 4: Work A.2 over the first 4 stitches, knit last stitch together with 3rd and 4th stitch after marker thread so that the 5 stitches in A.2 is worked together with back piece, turn. Continue back and forth like this by working last stitch in A.2 together with the next 2 stitches along armhole until all the 8-8-8-10-10-12 stitches along armhole have been worked together with A.2. Finish with a row from wrong side. Put aside. Edge on right armhole: Cast on 5 stitches on circular needle size 5.5 MM = US 9 with DROPS Paris. ROW 1 (= right side): Work A.3 over the first 4 stitches, purl last stitch together with 1st and 2nd stitch after marker thread in the side (i.e. of the 8-8-8-10-10-12 stitches on thread), so that the 5 stitches in A.3 is worked together with back piece, turn. ROW 2 (= wrong side): Work A.3 over these 5 stitches, turn. ROW 3: Work A.3 over the first 4 stitches, purl last stitch together with 3rd and 4th stitch after marker thread, so that the 5 stitches in A.3 is worked together with stitch on thread for armhole, turn. Continue back and forth like this by working last stitch in A.3 together with the next 2 stitches along armhole until all the 8-8-8-10-10-12 stitches along armhole have been worked together with A.3. Finish with a row from wrong side. Now work stitches from thread for back piece together with the 5 stitches for edge along armhole from right side as follows: Work A.3 over the first 5 stitches, knit over the 42-48-54-56-64-70 stitches from thread for back piece, work A.2 over the last 5 stitches (= 52-58-64-66-74-80 stitches on row), at the same time begin decrease for armhole – remember DECREASE TIP. Decrease for armhole in each side every other row 1-2-5-7-12-14 times, then every 4th row 4-4-3-2-0-0 times= 42-46-48-48-50-52 stitches. Continue back and forth with knit over knit and purl over purl until piece measures 9-10-11-11-12-14 cm = 3½"-4"-4⅜"-4⅜"-4¾"-5½" - from first decrease for armhole. Work 1 row from right side with knit over knit and purl over purl, and increase 0-0-2-2-0-2 stitches evenly (but not over the 5 outermost stitches in each side) = 42-46-50-50-50-54 stitches. Work 1 row in pattern from wrong side. Switch to circular needle size 4.5 MM = US 7. Now work rib as follows: Knit 3, purl 2, knit 2, purl 1, * knit 2, purl 2 *, work from *-* until 10 stitches remain on row, knit 2, purl 1, knit 2, purl 2, knit 3. Continue like this back and forth until rib measures 2 cm = ¾" – adjust so that next row is from right side, work from next to last row in A.5 over the first 10 stitches before these stitches are slipped on a thread (= strap), bind off with knit over knit and purl over purl over the next 22-26-30-30-30-34 stitches, work from next to last row in A.4 over the last 10 stitches on row (= strap). Repeat the pattern from row with arrow back and forth over these 10 stitches until strap measures approx. 6-6-6-7-7-7 cm = 2⅜"-2⅜"-2⅜"-2¾"-2¾"-2¾" - adjust to finish after next to last row in diagram. Bind off from wrong side with purl, at the same time purl 2 and 2 stitches together. Slip 10 stitches from thread back on circular needle and work last row in A.5 (= from wrong side). Then repeat the pattern from row with arrow until strap measures approx. 6-6-6-7-7-7 cm = 2⅜"-2⅜"-2⅜"-2¾"-2¾"-2¾" - adjust to finish after next to last row with cable. Bind off from wrong side with purl, at the same time purl 2 and 2 stitches together. ASSEMBLY: Sew together the straps with grafting/kitchener stitches. Sew together cast-on edge in the side where 5 new stitches were cast on (A.2/A.3). Sew with grafting/kitchener stitches to avoid a chunky seam. Fasten off. |
|||||||||||||||||||||||||
Diagram explanations |
|||||||||||||||||||||||||
|
|||||||||||||||||||||||||
|
|||||||||||||||||||||||||
|
|||||||||||||||||||||||||
Have you finished this pattern?Tag your pictures with #dropspattern #tangerinetwisttop or submit them to the #dropsfan gallery. Do you need help with this pattern?You'll find 25 tutorial videos, a Comments/Questions area and more by visiting the pattern on garnstudio.com. © 1982-2025 DROPS Design A/S. We reserve all rights. This document, including all its sub-sections, has copyrights. Read more about what you can do with our patterns at the bottom of each pattern on our site. |
|||||||||||||||||||||||||


With over 40 years in knitting and crochet design, DROPS Design offers one of the most extensive collections of free patterns on the internet - translated to 17 languages. As of today we count 314 catalogs and 11822 patterns - 11812 of which are translated into English (US/in).
We work hard to bring you the best knitting and crochet have to offer, inspiration and advice as well as great quality yarns at incredible prices! Would you like to use our patterns for other than personal use? You can read what you are allowed to do in the Copyright text at the bottom of all our patterns. Happy crafting!
Post a comment to pattern DROPS 240-19
We would love to hear what you have to say about this pattern!
If you want to leave a question, please make sure you select the correct category in the form below, to speed up the answering process. Required fields are marked *.