
Looking for a yarn?


Comments / Questions (18)
![]() Trienke Berg wrote:
Trienke Berg wrote:
Ik ben bij a2. Ik heb maat xs. Ik hen aan het eind van a1 49 steken (3+6+(3x10)+7+3)Bij a2 zijn het dan in een keer 57 (3+6+ (4x10)+5+3) steken. Hoe kan dat?
28.09.2024 - 19:15DROPS Design answered:
Dag Trienke,
Bij A.2 tel ik ook 49 steken in totaal. Namelijk 3 steken van de rand, 2 steken van A.2A, 40 steken van A.2B en 1 steek van A.2 C, tot slot 3 steken van de rand. Dan kom ik in totaal op (3+2+40+1+3=) 49 steken.
19.10.2024 - 12:30
![]() Kirsti Autio wrote:
Kirsti Autio wrote:
Hei, mitä tarkoittaa 2-2-0 silmukkaa nurin? Ihana malli, odotan että pääsen aloittamaan.
02.09.2024 - 06:39DROPS Design answered:
Tämä tarkoittaa, että neulot halutun koon mukaan joko 2 tai 0 nurjaa silmukkaa. Esim. koossa XS/S neulotaan 2 nurjaa silmukkaa.
02.09.2024 - 13:03
![]() Kirsti Autio wrote:
Kirsti Autio wrote:
Hei, mitä tarkoittaa 2-2-0 silmukkaa nurin? Ihana malli, odotan että pääsen aloittamaan.
02.09.2024 - 06:36
![]() Gaetane wrote:
Gaetane wrote:
Bonjour , dernière question , rendu à la fin, lorsqu’on fait les cotes, pourquoi qu on ne peut pas les faire sur toutes les mailles en même temps, dos et devant ? On se trouve avoir une petite ouverture de chaque côté en procédant faire séparer non ? Merci 🙏 de votre patience pour moi 😊
30.09.2023 - 14:35DROPS Design answered:
Bonjour Gaetane, c'est tout à fait ça, on va avoir une petite fente de chaque côté, de la hauteur des côtes, raison pour laquelle on termine le devant et le dos séparément. Bon tricot!
02.10.2023 - 09:57
![]() Gaetane wrote:
Gaetane wrote:
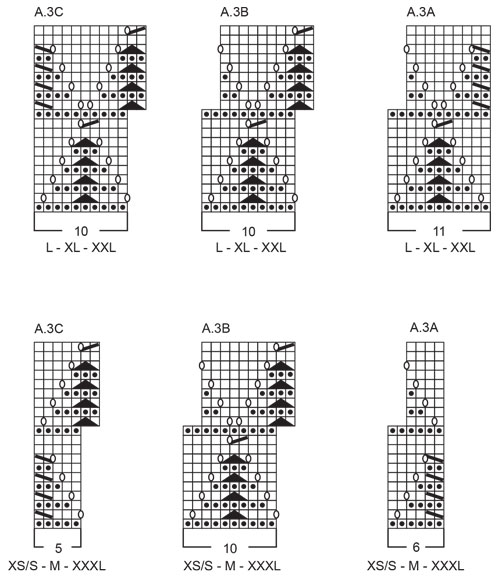
Bonjour , je parle de la 10 iemes ligne en fait , celle dont on a 2 m en moins dans A3A et 2 m de plus dans A3C !il n a que 9 m à tricoter , mais en fait en continuant me retrouve avec 10 m , a cause des 2 jetés à faire , vous comprenez ? Désolé, on procède comment alors pour suivre le motif ? Merci
25.09.2023 - 21:51DROPS Design answered:
Bonjour Gaetane, sur ce rang, vous allez décaler les diagrammes et tricoter A.3A sur 10 mailles, A.3B sur 10 mailles et A.3C sur 11 mailles. Cela va se faire automatiquement, en suivant le diagramme. Bon tricot!
26.09.2023 - 13:42
![]() Gaetane wrote:
Gaetane wrote:
Bonjour ! Lorsque rendu au diagramme, A3A , la 1ère ligne indique 2 jeté à faire , en faisant ça, on obtient 10 m. , et au retour de la 2 iemes lignes on a que 9 m à faire pour le motif, alors serait-ce qu il aurait un jeté de trop à faire ? Je saisi pas ça ! Merci , ( ma tailles c est L , )
25.09.2023 - 13:16DROPS Design answered:
Bonjour Gaetane, en taille L, vous tricotez A.3A sur 11 mailles, vous avez bien 2 jetés, mais vous diminuez 2 mailles au milieu (double diminution), autrement dit, tricotez le 2ème rang de A.3A ainsi: 1 m end, 1 jeté, 3 m end, glissez 1 m à l'end, 2 m ens à l'end, passez la m glissée par-dessus les mailes tricotées ensemble, 3 m end, 1 jeté, 1 m end (= 11 mailles de nouveau). Bon tricot!
25.09.2023 - 15:33
![]() Gaetane wrote:
Gaetane wrote:
Bonjour, Pour les bretelles , ajuster après un rang sur l\'envers, mettre en attente.\r\nÇa veut tu dire je termine en tricotant le rang à l envers ? Et je mets en attente ? \r\nComme pour l autre bretelle terminer après un rang à l endroit , je me trouves à tricoter le rang à l endroit c est ça ? Merci
21.09.2023 - 12:24DROPS Design answered:
Bonjour Gaetane, oui pour vos 2 questions, après avoir terminé la bretelle droite, vous tricotez, à suivre de ce dernier rang sur l'endroit l'encolure en montant de nouvelles mailles et vous tricotez ensuite les mailles de la bretelle gauche. Bon tricot!
21.09.2023 - 16:56
![]() Gaetane wrote:
Gaetane wrote:
Bonjour , dans le diagramme A3A,B et C, rendu en haut on a pas le même nombre de mailles, ça rimes pas Pour le À et le B ? Autre question , lorsqu on remonte les 7 mailles au bout du rang à l envers sur flèche , rendu sur l endroit on les tricotes comment ces mailles remontées à l endroit où en côte 1/1 ? Merci !
22.07.2023 - 13:41DROPS Design answered:
Bonjour Gateane, vous avez 2 m en moins dans A.3A et 2 m en plus dans A.3C, c'est juste ainsi. Tricotez les nouvelles mailles montées sur le côté à l'envers sur l'envers au rang suivant. Bon tricot!
27.07.2023 - 11:47
![]() Gaetane wrote:
Gaetane wrote:
Bonjour, je suis rendu à dos & devant, j ai mes 162 m, sur mon aiguille circulaire 5 , j ai tricote la 1 ère ligne du diagramme ( 3A,B,C ) sur l envers,ok , mais après vous dites de tricoter en rond , alors je me trouve à tricoter le diagramme que sur l endroit de mon ouvrage vu que c est en rond c est ça ? Merci 🙏
21.07.2023 - 12:49DROPS Design answered:
Bonjour Gaetane, ensuite vous commencez a tricoter en rond - le debut du tour est marque par le marqueur. Pour la taille L vous travaillez comme ca: 'TAILLES L - XL - XXL: * Tricoter A.3A, répéter 6-7-8 fois A.3B, tricoter A.3C * (= dos), tricoter encore 1 fois de *-* (= devant). Le premier rang des diagrammes (et les suivants) se trouvent sur l'endroit. Bon tricot!
21.07.2023 - 13:28
![]() Gaetane wrote:
Gaetane wrote:
Bonjour, pour les jetés on procède comment pour le faire , en avant ou arrière et on les tricote à l envers comme une maille envers ou torse ? Merci
20.07.2023 - 11:32DROPS Design answered:
Bonjour, dans les diagrammes: en tricotant en allers et retours: sur l'envers les jetes sont tricotes normalement (pas torse) a l'envers, c'est a dire par le brin avant, donc les trous sont visibles. En tricotant en rond: tous les rangs sont sur l'endroit, donc les jetes sont tricotes normallement (pas torse) a l'endroit par le brin avant. Quant il s'agit des augmentations finales (en bas de top) - ces jetes sont triotes torse (voir AUGMENTATIONS). Bon tricot!
20.07.2023 - 11:47
|
||||||||||||||||||||||
Stormlight Top#stormlighttop |
||||||||||||||||||||||
 |
 |
|||||||||||||||||||||
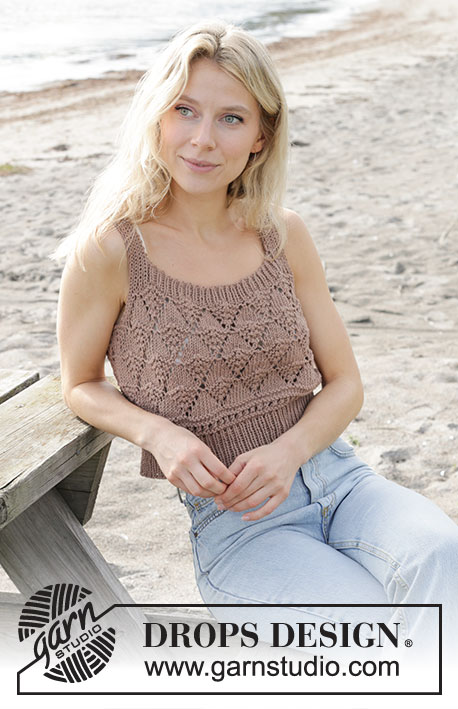
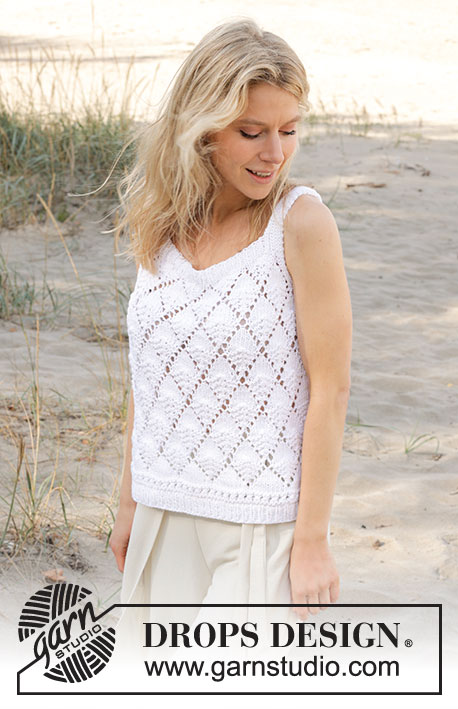
Knitted top in DROPS Paris. The piece is worked top down with lace pattern, garter stitch and split in sides. Sizes XS/S - XXXL.
DROPS 239-34 |
||||||||||||||||||||||
|
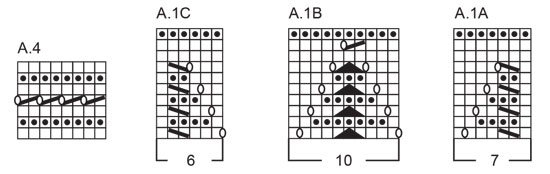
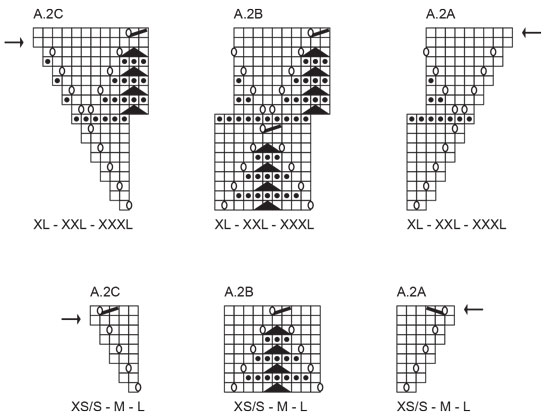
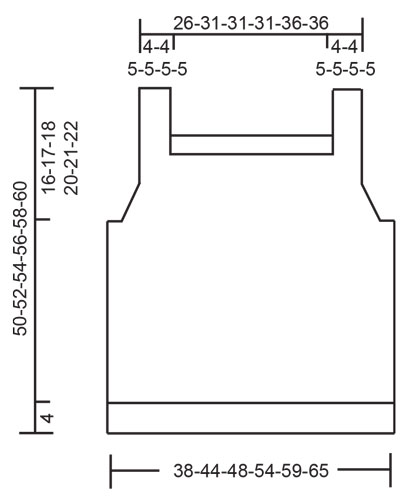
------------------------------------------------------- EXPLANATIONS FOR THE PATTERN: ------------------------------------------------------- RIDGE/GARTER STITCH (worked back and forth): Knit all rows. 1 ridge = knit 2 rows. PATTERN: See diagrams A.1 to A.4. Choose diagram for your size (applies to A.2 and A.3). The diagrams show all rows in the pattern from the right side. INCREASE TIP: Increase 1 stitch by making 1 yarn over, which is worked twisted on the next row to avoid a hole. ------------------------------------------------------- START THE PIECE HERE: ------------------------------------------------------- TOP – SHORT OVERVIEW OF THE PIECE: The back and front pieces are worked separately, back and forth and top down. The straps are worked first, before casting on stitches for the neck. The front and back pieces are joined below the armholes and the body worked in the round as far as the split, then finished back and forth. RIGHT BACK STRAP (when garment is worn): Cast on 9-9-11-11-13-13 stitches with double pointed needles size 4 MM = US 6 and DROPS Paris. Work rib back and forth as follows (first row = right side): 1 GARTER STITCH – read description above, * knit 1, purl 1 *, work from *-* a total of 3-3-4-4-5-5 times, knit 1, 1 garter stitch. When the strap measures 5-6-7-5-6-7 cm = 2"-2⅜"-2¾"-2"-2⅜"-2¾", and the last row was worked from the wrong side, lay the strap to one side. LEFT BACK STRAP: Cast on and work in the same way as the right strap. When the strap measures 5-6-7-5-6-7 cm = 2"-2⅜"-2¾"-2"-2⅜"-2¾" and the last row was worked from the right side, place these stitches on circular needle size 4 MM = US 6. Do not cut the strand but cast on 31-41-37-37-43-43 stitches at the end of this row for the neck, then continue over the stitches on the right strap = 49-59-59-59-69-69 stitches. Insert 1 marker – the piece is now measured from here! BACK PIECE: Work rib back and forth over all stitches with 1 garter stitch on each side. When the rib measures 3 cm = 1⅛" and the next row is from the right side, change to circular needle size 5 MM = US 8. Work as follows from the right side: 1 garter stitch, knit 1, purl 1, knit until there are 3 stitches left, purl 1, knit 1, 1 garter stitch. Knit back from the wrong side, continuing the 3 outermost on each side as before. Now begin the pattern, working the first row from the right side as follows: 1 garter stitch, knit 1, purl 1, work A.1A, A.1B 3-4-4-4-5-5 times, A.1C, purl 1, knit 1 and 1 garter stitch. Continue this pattern. When A.1 is finished in height, start to increase for the armholes. The first row is worked as follows from the right side: 1 garter stitch, knit 1, purl 1, work A.2A, A.2B 4-5-5-5-6-6 times, A.2C, purl 1, knit 1 and 1 garter stitch. Continue this pattern. AT THE SAME TIME on the rows marked with arrows in A.2, cast on 4-4-7-7-7-12 stitches for the armholes at the end of these 2 rows = 65-75-81-91-101-111 stitches. The piece measures approx. 16-17-18-20-21-22 cm = 6¼"-6¾"-7"-8"-8¼"-8¾" from the cast-on edge. Lay the piece to one side and work the front piece. LEFT FRONT STRAP (when the garment is worn): Cast on 9-9-11-11-13-13 stitches with double pointed needles size 4 MM = US 6 and DROPS Paris. Work rib back and forth as follows (first row = right side): 1 garter stitch, * knit 1, purl 1 *, work from *-* a total of 3-3-4-4-5-5 times, knit 1, 1 garter stitch. When the strap measures 9-10-11-9-10-11 cm = 3½"-4"-4⅜"-3½"-4"-4⅜", and the last row was worked from the wrong side, lay the strap to one side. RIGHT FRONT STRAP: Cast on and work in the same way as the left strap. When the strap measures 9-10-11-9-10-11 cm = 3½"-4"-4⅜"-3½"-4"-4⅜" and the last row was worked from the right side, place these stitches on circular needle size 4 MM = US 6. Do not cut the strand but cast on 31-41-37-37-43-43 stitches at the end of this row for the neck, then continue over the stitches on the left strap = 49-59-59-59-69-69 stitches. Insert 1 marker – the piece is now measured from here! FRONT PIECE: Work rib back and forth over all stitches with 1 garter stitch on each side. When the rib measures 3 cm = 1⅛" and the next row is from the right side, change to circular needle size 5 MM = US 8. Work as follows from the right side: 1 garter stitch, knit 1, purl 1, knit until there are 3 stitches left, purl 1, knit 1, 1 garter stitch. Knit back from the wrong side, continuing the 3 outermost stitches on each side as before. Now begin the pattern and increase for the armholes, working the first row from the right side as follows: 1 garter stitch, knit 1, purl 1, work A.2A, A.2B 4-5-5-5-6-6 times, A.2C, purl 1, knit 1 and 1 garter stitch. Continue this pattern. AT THE SAME TIME on the rows marked with arrows in A.2, cast on 4-4-7-7-7-12 stitches for the armholes at the end of these 2 rows = 65-75-81-91-101-111 stitches. The piece measures approx. 16-17-18-20-21-22 cm = 6¼"-6¾"-7"-8"-8¼"-8¾" from the cast-on edge. Now work the body as described below. BODY: Place the front and back pieces on the same circular needle size 5 MM = US 8 = 130-150-162-182-202-222 stitches. Insert 1 marker in each side (between the 2 pieces) and allow them to follow your work onwards. Work in the round as follows: SIZES XS/S - M - XXXL: * Purl 2-2-0, work A.3A, A.3B 5-6-10 times, A.3C, purl 2-2-0 *, work from *-* 1 more time. Continue this pattern but on all rounds where you are not purling all stitches knit 2-2-0 stitches on each side of both markers. SIZES L - XL - XXL: * Work A.3A, A.3B 6-7-8 times, A.3C *, work from *-* 1 more time. ALL SIZES: Continue the pattern until the body measures 28-29-30-30-31-32 cm = 11"-11⅜"-11¾"-11¾"-12¼"-12½" from the join, or finish after a half or complete repeat in height. Work A.4 over all stitches. When A.4 is finished, divide at the markers in each side. Place the last 65-75-81-91-101-111 stitches on a thread. Change to circular needle size 4 MM = US 6 and work the other stitches (working from the right side) increasing 8-10-10-12-12-14 stitches evenly spaced - read INCREASE TIP = 73-85-91-103-113-125 stitches. Work the next row as follows from the wrong side: 1 edge stitch in garter stitch, work rib (purl 1, knit 1) until there are 2 stitches left, purl 1, 1 edge stitch in garter stitch. Continue this rib for 4 cm = 1½". Bind off from the right side with knit over knit and purl over purl. The top measures approx. 50-52-54-56-58-60 cm = 19¾"-20½"-21¼"-22"-22¾"-23⅝" from the cast on edge on the straps. Place the other stitches back on circular needle size 4 MM = US 6 and work in the same way as the first piece. ASSEMBLY: Sew the straps together. |
||||||||||||||||||||||
Diagram explanations |
||||||||||||||||||||||
|
||||||||||||||||||||||
|
||||||||||||||||||||||
|
||||||||||||||||||||||
|
||||||||||||||||||||||
|
||||||||||||||||||||||
Have you finished this pattern?Tag your pictures with #dropspattern #stormlighttop or submit them to the #dropsfan gallery. Do you need help with this pattern?You'll find 25 tutorial videos, a Comments/Questions area and more by visiting the pattern on garnstudio.com. © 1982-2025 DROPS Design A/S. We reserve all rights. This document, including all its sub-sections, has copyrights. Read more about what you can do with our patterns at the bottom of each pattern on our site. |
||||||||||||||||||||||


With over 40 years in knitting and crochet design, DROPS Design offers one of the most extensive collections of free patterns on the internet - translated to 17 languages. As of today we count 314 catalogs and 11822 patterns - 11812 of which are translated into English (US/in).
We work hard to bring you the best knitting and crochet have to offer, inspiration and advice as well as great quality yarns at incredible prices! Would you like to use our patterns for other than personal use? You can read what you are allowed to do in the Copyright text at the bottom of all our patterns. Happy crafting!
Post a comment to pattern DROPS 239-34
We would love to hear what you have to say about this pattern!
If you want to leave a question, please make sure you select the correct category in the form below, to speed up the answering process. Required fields are marked *.