
Looking for a yarn?


Comments / Questions (177)
![]() Krystyna wrote:
Krystyna wrote:
Już wiem co robilam źle. Miłego dnia
28.05.2025 - 15:35DROPS Design answered:
Witaj Krysiu, właśnie wysłałam odpowiedź. Pozdrawiamy!
28.05.2025 - 15:40
![]() Krystyna wrote:
Krystyna wrote:
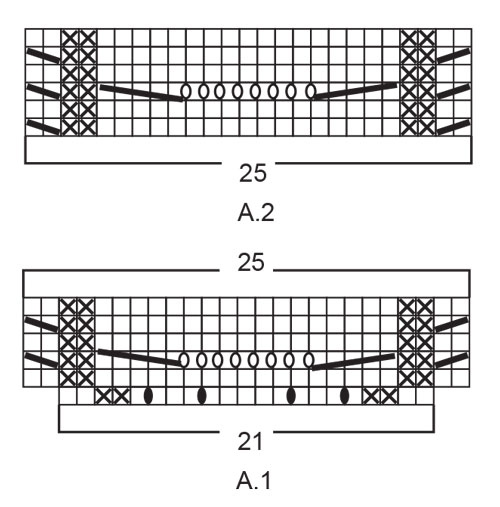
Nie zgadza mi się ilość oczekjuz w 3 rzędzie A1 jest 23 oczka a nie 25. W rzędzie 4 muszę dobierać oczka które dodawałam na reglan, po 1 oczka z każdej strony Sweterek się nie rozszerza Co robię źle
28.05.2025 - 14:27DROPS Design answered:
Witaj Krysiu, może pomyliły Ci się symbole na bokach schematu, które zwykle oznaczają zamknięcie 1 o., mowa o ukośnej kresce w prawo lub w lewo nad 2 oczkami (tj. albo 2 oczka razem na prawo, albo 'zdjąć 1 o. jak do przerobienia na prawo, 1 o.p., przełożyć oczko zdjęte nad przerobionym oczkiem'). W tym wzorze oznaczają one co innego, spójrz do legendy. Tu nie zamykamy oczka i powinno być 25 o. w rzędzie 3. Pozdrawiamy!
28.05.2025 - 15:39
![]() Liselott wrote:
Liselott wrote:
På det 2:a varvet på A1 blir det 4 maskor för mycket.
06.05.2025 - 12:58
![]() Liselott Haglund wrote:
Liselott Haglund wrote:
Mönstret stämmer inte på A1 varv 1 och 2. Det blir maskor över.
05.05.2025 - 22:06DROPS Design answered:
Hej Liselott, jo det stemmer, på varv 1 starter du med 21 masker, tager 4 masker ud og har nu 25 masker. 2r, 2av, 1r, 1oms, 3r, 1oms, 5r, 1oms, 3r, 1oms, 1r, 2av, 2r = 25 m :)
08.05.2025 - 10:30
![]() Randi wrote:
Randi wrote:
Ber om en forklaring til mønster A1. Med 2 økninger til raglan og 4 kast i mønsteret,blir det 27 m. På omgang 2 går ikke dette opp. Fint om jeg/vi kan få en utfyllende forklaring på hvordan man får dette riktig. Takk
02.05.2025 - 23:40DROPS Design answered:
Hei Randi, Alle økninger til raglan er strikket i glattstrikk og kommer i tillegg til mønster A.1. Kastene i A.1 utgjør økningene i selve mønsteret. Da går antall masker i mønsteret opp slik som i diagrammet. God fornøyelse!
05.05.2025 - 06:44
![]() Anke wrote:
Anke wrote:
Sorry, het klopt wel. Ik had niet goed gelezen dat je de markeerder in steek 13 moet plaatsen 🙈.
20.04.2025 - 15:02
![]() Anke wrote:
Anke wrote:
Beste, Ik denk dat de verdeling van de steken bij de pad niet klopt. Volgens mij moet dat 26 steken zijn voor het voor en achterpand in plaats van 24 steken voor maat medium. Met vriendelijke groeten, Anke
20.04.2025 - 14:51
![]() Susann Hinrichsen wrote:
Susann Hinrichsen wrote:
In welcher Größe wurde der abgebildete Pullover gestrickt? Trage normalerweise eine S, aber die Maße erscheinen mir doch etwas sehr schmal, wenn der Pullover locker sitzen soll..
09.04.2025 - 12:11DROPS Design answered:
Liebe Frau Hinrichsen, unsere Modellen sind meistens entweder in S oder in M gestrickt - um Ihre Größe zu wählen, messen Sie einen ähnlichen Pullover, den Sie gerne haben und vergleichen Sie die Maßen mit den in der Maßskizze. Mehr lesen Sie hier. Viel Spaß beim Stricken!
09.04.2025 - 16:10
![]() Helena wrote:
Helena wrote:
Upprepar man hela tiden A2 på ärmen efter att först ha stickat A1?
08.04.2025 - 16:04
![]() Johanna wrote:
Johanna wrote:
Hej! Jag får inte till de på ärmen. Hur kan de bli på varv 3 av A.1 att 2 rm ska bli en fläta plus att jag ska få två am maskor som ska ligga ovanpå varandra? Jag har bara en rm på de varvet, den andra maskan är ju ökningen till raglanen.
05.04.2025 - 11:22DROPS Design answered:
Hej Johanna, raglan udtagningen sker på hver side af A.1, det vil sige at A.1 altid består af de 25 masker du tog ud til :)
08.04.2025 - 14:34
|
|||||||||||||||||||||||||
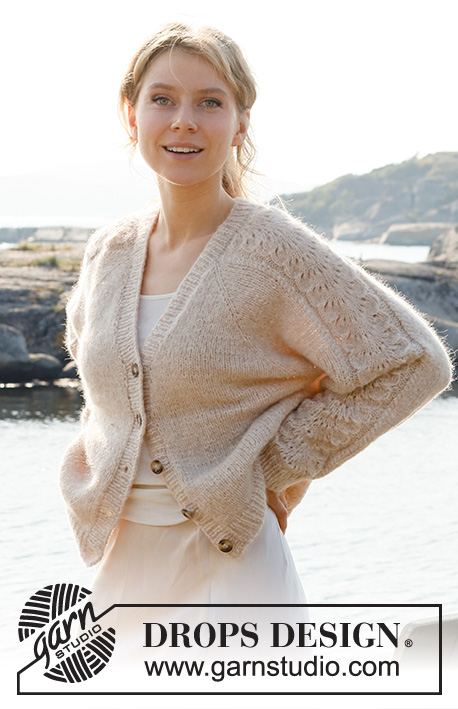
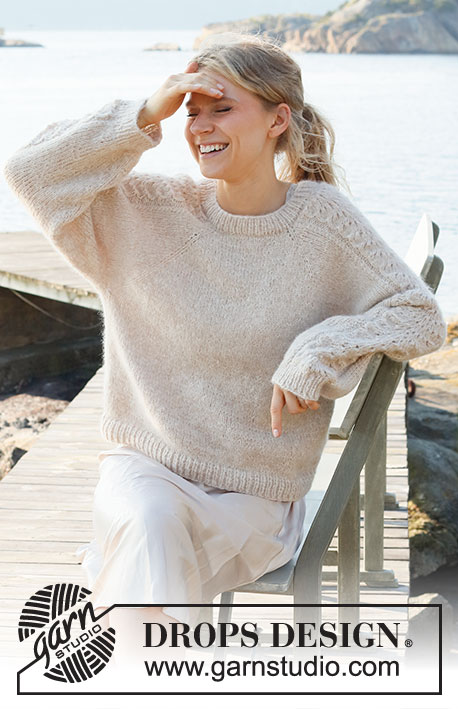
Bronze Summer Sweater#bronzesummersweater |
|||||||||||||||||||||||||
 |
 |
||||||||||||||||||||||||
Knitted sweater in DROPS Air. Piece is knitted top down with raglan and lace pattern on sleeves. Size: S - XXXL
DROPS 221-3 |
|||||||||||||||||||||||||
|
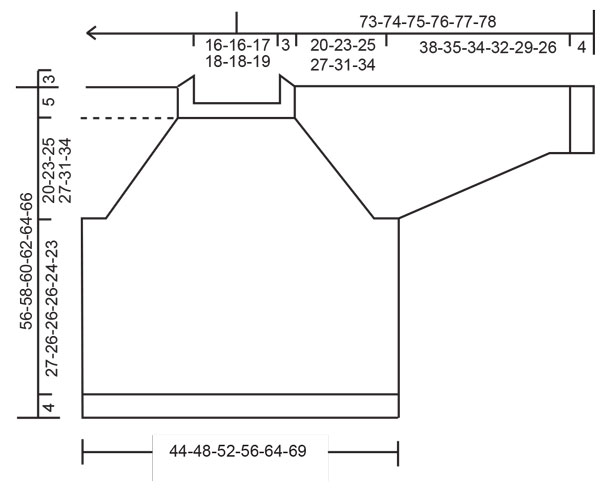
------------------------------------------------------- EXPLANATION FOR THE PATTERN: ------------------------------------------------------- PATTERN: See diagrams A.1 and A.2. RAGLAN: Increase 1 stitch on each side of 1 stitch in stockinette stitch (stitch with marker) in every transition between body and sleeves (= 8 stitches increased on round). Increase 1 stitch by making 1 yarn over. On next round work yarn overs twisted to avoid holes. Then work the new stitches in stockinette stitch. DECREASE TIP (applies to sleeves): Decrease 1 stitch on each side of marker thread as follows: Work until 3 stitches remain before marker thread and knit 2 together, knit 2 (marker thread is between these stitches), slip 1 stitch knitwise, knit 1, pass slipped stitch over stitch worked. BIND-OFF TIP: To avoid a tight bind-off edge you may use a larger needle size. If this also is too tight, work a 1 yarn over after approx. every 4th stitch while binding off (bind off yarn overs as regular stitches). ------------------------------------------------------- START THE PIECE HERE: ------------------------------------------------------- SWEATER - SHORT OVERVIEW OF THE PIECE: Work yoke in the round on circular needle from mid back, top down. AT THE SAME TIME increase for raglan. Now divide yoke for body and sleeves. Body is worked in the round on circular needle, top down. Work sleeves in the round on double pointed needles/short circular needle, top down. YOKE: Cast on 90-94-98-102-106-110 stitches on circular needle size 4 mm = US 6 with Air. Knit 1 round. Work rib (= knit 1/purl 1) over all stitches for 3 cm = 1⅛". Switch to circular size 5 mm = US 8 and insert 1 marker here, now measure piece from here. Insert 4 marker threads in piece as follows (without working the stitches): Count 11-12-13-14-15-16 stitches (= half back piece), insert 1 marker thread in next stitch, count 21 stitches (= sleeve), insert 1 marker thread in next stitch, count 22-24-26-28-30-32 stitches (= front piece), insert 1 marker thread in next stitch, count 21 stitches (= sleeve), insert 1 marker thread in next stitch, 11-12-13-14-15-16 stitches remain on row after last marker thread (= half back piece). Work in stockinette stitch over stitches on front piece and on back piece, and A.1 (= 21 stitches) over stitches on each sleeve, AT THE SAME TIME on first round start increase for RAGLAN in every transition between body and sleeves – read explanation above. Continue increases for raglan every other round. When A.1 has been worked 1 time vertically there are 122-126-130-134-138-142 stitches on round. Continue with A.2 (= 25 stitches) over stitches in A.1 with stockinette stitch over front piece and back piece, and continue with increase for raglan every other round until increase has been done 22-25-27-29-33-36 times in total on each side of the 4 stitches with marker threads = 274-302-322-342-378-406. REMEMBER THE KNITTING GAUGE! After last increase in raglan work without increases until piece measures 20-23-25-27-31-34 cm = 8"-9"-9¾"-10⅝"-12¼"-13⅜" from marker. Work next round as follows: Work the first 34-38-41-44-49-53 stitches (= half back piece), slip the next 69-75-79-83-91-97 stitches on a stitch holder for sleeve, cast on 6-6-6-8-10-12 new stitches on needle (= in the side under sleeve), work the next 68-76-82-88-98-106 stitches (= front piece), slip the next 69-75-79-83-91-97 stitches on a stitch holder (= sleeve), cast on 6-6-6-8-10-12 new stitches on needle (= in the side under sleeve), work the remaining 34-38-41-44-49-53 stitches (= half back piece). NOW MEASURE PIECE FROM HERE! BODY: = 148-164-176-192-216-236 stitches. Continue in stockinette stitch until piece measures 27-26-26-26-24-23 cm = 10⅝"-10¼"-10¼"-10¼"-9½"-9" from division. Switch to circular needle size 4 mm = US 6. Work rib (= purl 1/knit 1) over all stitches. Continue rib like this for 4 cm = 1½". Loosely bind off with knit over knit and purl over purl, read BIND-OFF TIP. Sweater measures approx. 56-58-60-62-64-66 cm = 22"-22¾"-23⅝"-24⅜"-25¼"-26" from shoulder. SLEEVE: Slip the 69-75-79-83-91-97 stitches from stitch holder in one side of piece on a short circular needle/double pointed needles size 5 mm = US 8 and pick in addition up 1 stitch in each of the 6-6-6-8-10-12 stitches cast on in the side under sleeve = 75-81-85-91-101-109 stitches. Insert 1 marker thread in the middle of the 6-6-6-8-10-12 stitches under sleeve and move the marker thread upwards when working, it is used for decrease later. Begin round at the marker thread and continue with A.2 and stockinette stitch in the round. When piece measures 3 cm = 1⅛" from division, decrease 2 stitches mid under sleeve - read DECREASE TIP. Decrease like this every 3½-3-2-1½-1-1 cm = 1¼"-1⅛"-¾"-½"-⅜"-⅜" 10-11-13-16-19-21 times in total = 55-59-59-59-63-67 stitches. Continue until piece measures 38-35-34-32-29-26 cm = 15"-13¾"-13⅜"-12½"-11⅜"-10¼" from division - or desired length (shorter measurements in the larger sizes because of longer yoke). Work 1 round while decreasing 11 stitches evenly over stitches in A.2 = 44-48-48-48-52-56 stitches. Switch to double pointed needles size 4 mm = US 6 and work rib in the round = knit 1/purl 1 for 4 cm = 1½". Bind off with knit over knit and purl over purl (to avoid a tight bind-off edge use double pointed needles size 4 mm = US 6). Work the other sleeve the same way. |
|||||||||||||||||||||||||
Diagram explanations |
|||||||||||||||||||||||||
|
|||||||||||||||||||||||||
|
|||||||||||||||||||||||||
|
|||||||||||||||||||||||||
Have you finished this pattern?Tag your pictures with #dropspattern #bronzesummersweater or submit them to the #dropsfan gallery. Do you need help with this pattern?You'll find 30 tutorial videos, a Comments/Questions area and more by visiting the pattern on garnstudio.com. © 1982-2025 DROPS Design A/S. We reserve all rights. This document, including all its sub-sections, has copyrights. Read more about what you can do with our patterns at the bottom of each pattern on our site. |
|||||||||||||||||||||||||


With over 40 years in knitting and crochet design, DROPS Design offers one of the most extensive collections of free patterns on the internet - translated to 17 languages. As of today we count 314 catalogs and 11822 patterns - 11812 of which are translated into English (US/in).
We work hard to bring you the best knitting and crochet have to offer, inspiration and advice as well as great quality yarns at incredible prices! Would you like to use our patterns for other than personal use? You can read what you are allowed to do in the Copyright text at the bottom of all our patterns. Happy crafting!
Post a comment to pattern DROPS 221-3
We would love to hear what you have to say about this pattern!
If you want to leave a question, please make sure you select the correct category in the form below, to speed up the answering process. Required fields are marked *.