
Popular categories
Looking for a yarn?


Comments / Questions (161)
![]() Pernille Nymann wrote:
Pernille Nymann wrote:
Hvorfra måles arbejdet? Det svinger med 2 cm fra opslåningskant alt efter om man måler fra yderkanten eller midt på arbejdet? Pernille
18.02.2021 - 21:02DROPS Design answered:
Hej igen Pernille, du kan måle midt på arbejdet :)
19.02.2021 - 14:14
![]() Pernille Nymann wrote:
Pernille Nymann wrote:
Strikker str 0/1 mdr. Der står der skal lukkes af til knaphul (2) på efter 2-8-14-20 og 26 cm. Er det mon rigtigt? Umiddelbart er stykket med knaphuls kanten noget længere. Der står strik til stykket måler 45 cm ca 1 cm fra sidste knaphul? Vh Pernille
17.02.2021 - 21:40DROPS Design answered:
Hej Pernille, ja vi har ikke hørt at knaphullerne skal være placeret fejl. Men du må naturligvis gerne flytte dem som du synes passer dig bedst. God fornøjelse!
23.02.2021 - 10:01
![]() Nancy Defoe wrote:
Nancy Defoe wrote:
Can I use 2 needles instead of the round to knit this.
12.02.2021 - 09:04DROPS Design answered:
Dear Nancy, yes you can, but you need to convert the pattern a little bit. Here is a DROPS lesson that will help you , and explain how to do that. Happy Knitting!
12.02.2021 - 11:19
![]() Sarah Dalle wrote:
Sarah Dalle wrote:
Thank you for the clarification! If it is reverse stockinette then there is a mistake in the pattern: after the increase (A.2), it says purl 1 row from the wrong side, but it should be knit for the 16 stitches in the middle...
12.02.2021 - 00:11DROPS Design answered:
Dear Mrs Dalle, the first row in A.2 is worked from RS (= knitted from RS), then you work next row (= from WS) purling all stitches with 1 edge st on each side. Then start working diagrams. Happy knitting!
12.02.2021 - 08:09
![]() Sarah Dalle wrote:
Sarah Dalle wrote:
For the front piece, size 6-9 months, it is not clear to me how I am supposed to knit the 16 stitches in between the A.6 pattern. Do i purl both on the right and wrong sides? In the photo it looks like it is reverse stockinette (purl right side, knit wrong sides). Thanks
11.02.2021 - 09:27DROPS Design answered:
Dear Mrs Dalle, correc,t the 16 stitches worked Purled from RS are worked in reversed stockinette (= purl from right side and knit from wrong side). Happy knitting!
11.02.2021 - 10:53
![]() Vero wrote:
Vero wrote:
De casualidad tendrá un vídeo del diseño paso a paso para realizarlo
28.01.2021 - 21:12
![]() Claudia wrote:
Claudia wrote:
Hallo, ich habe eine Frage bzgl der Blende mit Knopflöchern auf dem Vorderteil: Auf den Fotos und auch auf den Abbildung sieht es so aus, also ob die Blende mit den Kopflöchern auf dem linken Vorderteil gestrickt wird. In der Anleitung wird diese aber auf dem rechten Vorderteil gestrick. Was heißt rechtes bzw linkes Vorderteil, also von wo aus betrachtet?
01.01.2021 - 18:24DROPS Design answered:
Liebe Claudia, die Knopflöcher können Sie entweder auf die linke oder die rechte Blende stricken, wie Sie es möchten. Viel Spaß beim stricken!
04.01.2021 - 14:32
![]() A K wrote:
A K wrote:
Hei, suomenkielisessä ohjeessa neuvotaan etukappaleen keskisilmukat neulomaan sileää neuletta. Tässä näyttäisi olevan virhe - kuvassa ja norjankielisessä ohjeessä vaikuttaisivat nämä kuvioiden välissä olevat silmukat olevan neulottu nurjilla silmukoilla.
09.12.2020 - 11:09DROPS Design answered:
Hei, tähän ohjeeseen on tehty korjaus. Etukappaleen keskimmäiset silmukat neulotaan nurin.
24.03.2021 - 16:54
![]() Shannon wrote:
Shannon wrote:
I am just starting the back piece for size 1/3 months. I have cast on 68 sts and worked them for 4cm. At this point the front piece increased by 14 sts for a total of 80 sts. Is it correct that the back piece stays 68 sts until it is time to add on for the sleeves? Thank you.
28.11.2020 - 02:55DROPS Design answered:
Dear Shannon, yes, it's correct, because the increases in the front piece are for the cables and there are no cables in the back piece. Happy knitting!
29.11.2020 - 19:15
![]() Céline wrote:
Céline wrote:
Me066-by taille 6/9 comment je fais pour augmenter les mailles de la manche a la fin de chaque rang sur l'endroit 3 fois 7 mailles et une fois 17 mailles sur le coté droit merci
23.11.2020 - 20:47DROPS Design answered:
Bonjour Céline, cette vidéo montre comment monter de nouvelles mailles en fin de rang, sur l'envers dans la vidéo, mais quand vous devez monter ces mailles en fin de rang sur l'endroit, ce sera la même technique. Bon tricot!
24.11.2020 - 09:27
|
|||||||||||||||||||
Cable Snooze#cablesnoozebuntingbag |
|||||||||||||||||||
 |
 |
||||||||||||||||||
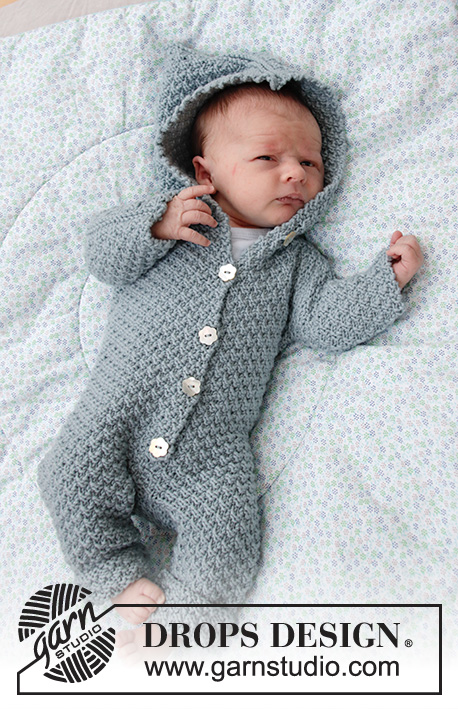
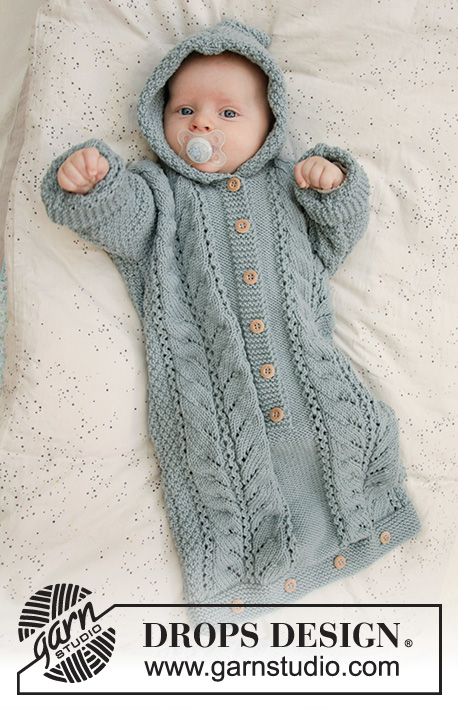
Knitted bag for babies in DROPS Merino Extra Fine. The piece is worked with lace pattern, double moss stitch and hood. Sizes premature – 2 years.
DROPS Baby 33-7 |
|||||||||||||||||||
|
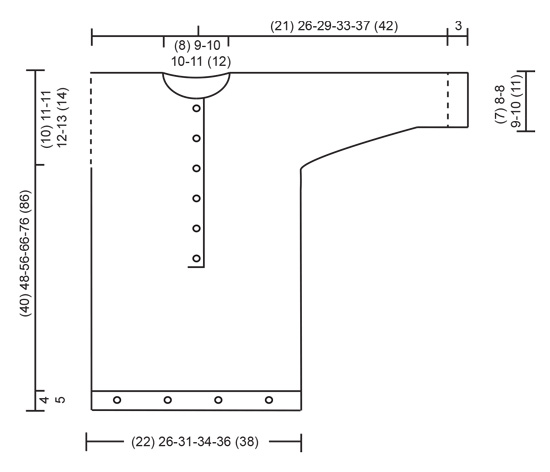
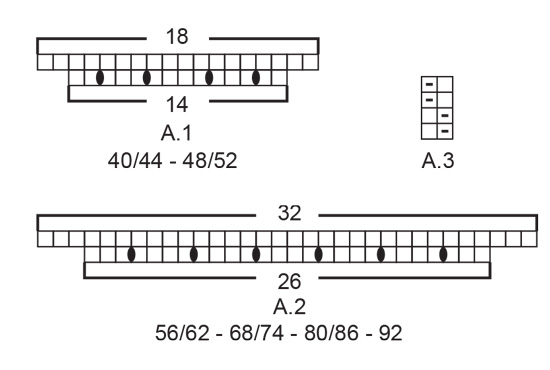
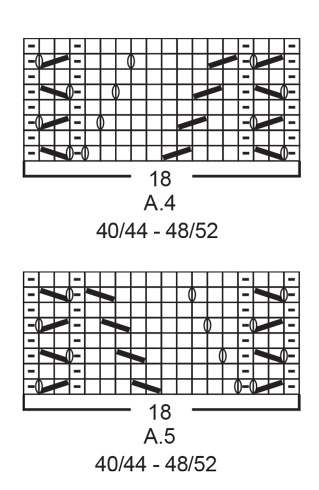
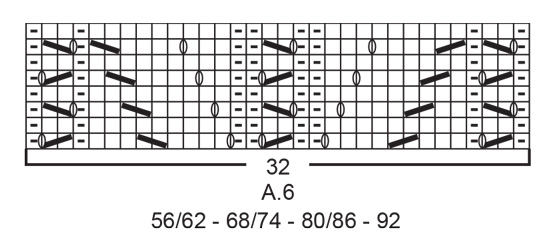
EXPLANATIONS FOR THE PATTERN: ------------------------------------------------------- RIDGE/GARTER STITCH (worked back and forth): 1 ridge = Knit 2 rows. PATTERN: Sizes (<0) 0/1 month: See diagrams A.1, A.3, A.4 and A.5. Sizes 1/3 - 6/9 - 12/18 months (2) years: See diagrams A.2, A.3 and A.6. The diagrams show all the rows in the pattern seen from the right side. BUTTONHOLE-1 (for bottom of bag): 1 BUTTONHOLE = knit 2 together, make 1 yarn over. On the next round knit the yarn over to leave a hole. The other (4) 4-4-5-5 (5) buttonholes are worked evenly spaced with approx. (4½) 5-6-5½-6 (6) cm between each. BUTTONHOLE-2 (for band mid front): Work buttonholes on the right band working from the right side. 1 BUTTONHOLE = knit together the 3rd and 4th stitch from the edge, make 1 yarn over. On the next row (wrong side) knit the yarn over to leave a hole. Work buttonholes when the band measures (measured from the marker): (<0) months: 2, 8, 14 and 20 cm 0/1 month: 2, 8, 14, 20 and 26 cm 1/3 months: 2, 7, 13, 18, 24 and 29 cm 6/9 months: 2, 9, 16, 23, 29 and 35 cm 12/18 months: 2, 8, 14, 20, 26, 32 and 38 cm (2) years: 2, 8, 15, 21, 28, 34 and 41 cm ------------------------------------------------------- START THE PIECE HERE: ------------------------------------------------------- BAG - SHORT OVERVIEW OF THE PIECE: The piece is worked back and forth with circular needle in 2 parts. You cast on stitches in each side for the sleeves. The piece is sewn together on the shoulders/mid top of sleeves and under sleeves. You work a hood to finish. FRONT PIECE: Cast on (48) 56-68-74-78 (82) stitches (including 1 edge stitch in each side) with circular needle size 4 mm and Merino Extra Fine. Work GARTER STITCH – read description above. When the piece measures (2) 2-2-2½-2½ (2½) cm work (4) 4-4-5-5 (5) buttonholes evenly spaced – read BUTTONHOLE-1. Continue with garter stitch until the piece measures (4) 4-4-5-5 (5) cm. The next row is worked as follows from the right side: SIZES (<0) 0/1 MONTH: 1 edge stitch in garter stitch, purl (2) 6 stitches, A.1 (= 14 stitches which increase to 18 stitches), purl (14) 14 stitches, A.1 (= 14 stitches which increase to 18 stitches), purl (2) 6 stitches and finish with 1 edge stitch in garter stitch = (56) 64 stitches on the row. Purl 1 row from the wrong side (edge stitches worked in garter stitch). The next row is worked as follows from the right side: 1 edge stitch in garter stitch, A.3 over the first (2) 6 stitches, A.4 (= 18 stitches), purl (14) 14, A.5 (= 18 stitches), A.3 over the next (2) 6 stitches and finish with 1 edge stitch in garter stitch. Then work as described under ALL SIZES! SIZES 1/3 - 6/9 - 12/18 MONTHS (2) YEARS: 1 edge stitch in garter stitch, purl 0-2-4 (6) stitches, work A.2 (= 26 stitches which increase to 32 stitches), purl 14-16-16 (16) stitches, A.2 (= 26 stitches which increase to 32 stitches), purl 0-2-4 (6) and finish with 1 edge stitch in garter stitch = 80-86-90 (94) stitches. Purl 1 row from the wrong side (edge stitches worked in garter stitch). The next row is worked as follows from the right side: 1 edge stitch in garter stitch, work A.3 over the first 0-2-4 (6) stitches, A.6 (= 32 stitches), purl 14-16-16 (16) stitches, A.6 (= 32 stitches), A.3 over the next 0-2-4 (6) stitches and finish with 1 edge stitch in garter stitch. Then work as described under ALL SIZES! ALL SIZES: Continue this pattern. REMEMBER THE KNITTING TENSION! When the piece measures (16) 18-22-26-32 (38) cm – adjust so that the next row is worked from the right side, divide the piece mid front and each side is finished separately. Cut the strand. Place the first (25) 29-37-40-42 (44) stitches, seen from the right side, on 1 thread (= left front piece). There are now (31) 35-43-46-48 (50) stitches left on needle for right front piece. RIGHT FRONT PIECE: = (31) 35-43-46-48 (50) stitches. Insert 1 marker in the piece - will be used to measure the positions of the buttonholes. Start from the right side and continue pattern as before, but the outermost 6 stitches towards mid front are worked in garter stitch (= band). Work buttonholes on the right band – read BUTTONHOLE-2. AT THE SAME TIME when the piece measures (30) 37-45-54-63 (72) cm from the cast-on edge cast on stitches for the sleeve at the end of each row from the right side (i.e. towards the side) as follows: Cast on (4) 6-6-7-9 (12) stitches a total of 3 times and then (14) 15-16-17-18 (18) stitches 1 time = (57) 68-77-84-93 (104) stitches on the needle (the new stitches are worked into A.3 as you go). When all stitches are cast on continue with pattern as before, but the outermost 12 stitches on the sleeve are worked in garter stitch (= turn-up). Continue working until the piece measures (37) 45-52-62-71 (81) cm. You should now have worked approx. 1 cm after the last buttonhole on the band, but adjust so that the next row is worked from the right side. On the next row (right side) place the outermost (7) 8-9-10-10 (11) stitches towards mid front on 1 thread for neck, but to avoid having to cut the strand, work the stitches before placing them on the thread. Continue the pattern as before. Then cast off for the neck at the beginning of each row from the neck as follows: Cast off 2 stitches 1 time and then 1 stitch (2) 2-2-2-3 (3) times = (46) 56-64-70-78 (88) stitches left on needle for shoulder/sleeve. Continue the pattern as before until the piece measures (39) 47-55-65-75 (85) cm, but adjust so that the next row is worked from the right side. Knit 1 row from the right side and at the same time decrease (4) 4-6-6-6 (6) stitches evenly over A.5/A.6 = (42) 52-58-64-72 (82) stitches on the row. Knit 1 row from the wrong side. Cast off with knit from the right side, but make sure that the cast-off edge is not tight. The piece measures approx. (40) 48-56-66-76 (86) cm from the cast-on edge. Work the left front piece as described below. LEFT FRONT PIECE: Place the (25) 29-37-40-42 (44) stitches from the strand back on the circular needle. Start from the right side and continue pattern as before. AT THE SAME TIME, at the end of the first row, knit up 6 new stitches behind the right band, i.e. knit up 1 stitch in each of the 6 band stitches = (31) 35-43-46-48 (50) stitches on needle. Continue pattern as before, but the outermost 6 stitches towards mid front are worked in garter stitch (= band – NOTE: do not work buttonholes on left band). AT THE SAME TIME when the piece measures (30) 37-45-54-63 (72) cm cast on new stitches for the sleeve at the end of each row from the wrong side (i.e. towards the side) as follows: Cast on (4) 6-6-7-9 (12) stitches a total of 3 times and then (14) 15-16-17-18 (18) stitches 1 time = (57) 68-77-84-93 (104) stitches on the needle (the new stitches are worked into A.3 as you go). When all stitches are cast on continue pattern as before, but the outermost 12 stitches on the sleeve are worked in garter stitch = turn up). Continue until the piece measures approx. (37) 45-52-62-71 (81) cm - adjust to match the right front piece and so that the next row is worked from the wrong side. On the next row (wrong side) place the outermost (7) 8-9-10-10 (11) stitches towards mid front on a thread for the neck, but to avoid having to cut the strand, work the stitches before placing them on the thread. Continue the pattern as before. Then cast off for the neck at the beginning of each row from the neck as follows: Cast off 2 stitches 1 time and then 1 stitch (2) 2-2-2-3 (3) times = (46) 56-64-70-78 (88) stitches left on shoulder/sleeve. Continue pattern as before until the piece measures (39) 47-55-65-75 (85) cm, but adjust so that the next row is from the right side. Knit 1 row from the right side and decrease at the same time (4) 4-6-6-6 (6) stitches evenly over A.4/A.6 = (42) 52-58-64-72 (82) stitches on needle. Knit 1 row from the wrong side. Cast off with knit from the right side, but make sure that the cast-off edge is not tight. The piece measures approx. (40) 48-56-66-76 (86) cm. Work the back piece as described below. BACK PIECE: Cast on (48) 56-68-74-78 (82) stitches and work garter stitch for (4) 4-4-5-5 (5) cm. Work 2 rows stocking stitch with 1 edge stitch in garter stitch in each side. The next row is worked as follows from the right side: 1 edge stitch in garter stitch, work A.3 until there is 1 stitch left on the row and finish with 1 edge stitch in garter stitch. Continue this pattern. When the piece measures (30) 37-45-54-63 (72) cm cast on new stitches for the sleeves at the end of each row on each side as follows: Cast on (4) 6-6-7-9 (12) stitches a total of 3 times on each side and then (14) 15-16-17-18 (18) stitches 1 time on each side = (100) 122-136-150-168 (190) stitches on the row (the new stitches are worked into A.3 as you go). When all stitches are cast on continue with A.3 as before, but the outermost 12 stitches on both sleeves are worked in garter stitch (= turn up). When the piece measures (38) 46-54-64-74 (84) cm cast off the middle (12) 14-16-18-20 (22) stitches for neck. Then cast off 2 stitches on the next row from the neck = (42) 52-58-64-72 (82) stitches left on needle for shoulder/sleeve. Continue pattern as before until there is 1 cm left before the piece measures (40) 48-56-66-76 (86) cm, but adjust so that the next row is worked from the right side. Knit 1 row from the right side and knit 1 row from the wrong side. Cast off with knit from the right side, but make sure that the cast-off edge is not tight. Work the other shoulder in the same way. ASSEMBLY: Sew shoulder/top of sleeve seams inside the cast-off edge. Sew under-sleeve seams and side seams inside the 1 edge stitch. Turn up the bottom 3 cm on each sleeve and fasten with a couple of small stitches on each side. Sew buttons onto bottom of bag (the buttons are sewn along the middle of the garter stitch edge on the back piece but on the wrong side so that they are buttoned through the buttonholes on the front piece). Sew the remaining buttons to the left band. HOOD: Knit up from the right side approx. 52 to 72 stitches around the neck (including the stitches from the threads in front) with circular needle size 4 mm and Merino Extra Fine. Knit 1 row from the wrong side. Then knit 1 row from the right side, where you increase evenly on row until you have a total of (68) 76-84-88-92 (96) stitches. Work A.3 back and forth over all stitches - AT THE SAME TIME cast on 6 new stitches at the end of the next 2 rows for the folding edge = (80) 88-96-100-104 (108) stitches. Continue with A.3 over all stitches until the hood measures approx. (18) 19-20-21-22 (23) cm. Knit 1 row from the right side and knit 1 row from the wrong side. Cast off with knit from the right side. Fold the hood double and sew together at the top, inside the cast-off edge. Fold the 6 outermost stitches on each side to the right side and sew down to the neck with small, neat stitches. |
|||||||||||||||||||
Diagram explanations |
|||||||||||||||||||
|
|||||||||||||||||||
 |
|||||||||||||||||||
 |
|||||||||||||||||||
 |
|||||||||||||||||||
 |
|||||||||||||||||||
Have you finished this pattern?Tag your pictures with #dropspattern #cablesnoozebuntingbag or submit them to the #dropsfan gallery. Do you need help with this pattern?You'll find 27 tutorial videos, a Comments/Questions area and more by visiting the pattern on garnstudio.com. © 1982-2026 DROPS Design A/S. We reserve all rights. This document, including all its sub-sections, has copyrights. Read more about what you can do with our patterns at the bottom of each pattern on our site. |
|||||||||||||||||||


With over 40 years in knitting and crochet design, DROPS Design offers one of the most extensive collections of free patterns on the internet - translated to 17 languages. As of today we count 324 catalogues and 12245 patterns translated into English (UK/cm). 12245
We work hard to bring you the best knitting and crochet have to offer, inspiration and advice as well as great quality yarns at incredible prices! Would you like to use our patterns for other than personal use? You can read what you are allowed to do in the Copyright text at the bottom of all our patterns. Happy crafting!
Post a comment to pattern DROPS Baby 33-7
We would love to hear what you have to say about this pattern!
If you want to leave a question, please make sure you select the correct category in the form below, to speed up the answering process. Required fields are marked *.