
Popular categories
Looking for a yarn?


Comments / Questions (72)
![]() Pat Marshall wrote:
Pat Marshall wrote:
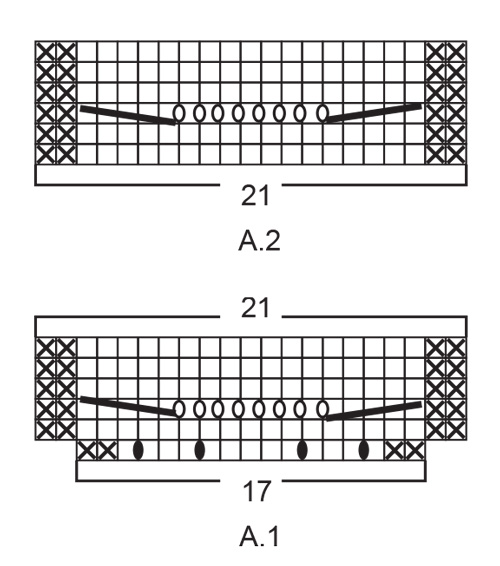
Hello, I am confused about when I am to apply A.1 and A.2 "When A.1 have been completed in height, work A2. over A.1. Repeat A.2 in height to finish length". I need more explanation. I did A.1 and then started to repeat it, but I do not have the pattern as shown. Do I work the 6 pattern rows of A.1 and then the 6 pattern rows of A.2?
11.11.2020 - 16:53DROPS Design answered:
Hi Pat, Yes, A.1 is only worked once in height (i.e. 6 rows), then you continue repeating A.2 in height until the jumper is finished. Happy knitting!
12.11.2020 - 08:25
![]() Erin Colin wrote:
Erin Colin wrote:
Hi there! I am having some trouble getting started on the sleeves. I have placed my 43 sleeve stitches back on my needles. The next part confuses me though. The instructions say to knit up 6 stitches in the undersleeve, but then to place a marker thread in the middle of those 6 stitches and start the round there. I'm confused as to how I start the round in the middle of the new stitches if my working yarn is at the end of those 6 new stitches? Maybe I am overthinking this? Thank You!
06.11.2020 - 06:01DROPS Design answered:
Dear Mrs Colin, this lesson shows how to work a jumper top down and from picture 18B how to pick up sts mid under sleeve - just insert a marker in the middle of the 6 new stitches and consider the round starts after the marker. Hope this helps Happy Happy knitting!
06.11.2020 - 08:39
![]() Marcia Turk-Mcneill wrote:
Marcia Turk-Mcneill wrote:
Sorry, I’m still confused about the a21 diagram for the lace on the front of this sweater, after I decrease, I make 1 yarn over and then knit 7 and then one more yarn over? On the diagram, it looks as though I should do a yarn over every other knit stitch, but that makes the lace panel very wide. Is this correct? Should the lace section stay to 21 stitches or increase as the sweater is made. Is there a written out version of the diagram?
21.10.2020 - 08:19DROPS Design answered:
Dear Mrs Turk-Mcneill, work the 3rd row in A.1/A.2 like this: P2, knit 5 stitches together (= decrease 4 sts), *YO, K1*, work from *-* a total of 7 times, YO (= there are now 8 yarn overs), knit 5 stitches together, (= decrease 4 sts), P2 = you decreased 4 sts 2 times and increased 8 sts = number of stitches is still the same. This means you still have 21 sts for these diagrams. Hope this helps. Happy knitting!
21.10.2020 - 08:52
![]() Marcia Turk-Mcneill wrote:
Marcia Turk-Mcneill wrote:
Hello! I’m a bit confused about pattern a.2. For the increases (ovals) how many stitches should be in between the ovals? I feel like I should only increase by 8 stitches, but knitting every other stitch adds too many.
21.10.2020 - 07:45DROPS Design answered:
Hi Marcia, You make 1 yarn over, then knit 1 x 7 and then finish with 1 yarn over. This increases 8 stitches. Happy knitting!
21.10.2020 - 07:47
![]() Rene Gould wrote:
Rene Gould wrote:
I'm sorry I forgot to tell you which pattern I'm doing it's the clover sweater thank you
18.09.2020 - 01:09DROPS Design answered:
See answer below :)
18.09.2020 - 08:40
![]() Rene Gould wrote:
Rene Gould wrote:
Hi I can't use double pointed needles is there another way I can use for sleeves etc thank you
18.09.2020 - 01:06DROPS Design answered:
Dear Mrs Gould, sure you can use a short circular needle (if it's not too long in the size), or use the longer circular needle and the magic loop technique . Happy knitting!
18.09.2020 - 08:40
![]() Joaquim wrote:
Joaquim wrote:
Bonjour, j’aimerais tricoter ce modèle en 14 et 16 ans Quel nombre de mailles pour commencer l’empiètement puis en largeur et hauteur pour dos et devant et les manches Merci de votre réponse
14.09.2020 - 09:08DROPS Design answered:
Bonjour Mme Joaquim, nous ne sommes malheureusement pas en mesure de pouvoir adapter chacun de nos modèles à chaque demande ; merci de bien vouloir contacter votre magasin ou bien un forum spécialisé pour toute assistance complémentaire. Merci pour votre compréhension. Bon tricot!
14.09.2020 - 09:47
![]() Anna-Karin Allansson wrote:
Anna-Karin Allansson wrote:
Jag stickar 7/8 år men det blir inte 200 efter 16 ökningar. Ska framstycket vara 4 maskor mer än bakstycket?
21.08.2020 - 19:39
![]() Jaypatto wrote:
Jaypatto wrote:
G’day, thanks for a lovely pattern. The front looks complicated but it’s very easy! My question, there are an odd number of stitches specified for the sleeve before the rib band starts. Because the band is knitted in the round, shouldn’t this number be even as it was for both the neck and bottom band?
18.07.2020 - 05:31DROPS Design answered:
Dear Jaypatto, you can increase only 1 stitch or 1 more stitch (as prefered) to get an even number of stitches so that the rib will fit in the round. Happy knitting!
20.07.2020 - 09:13
![]() Ingrid Engkrog wrote:
Ingrid Engkrog wrote:
Holder på å strikke genser str. 7/8 år...men forstår ikke hvorfor det skal økes på omgangen nede før en strikker bråtet...skulle tro det var omvendt, at en skal felle noen masker...men det holder vel å bruke å bruke tynnere pinne...har jeg misforstått noe her eller ?
12.03.2020 - 10:42DROPS Design answered:
Hei Ingrid. I mange oppskrifter, gjerne eldre oppskrifter, skulle vrangborden være stram/strammere enn selve plagget. Nå ønsker man heller at vrangborden skal falle pent sammen med resten av plagget og da økes det masker før vrangborden. Strikkes det f.eks en vrangbord med 2 rett/2 vrang vil det trekkes seg sammen litt, slik det blir en penere overgang mellom plagg og vrangbord. God Fornøyelse!
16.03.2020 - 12:21
|
|||||||||||||||||||
Clover#cloversweater |
|||||||||||||||||||
 |
 |
||||||||||||||||||
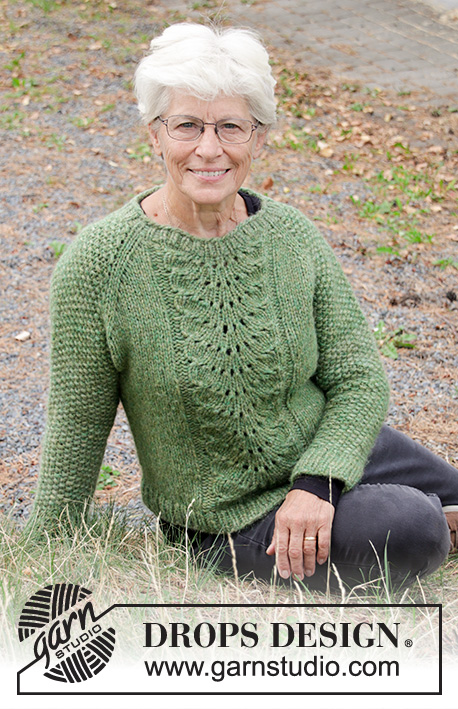
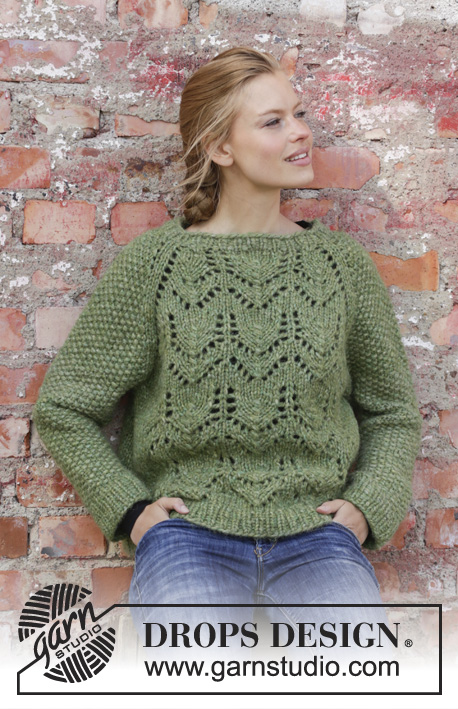
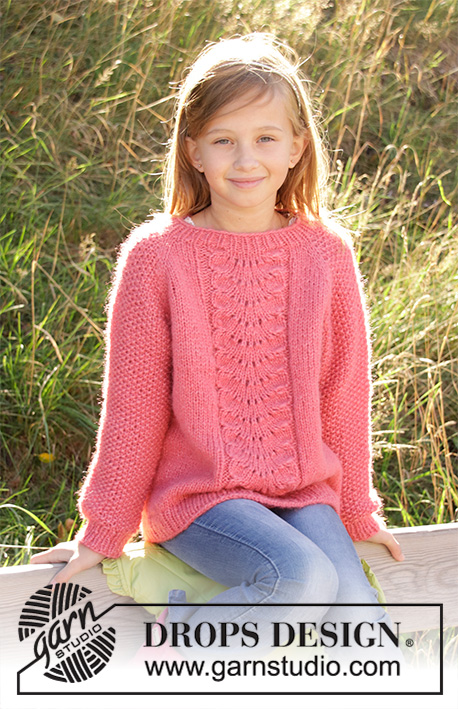
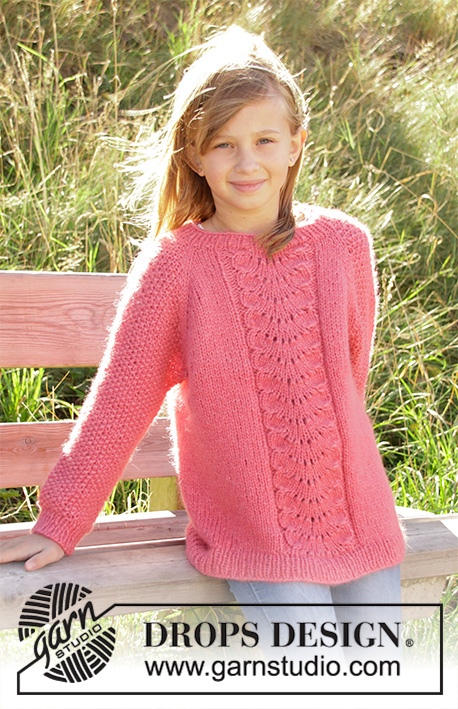
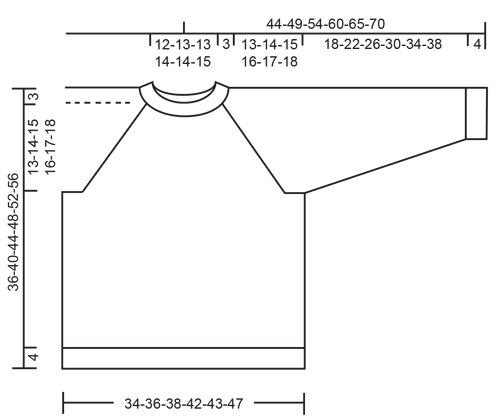
Knitted jumper for children in DROPS Air or DROPS Paris. The piece is worked top down with lace pattern and raglan. Sizes 2-12 years.
DROPS Children 34-4 |
|||||||||||||||||||
|
EXPLANATIONS FOR THE PATTERN: ------------------------------------------------------- PATTERN: See diagrams A.1 and A.2. The diagrams show all the rows in the pattern seen from the right side. INCREASE/DECREASE TIP (evenly spaced): To work out how to increase/decrease evenly, count the total number of stitches on the needle (e.g. 54 stitches) and divide by the number of increases/decreases to be made (e.g. 6) = 9. In this example, increase by making 1 yarn over after each 9th stitch. On the next round work the yarn overs twisted to avoid holes. When decreasing, knit together each 8th and 9th stitch (in this example). MOSS STITCH: ROUND 1: * Knit 1, Purl 1 *, work from *-*. ROUND 2: Knit over purl and purl over knit. Repeat round 2 onwards. RAGLAN: Increase 1 stitch on each side of the 2 knitted stitches in each transition between body and sleeves (= 8 stitches increased on the round). Increase 1 stitch by making 1 yarn over. On the next round work the yarn overs twisted to avoid holes. Then work the new stitches in moss stitch on the sleeves and stocking stitch on the front and back pieces. DECREASE TIP (for sleeves): Decrease 1 stitch on each side of the marker thread as follows: Work until there is 1 stitch left before the marker thread, purl 3 together. In this way, 3 stitches become 1 stitch; then move the marker thread to the stitch before this stitch. ------------------------------------------------------- START THE PIECE HERE: ------------------------------------------------------- JUMPER - SHORT OVERVIEW OF THE PIECE: The piece is worked in the round with circular needle, top down. After the yoke the body is continued in the round with circular needle. The sleeves are worked in the round with short circular needle/double pointed needles. YOKE Cast on 54-54-58-62-64-68 stitches with circular needle size 4.5 mm and Air or Paris. Knit 1 round. Then work rib in the round (= knit 1 / purl 1) for 3 cm. Knit 1 round where you increase 6-6-6-6-8-16 stitches evenly – read INCREASE/DECREASE TIP = 60-60-64-68-72-84 stitches. Change to circular needle size 5.5 mm. Insert 1 marker here - THE PIECE IS NOW MEASURED FROM HERE! Now insert 4 marker threads (without working the stitches) as follows: Insert 1 marker thread at the beginning of the round (= in transition between sleeve and back piece), 1 marker thread after 21-21-23-25-25-31 stitches (= back piece), 1 marker thread after 9-9-9-9-11-11 more stitches (= sleeve), 1 marker thread after 21-21-23-25-25-31 more stitches (= front piece). There are 9-9-9-9-11-11 stitches left to the first marker thread (= sleeve). The next round is worked as follows: The round starts at the first marker thread, in the transition between sleeve and back piece. Knit 1, make 1 yarn over, work 19-19-21-23-23-29 stitches in stocking stitch (= back piece), 1 yarn over, knit 2 (marker thread sits in the middle of these 2 stitches), 1 yarn over, work 7-7-7-7-9-9 stitches in MOSS STITCH – see description above (= sleeve), 1 yarn over, knit 2 (marker thread sits in the middle of these 2 stitches), 1 yarn over, work 1-1-2-3-3-6 stitches in stocking stitch, work A.1 (= 17 stitches = front piece), 1-1-2-3-3-6 stitches in stocking stitch, 1 yarn over, knit 2 (marker thread sits in the middle of these 2 stitches), 1 yarn over, work 7-7-7-7-9-9 stitches in moss stitch (= sleeve), 1 yarn over and knit 1. REMEMBER THE KNITTING TENSION! The first increase to RAGLAN – read description above, is now finished (= 8 stitches increased on the round). Continue with this pattern and increase to raglan every 2nd round a total of 13-14-15-16-17-17 times (including the first increase described above). NOTE: When A.1 has been completed in height, work A.2 (= 21 stitches) over A.1. Repeat A.2 in height to finished length. After the last increase to raglan there are 168-176-188-200-212-224 stitches on the needle. Continue with pattern as before, but without increasing, until the piece measures 13-14-15-16-17-18 cm from the marker at the beginning of the yoke. The next round is worked in pattern and stocking stitch as before, but start the round 1 stitch earlier (before the 2 stitches in stocking stitch between sleeve and back piece). Work stocking stitch over 49-51-55-59-61-67 stitches (= back piece), place the next 33-35-37-39-43-43 stitches on a thread (= sleeve), cast on 4-4-4-6-6-6 new stitches on the needle (= in side under sleeve), continue with stocking stitch and pattern over the next 53-55-59-63-65-71 stitches (= front piece), place the next 33-35-37-39-43-43 stitches on a thread (= the other sleeve), cast on 4-4-4-6-6-6 new stitches on the needle (= in side under sleeve). Body and sleeves are finished separately. THE PIECE IS NOW MEASURED FROM HERE! BODY: There are now 110-114-122-134-138-150 stitches on the needle. Continue with stocking stitch and pattern A.2 in the round as before. When the piece measures 16-19-22-25-28-31 cm from the division knit 1 round where you increase 10-12-14-16-18-20 stitches evenly on round = 120-126-136-150-156-170 stitches. Change to circular needle size 4.5 mm and work rib (= knit 1 / purl 1) for 4 cm. Loosely cast off with knit over knit and purl over purl – to avoid the cast-off edge being tight, you can cast off with a needle size 5.5 mm. Cut and fasten the strand. SLEEVE: Place the stitches from the thread on one side of the piece onto short circular needle/double pointed needle size 5.5 mm (= 33-35-37-39-43-43 stitches). Knit up 1 stitch in each of the 4-4-4-6-6-6 stitches cast on under the sleeve = 37-39-41-45-49-49 stitches. Insert 1 marker thread in the middle of these 4-4-4-6-6-6 stitches and start the round here. Work moss stitch. When the piece measures 2 cm from the division decrease 2 stitches mid under sleeve – read DECREASE TIP. Decrease like this every 2½-3-3½-4-4½-5½ cm a total of 6-6-7-7-7-7 times = 25-27-27-31-35-35 stitches. Continue working until the sleeve measures 18-22-26-30-34-38 cm from the division. Knit 1 round where you increase 3-3-3-3-3-3 stitches in all sizes = 28-30-30-34-38-38 stitches. Change to double pointed needles size 4.5 mm and work rib (knit 1 / purl 1) for 4 cm. Loosely cast off with knit over knit and purl over purl – to avoid the cast-off edge being tight, you can cast off with a needle size 5.5 mm. Cut and fasten the strand. Work the other sleeve in the same way. |
|||||||||||||||||||
Diagram explanations |
|||||||||||||||||||
|
|||||||||||||||||||
 |
|||||||||||||||||||
 |
|||||||||||||||||||
Have you finished this pattern?Tag your pictures with #dropspattern #cloversweater or submit them to the #dropsfan gallery. Do you need help with this pattern?You'll find 24 tutorial videos, a Comments/Questions area and more by visiting the pattern on garnstudio.com. © 1982-2026 DROPS Design A/S. We reserve all rights. This document, including all its sub-sections, has copyrights. Read more about what you can do with our patterns at the bottom of each pattern on our site. |
|||||||||||||||||||


With over 40 years in knitting and crochet design, DROPS Design offers one of the most extensive collections of free patterns on the internet - translated to 17 languages. As of today we count 324 catalogues and 12245 patterns translated into English (UK/cm). 12245
We work hard to bring you the best knitting and crochet have to offer, inspiration and advice as well as great quality yarns at incredible prices! Would you like to use our patterns for other than personal use? You can read what you are allowed to do in the Copyright text at the bottom of all our patterns. Happy crafting!
Post a comment to pattern DROPS Children 34-4
We would love to hear what you have to say about this pattern!
If you want to leave a question, please make sure you select the correct category in the form below, to speed up the answering process. Required fields are marked *.