
Popular categories
Looking for a yarn?


Comments / Questions (72)
![]() Astrid wrote:
Astrid wrote:
Hej! Jag stickar DROPS CHILDREN / 34 / 4. I beskrivningen ser det ut som att man ska ha ett ojämnt antal maskor för varje ärm (37-39-41-45-49-49). Såg att en annan (danska) frågat om detta tidigare men då svarade ni att man ska ta bort en maska. Är inte det ett fel i beskrivningen? För mosstickning måste det väl vara jämnt antal för att inte bli fult under ärmen?
20.09.2021 - 10:24DROPS Design answered:
Hej Astrid. Den danska frågan gällde resåren och där har det nu kommit en rättelse. Gällande mosstickning så ska det vara ett ojämnt antal maskor, sista maskan på varet blir då rät och då blir första maskan på varv 2 avig och hamnar då över den räta maskan på varv 1. Mvh DROPS Design
22.09.2021 - 09:58
![]() Christina Christensen wrote:
Christina Christensen wrote:
Jeg har lavet strikkeprøve i Air (pinde 5,5) og vasket denne. Det giver 17,5 masker i bredden og 26 pinde i højden i glatstrik. Før vask var tallene 16 gange 26. Det virker noget skævt i forhold til opskriftens 16 masker gange 20 pinde og bliver vel næppe løst ved at gå op i pinde 6?
10.09.2021 - 18:19DROPS Design answered:
Hei Christina. Ville ha strikket med med pinne 5,5 som er opplyst i oppskriften og ville ha prøvd å strikket en nye strikkeprøve der du får riktig pinne i høyden. Når du vasker, la den tørke i fasong/den strikkefastheten som er oppgitt. mvh DROPS design
20.09.2021 - 11:33
![]() Monika wrote:
Monika wrote:
Jag försökte lägga upp 64 maskor på rundsticka men det fungerar inte då maskantalet är för litet för 40 cm rundsticka ska halsringmungen verkligen vara så liten? Har visserligen ett annat garn, ett acrylgarn "we love yarn" men verkar ju vara samma tjocklek? Mvh Minika
16.08.2021 - 12:15DROPS Design answered:
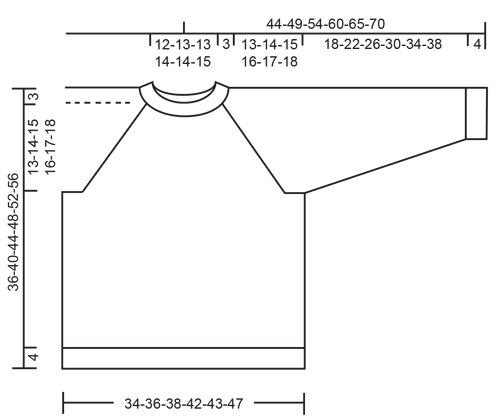
Hei Monika. Om du ser på målskissen nederst på oppskriften ser du målene på halsen. Om du strikker med DROPS LOVE YOU #8 er dette 100 Bomull, ikke akryl, og det garnet kan du erstatte DROPS Air med. Om det er et garn som ikke er fra oss, kan jeg ikke utale meg om den er like tykk som DROPS Air eller DROPS LOVE YOU #8 og kan brukes på denne oppskriften. mvh DROPS design
16.08.2021 - 14:48
![]() Dagny Rasmussen wrote:
Dagny Rasmussen wrote:
Er de meget små i størrelser, synes at str 7-8år har en meget lille åbning også selv om det hele stemmer
22.07.2021 - 13:16DROPS Design answered:
Hej Dagny, Nej, men du kan se målene til de forskellige størrelser i måleskitsen nederst i opskriften :)
04.08.2021 - 08:46
![]() Karen Figueroa wrote:
Karen Figueroa wrote:
I wish there was a way to get the comments/questions translated into the same language as the pattern.
03.06.2021 - 17:29
![]() Debora wrote:
Debora wrote:
Hola, estoy haciendo el talle 12, para los aumentos por ej dice 68/16aum=4,25, ( cada 4,25 puntos) no me da un numero entero.. Si yo divido 68/4=17, aum, cada 4 puntos.!!
06.04.2021 - 10:12
![]() Sybille wrote:
Sybille wrote:
Liebes Drops-Team, in Ihren Videos wird zweimal gezeigt wie man 5 Maschen rechts verschränkt zusammenstrickt. Ein Video hat aber die falsche Unterschrift. Das Video wie 5 Maschen rechts zusammen gestrickt werden fehlt leider. Herzliche Grüße und vielen Dank für Ihre tollen Anleitungen. Sybille
09.02.2021 - 14:12DROPS Design answered:
Liebe Sylbille, danke für den Hinweis, das Video werden wir neu hochladen; inzwischen kann vielleicht das für 4 Maschen rechts zusammen helfen, diese Abanhme wird genauso gleich gemacht, nur mit 5 anstatt 4 Maschen. Viel Spaß beim stricken!
26.04.2021 - 14:10
![]() Jette Skougaard wrote:
Jette Skougaard wrote:
Hvorfor skal der bruges dobbelt så meget garn med Paris 300 g og ½ 150 g garnmængde med Air. Voksenudgaven 196-4 strikkes med 2 tråden i Air. Men det angiver I kke noget om i børneudgaven 34-4? Det er vel en fejl. Og hvis der skal strikkes med 2 tråde i 34-4 kan garnmængden ikke være korrekt. Jeg fik 3½ nøgle garn til rest med Paris! Hjælp den fortrivlede Jette
19.01.2021 - 13:11DROPS Design answered:
Hej Jette, Denne bluse strikkes i en tråd DROPS Air, vælger du at strikke den i bomuld, så bliver den tungere da der ikke er lige så mange meter på 50 gram. Det er to helt forskellige kvaliteter :)
20.01.2021 - 16:30
![]() Cat wrote:
Cat wrote:
Bonjour Il manque 4 mailles après avoir fait le rang d 'augmentation avec les 8 jetés. Je l'ai refait plusieurs fois et le résultat est le même. Pouvez vous m'aider Merci beaucoup
26.11.2020 - 10:48DROPS Design answered:
Bonjour Cat, parlez-vous des 8 jetés faits pour la 1ère augmentation du raglan? Autrement dit, le 1er rang de A.1? Avez-vous bien augmenté comme indiqué dans A.1? Vous devez faire 4 jetés (augmentations) au 1er rang de A.1, ces jetés se tricotent torse à l'endroit au tour suivant pour éviter des trous. Bon tricot!
26.11.2020 - 16:43
![]() Marsha Preis wrote:
Marsha Preis wrote:
I don't see a guage listed. It states use a smaller needle or a larger needle, but I don't see what the expected guage is.
12.11.2020 - 22:00DROPS Design answered:
Dear Mrs Preis, you will find the gauge under KNITTING GAUGE just above the needle size and the informations about using a smaller or a larger needle, ie: 16 stitches in width and 20 rows in height with stockinette stitch = 10 x 10 cm = 4” x 4”.. Happy knitting!
13.11.2020 - 08:18
|
|||||||||||||||||||
Clover#cloversweater |
|||||||||||||||||||
 |
 |
||||||||||||||||||
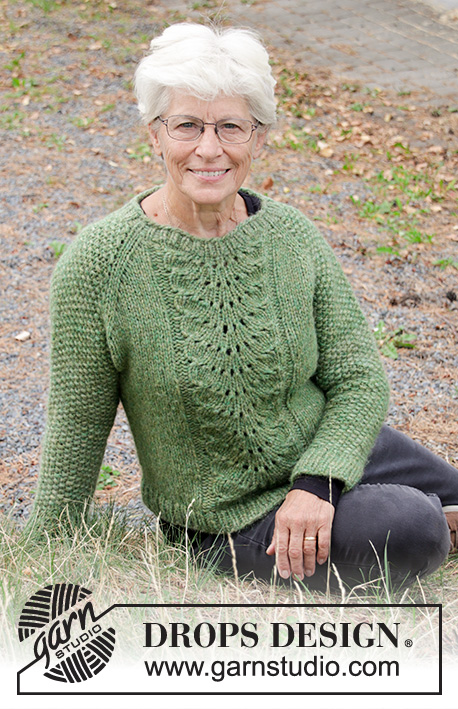
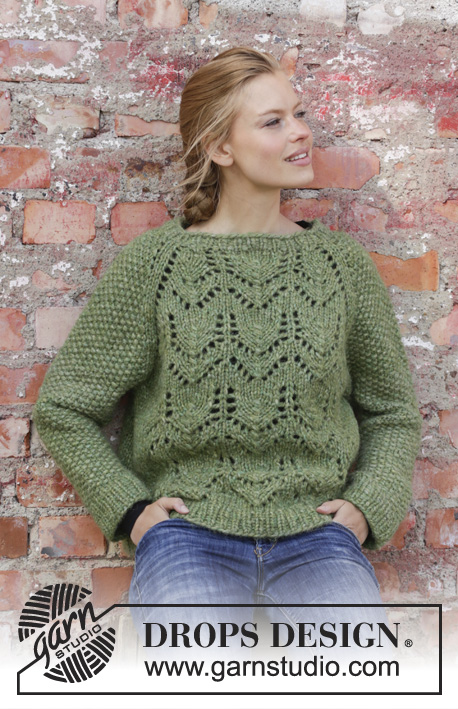
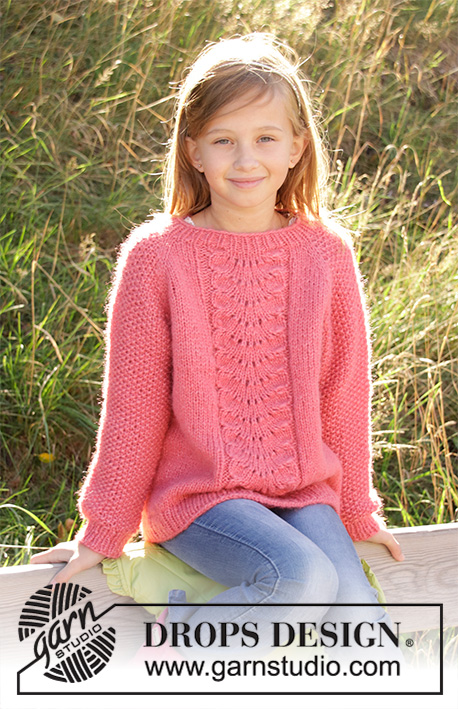
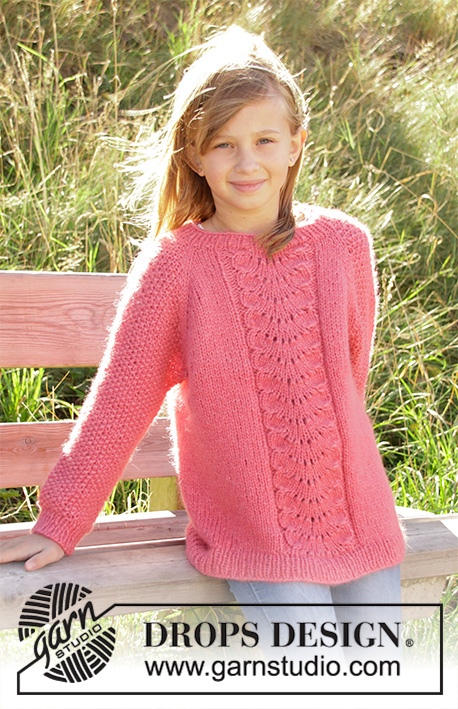
Knitted jumper for children in DROPS Air or DROPS Paris. The piece is worked top down with lace pattern and raglan. Sizes 2-12 years.
DROPS Children 34-4 |
|||||||||||||||||||
|
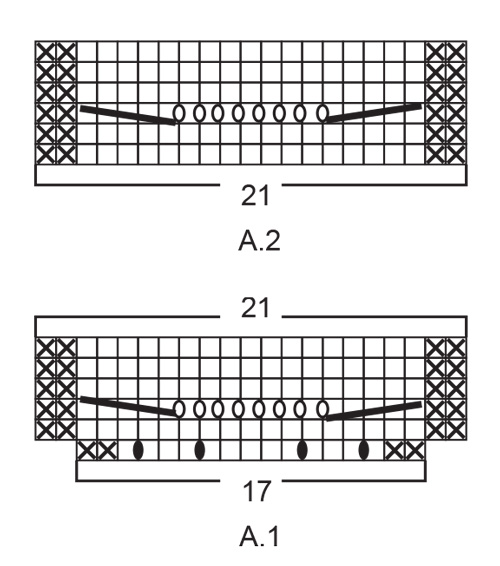
EXPLANATIONS FOR THE PATTERN: ------------------------------------------------------- PATTERN: See diagrams A.1 and A.2. The diagrams show all the rows in the pattern seen from the right side. INCREASE/DECREASE TIP (evenly spaced): To work out how to increase/decrease evenly, count the total number of stitches on the needle (e.g. 54 stitches) and divide by the number of increases/decreases to be made (e.g. 6) = 9. In this example, increase by making 1 yarn over after each 9th stitch. On the next round work the yarn overs twisted to avoid holes. When decreasing, knit together each 8th and 9th stitch (in this example). MOSS STITCH: ROUND 1: * Knit 1, Purl 1 *, work from *-*. ROUND 2: Knit over purl and purl over knit. Repeat round 2 onwards. RAGLAN: Increase 1 stitch on each side of the 2 knitted stitches in each transition between body and sleeves (= 8 stitches increased on the round). Increase 1 stitch by making 1 yarn over. On the next round work the yarn overs twisted to avoid holes. Then work the new stitches in moss stitch on the sleeves and stocking stitch on the front and back pieces. DECREASE TIP (for sleeves): Decrease 1 stitch on each side of the marker thread as follows: Work until there is 1 stitch left before the marker thread, purl 3 together. In this way, 3 stitches become 1 stitch; then move the marker thread to the stitch before this stitch. ------------------------------------------------------- START THE PIECE HERE: ------------------------------------------------------- JUMPER - SHORT OVERVIEW OF THE PIECE: The piece is worked in the round with circular needle, top down. After the yoke the body is continued in the round with circular needle. The sleeves are worked in the round with short circular needle/double pointed needles. YOKE Cast on 54-54-58-62-64-68 stitches with circular needle size 4.5 mm and Air or Paris. Knit 1 round. Then work rib in the round (= knit 1 / purl 1) for 3 cm. Knit 1 round where you increase 6-6-6-6-8-16 stitches evenly – read INCREASE/DECREASE TIP = 60-60-64-68-72-84 stitches. Change to circular needle size 5.5 mm. Insert 1 marker here - THE PIECE IS NOW MEASURED FROM HERE! Now insert 4 marker threads (without working the stitches) as follows: Insert 1 marker thread at the beginning of the round (= in transition between sleeve and back piece), 1 marker thread after 21-21-23-25-25-31 stitches (= back piece), 1 marker thread after 9-9-9-9-11-11 more stitches (= sleeve), 1 marker thread after 21-21-23-25-25-31 more stitches (= front piece). There are 9-9-9-9-11-11 stitches left to the first marker thread (= sleeve). The next round is worked as follows: The round starts at the first marker thread, in the transition between sleeve and back piece. Knit 1, make 1 yarn over, work 19-19-21-23-23-29 stitches in stocking stitch (= back piece), 1 yarn over, knit 2 (marker thread sits in the middle of these 2 stitches), 1 yarn over, work 7-7-7-7-9-9 stitches in MOSS STITCH – see description above (= sleeve), 1 yarn over, knit 2 (marker thread sits in the middle of these 2 stitches), 1 yarn over, work 1-1-2-3-3-6 stitches in stocking stitch, work A.1 (= 17 stitches = front piece), 1-1-2-3-3-6 stitches in stocking stitch, 1 yarn over, knit 2 (marker thread sits in the middle of these 2 stitches), 1 yarn over, work 7-7-7-7-9-9 stitches in moss stitch (= sleeve), 1 yarn over and knit 1. REMEMBER THE KNITTING TENSION! The first increase to RAGLAN – read description above, is now finished (= 8 stitches increased on the round). Continue with this pattern and increase to raglan every 2nd round a total of 13-14-15-16-17-17 times (including the first increase described above). NOTE: When A.1 has been completed in height, work A.2 (= 21 stitches) over A.1. Repeat A.2 in height to finished length. After the last increase to raglan there are 168-176-188-200-212-224 stitches on the needle. Continue with pattern as before, but without increasing, until the piece measures 13-14-15-16-17-18 cm from the marker at the beginning of the yoke. The next round is worked in pattern and stocking stitch as before, but start the round 1 stitch earlier (before the 2 stitches in stocking stitch between sleeve and back piece). Work stocking stitch over 49-51-55-59-61-67 stitches (= back piece), place the next 33-35-37-39-43-43 stitches on a thread (= sleeve), cast on 4-4-4-6-6-6 new stitches on the needle (= in side under sleeve), continue with stocking stitch and pattern over the next 53-55-59-63-65-71 stitches (= front piece), place the next 33-35-37-39-43-43 stitches on a thread (= the other sleeve), cast on 4-4-4-6-6-6 new stitches on the needle (= in side under sleeve). Body and sleeves are finished separately. THE PIECE IS NOW MEASURED FROM HERE! BODY: There are now 110-114-122-134-138-150 stitches on the needle. Continue with stocking stitch and pattern A.2 in the round as before. When the piece measures 16-19-22-25-28-31 cm from the division knit 1 round where you increase 10-12-14-16-18-20 stitches evenly on round = 120-126-136-150-156-170 stitches. Change to circular needle size 4.5 mm and work rib (= knit 1 / purl 1) for 4 cm. Loosely cast off with knit over knit and purl over purl – to avoid the cast-off edge being tight, you can cast off with a needle size 5.5 mm. Cut and fasten the strand. SLEEVE: Place the stitches from the thread on one side of the piece onto short circular needle/double pointed needle size 5.5 mm (= 33-35-37-39-43-43 stitches). Knit up 1 stitch in each of the 4-4-4-6-6-6 stitches cast on under the sleeve = 37-39-41-45-49-49 stitches. Insert 1 marker thread in the middle of these 4-4-4-6-6-6 stitches and start the round here. Work moss stitch. When the piece measures 2 cm from the division decrease 2 stitches mid under sleeve – read DECREASE TIP. Decrease like this every 2½-3-3½-4-4½-5½ cm a total of 6-6-7-7-7-7 times = 25-27-27-31-35-35 stitches. Continue working until the sleeve measures 18-22-26-30-34-38 cm from the division. Knit 1 round where you increase 3-3-3-3-3-3 stitches in all sizes = 28-30-30-34-38-38 stitches. Change to double pointed needles size 4.5 mm and work rib (knit 1 / purl 1) for 4 cm. Loosely cast off with knit over knit and purl over purl – to avoid the cast-off edge being tight, you can cast off with a needle size 5.5 mm. Cut and fasten the strand. Work the other sleeve in the same way. |
|||||||||||||||||||
Diagram explanations |
|||||||||||||||||||
|
|||||||||||||||||||
 |
|||||||||||||||||||
 |
|||||||||||||||||||
Have you finished this pattern?Tag your pictures with #dropspattern #cloversweater or submit them to the #dropsfan gallery. Do you need help with this pattern?You'll find 24 tutorial videos, a Comments/Questions area and more by visiting the pattern on garnstudio.com. © 1982-2026 DROPS Design A/S. We reserve all rights. This document, including all its sub-sections, has copyrights. Read more about what you can do with our patterns at the bottom of each pattern on our site. |
|||||||||||||||||||


With over 40 years in knitting and crochet design, DROPS Design offers one of the most extensive collections of free patterns on the internet - translated to 17 languages. As of today we count 324 catalogues and 12245 patterns translated into English (UK/cm). 12245
We work hard to bring you the best knitting and crochet have to offer, inspiration and advice as well as great quality yarns at incredible prices! Would you like to use our patterns for other than personal use? You can read what you are allowed to do in the Copyright text at the bottom of all our patterns. Happy crafting!
Post a comment to pattern DROPS Children 34-4
We would love to hear what you have to say about this pattern!
If you want to leave a question, please make sure you select the correct category in the form below, to speed up the answering process. Required fields are marked *.