
Popular categories
Looking for a yarn?


Comments / Questions (16)
![]() Saroj wrote:
Saroj wrote:
I would like to make this pattern in crochet. Would like your help if I can. Can I work this pattern With the seams. Can it be made with velvet yarn., the main body.
19.07.2020 - 17:57DROPS Design answered:
Dear Saroj, we are unfortunately not able to adjust every pattern to every single request - please contact the store where you bought the yarn for any individual assistance. Happy crocheting!
20.07.2020 - 09:55
![]() Sara wrote:
Sara wrote:
Vad betyder detta "Sätt 2 markörer i arbetet utan att sticka maskorna"? Betyder det att man helt enkelt trär på markören på stickan och flyttar över den varje varv så att den alltid är mellan samma maskor men alltid på det nya varvet? Jag har försökt klura ut varför man behöver dem för Nos & Huvud, men blir inte riktigt klok på det. Man ser ju på nästa varv att man gjort en ökning genom omslag eftersom ökningen inte ser ut som en vanlig rät maska. Tack på förhand! :)
02.03.2020 - 17:03DROPS Design answered:
Hej Ja då sätter du bara markörer i arbetet utan att sticka ett varv när du gör det (det är bara för att nästa förklarade varv i texten ska vara från avigsidan). Markörerna flyttar du bara med upp i kommande varv och du ser i texten att de markerar var du ska göra ökningar på de nästa 2 varven. Lycka till!
03.03.2020 - 14:38
![]() Johanna wrote:
Johanna wrote:
Hallo! Ich wollte diesen tollen Hund stricken, da ein Familienmitglied jetzt schwanger ist. Aber ich denke, dass 50 cm vielleicht ein bisschen zu gross für das Baby wird, auch wenn das Baby 1-2 Jahre alt ist... Könnte ich die Beschreibung einfach halbieren, oder wird das nicht funktionieren? Müsste ich dann auch was anderes beachten, zB dünnere Wolle und Nadeln? Vielen Dank im Voraus!
02.03.2020 - 16:56DROPS Design answered:
Liebe Johanna, wenn Sie eine dünnere Wolle stricken, dann wird die Maschenprobe unterschiedlich und der Hund kleiner - Siehe FAQ, Maschenprobe hier - Ihr DROPS Laden wird Ihnen gerne weiter helfen - auch telefonisch oder per E-Mail. Viel Spaß beim stricken!
03.03.2020 - 09:33
![]() Johanna wrote:
Johanna wrote:
Hej! Tänkte sticka denna fina hund då en familjemedlem väntar barn. Tänker att 50 cm blir väldigt stort för en liten bebis, även när bebisen är några år gammalt. Kan man halvera beskrivningen rätt av eller kommer det att bli konstigt? Måste jag tänka på något annat i sådana fall, typ att använda tunnare garn och stickor? Tack så mycket på förhand!
02.03.2020 - 16:54DROPS Design answered:
Hej Johanna, tycker inte den är för stor ;) Men du kan ju också sticka Arnie the Caterpillar fast lite kortare
03.03.2020 - 15:29
![]() Manu wrote:
Manu wrote:
Hallo, danke für die schnelle Antwort. Ich habe nochmal eine Frage bezüglich der Beine. Wenn ich beim Aschlagsfaden zusammenziehe sind noch 2 Seiten offen. Wird dann die eine Seite zusammengenäht? Dann mit Watte befüllt und dann angenäht? Danke
08.12.2017 - 08:57DROPS Design answered:
Liebe Manu, ja genau so werden die Beinen zusammen- bzw angenäht. Viel Spaß beim stricken!
08.12.2017 - 13:30
![]() Manu wrote:
Manu wrote:
Hallo, ich habe trotz des verschränkt links abstricken der Umschläge Löcher in der Schnauze.. Ist das normal oder mache ich etwas falsch????
19.11.2017 - 19:54DROPS Design answered:
Liebe Manu, versuchen Sie die Umschläge nicht zu locker zu stricken, sonnst können Sie auch eine andere Zunahmetechnik benutzen. Viel Spaß beim stricken!
20.11.2017 - 09:46
|
|||||||
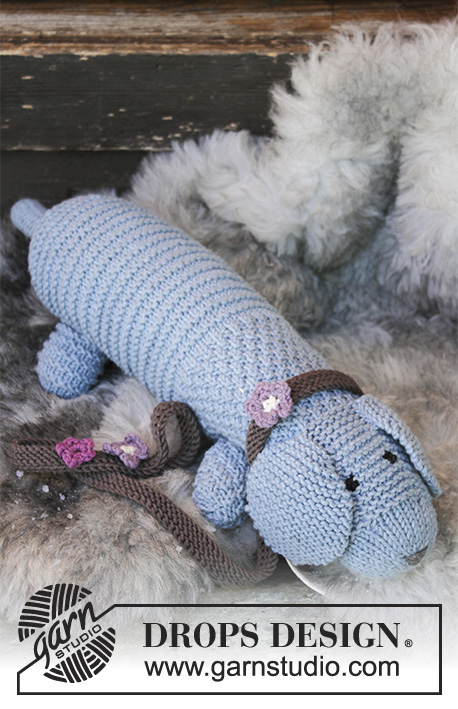
Allie Woof the Dog#dropsalliewoofthedog |
|||||||
 |
 |
||||||
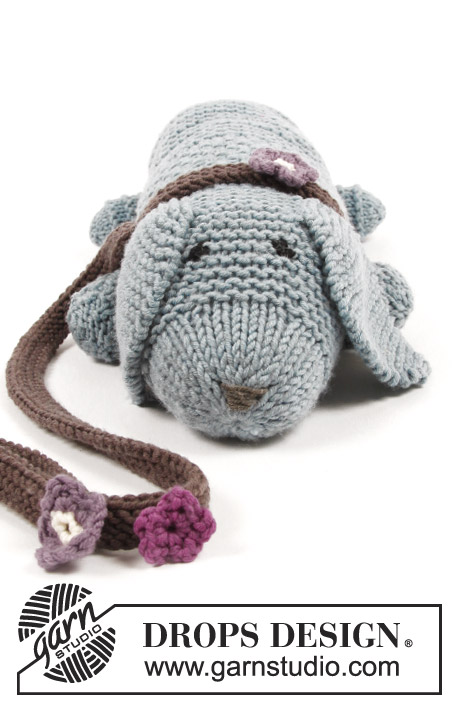
Knitted toy dog in garter stitch and moss stitch, with collar. The piece is worked in DROPS Big Merino.
DROPS Children 30-24 |
|||||||
|
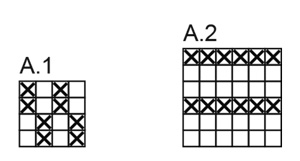
INFORMATION FOR THE PATTERN: RIDGE/GARTER STITCH (worked back and forth): 1 ridge = Knit 2 rows. INCREASE TIP: Increase 1 stitch by making 1 yarn over. On the next row work the yarn over twisted to prevent hole. PATTERN: See diagrams A.1 and A.2. The diagrams show all the rows in the pattern seen from the right side. DECREASE TIP: Start 2 stitches before the marker thread and knit 2 together (= 1 stitch decreased). ---------------------------------------------------------- DOG: All parts are worked back and forth on needle and sewn together to finish. MUZZLE AND HEAD: Cast on 8 stitches with needle size 4.5 mm and forget-me-not and work as follows: ROW 1 (= right side): * Knit 1, 1 yarn over *, work from *-* a total of 7 times and finish with knit 1 = 15 stitches. ROW 2 (= wrong side): Knit 1, purl 13 (yarn overs purled twisted to prevent holes), knit 1. ROW 3 (= right side): * Knit 1, 1 yarn over *, work from *-* a total of 14 times and finish with knit 1 = 29 stitches. ROW 4 (= wrong side): Knit 1, purl 27 (yarn overs purled twisted to prevent holes), knit 1. ROW 5 (= right side): Knit 1, * 1 yarn over, knit 2 *, work from *-* a total of 13 times, 1 yarn over, knit 1, 1 yarn over, knit 1 = 44 stitches. Continue by working stocking stitch with 1 edge stitch in GARTER STITCH – see description above, in each side until the muzzle measures approx. 4 cm from the cast-on edge. Insert 2 markers in the piece, without working the stitches, as follows: The first marker is inserted after the first 19 stitches on the row, 2nd marker inserted after the next 6 stitches on the row (after the last marker, there are 19 stitches on the row). Continue working in garter stitch. AT THE SAME TIME on the first row from the right side increase 1 stitch before the first marker and 1 stitch after the 2nd marker – read INCREASE TIP (= 2 stitches increased). Repeat the increases on the next row from the right side = 48 stitches on the row. Continue with garter stitch until the head measures 11 cm from the cast-on edge. On the next row from the right side decrease 8 stitches evenly on row (knit every 5th and 6th stitch together) = 40 stitches. Knit 5 rows (the last row is from the wrong side). Continue by working the body as described below (without cutting the strand). BODY: Knit 1 row from the right side where you increase 12 stitches evenly on row (increase 1 stitch after approx. every 3rd stitch) = 52 stitches. Purl 1 row from the wrong side with 1 edge stitch knitted in each side Continue by working A.1 back and forth with 1 edge stitch in garter stitch in each side. When A.1 measures 9 cm (the whole piece measures approx. 22 cm), work A.2 back and forth with 1 edge stitch in garter stitch in each side. When A.2 measures 15 cm (the whole piece measures approx. 37 cm), insert 6 marker threads as follows from the right side (do this without working the stitches): First marker thread inserted after the first 10 stitches on the row, then insert the next 5 marker threads with 8 stitches between each (after the last marker thread there are 2 stitches left on the row). Continue A.2. AT THE SAME TIME on the first row from the right side decrease 1 stitch before each marker thread – read DECREASE TIP (= 6 stitches decreased). Decrease in this way every 2nd row (i.e. every row from the right side) a total of 5 times = 22 stitches. On the next row from the right side knit all stitches together, 2 and 2 = 11 stitches left on needle. The dog measures approx. 41 cm from the cast-on edge. Continue by working tail as described below (without cutting the strand). TAIL: Work garter stitch back and forth over the 11 stitches until the tail measures approx. 8 cm. Now decrease 1 stitch at the end of every row by knitting the last 2 stitches together until there are 4 stitches left on the needle (the tail measures approx. 11 cm). Cut the strand, pull it through the stitches, tighten and fasten well. The whole dog measures approx. 52 cm including the tail. EAR: Cast on 7 stitches with needle size 4.5 mm and forget-me-not and work garter stitch. AT THE SAME TIME after 1 ridge increase 1 stitch in each side on the inside of the 1 edge stitch in each side – read INCREASE TIP (= 2 stitches increased). Increase in this way every 2nd row (i.e. every row from the right side) a total of 4 times = 15 stitches. Continue with garter stitch until the ear measures 6 cm. Now decrease 1 stitch at the beginning of the row and 1 stitch at the end of the row by knitting the 2 first and 2 last stitches on the row together (= 2 stitches decreased). Repeat the decreases when you have worked 3 rows. Then decrease in the same way every 2nd row (i.e. every row from the right side) a total of 2 times = 7 stitches left on needle. Cast off. Cut the strand long enough to be able to use it to sew on the ear. Work the other ear in the same way. LEG: Cast on 12 stitches with needle size 4.5 mm and forget-me-not. ROW 1 (= right side): Knit 1, * 1 yarn over, knit 2 *, work from *-* a total of 5 times, 1 yarn over, knit 1 = 18 stitches. ROW 2 (= wrong side): Knit 1, purl 16 (yarn overs purled twisted to prevent holes), knit 1. Continue by working A.1 back and forth with 1 edge stitch in garter stitch in each side. Cast off when the leg measures approx. 6 cm. Cut the strand long enough to be able to use it to sew on the leg. Tack a strand up and down through the stitches along the cast-on edge at the bottom of the leg, tighten the strand so that the opening is closed and fasten the strand well. Work one more leg in the same way. Then work 2 more legs in the same way but working A.2 instead of A.1 (= a total of 4 legs, 2 with A.1 and 2 with A.2). ASSEMBLY: Sew the dog together all the way from the tip of the muzzle, along the body to the end of the tail - sew in the outermost loop of the outermost stitch so that the seam is flat, but leave an opening in the middle underneath to be able to fill with padding. Fill the dog with padding and sew the opening shut. Embroider 2 eyes with black in the middle of the head and a nose with mocca at the tip of the muzzle – see photo. Sew on the ears on each side of the head (there should be approx. 5 cm between the ears on top of the head). Fill each leg with padding and sew the legs onto the underneath of the body – see photo for positions. COLLAR AND LEASH: NOTE: Due to the length of the leash, it should only be made for children over the age of 3 years: Cast on 160 stitches with needle size 4.5 mm and mocca. Work 3 ridges and cast off with knit over knit and purl over purl. To avoid the cast-off edge being tight, you can make 1 yarn over after every 8th stitch at the same time as you cast off (yarn overs cast off as normal stitches). Fold the one end double so that you make a small loop (large enough for the hand which will hold the leash) and fasten down with small stitches. Lay the other end around the neck of the dog and fasten with a couple of small stitches to make the collar. SMALL CROCHET FLOWER: Work 4 chain stitches with hook size 4 mm and plum and form them into a ring with 1 slip stitch in the first chain stitch worked. ROUND 1: * Work 3 chain stitches, 1 double crochet around the ring *, work from *-* a total of 4 times, work 3 chain stitches and finish with 1 slip stitch around the ring = 5 petals. Cut the strand and pull it through the stitch on the hook. Sew the flower onto the leash as decoration, by the hand loop. LARGE CROCHET FLOWER: Work 4 chain stitches with hook size 4 mm and off white and form them into a ring with 1 slip stitch in the first chain stitch worked. ROUND 1: Work 1 chain stitch, work 5 double crochets around the ring, change to amethyst and finish the round with 1 slip stitch in the first chain stitch worked at the beginning of the round. ROUND 2: Work with amethyst in each double crochet from the previous round as follows: 1 double crochet, 1 chain stitch, 1 treble crochet, 1 chain stitch and 1 double crochet, finish the round with 1 slip stitch in the first chain stitch worked at the beginning of the round = 5 petals. Cut the strand and pull it through the stitch on the hook. Sew the flower onto the leash as decoration by the hand loop. Work one more flower in the same way and fasten to the collar mid front of dog’s neck. |
|||||||
Diagram explanations |
|||||||
|
|||||||
 |
|||||||
Have you finished this pattern?Tag your pictures with #dropspattern #dropsalliewoofthedog or submit them to the #dropsfan gallery. Do you need help with this pattern?You'll find 27 tutorial videos, a Comments/Questions area and more by visiting the pattern on garnstudio.com. © 1982-2026 DROPS Design A/S. We reserve all rights. This document, including all its sub-sections, has copyrights. Read more about what you can do with our patterns at the bottom of each pattern on our site. |
|||||||


With over 40 years in knitting and crochet design, DROPS Design offers one of the most extensive collections of free patterns on the internet - translated to 17 languages. As of today we count 324 catalogues and 12245 patterns translated into English (UK/cm). 12245
We work hard to bring you the best knitting and crochet have to offer, inspiration and advice as well as great quality yarns at incredible prices! Would you like to use our patterns for other than personal use? You can read what you are allowed to do in the Copyright text at the bottom of all our patterns. Happy crafting!
Post a comment to pattern DROPS Children 30-24
We would love to hear what you have to say about this pattern!
If you want to leave a question, please make sure you select the correct category in the form below, to speed up the answering process. Required fields are marked *.