Comments / Questions (51)
![]() Pásztor Krisztina wrote:
Pásztor Krisztina wrote:
Üdvözlöm! Elkészítettem a nyakkivágást, megvan a 96 szem (L). Készíteném a vállrészt, de nem jön ki a 96 szem a leírás alapján (11+4+4+14+4+11+22)! Mit hagyok ki?
23.11.2024 - 20:20DROPS Design answered:
Kedves Krisztina! Köszönjük, hogy felhívta a figyelmünket, a mintánál a vállrész leírását javítottuk.
14.01.2025 - 13:55
![]() Ana wrote:
Ana wrote:
Buenos días, Tengo una duda, cuando he terminado el primer aumento de raglán dice que continúe el patrón en redondo y teja A.1 y A.X, pero supongo que debo centrar el diagrama sino no me coincide. Gracias
31.08.2024 - 08:28
![]() Claudie wrote:
Claudie wrote:
Bonjour ! Quand je reprends les mailles pour faire les manches et après avoir relevé 1 maille dans chacune des mailles montées sous la manche, j'obtiens des trous sous la manche. Comment éviter cela ? J'ai essayé deux fois et comme il y a toujours des trous, je défais tout ! Pouvez-vous m'aider s'il vous plaît ? D'avance, merci beaucoup !
14.04.2024 - 16:05DROPS Design answered:
Bonjour Claudie, dans cette leçon, nous montrons, à partir de la photo 18B, comment on va relever les mailles sous la manche; pour éviter d'éventuels trous, vous pouvez relever le fil entre 2 mailles (à la transition entre les mailles en attente et les mailles à relever) et tricoter ce fil torse avec la maille suivante; ou bien faire quelques points par la suite pour fermer ces trous. Bon tricot!
15.04.2024 - 08:12
![]() Nadia Bergamini wrote:
Nadia Bergamini wrote:
Non capisco il diagramma A1 del modello Maple Wood che significa puntare il ferro destro nella maglia del ferro precedente, lavorare una maglia a dritto e far cadere le maglie dal ferro sinistro. Mi potete indicare un video tutorial. Grazie
01.03.2024 - 23:03DROPS Design answered:
Buongiorno Nadia, deve lavorare sulla maglia del ferro sotto, non quella attuale, e la deve lavorare a diritto. Provi a vedere se questo video le può essere di aiuto. Buon lavoro!
02.03.2024 - 11:19
![]() Sandra Faucett wrote:
Sandra Faucett wrote:
Hi, Just wondering why there is a ridge at the increase after A2/AX2 and knit 3 on the right side of the front. There isn't a ridge on the left side.. This doesn't look right. Am I doing something wrong.?
21.02.2024 - 17:48DROPS Design answered:
Dear Mrs Faucett, when you work the 2nd round in A.2, ie the round after the increases, knit the yarn overs twisted to avoid holes, you will have: P2, K20, P2 = 24 sts for A.2. Happy knitting!
22.02.2024 - 09:24
![]() Marianne Ehler wrote:
Marianne Ehler wrote:
Hej Er det korrekt at der i A.2 skal være 5 pinde mellem første snoning (en snoning) og anden snoning (to snoninger, men 7 pinde mellem anden og tredje snoning osv. mvh Marianne
16.11.2023 - 17:07DROPS Design answered:
Hej Marianne, ja det stemmer, da vil snoningerne ser ud som på billedet :)
17.11.2023 - 10:55
![]() Friederike André wrote:
Friederike André wrote:
Hallo, ich finde das Muster sehr schön. Leider ist Ihnen bei der Umrechnung der Größen ein Grundsatzfehler unterlaufen. Der weitere Halsausschnitt und die längere Passe sind notwendig für meine größere Oberweite. Meine Arme sind genau so lang wie die von anderen Frauen - ca. 50 cm vom Armausschnitt bis zum Handgelenk, nur eben weiter. D.h. es wird vermutlich auch mehr Wolle benötigt. Im Englischen ist es auch falsch. Mir ist derFehler auch in anderen Mustern aufgefallen.
18.08.2023 - 06:42
![]() Tara wrote:
Tara wrote:
Ik ben bezig met dit patroon maar de telling klopt vlgs mij niet..ik had 116steken op de naald , moet 23 x 8 meerderen en kom dat uit op 300 steken en niet op 310 steken ( 1 na laatste maat!!l en ik heb de 10 vh begin er al bij geteld..
30.01.2023 - 16:07DROPS Design answered:
Dag Tara,
In het begin van de pas (in de eerste naald, die stap voor stap beschreven is) meerder je ook 10 steken midden voor in A.2. Er worden dan 14 steken gemeerderd naar 24 steken.
01.02.2023 - 20:47
![]() Tara wrote:
Tara wrote:
Ik ben bezig met dit patroon maar de telling kloot vlgs mij niet..ik had 116steken op de naald , moet 23 x 8 meerderen en kom dat uit op 300 steken en niet op 310 steken ( 1 na laaste maat!!l
30.01.2023 - 12:58
![]() Ann Matthews wrote:
Ann Matthews wrote:
I am confused about diagram A2 by the A.X part. After I have reached the top of the diagram do I start again from the bottom line of A.X working 2 rounds plain before using the cable needle or do I go straight to the first use of the cable needle (round 4 of 24 stitches)? Thanks, Ann
29.11.2022 - 16:20DROPS Design answered:
Hi Ann, You go to the bottom of A.X, with 2 rounds of knit before the cable. Happy knitting!
30.11.2022 - 08:05
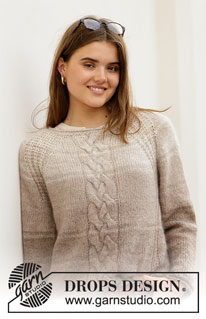
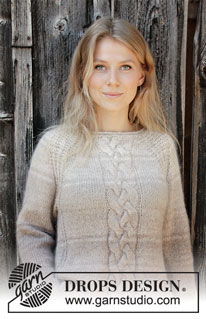
Maple Wood#maplewoodsweater |
|||||||||||||||||||
 |
 |
||||||||||||||||||
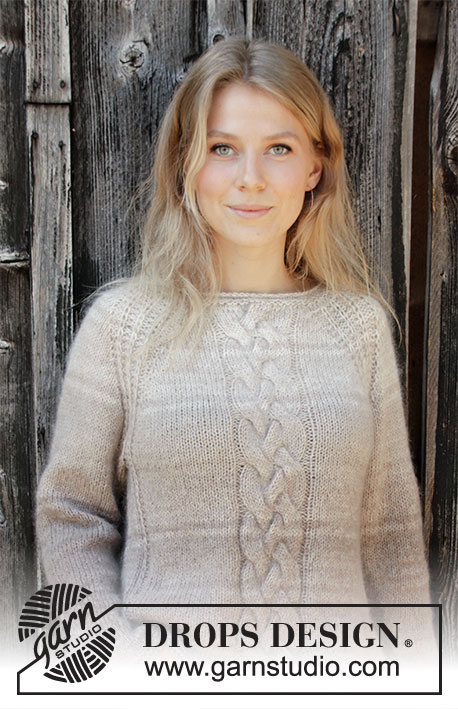
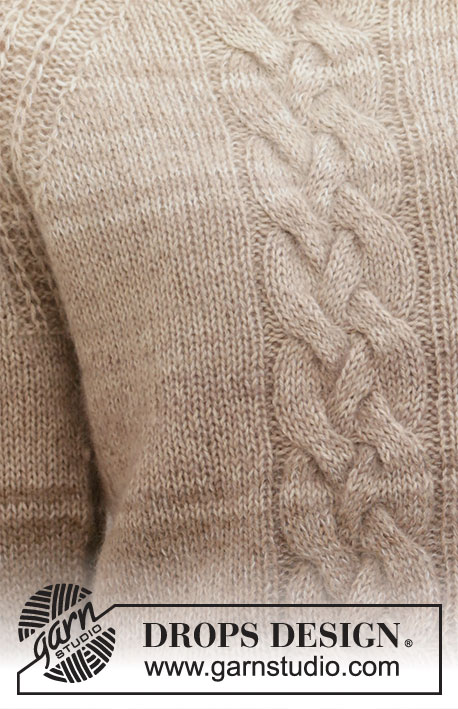
Knitted jumper in DROPS Alpaca and DROPS Kid-Silk. Piece is knitted top down with cable, stripes and false English rib. Size: S - XXXL
DROPS 206-50 |
|||||||||||||||||||
|
---------------------------------------------------------- EXPLANATION FOR THE PATTERN: ---------------------------------------------------------- GARTER STITCH (worked in the round): 1 ridge vertically = 2 rounds, i.e. knit 1 round and purl 1 round. INCREASE TIP-1 (evenly): To calculate how to increase evenly, use the total number of stitches on row (e.g. 73 stitches) and divide stitches by number of increases to be done (e.g. 15) = 4.9. In this example increase by making 1 yarn over after approx. every 5th stitch. On next round knit yarn overs twisted to avoid holes. STRIPES: NOTE! Work all stripes in 1 strand Alpaca (A) and 1 strand Kid-Silk (KS) = 2 strands. STRIPE 1: 6-6-6½-6½-7-7 cm with off white (A) and light beige (KS). STRIPE 2: 2 rounds with light nougat (A) and off white (KS). STRIPE 3: 2 rounds with off white (A) and light beige (KS). STRIPE 4: 6-6-6½-6½-7-7 cm with light nougat (A) and off white (KS). STRIPE 5: 2 rounds with light nougat (A) and light beige (KS). STRIPE 6: 2 rounds light nougat (A) and off white (KS). STRIPE 7: 6-6-6½-6½-7-7 cm with light nougat (A) and light beige (KS). STRIPE 8: 2 rounds with light nougat (A) and beige (KS). STRIPE 9: 2 rounds with light nougat (A) and light beige (KS). STRIPE 10: 6-6-6½-6½-7-7 cm with light nougat (A) and beige (KS). STRIPE 11: 2 rounds with nougat (A) and light beige (KS). STRIPE 12: 2 rounds with light nougat (A) and beige (KS). STRIPE 13: 6-6-6½-6½-7-7 cm with nougat (A) and light beige (KS). STRIPE 14: 2 rounds with nougat (A) and beige (KS). STRIPE 15: 2 rounds with nougat (A) and light beige (KS). STRIPE 16: 6-6-6½-6½-7-7 cm with nougat (A) and beige (KS). STRIPE 17: 2 rounds with light brown (A) and light beige (KS). STRIPE 18: 2 rounds with nougat (A) and beige (KS). STRIPE 19: Work with light brown (A) and light beige (KS) until finished measurements. PATTERN: See diagrams A.1 to A.3. RAGLAN: Increase 1 stitch in each side of A.1 in every transition between body and sleeves (= 8 stitches increased on round). Increase 1 stitch by making 1 yarn over. On next round knit yarns over twisted to avoid holes. Then work the new stitches in stocking stitch. INCREASE TIP-2 (applies to sides of body): Work until 2 stitches remain before marker thread, 1 yarn over, knit 4 (marker thread is in the middle of these 4 stitches), 1 yarn over. On next round purl yarn overs twisted to avoid holes. Then work the new stitches in stocking stitch. DECREASE TIP (applies to sleeves): Decrease 1 stitch on each side of marker thread as follows: Work until 3 stitches remain before marker thread and knit 2 together, knit 2 (marker thread is between these stitches), slip 1 stitch knitwise, knit 1, pass slipped stitch over stitch worked. ---------------------------------------------------------- START THE PIECE HERE: ---------------------------------------------------------- JUMPER - SHORT OVERVIEW OF THE PIECE: Neck edge and yoke are worked in the round on circular needle, top down. Now divide yoke for body and sleeves. Body is worked in the round on circular needle, top down. Work sleeves in the round on double pointed needles/a short circular needle, top down. NECK EDGE: Cast on 73-77-81-87-91-93 stitches on circular needle size 5 mm with 1 strand off white Alpaca and 1 strand light beige Kid-Silk (= 2 strands). Work first a rolling edge, i.e. knit 3 rounds. Switch to circular needle size 4 mm and work 2 ridges in GARTER STITCH - see explanation above. Switch back to circular needle size 5 mm. Knit 1 round while increasing 15-15-15-17-25-27 stitches evenly - read INCREASE TIP-1 = 88-92-96-104-116-120 stitches. Knit 1 round. Insert 1 marker thread in the middle of the row - NOW MEASURE PIECE FROM HERE! YOKE: Now work STRIPES – read explanation above, and pattern as follows: Work A.1 (= 11 stitches), make 1 yarn over (= increase), work 4 stitches in stocking stitch (= sleeve), make 1 yarn over (= increase), work A.1 (= 11 stitches), make 1 yarn over (= increase), work 2-3-4-6-9-10 stitches in stocking stitch, work A.2 (= 14 stitches that are increased to 24 stitches), work 2-3-4-6-9-10 stitches in stocking stitch (= front piece), make 1 yarn over (= increase), work A.1 (= 11 stitches), make 1 yarn over (= increase), work 4 stitches in stocking stitch (= sleeve), make 1 yarn over (= increase), work A.1 (= 11 stitches), make 1 yarn over (= increase), work in stocking stitch over the remaining 18-20-22-26-32-34 stitches (= back piece), and make 1 yarn over (= increase). First increase for RAGLAN - read explanation above, is now done. REMEMBER THE KNITTING TENSION! Continue pattern in the round (repeat A.1 and A.X vertically), and increase every other round 15-18-21-22-23-24 times in total (including first increase as explained above) = 218-246-274-290-310-322 stitches. Then increase only on front and back piece (= 4 stitches increased) every other round 5-5-3-4-5-7 times = 238-266-286-306-330-350 stitches. Work without increases until piece measures 20-22-24-26-28-30 cm from marker thread. Now divide yoke for body and sleeves, i.e. work last round as follows: Work first 5 stitches (= on back piece) as before, slip the next 46-52-58-60-62-64 stitches on 1 stitch holder for sleeve, cast on 6-6-8-8-10-12 new stitches on needle (= in the side under sleeve), work the next 78-86-90-98-108-116 stitches as before (= front piece), slip the next 46-52-58-60-62-64 stitches on 1 stitch holder for sleeve, cast on 6-6-8-8-10-12 new stitches on needle (in the side under sleeve). and work the remaining 63-71-75-83-93-101 stitches (= on back piece). Cut the yarn. Then finish body and sleeves separately. NOW MEASURE THE PIECE FROM HERE! BODY: = 158-174-186-202-226-246 stitches. Insert 1 marker thread in the middle of each side, in the middle of the 6-6-8-8-10-12 stitches that were cast on under sleeves. There are now 84-92-98-106-118-128 stitches on front piece and 74-82-88-96-108-118 stitches on back piece. Move the marker threads upwards when working; they should be used for increase later in the sides on body. Begin round in the side and begin with front piece. Then work pattern as follows: Work 3-3-4-4-5-6 stitches in stocking stitch (= in the side), work A.3 (= 5 stitches), work in stocking stitch and A.2 over the next 68-76-80-88-98-106 stitches as before, work A.3 (= 5 stitches), work 6-6-8-8-10-12 stitches in stocking stitch (= in the side), work A.3 (= 5 stitches), work in stocking stitch over the next 58-66-70-78-88-96 stitches as before, work A.3 (= 5 stitches), and finish with 3-3-4-4-5-6 stitches in stocking stitch (= in the side). When body measures 5 cm from division in all sizes, increase 1 stitch on each side of both markers - READ INCREASE TIP-2 (= 4 stitches increased). Increase like this every 6 cm 4 times in total in each side = 174-190-202-218-242-262 stitches. Work until body measures approx. 29 cm from division in all sizes - adjust after 6th or 12th round in A.X (approx. 2 cm remain until finished measurements, try the jumper on and work to desired length). Work 1 round while increasing 10-10-10-14-14-14 stitches evenly (do not increase over cable) = 184-200-212-232-256-276 stitches. Switch to circular needle size 4 mm. Work 2 ridges. Switch back to circular needle size 5 mm. Work in 2 rounds stocking stitch over all stitches. Cast off - make sure that the cast-off edge is not too tight. Jumper measures approx. 54-56-58-60-62-64 cm from shoulder and down. SLEEVE: Slip the 46-52-58-60-62-64 stitches from stitch holder in one side of piece on double pointed needles/short circular needle size 5 mm and pick in addition up 1 stitch in each of the 6-6-8-8-10-12 stitches cast on under sleeve = 52-58-66-68-72-76 stitches. Insert 1 marker thread in the middle of the new stitches under sleeve, move the marker thread upwards when working; it should be used for decrease mid under sleeve. Begin round at the marker thread and work stocking stitch and stripes the same way as on body. When sleeve measures 2 cm from division, decrease 1 stitch on each side of marker thread - read DECREASE TIP. Decrease like this every 4½-3½-2½-2-1½-1½ cm 8-10-13-14-15-16 times in total = 36-38-40-40-42-44 stitches. Work until sleeve measures 40-39-37-35-34-32 cm from division (approx. 2 cm remain until finished measurements, try the jumper on and work to desired length)- NOTE: Shorter measurements in the larger sizes because of wider neck and longer yoke. Work 1 round while increasing 6 stitches evenly = 42-44-46-46-48-50 stitches. Switch to double pointed needles size 4 mm. Work 2 ridges. Switch back to double pointed needles size 5 mm. Work 2 rounds in stocking stitch. Cast off - make sure that the cast-off edge is not too tight. Work the other sleeve the same way. |
|||||||||||||||||||
Diagram explanations |
|||||||||||||||||||
|
|||||||||||||||||||
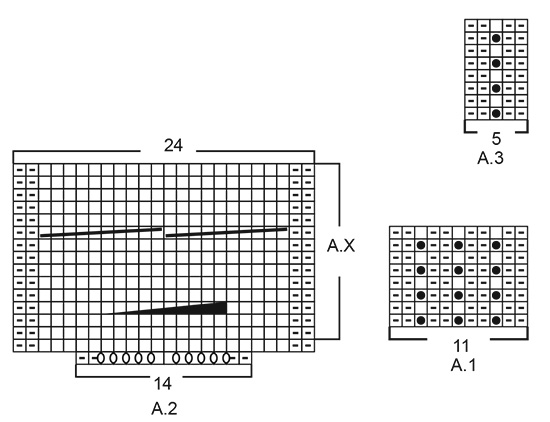 |
|||||||||||||||||||
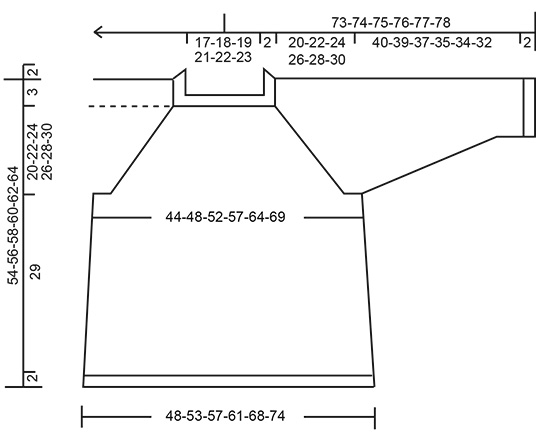 |
|||||||||||||||||||
Have you finished this pattern?Tag your pictures with #dropspattern #maplewoodsweater or submit them to the #dropsfan gallery. Do you need help with this pattern?You'll find 28 tutorial videos, a Comments/Questions area and more by visiting the pattern on garnstudio.com. © 1982-2026 DROPS Design A/S. We reserve all rights. This document, including all its sub-sections, has copyrights. Read more about what you can do with our patterns at the bottom of each pattern on our site. |
|||||||||||||||||||







Post a comment to pattern DROPS 206-50
We would love to hear what you have to say about this pattern!
If you want to leave a question, please make sure you select the correct category in the form below, to speed up the answering process. Required fields are marked *.