DROPS Alpaca
DROPS Alpaca
100% Alpaca
from 3.40 £ /50g
DROPS Kid-Silk
DROPS Kid-Silk
75% Mohair, 25% Silk
from 4.60 £ /25g
Get the yarn to make this pattern from 43.40£.

The yarn cost is calculated from the pattern’s smallest size and the yarn’s cheapest product type. Looking for an even better price? You might find it on the DROPS Deals!

DROPS SS24

Maple Wood

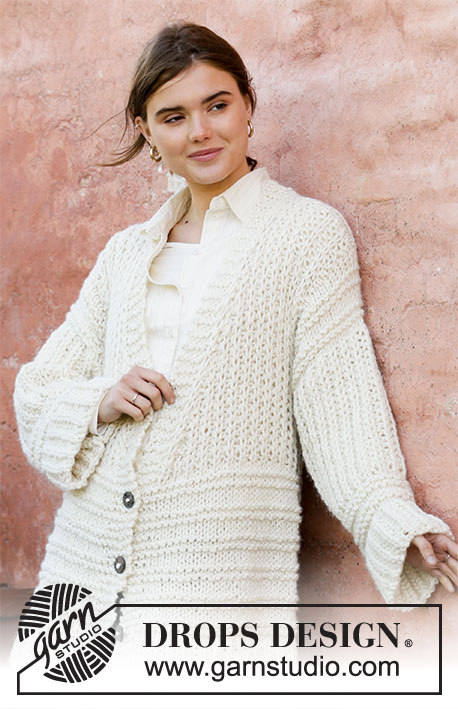
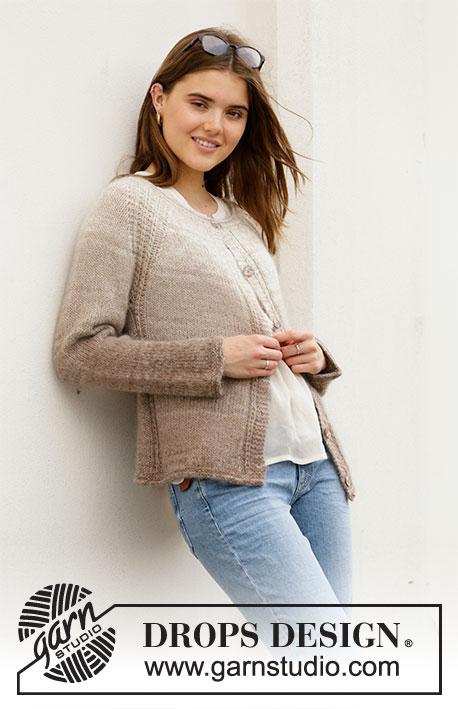
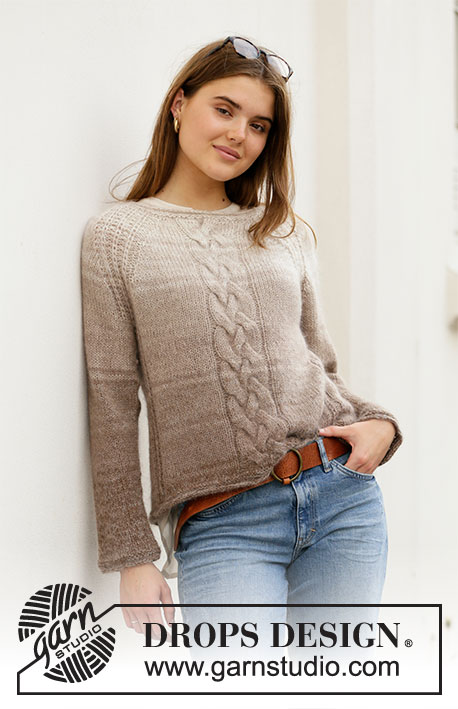
Knitted jumper in DROPS Alpaca and DROPS Kid-Silk. Piece is knitted top down with cable, stripes and false English rib. Size: S - XXXL

DROPS 206-50
DROPS design: Pattern z-865
Yarn group A + A or C
----------------------------------------------------------

SIZE:
S - M - L - XL - XXL - XXXL

MATERIALS:
DROPS ALPACA from Garnstudio (belongs to yarn group A)
100-150-150-150-200-200 g colour 2020, light nougat
100-100-100-100-150-150 g colour no 618, nougat
50-50-100-100-100-100 g colour 607, light brown
50-50-50-50-50-50 g colour 100, off white
And use:
DROPS KID-SILK from Garnstudio (belongs to yarn group A)
50-75-75-75-75-100 g colour 20, light beige
50-50-50-50-75-75 g colour no 12, beige
25-25-25-25-50-50 g colour 01, off white

KNITTING TENSION:
17 stitches in width and 22 rows vertically in stocking stitch and 1 strand of each quality = 10 x 10 cm.

NEEDLES:
DROPS DOUBLE POINTED NEEDLES SIZE 5 mm
DROPS CIRCULAR NEEDLE SIZE 5 mm : Length 40 and 80 cm for stocking stitch.
DROPS DOUBLE POINTED NEEDLES SIZE 4 mm
DROPS CIRCULAR NEEDLE SIZE 4 mm : Length 40 and 80 cm for edges in rolling edges.
DROPS CABLE NEEDLE - for cables.
Needle size is only a suggestion! If you have too many stitches on 10 cm switch to larger needles. If you have too few stitches on 10 cm switch to smaller needles.

-------------------------------------------------------

Alternative Yarn – See how to change yarns here
Yarn Groups A to F – Use the same pattern and change the yarn here
Yarn usage using an alternative yarn – Use our yarn converter here

-------------------------------------------------------

DROPS Alpaca
DROPS Alpaca
100% Alpaca
from 3.40 £ /50g
DROPS Kid-Silk
DROPS Kid-Silk
75% Mohair, 25% Silk
from 4.60 £ /25g
Get the yarn to make this pattern from 43.40£.

The yarn cost is calculated from the pattern’s smallest size and the yarn’s cheapest product type. Looking for an even better price? You might find it on the DROPS Deals!

Pattern instructions

NOTE: This pattern is written in British English. All measurements in charts are in cm. For conversion from cm to inches - click here. There are different terms for crocheting in British and American English. If this pattern includes crochet, click for "crochet terms" here. For this pattern in American English, please click here.
----------------------------------------------------------

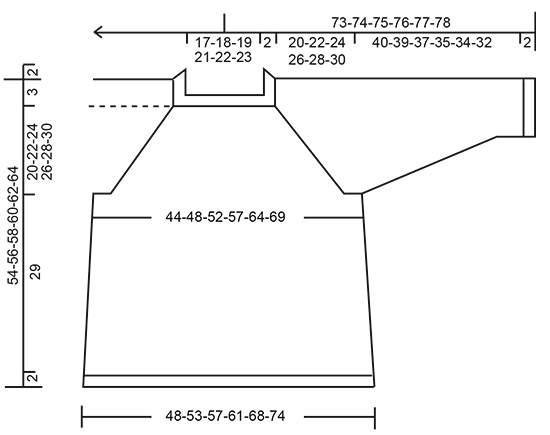
EXPLANATION FOR THE PATTERN:

----------------------------------------------------------

GARTER STITCH (worked in the round):
1 ridge vertically = 2 rounds, i.e. knit 1 round and purl 1 round.

INCREASE TIP-1 (evenly):
To calculate how to increase evenly, use the total number of stitches on row (e.g. 73 stitches) and divide stitches by number of increases to be done (e.g. 15) = 4.9. 
In this example increase by making 1 yarn over after approx. every 5th stitch. On next round knit yarn overs twisted to avoid holes.

STRIPES:
NOTE! Work all stripes in 1 strand Alpaca (A) and 1 strand Kid-Silk (KS) = 2 strands.
STRIPE 1: 6-6-6½-6½-7-7 cm with off white (A) and light beige (KS).
STRIPE 2: 2 rounds with light nougat (A) and off white (KS).
STRIPE 3: 2 rounds with off white (A) and light beige (KS).
STRIPE 4: 6-6-6½-6½-7-7 cm with light nougat (A) and off white (KS).
STRIPE 5: 2 rounds with light nougat (A) and light beige (KS).
STRIPE 6: 2 rounds light nougat (A) and off white (KS).
STRIPE 7: 6-6-6½-6½-7-7 cm with light nougat (A) and light beige (KS).
STRIPE 8: 2 rounds with light nougat (A) and beige (KS).
STRIPE 9: 2 rounds with light nougat (A) and light beige (KS).
STRIPE 10: 6-6-6½-6½-7-7 cm with light nougat (A) and beige (KS).
STRIPE 11: 2 rounds with nougat (A) and light beige (KS).
STRIPE 12: 2 rounds with light nougat (A) and beige (KS).
STRIPE 13: 6-6-6½-6½-7-7 cm with nougat (A) and light beige (KS).
STRIPE 14: 2 rounds with nougat (A) and beige (KS).
STRIPE 15: 2 rounds with nougat (A) and light beige (KS).
STRIPE 16: 6-6-6½-6½-7-7 cm with nougat (A) and beige (KS).
STRIPE 17: 2 rounds with light brown (A) and light beige (KS).
STRIPE 18: 2 rounds with nougat (A) and beige (KS).
STRIPE 19: Work with light brown (A) and light beige (KS) until finished measurements.

PATTERN: 
See diagrams A.1 to A.3.

RAGLAN:
Increase 1 stitch in each side of A.1 in every transition between body and sleeves (= 8 stitches increased on round). Increase 1 stitch by making 1 yarn over. On next round knit yarns over twisted to avoid holes. Then work the new stitches in stocking stitch

INCREASE TIP-2 (applies to sides of body):
Work until 2 stitches remain before marker thread, 1 yarn over, knit 4 (marker thread is in the middle of these 4 stitches), 1 yarn over. On next round purl yarn overs twisted to avoid holes. Then work the new stitches in stocking stitch. 

DECREASE TIP (applies to sleeves): 
Decrease 1 stitch on each side of marker thread as follows: Work until 3 stitches remain before marker thread and knit 2 together, knit 2 (marker thread is between these stitches), slip 1 stitch knitwise, knit 1, pass slipped stitch over stitch worked.

----------------------------------------------------------

START THE PIECE HERE:

----------------------------------------------------------

JUMPER - SHORT OVERVIEW OF THE PIECE:
Neck edge and yoke are worked in the round on circular needle, top down. Now divide yoke for body and sleeves. Body is worked in the round on circular needle, top down. Work sleeves in the round on double pointed needles/a short circular needle, top down.

NECK EDGE:
Cast on 73-77-81-87-91-93 stitches on circular needle size 5 mm with 1 strand off white Alpaca and 1 strand light beige Kid-Silk (= 2 strands). Work first a rolling edge, i.e. knit 3 rounds.
Switch to circular needle size 4 mm and work 2 ridges in GARTER STITCH - see explanation above. Switch back to circular needle size 5 mm. Knit 1 round while increasing 15-15-15-17-25-27 stitches evenly - read INCREASE TIP-1 = 88-92-96-104-116-120 stitches. Knit 1 round. Insert 1 marker thread in the middle of the row - NOW MEASURE PIECE FROM HERE!

YOKE:
Now work STRIPES – read explanation above, and pattern as follows:
Work A.1 (= 11 stitches), make 1 yarn over (= increase), work 4 stitches in stocking stitch (= sleeve), make 1 yarn over (= increase), work A.1 (= 11 stitches), make 1 yarn over (= increase), work 2-3-4-6-9-10 stitches in stocking stitch, work A.2 (= 14 stitches that are increased to 24 stitches), work 2-3-4-6-9-10 stitches in stocking stitch (= front piece), make 1 yarn over (= increase), work A.1 (= 11 stitches), make 1 yarn over (= increase), work 4 stitches in stocking stitch (= sleeve), make 1 yarn over (= increase), work A.1 (= 11 stitches), make 1 yarn over (= increase), work in stocking stitch over the remaining 18-20-22-26-32-34 stitches (= back piece), and make 1 yarn over (= increase).
First increase for RAGLAN - read explanation above, is now done. REMEMBER THE KNITTING TENSION!
Continue pattern in the round (repeat A.1 and A.X vertically), and increase every other round 15-18-21-22-23-24 times in total (including first increase as explained above) = 218-246-274-290-310-322 stitches. Then increase only on front and back piece (= 4 stitches increased) every other round 5-5-3-4-5-7 times = 238-266-286-306-330-350 stitches. Work without increases until piece measures 20-22-24-26-28-30 cm from marker thread.
Now divide yoke for body and sleeves, i.e. work last round as follows:
Work first 5 stitches (= on back piece) as before, slip the next 46-52-58-60-62-64 stitches on 1 stitch holder for sleeve, cast on 6-6-8-8-10-12 new stitches on needle (= in the side under sleeve), work the next 78-86-90-98-108-116 stitches as before (= front piece), slip the next 46-52-58-60-62-64 stitches on 1 stitch holder for sleeve, cast on 6-6-8-8-10-12 new stitches on needle (in the side under sleeve). and work the remaining 63-71-75-83-93-101 stitches (= on back piece). Cut the yarn. Then finish body and sleeves separately. NOW MEASURE THE PIECE FROM HERE!

BODY:
= 158-174-186-202-226-246 stitches. Insert 1 marker thread in the middle of each side, in the middle of the 6-6-8-8-10-12 stitches that were cast on under sleeves. There are now 84-92-98-106-118-128 stitches on front piece and 74-82-88-96-108-118 stitches on back piece. Move the marker threads upwards when working; they should be used for increase later in the sides on body.
Begin round in the side and begin with front piece. Then work pattern as follows:
Work 3-3-4-4-5-6 stitches in stocking stitch (= in the side), work A.3 (= 5 stitches), work in stocking stitch and A.2 over the next 68-76-80-88-98-106 stitches as before, work A.3 (= 5 stitches), work 6-6-8-8-10-12 stitches in stocking stitch (= in the side), work A.3 (= 5 stitches), work in stocking stitch over the next 58-66-70-78-88-96 stitches as before, work A.3 (= 5 stitches), and finish with 3-3-4-4-5-6 stitches in stocking stitch (= in the side).
When body measures 5 cm from division in all sizes, increase 1 stitch on each side of both markers - READ INCREASE TIP-2 (= 4 stitches increased). Increase like this every 6 cm 4 times in total in each side = 174-190-202-218-242-262 stitches. Work until body measures approx. 29 cm from division in all sizes - adjust after 6th or 12th round in A.X (approx. 2 cm remain until finished measurements, try the jumper on and work to desired length).
Work 1 round while increasing 10-10-10-14-14-14 stitches evenly (do not increase over cable) = 184-200-212-232-256-276 stitches.
Switch to circular needle size 4 mm. Work 2 ridges. Switch back to circular needle size 5 mm. Work in 2 rounds stocking stitch over all stitches. Cast off - make sure that the cast-off edge is not too tight. Jumper measures approx. 54-56-58-60-62-64 cm from shoulder and down.

SLEEVE:
Slip the 46-52-58-60-62-64 stitches from stitch holder in one side of piece on double pointed needles/short circular needle size 5 mm and pick in addition up 1 stitch in each of the 6-6-8-8-10-12 stitches cast on under sleeve = 52-58-66-68-72-76 stitches. Insert 1 marker thread in the middle of the new stitches under sleeve, move the marker thread upwards when working; it should be used for decrease mid under sleeve. Begin round at the marker thread and work stocking stitch and stripes the same way as on body.
When sleeve measures 2 cm from division, decrease 1 stitch on each side of marker thread - read DECREASE TIP. Decrease like this every 4½-3½-2½-2-1½-1½ cm 8-10-13-14-15-16 times in total = 36-38-40-40-42-44 stitches.
Work until sleeve measures 40-39-37-35-34-32 cm from division (approx. 2 cm remain until finished measurements, try the jumper on and work to desired length)- NOTE: Shorter measurements in the larger sizes because of wider neck and longer yoke. Work 1 round while increasing 6 stitches evenly = 42-44-46-46-48-50 stitches. Switch to double pointed needles size 4 mm. Work 2 ridges. Switch back to double pointed needles size 5 mm. Work 2 rounds in stocking stitch. Cast off - make sure that the cast-off edge is not too tight. Work the other sleeve the same way.

Diagram

symbols = knit from the right side, purl from the wrong side
symbols = purl from the right side, knit from the wrong side
symbols = insert right needle through stitch from previous row, knit 1 and slip stitches off the needle
symbols = between 2 stitches make 1 yarn over, on next round work yarn over twisted to avoid holes
symbols = slip 5 stitches on cable needle behind piece, knit 5, knit 5 from cable needle
symbols = slip 5 stitches on cable needle in front of piece, knit 5, knit 5 from cable needle
diagram
diagram

Each of our patterns has specific tutorial videos to help you.

Do you have a question? See a list of frequently asked questions (FAQ)

Knitting tension is what determines the final measurements of your work, and is usually measured per 10 x 10 cm. It is provided like so: number of stitches in width x number of rows in height - eg: 19 stitches x 26 rows = 10 x 10 cm.

The knitting tension is very individual; some people knit/crochet loosely while others work tightly. You adjust the knitting tension with the needle size, which is why the suggested needle size is only meant as a guide! You need to adjust this (up or down) to ensure that YOUR knitting tension matches the knitting tension provided in the pattern. If you work with a different knitting tension than provided you will have a different yarn consumption, and your work will have different measurements than what the pattern suggests.

The knitting tension also determines which yarns can replace each other. As long as you achieve the same knitting tension you can replace one yarn with another.

See DROPS lesson: How to measure your tension/gauge

See DROPS video: How to make a gauge tension swatch

The required amount of yarn is provided in grams, eg: 450 g. To calculate how many balls you’ll need you first need to know how many grams are in 1 ball (25g, 50g or 100g). This information is available if you click on the individual yarn quality on our pages. Divide the amount required with the amount of each ball. For example, if each ball is 50g (the most common amount), the calculation will be as follows: 450 / 50 = 9 balls.

The important thing when changing from one yarn to another is that the knitting/crochet tension remains the same. This is so that the measurements of the finished piece will be the same as on the sketch provided. It is easier to achieve the same knitting tension using yarns from the same yarn group. It is also possible to work with multiple strands of a thinner yarn to achieve the knitting tension of a thicker one. Please try our yarn converter. We recommend you to always work a test swatch.

Please NOTE: when changing yarn the garment might have a different look and feel to the garment in the photo, due to individual properties and qualities of each yarn.

See DROPS lesson: Can I use a different yarn than the one mentioned in the pattern?

All our yarns are categorised into yarn groups (from A to F) according to thickness and knitting tension – group A contains the thinnest yarns and group F the thickest. This makes it easier for you to find alternative yarns to our patterns, should you wish to switch yarn. All yarns within the same group have a similar knitting tension and can easily replace each other. However, different yarn qualities have different structures and properties which will give the finished work a unique look and feel.

Click here for an overview of the yarns in each yarn group

At the top of all our patterns you’ll find a link to our yarn calculator, which is a helpful tool should you wish to use a different yarn than suggested. By filling in the yarn quality you wish to replace, the amount (in your size) and number of strands, the calculator will present good alternative yarns with the same knitting tension. Additionally it will tell you how much you’ll require in the new qualities and whether you’ll need to work with multiple strands. Most skeins are 50g (some are 25g or 100g).

If the pattern is worked with multiple colours, every colour will have to be calculated separately. Similarly, if the pattern is worked with several strands of different yarns (for example 1 strand Alpaca and 1 strand Kid-Silk) you will have to find alternatives for each, individually.

Click here to see our yarn calculator

Since different yarns have different qualities and textures we have chosen to keep the original yarn in our patterns. However, you can easily find options among our available qualities by using our yarn calculator, or simply pick a yarn from the same yarn group.

It is possible that some retailers still have discontinued yarns in stock, or that someone has a few skeins at home that they would like to find patterns for.

The yarn calculator will provide both alternative yarn as well as required amount in the new quality.

If you think it's hard to decide what size to make, it can be a good idea to measure a garment you own already and like the size of. Then you can pick the size by comparing those measures with the ones available in the pattern's size chart.

You'll find the size chart at the bottom of the pattern.

See DROPS lesson: How to read size chart

The needle size provided in the pattern serves only as a guide, the important thing is to follow the knitting tension. And since knitting tension is very individual, you will have to adjust the needle size to ensure that YOUR tension is the same as in the pattern – maybe you’ll have to adjust 1, or even 2 needle sizes, up or down to achieve the correct tension. For this, we recommend that you work test swatches.

Should you work with a different knitting tension than the one provided, the measurements of the finished garment might deviate from the measurement sketch.

See DROPS lesson: How to measure your tension/gauge

See DROPS video: How to make a tension/gauge swatch

Working a garment top-down provides more flexibility and room for personal adjustment. For example it is easier to try the garment on while working, as well as making adjustments to length of yoke and shoulder caps.

The instructions are carefully explaining every step, in the correct order. Diagrams are adjusted to the knitting direction and are worked as usual.

The diagram depicts all rows/rounds, and every stitch seen from the right side. It is read from bottom to top, from right to left. 1 square = 1 stitch.

When working back and forth, every other row is worked from the right side and every other row is worked from the wrong side. When working from the wrong side, the diagram will have to be worked reversed: from left to right, knit stitches are purled, purl stitches are knit etc.

When working in the round every round is worked from the right side and the diagram are worked from right to left on all rounds.

See DROPS lesson: How to read knitting diagrams

The diagram depicts all rows/rounds, and every stitch seen from the right side. It is worked from bottom to top, from right to left.

When working back and forth every other row is worked from the right side: from right to left and every other row is worked from the wrong side: from left to right.

When working in the round, every row in the diagram are worked from the right side, from right to left.

When working a circular diagram you start in the middle and work your way outwards, counter clockwise, row by row.

The rows usually start with a given number of chain stitches (equivalent to the height of the following stitch), this will either be depicted in the diagram or explained in the pattern.

See DROPS lesson: How to read crochet diagrams

Instructions for working several diagrams after each other on the same row/round, will often be written like so: “work A.1, A.2, A.3 a total of 0-0-2-3-4 times". This means you work A.1 once, then A.2 is worked once, and A.3 is repeated (in width) the number of times provided for your size – in this case like so: S = 0 times, M = 0 times, L=2 times, XL= 3 times and XXL = 4 times.

The diagrams are worked as usual: begin with the first row in A.1, then work the first row in A.2 etc.

See DROPS lesson: How to read knitting diagrams

See DROPS lesson: How to read crochet diagrams

The total width of the garment (from wrist-to-wrist) will be larger in the larger sizes, despite the actual sleeves being shorter. The larger sizes have longer sleeve caps and wider shoulders, so there will be a good fit in all sizes.

The measurement sketch/schematic drawing provides information regarding the full length of the garment. If it’s a jumper or a jacket the length is measured from the highest point on the shoulder closest to the neckline, and straight down to the bottom of the garment. It is NOT measured from the tip of shoulder. Similarly, the length of yoke is measured from the highest point on the shoulder and down to where yoke is split into body and sleeves.

On a jacket measures are never taken along bands, unless specifically stated. Always measure inside band stitches when measuring the length.

See DROPS lesson: How to read a schematic drawing

Diagrams are often repeated on the round or in height. 1 repeat is the diagram the way it appears in the pattern. If it says to work 5 repeats of A.1 in the round, then you work A.1 a total of 5 times after/next to each other in the round. If it says to work 2 repeats of A.1 vertically/in height you work the entire diagram once, then begin again at the start and work the entire diagram one more time.

Chain stitches are slightly narrower than other stitches and to avoid working the cast-on edge too tight, we simply chain more stitches to begin with. The stitch count will be adjusted on the following row to fit the pattern and measurement sketch.

The rib edge is more elastic and will contract slightly compared to, for example, stocking stitch. By increasing before the rib edge, you avoid a visible difference in width between the rib edge and the rest of the body.

It’s very easy to cast off too tightly, and by making yarn overs while casting off (and simultaneously casting these off) you avoid a too tight cast off edge.

See DROPS video: How to bind off with yarn overs (yo)

To achieve an even increase (or decrease) you can increase on, for example: every 3rd and 4th row alternately, like so: work 2 rows and increase on the 3rd row, work 3 rows and increase on the 4th. Repeat this until the increase is complete.

See DROPS lesson: Increase or decrease 1 st on every 3rd and 4th row alternately

Should you prefer to work in the round instead of back and forth, you may of course adjust the pattern. You’ll need to add steeks mid-front (usually 5 stitches), and follow the instructions. When you would normally turn and work from the wrong side, simply work across the steek and continue in the round. At the end you’ll cut the piece open, pick up stitches to work bands, and cover the cut edges.

See DROPS video: How to knit steeks and cut open

Should you prefer to work back and forth instead of in the round, you may of course adjust the pattern so you work the pieces separately and then assemble them at the end. Divide the stitches for the body in 2, add 1 edge stitch in each side (for sewing) and work the front and back pieces separately.

See DROPS lesson: Can I adapt a pattern for circular needles into straight needles?

Pattern repeats can vary slightly in the different sizes, in order to get the correct proportions. If you’re not working the exact same size as the garment in the photo, yours might deviate slightly. This has been carefully developed and adjusted so that the complete impression of the garment is the same in all sizes.

Make sure to follow instructions and diagrams for your size!

If you have found a pattern you like which is available in women’s size it’s not very difficult to convert it to men’s size. The biggest difference will be the length of sleeves and body. Start working on the women size that you think would fit across the chest. The additional length will be worked right before you cast off for the armhole/sleeve cap. If the pattern is worked top-down you can add the length right after the armhole or before the first decrease on sleeve.

Regarding additional yarn amount, this will depend on how much length you add, but it is better with a skein too many than too few.

All yarns will have excess fibres (from production) that might come off as lint or shedding. Brushed yarns (ie hairier yarns) have more of these loose, excess fibres, causing more shedding.

Shedding also depends on what is worn under or over the garment, and whether this pulls at the yarn fibres. It’s therefore not possible to guarantee that there will be no shedding

Below are some tips on how to get the best result when working with hairier yarns:

1. When the garment is finished (before you wash it) shake it vigorously so the looser hairs come off. NOTE: do NOT use a lint roller, brush or any method that pulls at the yarn.

2. Place the garment in a plastic bag and put it in your freezer - the temperature will cause the fibres to become less attached to each other, and excess fibres will come off easier.

3. Leave in the freezer for a few hours before taking it out and shaking it again.

4. Wash the garment according to the instructions on the yarn label.

Pilling is a natural process that happens to even the most exclusive of fibers. It's a natural sign of wear and tear that is hard to avoid, and that is most visible in high friction areas of your garment like a sweater's arms and cuffs.

You can make your garment look as new by removing the pilling, using a fabric comb or a pill/lint remover.

Still can't find the answer you need? Then scroll down and leave your question so one of our experts can try to help you. This will be done normally within 5 to 10 working days.
In the meantime, you can read the questions and answers that others have left to this pattern or join the DROPS Workshop on Facebook to get help from fellow knitters/crocheters!

You might also like...

Post a comment to pattern DROPS 206-50

We would love to hear what you have to say about this pattern!

If you want to leave a question, please make sure you select the correct category in the form below, to speed up the answering process. Required fields are marked *.

Comments / Questions (50)

country flag Claudie wrote:

Bonjour ! Quand je reprends les mailles pour faire les manches et après avoir relevé 1 maille dans chacune des mailles montées sous la manche, j'obtiens des trous sous la manche. Comment éviter cela ? J'ai essayé deux fois et comme il y a toujours des trous, je défais tout ! Pouvez-vous m'aider s'il vous plaît ? D'avance, merci beaucoup !

14.04.2024 - 16:05

DROPS Design answered:

Bonjour Claudie, dans cette leçon, nous montrons, à partir de la photo 18B, comment on va relever les mailles sous la manche; pour éviter d'éventuels trous, vous pouvez relever le fil entre 2 mailles (à la transition entre les mailles en attente et les mailles à relever) et tricoter ce fil torse avec la maille suivante; ou bien faire quelques points par la suite pour fermer ces trous. Bon tricot!

15.04.2024 - 08:12

country flag Nadia Bergamini wrote:

Non capisco il diagramma A1 del modello Maple Wood che significa puntare il ferro destro nella maglia del ferro precedente, lavorare una maglia a dritto e far cadere le maglie dal ferro sinistro. Mi potete indicare un video tutorial. Grazie

01.03.2024 - 23:03

DROPS Design answered:

Buongiorno Nadia, deve lavorare sulla maglia del ferro sotto, non quella attuale, e la deve lavorare a diritto. Provi a vedere se questo video le può essere di aiuto. Buon lavoro!

02.03.2024 - 11:19

country flag Sandra Faucett wrote:

Hi, Just wondering why there is a ridge at the increase after A2/AX2 and knit 3 on the right side of the front. There isn't a ridge on the left side.. This doesn't look right. Am I doing something wrong.?

21.02.2024 - 17:48

DROPS Design answered:

Dear Mrs Faucett, when you work the 2nd round in A.2, ie the round after the increases, knit the yarn overs twisted to avoid holes, you will have: P2, K20, P2 = 24 sts for A.2. Happy knitting!

22.02.2024 - 09:24

country flag Marianne Ehler wrote:

Hej Er det korrekt at der i A.2 skal være 5 pinde mellem første snoning (en snoning) og anden snoning (to snoninger, men 7 pinde mellem anden og tredje snoning osv. mvh Marianne

16.11.2023 - 17:07

DROPS Design answered:

Hej Marianne, ja det stemmer, da vil snoningerne ser ud som på billedet :)

17.11.2023 - 10:55

country flag Friederike André wrote:

Hallo, ich finde das Muster sehr schön. Leider ist Ihnen bei der Umrechnung der Größen ein Grundsatzfehler unterlaufen. Der weitere Halsausschnitt und die längere Passe sind notwendig für meine größere Oberweite. Meine Arme sind genau so lang wie die von anderen Frauen - ca. 50 cm vom Armausschnitt bis zum Handgelenk, nur eben weiter. D.h. es wird vermutlich auch mehr Wolle benötigt. Im Englischen ist es auch falsch. Mir ist derFehler auch in anderen Mustern aufgefallen.

18.08.2023 - 06:42

country flag Tara wrote:

Ik ben bezig met dit patroon maar de telling klopt vlgs mij niet..ik had 116steken op de naald , moet 23 x 8 meerderen en kom dat uit op 300 steken en niet op 310 steken ( 1 na laatste maat!!l en ik heb de 10 vh begin er al bij geteld..

30.01.2023 - 16:07

DROPS Design answered:

Dag Tara,

In het begin van de pas (in de eerste naald, die stap voor stap beschreven is) meerder je ook 10 steken midden voor in A.2. Er worden dan 14 steken gemeerderd naar 24 steken.

01.02.2023 - 20:47

country flag Tara wrote:

Ik ben bezig met dit patroon maar de telling kloot vlgs mij niet..ik had 116steken op de naald , moet 23 x 8 meerderen en kom dat uit op 300 steken en niet op 310 steken ( 1 na laaste maat!!l

30.01.2023 - 12:58

country flag Ann Matthews wrote:

I am confused about diagram A2 by the A.X part. After I have reached the top of the diagram do I start again from the bottom line of A.X working 2 rounds plain before using the cable needle or do I go straight to the first use of the cable needle (round 4 of 24 stitches)? Thanks, Ann

29.11.2022 - 16:20

DROPS Design answered:

Hi Ann, You go to the bottom of A.X, with 2 rounds of knit before the cable. Happy knitting!

30.11.2022 - 08:05

country flag Giulia wrote:

Posso sapere come qalcolare la quantità di filato da ordinare per una taglia L/XL è in generale come calcolare la quantità di filato per ogni taglia dei vostri modelli gratuiti?

28.07.2022 - 12:29

DROPS Design answered:

Buongiorno Giulia, la quantità di filato è riportata a destra della foto per tutte le taglie. Per trovare la taglia corretta, in fondo alla pagina trova uno schema con le misure del capo finito che può confrontare con quelle di un capo già in suo possesso. Buon lavoro!

28.07.2022 - 12:33

country flag Olga wrote:

Buongiorno, arrivata alle maniche pongo un quesito. Queste devono iniziare subito totalmente in maglia rasata, o bisogna lavorare comunque in parte il diagramma A.3? Grazie.

07.02.2022 - 10:03

DROPS Design answered:

Buonasera Olga, le maniche si lavorano in tondo come indicato nel testo. Buon lavoro!

08.02.2022 - 23:33