
Popular categories
Looking for a yarn?


Comments / Questions (150)
![]() Monika Klein wrote:
Monika Klein wrote:
Stricke Größe L. will nun die Ärmel stilllegen. wo schlage ich die 12 neuen Maschen an? steht da "an der Seite unter dem Arm" - also die Hälfte der Ärmelmaschen stilllegen, dann 12 neue Maschen, dann die restlichen Ärmelmaschen? Aber dann klappt es mit dem Muster nicht. Ich habe hier sicher einen Denkfehler.
26.03.2025 - 14:53DROPS Design answered:
Liebe Frau Klein, diese 12 Maschen werden die stillgelegten Maschen vom Ärmel ersetzen, schauen Sie mal die Aufteilung in dieser Lektion ab Bild 9) und die Ärmel zeigen wir ab Bild 18B. Das Lochmuster stricken Sie für die Ärmel dann wie unter Absatz Ärmel erklärt. Viel Spaß beim Striken!
26.03.2025 - 15:53
![]() Monika Klein wrote:
Monika Klein wrote:
Habe insgesamt 29x zugenommen, 350 Maschen auf der Nadel. Wie nun weiter mit dem Muster der Ärmel? Wenn gleich wie beschrieben mit A.2-A.6 ist doch ein Abbruch im Muster oder sehe ich das falsch. Andererseits steht "im Muster wie zuvor stricken", also erst mit A2 usw. beginnen, wenn es paßt? Weiterstricken, bis 26 cm ab Anschlagrand - bedeutet das dann wieder mit der im Pfeil markierten Runde beginnen? Dann noch: 77 Maschen stilllegen, Ärmel hat aber 79 - wo sind die zwei Maschen?
21.03.2025 - 17:12DROPS Design answered:
Liebe Frau Klein, wenn alle Zunahmen fertig sind stricken Sie die 79 Maschen von beiden Ärmeln so: A.2 (2 M), 2 M glatt rechts, die 10 Maschen A.3 (beginnen Sie mit der Runde mit dem Pfeil), dann stricken Sie 5 Mal die 10 M A.4, dann die 11 M A.5, 2 M glatt rechts und A.6= 2+2+10+50+11+2+2=79 M. Bei der Verteilung werden die 1. Masche A.2 und die letzte Masche A.6 für das Vorder/Rückenteil vergeben, so sind es nur noch 77 M für jede Ärmel. Viel Spaß beim Stricken!
24.03.2025 - 07:44
![]() Catherine wrote:
Catherine wrote:
Bonjour j'ai du mal à comprendre on tricote les 16 m jersey ( demi dos ) 1 jeté,2 m jersey. A1( manche) ,2 mailles jersey, 1 jeté. Les jetés on les tricote torse ou pas,car sur le pull on voit un trou avant ou après le devant. Je vous remercie de votre réponse Catherine
20.03.2025 - 12:45DROPS Design answered:
Bonjour Catherine, les augmentations du raglan pour les manches se tricotent à l'endroit pour former des trous mais celles du devant et du dos vont se tricoter torse à l'endroit pour éviter des trous. Autrement dit, les jetés de A.1 se tricotent à l'endroit mais ceux que vous ferez avant les 2 m jersey (fin du dos et du devant) et après les 2 m jersey (début du devant et du dos) vont se tricoter torse (le trou est plus petit que s'il était tricoté à l'endroit). Bon tricot!
20.03.2025 - 15:40
![]() Catherine wrote:
Catherine wrote:
Bonjour j'ai commencé à tricoter les 16 mailles, le jeté et les 2 mailles jersey je suppose que c'est pour le raglan. Au tour suivant doit on faire une diminution et un jeté pour avoir un point ajouré tout le long du raglan
08.03.2025 - 19:20DROPS Design answered:
Bonjour Catherine, je ne comprends pas bien votre question; au 1er rang, vous augmentez effectivement pour le raglan de chaque côté des 2 mailles jersey à chaque transition entre les manches et le dos/le devant; vous augmentez ainsi d'abord 8 mailles tous les 2 tours. Les jetés = augmentations des manches figurent au début + à la fin de A.1. Vous augmentez ainsi le nombre de mailles de A.1 (mais aussi du devant et du dos) de 2 mailles tous les 2 tours. Bon tricot!
10.03.2025 - 08:26
![]() Monika Klein wrote:
Monika Klein wrote:
Möchte dieses Modell in Muskat stricken. Maschenprobe mit Nadel 4. Breite 10 cm, jedoch in der Höhe 11,5 cm. Mit Nadel 3,5 paßte es gar nicht. Stricke ich nun mit Nadel 4? Bei den Höhenangaben richte ich mit doch sowieso nach cm. Vielen Dank. Mit freundlichen Grüßen
02.03.2025 - 18:00DROPS Design answered:
Liebe Frau Klein, versuchen Sie mal mit kleineren Nadeln ob Sie beide Breite sowie Höhe erreichen können, so wird die Passe nicht zu lang und auch nicht zu kurz sein. Viel Spaß beim Stricken!
03.03.2025 - 10:19
![]() Anne-Marie Guevin wrote:
Anne-Marie Guevin wrote:
Je suis à faire ce chandail 199-3, et je suis rendu à 79 mailles pour la manche mais j'ai seulement 318mailles total au lieu de 350 comme demandé dans le patron. Si je me rends à 350 mailles j'aurai 87 mailles pour la manche est-ce normal pour un taille L
12.02.2025 - 22:09DROPS Design answered:
Bonjour Mme Guevin, vérifiez que vous avez bien augmenté tous les 2 tours, car vous aviez 118 m + 29 x 8 augmentations = 350 mailles au total soit pour les manches 21+(29x2)=79 mailles pour les manches. Bon tricot!
13.02.2025 - 10:03
![]() Andrea Richter wrote:
Andrea Richter wrote:
Hallo nochmal. Ich stricke Größe xxl. Nach den 34 Zunahmen habe ich jetzt wie beschrieben je 89 Maschen für den Ärmel. Weiter ohne Zunahmen. Ist hier nur der Ärmel gemeint oder auch Vorder-und Rückenteil? Wenn ich ohne Zunahmen weiter stricke kommt keine Masche dazu, es wird jedochauch nicht abgenommen. Wie komme ich dann beim Stillegen der Ärmelmaschen auf die beschrieben 83 Maschen?
30.01.2025 - 23:07DROPS Design answered:
Liebe Frau Richter, nach allen Zunahmen für Raglan stricken Sie einfach mit Lochmuster und Glattrechts genauso wie zuvor aber anstatt Löcher bei den Raglanlinien stricken Sie jetzt A.2 und A.6 bei jedem Ärmel, so haben Sie immer noch Löcher aber keine Zunahmen noch Abnahmen da A.2/A.6 1 Abnahmen + 1 Umschlag umfasst, so wird die Maschenanzahl nicht mehr zunehmen. Bei der Teilung gehören aber die ersten und letzten Maschen von jedem Ärmel zum Vorder-/Rückenteil, deshalb sind es nur noch 83 Maschen für die Ärmel behalten. Viel Spaß beim Stricken!
31.01.2025 - 08:18
![]() Andrea Richter wrote:
Andrea Richter wrote:
Hallo. Ich habe gerade einen Knoten in meiner Denkmaschine. Bin jetzt fertig mit den Raglanzunahmen für Größe xxl. Habe 89 Maschen auf der Ärmelnadel. Ohne Zunahmen weiter hab ich verstanden. Jetzt soll a2 gestrickt werden. Beginne ich jetzt direkt mit dem Umschlag oder zählt die erste Raglanmasche noch nicht dazu?Irgendwie geht es nicht auf wenn ich stricke. Bitte um Hilfe.
29.01.2025 - 17:20DROPS Design answered:
Liebe Frau Richter, die Raglanmaschen sind nicht damit gezählt, so haben Sie 89 Maschen für den Ärmel und diese 89 stricken Sie so: A.2 (= 2 M), 2 M rechts, A.3 (= 10 M), A.4 über die nächsten 60 M, A.5 (= 11 M), 2 M rechts und A.6 (= 2 M) = 2+2+10+60+11+2+2=89. Die Umschläge in A.2/A.6 sollen das Lochmuster vom Raglan fortsetzen, die Abnahme in A.2/A.6 wird vermeiden, daß die Maschenanzahl zunimmt. Viel Spaß beim Stricken!
30.01.2025 - 10:41
![]() Isabelle C wrote:
Isabelle C wrote:
Bonjour, j arrive a la fin du diagramme, mais pas assez de longueur aussi dois je continuer. Mais je reprends a quelle ligne du diagramme : 1 ou a la fleche de ma taille ? Merci
27.01.2025 - 14:54DROPS Design answered:
Bonjour Isabelle, notez le rang du diagramme où vous avez terminé les augmentations et continuez le point ajouré ainsi, tricotez en jersey les mailles que vous ne pouvez pas tricoter en point fantaisie, jusqu'à la hauteur indiquée - veillez à toujours bien avoir autant de diminutions que de jetés dans chaque motif du point ajouré. Bon tricot!
27.01.2025 - 17:57
![]() Elaine wrote:
Elaine wrote:
Je reprends les 77 mailles en attente de ma manche elle se termine par 2 mailles jersey et une maille de A2ou A6. Alors lorsque que j’ai ajouté mes 12 mailles et que je débute au centre de ces 12 mailles par 4 mailles jerseys et A3( je dois faire le 3ieme rang du point fantaisie) tout est décalé . Est-ce que j’aurais du débuter avecA2 et 2 mailles jerseys avant A3? Je ne sais plus quoi faire, j’ai besoin d’aide svp.
27.08.2024 - 14:35DROPS Design answered:
Bonjour Elaine, le plus simple est de simplement continuer le motif comme avant, tricotez les mailles du début/de la fin du tour en les ajustant sur le point ajouré et si vous ne pouvez pas les tricoter dans le point ajouré, tricotez-les en jersey. Bon tricot!
30.08.2024 - 14:10
|
|||||||||||||||||||||||||
Blue Nostalgia#bluenostalgiasweater |
|||||||||||||||||||||||||
 |
 |
||||||||||||||||||||||||
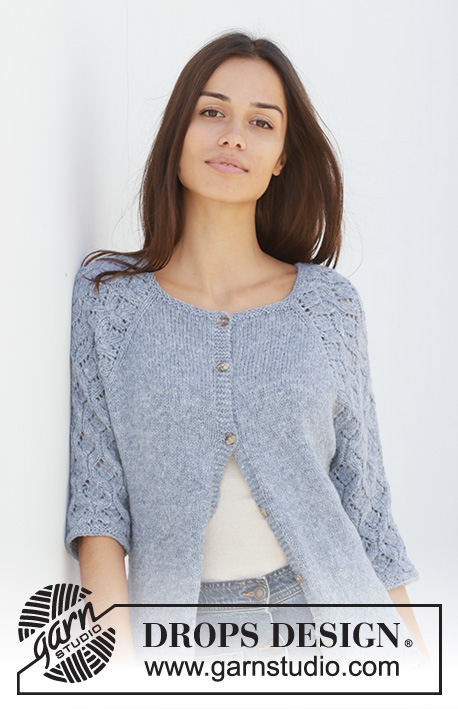
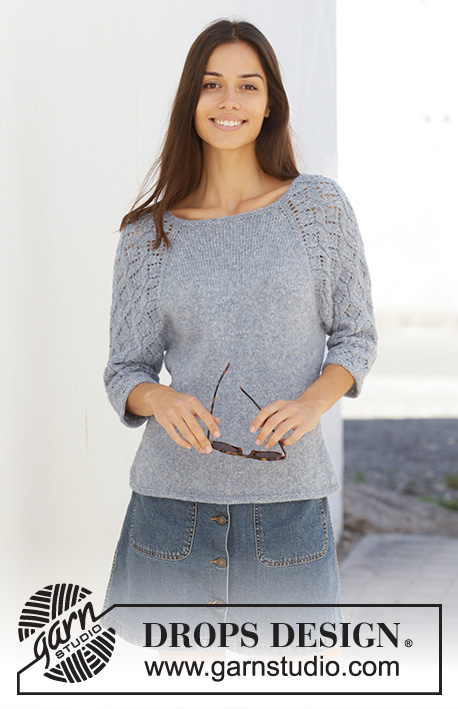
Knitted jumper with raglan in DROPS Sky. The piece is worked top down with lace pattern on sleeves. Sizes S – XXXL.
DROPS 199-3 |
|||||||||||||||||||||||||
|
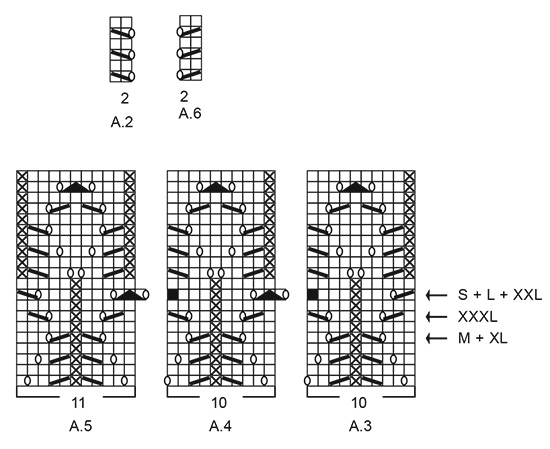
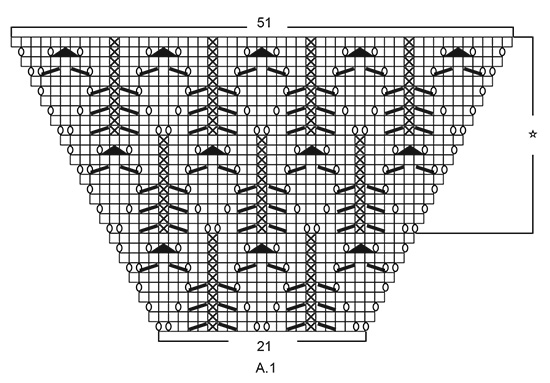
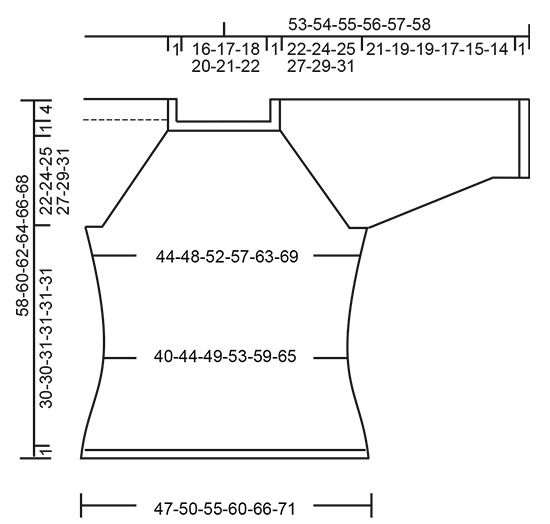
------------------------------------------------------- EXPLANATIONS FOR THE PATTERN: ------------------------------------------------------- RIDGE/GARTER STITCH (worked in the round): 1 ridge in height = 2 rounds; knit 1 round and purl 1 round. INCREASE TIP-1 (evenly spaced): To work out how to increase evenly, count the total number of stitches on the needle (e.g. 100 stitches), and divide by the number of increases to be made (e.g. 10) = 10. In this example, increase by making 1 yarn over after each 10th stitch. On the next round work the yarn overs twisted to avoid holes. PATTERN: See diagrams A.1 to A.6. Find your size in the diagrams (applies to A.3 to A.5). The diagrams show all rows in the pattern seen from the right side. DECREASE TIP (for sides of body and sleeves): Work until there are 3 stitches left before marker thread, knit 2 together, knit 2 (marker thread sits between these stitches), slip 1 stitch, knit 1 and pass the slipped stitch over the knitted stitch. INCREASE TIP-2 (for sides of body): Work until there are 2 stitches left before marker thread, 1 yarn over, knit 4 (marker thread sits in the middle of these stitches), 1 yarn over. On the next round work the yarn overs twisted to avoid holes. Then work the new stitches in stocking stitch. ------------------------------------------------------- START THE PIECE HERE: ------------------------------------------------------- JUMPER - SHORT OVERVIEW OF THE PIECE: Yoke and body are worked in the round with circular needle from mid back, top down. Sleeves are worked in the round with short circular needle/double pointed needles, top down. YOKE: Cast on 100-106-110-116-120-126 stitches with circular needle size 3.5 mm and Sky. Work 2 RIDGES – read description above. Knit 1 round where you increase 10-8-8-10-10-8 stitches evenly spaced – read INCREASE TIP-1 = 110-114-118-126-130-134 stitches. Change to circular needle size 4 mm. Knit 1 round. The next round is worked as follows: Work stocking stitch over the first 15-16-17-19-20-21 stitches (= half back piece), 1 yarn over, 2 stitches in stocking stitch, work A.1 over 21 stitches (= sleeve), 2 stitches in stocking stitch, 1 yarn over, work 30-32-34-38-40-42 stitches in stocking stitch (= front piece), 1 yarn over, 2 stitches stocking stitch, work A.1 over 21 stitches (= sleeve), 2 stitches in stocking stitch, 1 yarn over, work stocking stitch over the last 15-16-17-19-20-21 stitches (= half back piece). There are now 118-122-126-134-138-142 stitches on the needle. Continue this pattern onwards; i.e. on the sleeves increase on each side as shown in A.1. On the next round knit the yarn overs (= holes) and the increased stitches are worked into the pattern as you go as shown in A.1. On front and back pieces increase with yarn overs before/after the 2 stitches in stocking stitch in each side (there will be 2 stitches stocking stitch between each raglan increase). On the next round knit the yarn overs twisted (= no holes) and the increased stitches are worked in stocking stitch. Increase like this every 2nd round. You increase a total of 8 stitches on each increase-round (= 4 yarn overs + 4 stitches increased in A.1). REMEMBER THE KNITTING TENSION! When A.1 has been worked 1 time in height there are 230-234-238-246-250-254 stitches on the needle. Continue this pattern onwards, i.e. the pattern repeats itself as shown in A.1. Each time you have worked 20 rounds there will be room for 1 more repeat of lace pattern in width on each sleeve. When you have increased a total of 24-27-29-32-34-38 times there are 302-330-350-382-402-438 stitches on the needle and the piece measures 18-20-22-24-25-28 cm from the cast-on edge mid front. Continue with stocking stitch and pattern as before, but without increasing; i.e. the 69-75-79-85-89-97 stitches in A.1 are worked as follows: Work A.2 (= 2 stitches), 2-0-2-0-2-1 stitches in stocking stitch, starting on the round marked with an arrow for your size work A.3 (= 10 stitches), A.4 over the next 40-50-50-60-60-70 stitches (= 4-5-5-6-6-7 reports of 10 stitches), A.5 (= 11 stitches), 2-0-2-0-2-1 stitches in stocking stitch and A.6 (= 2 stitches). Continue until the piece measures approx. 23-25-26-28-30-32 cm from the cast-on edge mid front. The next round is worked as follows: Work 41-45-49-54-59-65 stitches in stocking stitch (= half back piece), place the next 69-75-77-83-83-89 stitches on 1 thread for sleeve, cast on 10-10-12-12-14-14 new stitches on the needle (= in side under sleeve), work 82-90-98-108-118-130 stitches stocking stitch (= front piece), place the next 69-75-77-83-83-89 stitches on 1 thread for sleeve, cast on 10-10-12-12-14-14 new stitches on the needle (= in side under sleeve) and work the remaining 41-45-49-54-59-65 stitches in stocking stitch (= half back piece). Body and sleeves are finished separately. THE PIECE IS NOW MEASURED FROM HERE! BODY: = 184-200-220-240-264-288 stitches. Insert 1 marker thread on each side in the middle of the 10-10-12-12-14-14 stitches cast on under each sleeve. Allow them to follow your work onwards; they will be used a little later when decreasing/increasing. Work stocking stitch. When the piece measures 2 cm from the division decrease 1 stitch on each side of both marker threads - read DECREASE TIP = 4 stitches decreased. Decrease like this every 3 cm a total of 4 times = 168-184-204-224-248-272 stitches. Continue working until the piece measures 14 cm from the division. Now increase 1 stitch on each side of both marker threads – read INCREASE TIP-2 = 4 stitches increased. Increase like this every 2 cm a total of 7 times = 196-212-232-252-276-300 stitches. Continue working until the piece measures 30-30-31-31-31-31 cm from the division. Change to circular needle size 3.5 mm and work 2 ridges. Loosely cast off, but to avoid the cast-off edge being tight you can cast off with needle size 4 mm. The jumper measures approx. 58-60-62-64-66-68 cm from the shoulder down. SLEEVE: Place the 69-75-77-83-83-89 stitches from the thread on the one side of the piece on short circular needle/double pointed needles size 4 mm and knit up 1 stitch in each of the 10-10-12-12-14-14 stitches cast on under the sleeve = 79-85-89-95-97-103 stitches. Insert 1 marker thread in the middle of the 10-10-12-12-14-14 stitches cast on under the sleeve and allow it to follow your work onwards; it will be used a little later when decreasing. Start the round at the marker thread. Start on the correct round in the diagrams so that the pattern continues from the yoke and work as follows: Work 4-2-4-2-3-1 stitches in stocking stitch, A.3 (= 10 stitches), A.4 over the next 50-60-60-70-70-80 stitches (= 5-6-6-7-7-8 repeats of 10 stitches), A.5 (= 11 stitches) and 4-2-4-2-3-1 stitches in stocking stitch. Continue this pattern. When the piece measures 2 cm from the division, decrease 2 stitches mid under sleeve – remember DECREASE TIP. Decrease like this every 3rd-3rd-3rd-2nd-2nd-2nd round a total of 14-15-15-16-15-16 times = 51-55-59-63-67-71 stitches. The stitches which do not fit into the pattern as you decrease are worked in stocking stitch, but make sure that if decreases are in the pattern you also make a yarn over. Continue working until the piece measures 21-19-19-17-15-14 cm from the division (shorter measurements in larger sizes due to longer yoke). Change to double pointed needles size 3.5 mm and work 2 ridges. Loosely cast off, but to avoid the cast-off edge being tight you can cast off with needle size 4 mm. Sleeve measures approx. 22-20-20-18-16-15 cm from the division. Work the other sleeve in the same way. |
|||||||||||||||||||||||||
Diagram explanations |
|||||||||||||||||||||||||
|
|||||||||||||||||||||||||
 |
|||||||||||||||||||||||||
 |
|||||||||||||||||||||||||
 |
|||||||||||||||||||||||||
Have you finished this pattern?Tag your pictures with #dropspattern #bluenostalgiasweater or submit them to the #dropsfan gallery. Do you need help with this pattern?You'll find 27 tutorial videos, a Comments/Questions area and more by visiting the pattern on garnstudio.com. © 1982-2026 DROPS Design A/S. We reserve all rights. This document, including all its sub-sections, has copyrights. Read more about what you can do with our patterns at the bottom of each pattern on our site. |
|||||||||||||||||||||||||


With over 40 years in knitting and crochet design, DROPS Design offers one of the most extensive collections of free patterns on the internet - translated to 17 languages. As of today we count 324 catalogues and 12290 patterns translated into English (UK/cm). 12290
We work hard to bring you the best knitting and crochet have to offer, inspiration and advice as well as great quality yarns at incredible prices! Would you like to use our patterns for other than personal use? You can read what you are allowed to do in the Copyright text at the bottom of all our patterns. Happy crafting!
Post a comment to pattern DROPS 199-3
We would love to hear what you have to say about this pattern!
If you want to leave a question, please make sure you select the correct category in the form below, to speed up the answering process. Required fields are marked *.