
Popular categories
Looking for a yarn?


Comments / Questions (46)
![]() Aiden wrote:
Aiden wrote:
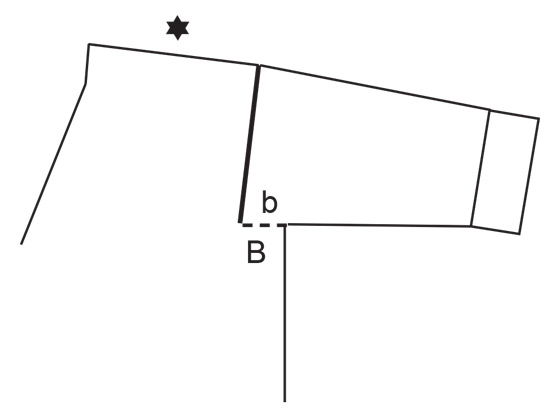
In the left and right front piece, it is mentioned when the piece measures 4 cm. Is it 4 cm from top of the piece or the measurement starts after the 28 stitches are knit up
03.10.2024 - 13:28DROPS Design answered:
Dear Aiden, measure these 4 cm from the stitches picked up for front piece/shoulders. Happy knitting!
03.10.2024 - 16:21
![]() Julie Parker wrote:
Julie Parker wrote:
With the Elodie cardigan I am up to the right front side measuring 26 cm. How do you cast in the 12 stitches from the wrong side and work the 90 stitches on the back
05.09.2024 - 11:42DROPS Design answered:
Dear Mrs Parker, work the stitches from right front piece as before from wrong side, then cast on 12 sts (see lesson or video), work the 90 sts on the back from wrong side, cast on 12 sts a s before and work the stitches on left front piece as before. See also under Video/Lesson tabs how to join front/back pieces together for a jumper (same as for a jacket, you will just here work in rows instead of in the round). Happy knitting!
06.09.2024 - 07:51
![]() Julie Parker wrote:
Julie Parker wrote:
When picking up stitches to knit the left front piece, what does it mean by “knit up stitches inside 1 stitch?
29.08.2024 - 23:44DROPS Design answered:
Dear Mrs Parker, please look at this video where you will see how to pick up stitches along shoulders, inside 1 stitch. Happy knitting!
30.08.2024 - 14:37
![]() Aiden wrote:
Aiden wrote:
How do I know which size to make. The bust dimensions are not given in the chart.
23.08.2024 - 07:48DROPS Design answered:
Dar Aiden, you will find all finished measurements in the chart, measure a similar garment you have and like the size and compare them to the ones in the chart to find out the matching size. Read more here. Happy knitting!
23.08.2024 - 08:11
![]() Miriam wrote:
Miriam wrote:
Could you please clarify the increase instructions on the left front piece? Am I increasing every 2nd row 12x (24 rows) THEN increasing every 4th row 3x THEN every 6th row 3x ?
13.08.2024 - 12:57DROPS Design answered:
Dear Miriam, in 3rd size you will increase 1 stitch 11 times on every other row (every row from RS), then on every 4th row (on every other row from RS) 3 times then on every 6th row (every 3rd row from RS) 2 times. Happy knitting!
13.08.2024 - 16:05
![]() Julia wrote:
Julia wrote:
Dzień dobry, Robię sweter w rozmiarze M, jestem na etapie skończenia obu przodów i w każdym z nich, gdy doszłam do 88 oczek robótka wynosiła już 28 cm (według przepisu powinnam przerabiać po nalozeniu 88 oczek az do uzyskania 25 cm robótki). Czy to oznacza, że mam wydłużyć tył o te nadprogramowe 3 cm czy po prostu przerabiać dalej?
07.08.2024 - 19:27DROPS Design answered:
Witaj Julio, długość przodów mierzysz od nabrania oczek na ramieniu. Przody będą dłuższe niż tył ponieważ skos ramienia leży opada niżej wzdłuż tyłu. Najlepiej przełóż robótkę na żyłką pomocniczą/ nitkę i zmierz. Wtedy ocenisz czy tył powinien być nieco dłuższy czy nie. Pozdrawiamy!
08.08.2024 - 09:32
![]() Makena wrote:
Makena wrote:
I'd like to knit the button band in a different colour. Do I just cast on stitches in the second colour and then pick up with the main body colour? If so how do I attach the two sections. Or should I knit the cardigan them attach a button band after?
02.07.2024 - 22:13DROPS Design answered:
Dear Makena, this cardigan was designed with the buttonband mostly knitted at the same time, as the rest of the piece. So unless you are willing to have the yarns twisted and changed after and before the bands at every row (like you would do if you knit intarsia), it would take much modification to knit the bands at a different color, and please understand that with many thousands of patterns available in several languages, we cannot modify our patterns to each individual request. Happy Knitting!
03.07.2024 - 00:42
![]() Monica wrote:
Monica wrote:
Hei! Jeg får det ikke helt til å stemme at bakstykket kun skal være 14 cm. Når forstykkene skal kobles til bakstykke så faller skulderkonstruksjonen langt ned på skuldrene om du skjønner. Jeg har strikket flere gensere og jakker med helt lik konstruksjon, og da er ofte bakstykkene i alle fall lengre enn 25 cm målt fra oppleggskanten. Er det noe her jeg ikke forstår?
18.06.2024 - 14:12DROPS Design answered:
Hei Monica, Det er toppen av forstykket som er litt ned på bakstykket (derfor er forstykket litt lengre en bakstykket og opplukningsrad er bak på skuldrene). Håper dette hjelper og god fornøyelse!
19.06.2024 - 08:05
![]() Robert wrote:
Robert wrote:
Bonjour La finition du col proposée ne donne pas un excellent rendu. J’ai donc modifié et fait une seule bande d’encolure que j’ai cousu à point arrière. Le rendu est bien plus joli. N’y aurait il pas une autre solution possible? Le gilet est vraiment superbe. Isa
13.03.2024 - 07:38DROPS Design answered:
Bonjour Mme Robert, vous pouvez peut-être vous inspirer de cette vidéo où on montre comment coudre un bord point mousse (emmanchure dans la vidéo, col dans ce modèle) le long du jersey (manche dans la vidéo, encolure dos dans ce gilet). Bon assemblage!
13.03.2024 - 08:29
![]() Nicole wrote:
Nicole wrote:
Hi again, increasing every 2nd row, is that: increase on the right side, no increase wrong side and then increase on the right side again? Or am I knitting a whole right and wrong side as well as a non increase? Thanks.
11.03.2024 - 06:57DROPS Design answered:
Dear Nicole, increasing every second row is increasing every row from the right side (and no increase on th ewrong side). I hope this helps. Happy Knitting!
11.03.2024 - 09:24
|
||||||||||
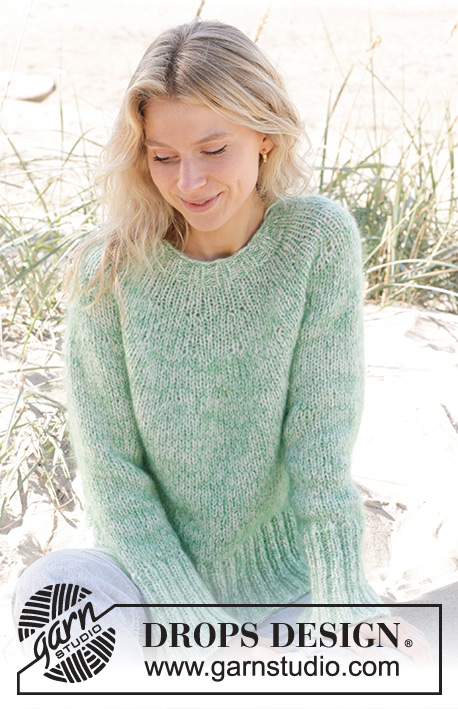
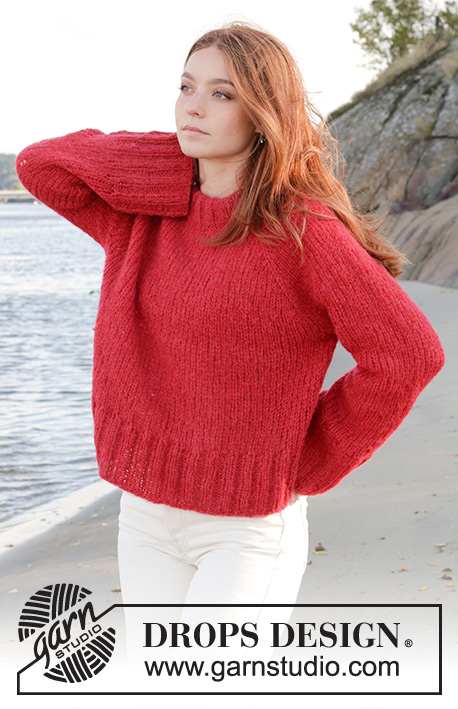
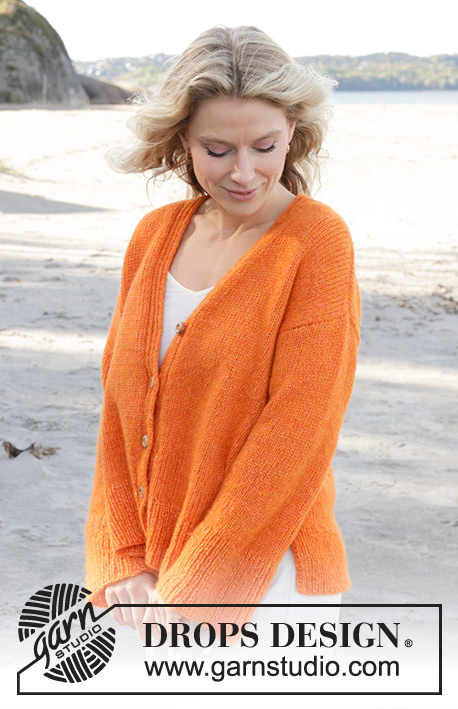
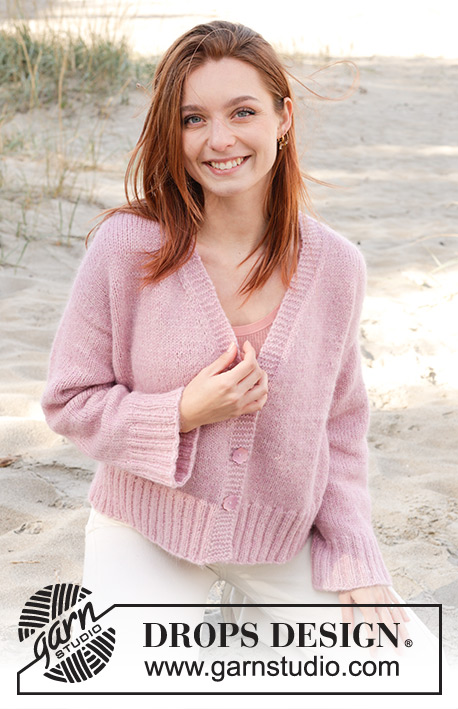
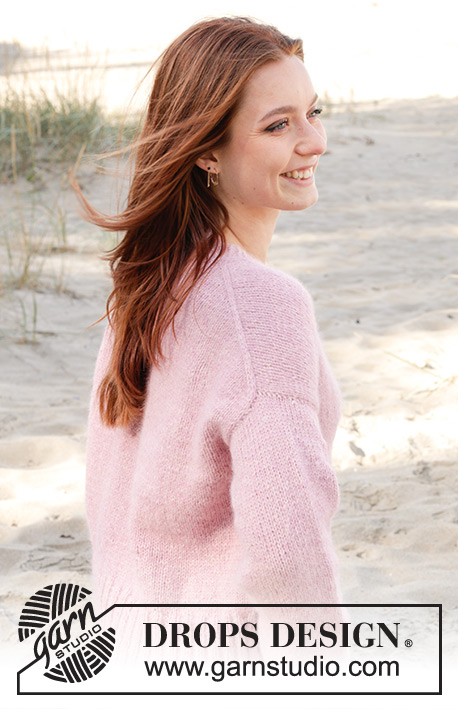
Elodie Cardigan#elodiecardigan |
||||||||||
 |
 |
|||||||||
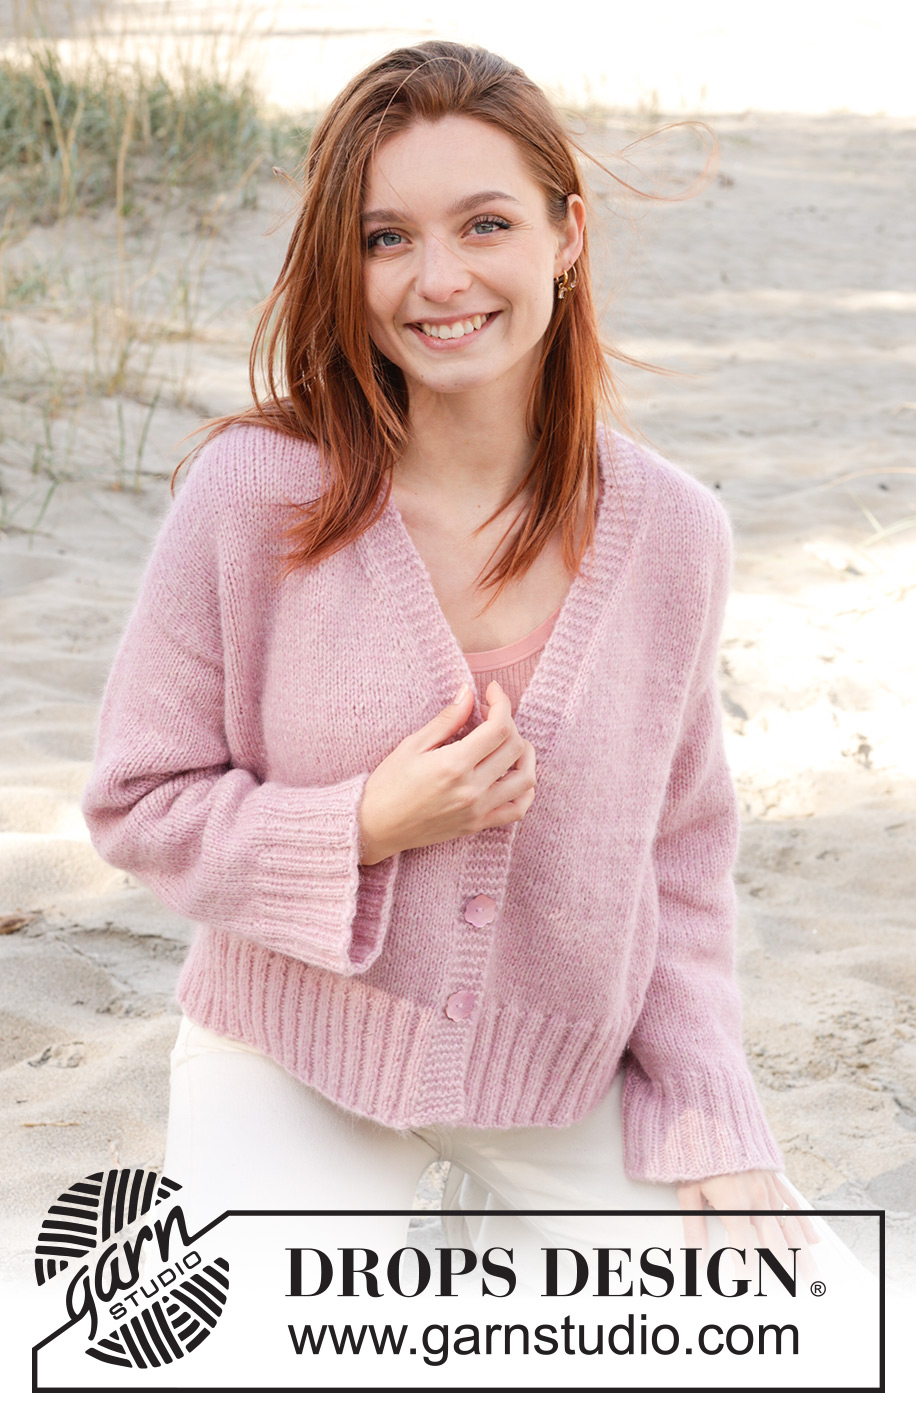
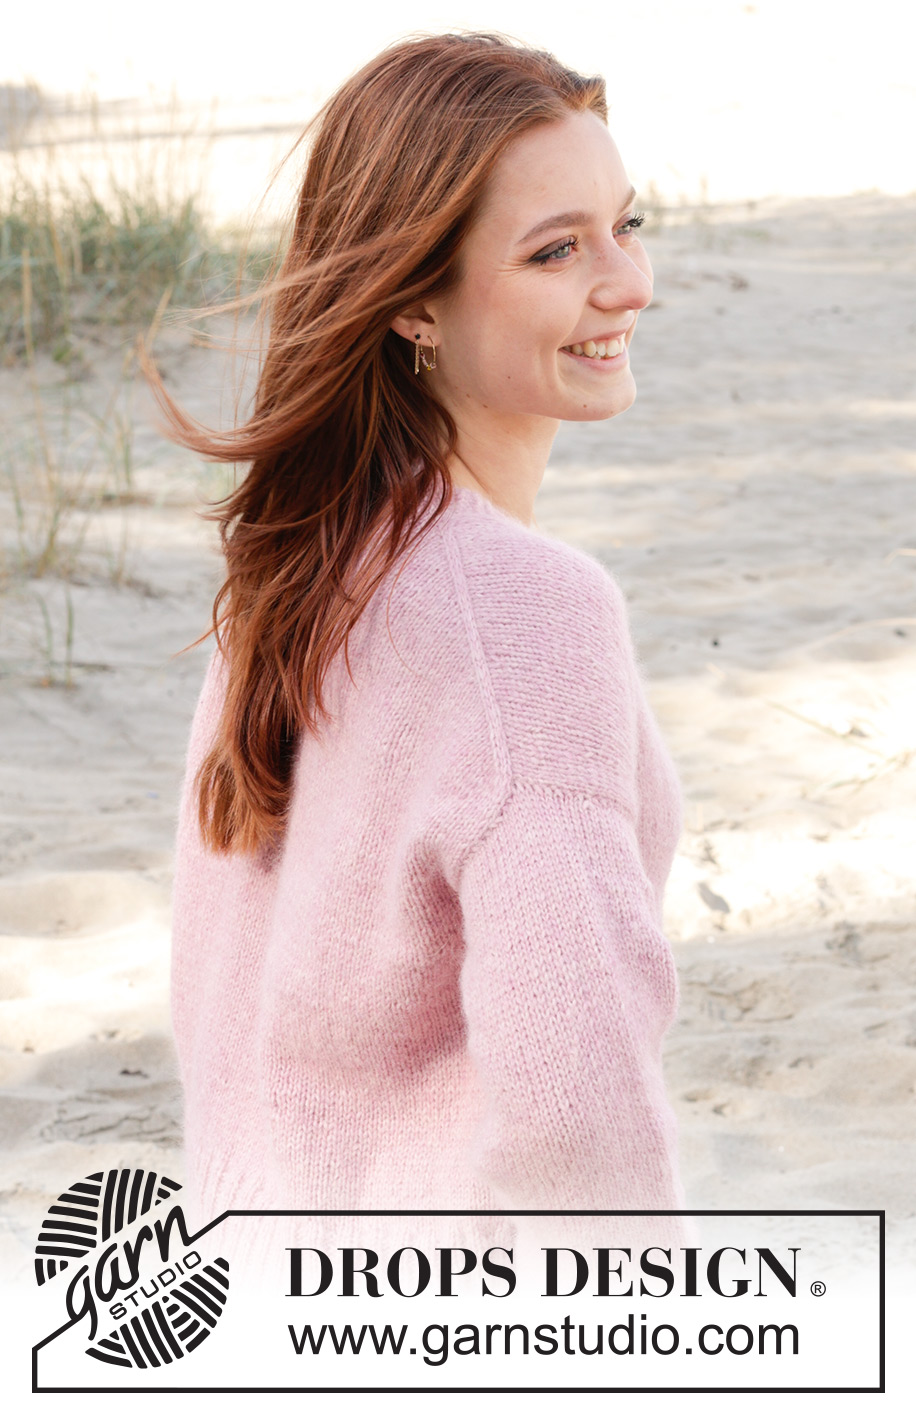
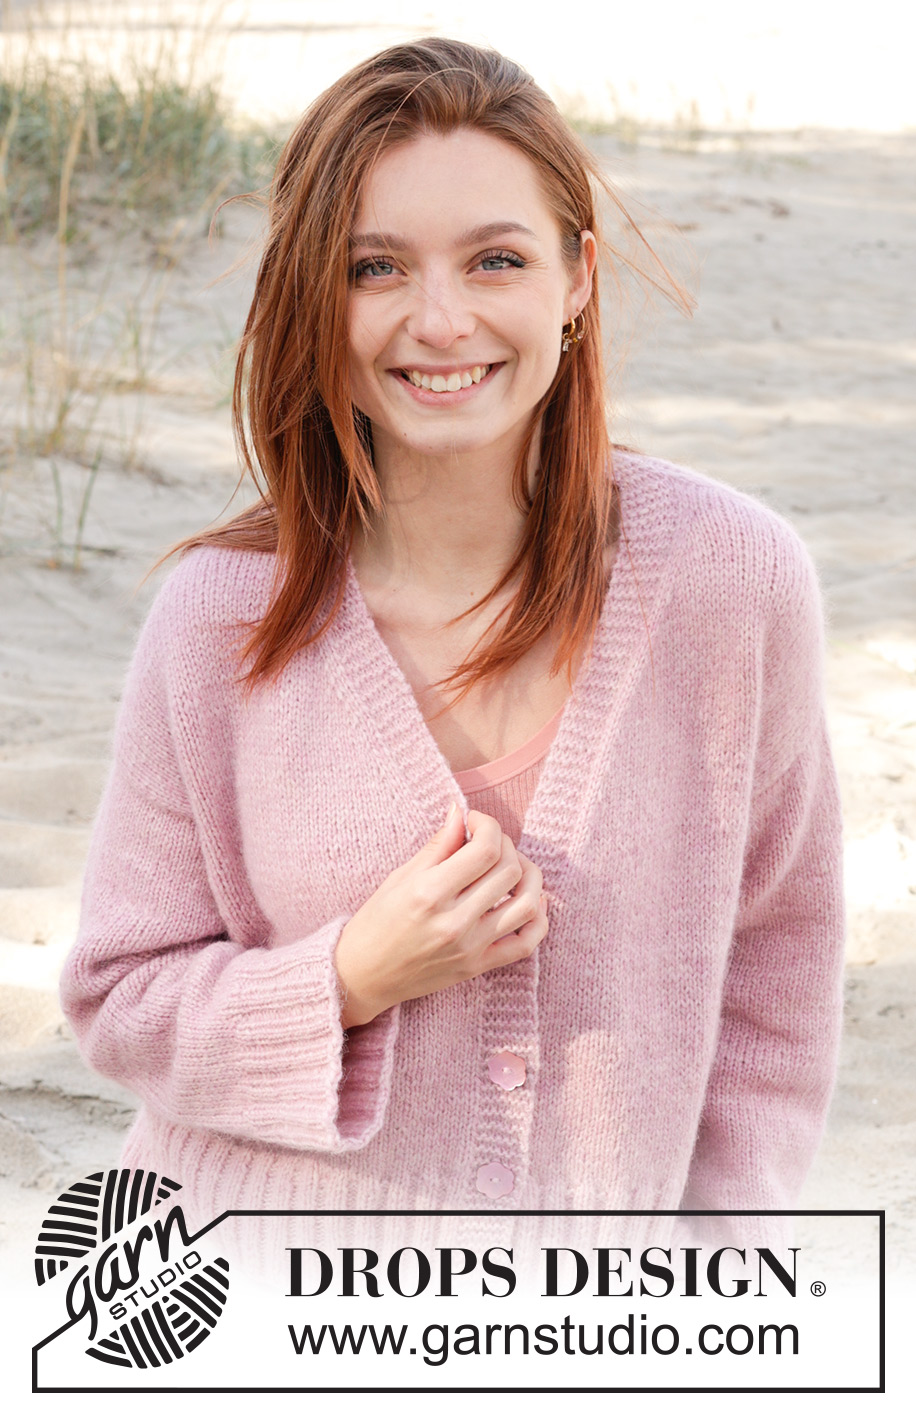
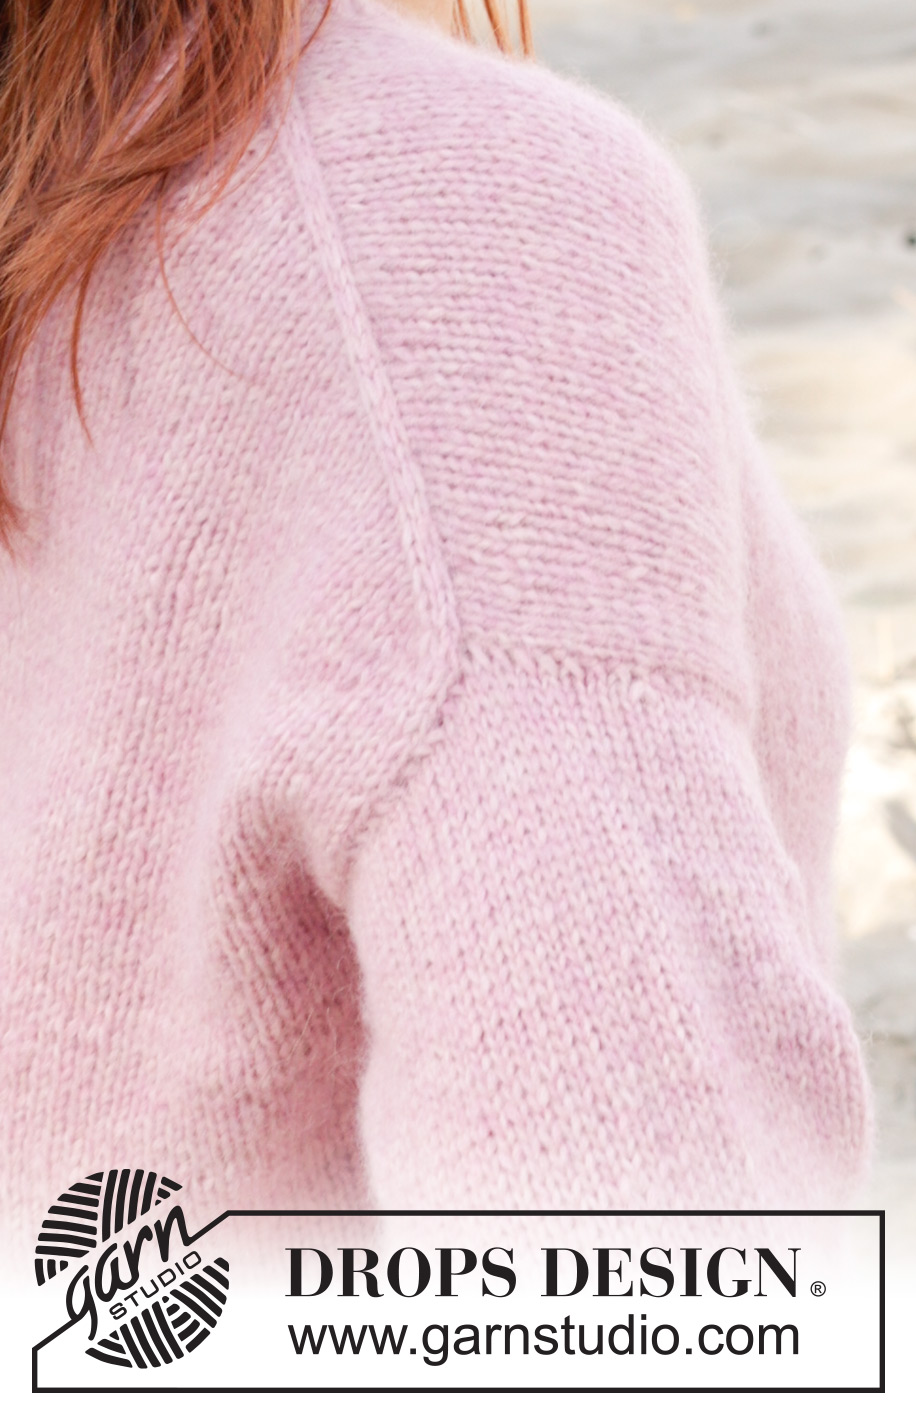
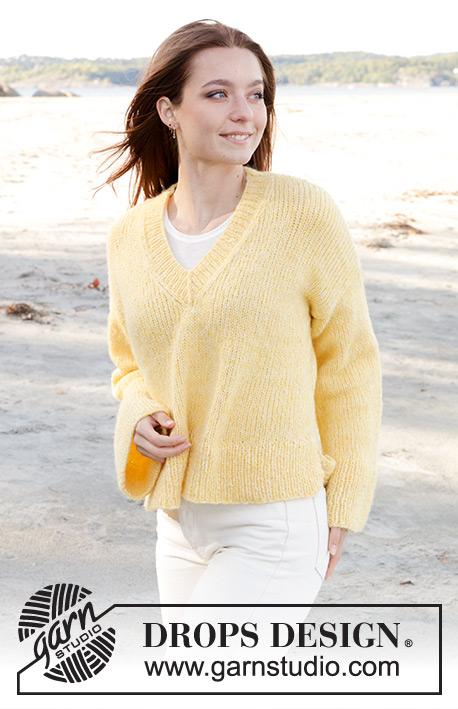
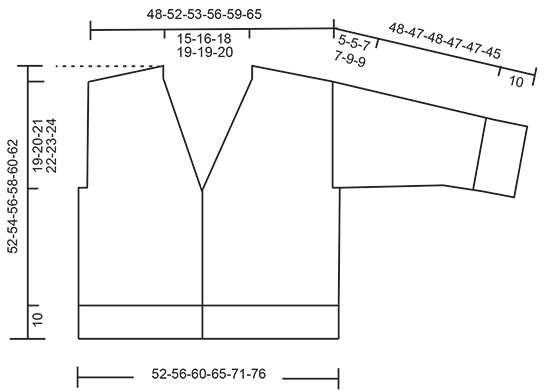
Knitted jacket in DROPS Air. The piece is worked top down with European/diagonal shoulders and V-neck. Sizes S - XXXL.
DROPS 240-29 |
||||||||||
|
------------------------------------------------------- EXPLANATIONS FOR THE PATTERN: ------------------------------------------------------- RIDGE/GARTER STITCH (worked back and forth): Knit all rows. 1 ridge = knit 2 rows. INCREASE TIP FROM THE RIGHT SIDE: Increase towards the left AFTER MARKER: Use left needle to pick up yarn between 2 stitches from row below, pick up yarn from the front and knit in the stitch loop that is on the back of the needle. Increase towards the right BEFORE MARKER: Use left needle to pick up yarn between 2 stitches from row below, pick up yarn from the back and knit in the stitch loop that is on the front side of the needle. INCREASE TIP FROM THE WRONG SIDE: Increase towards the right AFTER MARKER: Use left needle to pick up yarn between 2 stitches from row below, pick up yarn from the back and purl in the stitch loop that is on the front side of the needle. Increase towards the left BEFORE MARKER: Use left needle to pick up yarn between 2 stitches from row below, pick up yarn from the front and purl in the stitch loop that is on the back side of the needle. BUTTONHOLES: Work buttonholes on the right band (when the garment is worn). Work from the right side when there are 4 stitches left on the row as follows: Make 1 yarn over, knit 2 together and knit 2. On the next row (wrong side), knit the yarn over to leave a hole. Work buttonholes when the piece measures: S: 27, 34 and 41 cm. M: 27, 35 and 43 cm. L: 29, 37 and 45 cm. XL: 30, 38 and 47 cm. XXL: 32, 40 and 49 cm. XXXL: 33, 42 and 51 cm. DECREASE TIP (for sleeves): Decrease 1 stitch on either side of the marker-thread as follows: Work until there are 3 stitches left before the marker-thread, knit 2 together, knit 2 (marker-thread sits between these 2 stitches), slip 1 stitch as if to knit, knit 1 and pass the slipped stitch over the knitted stitch. ------------------------------------------------------- START THE PIECE HERE: ------------------------------------------------------- JACKET – SHORT OVERVIEW OF THE PIECE. The pattern uses both long and short needles; start with the length which fits the number of stitches and change when necessary. The piece is started by casting on stitches at the back of the neck and working the back piece top down, while increasing stitches on each side for the shoulders, which become slightly diagonal. The back piece is worked as far as the armholes. The front pieces are started by knitting up stitches along the back shoulders, working downwards while increasing for the neck and working until the armholes are finished. The front and back pieces are joined on the same circular needle and the body finished, working back and forth. Stitches are knitted up around the armholes for the sleeves, which are started back and forth for the sleeve cap, then finished in the round. Then work an edge for neck on back piece. BACK PIECE: Cast on 30-32-34-36-36-38 stitches with circular needle size 5 mm and DROPS Air. Purl 1 row from the wrong side. Insert 1 marker inside the 3 outermost stitches on each side. Keep the markers inside these 3 stitches onwards. Work stocking stitch back and forth. AT THE SAME TIME, increase AFTER the marker at the beginning of the row and BEFORE the marker at the end of the row – read INCREASE FROM RIGHT SIDE. On the next row (wrong side) increase in the same way – read INCREASE FROM WRONG SIDE. Increase from both the right and wrong side a total of 26-28-28-30-32-36 times. After the last increase there are 82-88-90-96-100-110 stitches. THE PIECE IS NOW MEASURED FROM HERE! Continue working until the piece measures 14-15-16-17-17-18 cm. Cut the yarn, put stitches on a thread or on an extra needle and work the front pieces as explained below. LEFT FRONT PIECE: Start on the left shoulder (when the garment is worn). Cast on 7 stitches (band), knit up 26-28-28-30-32-36 stitches inside 1 stitch along the left shoulder on the back piece (knit up 1 stitch in each row) = 33-35-35-37-39-43 stitches. Work stocking stitch with 7 stitches in GARTER STITCH-see description above, mid-front. When the piece measures 4 cm, increase at the beginning of each row from the right side for the neck, after the 7 garter stitches + 2 stocking stitches – remember INCREASE FROM RIGHT SIDE. Increase 1 stitch every 2nd row 10-11-12-13-13-14 times, every 4th row 3 times and every 6th row 2 times = 48-51-52-55-57-62 stitches. When the piece measures 24-25-26-27-29-30 cm, put stitches on a thread or on an extra needle after working the last row from the right side. Cut the yarn. Work the right front piece as explained below. RIGHT FRONT PIECE: Knit up 26-28-28-30-32-36 stitches inside 1 stitch along the right shoulder on the back piece then cast on 7 stitches at the end of the row (band) = 33-35-35-37-39-43 stitches. Work stocking stitch with 7 stitches in garter stitch mid-front. When the piece measures 4 cm increase at the end of each row from the right side for the neck, before 2 stocking stitches + 7 garter stitches – remember INCREASE FROM RIGHT SIDE. Increase 1 stitch every 2nd row 10-11-12-13-13-14 times, every 4th row 3 times and every 6th row 2 times = 48-51-52-55-57-62 stitches. When the piece measures 24-25-26-27-29-30 cm, work as follows from the wrong side: Work the 48-51-52-55-57-62 stitches on the right front piece, cast on 6-8-12-14-20-20 stitches work the 82-88-90-96-100-110 stitches on the back piece, cast on 6-8-12-14-20-20 stitches, work the 48-51-52-55-57-62 stitches on the left front piece. BODY: = 190-206-218-234-254-274 stitches. Continue back and forth with stocking stitch and garter stitch - REMEMBER THE BUTTONHOLES – see description above, for a further 42-44-46-48-50-52 cm. Knit 1 row from the right side and increase 62-62-70-74-82-90 stitches evenly spaced (do not increase over the bands) = 252-268-288-308-336-364 stitches. Change to circular needle size 4 mm. Work rib as follows from the wrong side: 7 garter stitches, * purl 2, knit 2 *, work from *-* until there are 9 stitches left, purl 2 and 7 garter stitches. Continue this rib for 10 cm. Cast off. LEFT SLEEVE: Using circular needle size 5 mm, knit up from the right side 40-42-45-45-49-51 stitches from the bottom of the armhole and up the front piece to the shoulder, then 24-26-27-29-29-31 stitches from the shoulder to the bottom of the armhole down the back piece = 64-68-72-74-78-82 stitches. Insert 1 marker in the middle of the stitches picked up. Work now back and forth in stocking stitch with short rows for the sleeve cap, to gives a better shape to the sleeve. 1st row (from wrong side): work to 16 stitches after marker, turn. 2nd row (from right side): work to 16 stitches after marker, turn. 3rd row (from wrong side): work to 20 stitches after marker, turn. 4th row (from right side): work to 20 stitches after marker, turn. 5th row (from wrong side): work to 24 stitches after marker, turn. 6th row (from right side): work to 24 stitches after marker, turn. 7th row (from wrong side): work to the beginning of the row. Work stocking stitch back and forth for 5-5-7-7-9-9 cm, measure from where the stitches were picked up (all length are measured mid on top of sleeve). Join the sleeve, using short circular needle/double pointed needles size 5 mm and continue in the round. Insert 1 marker thread at the beginning of the round (mid-under sleeve). Allow the thread to follow your work onwards. Start at the marker-thread and continue with stocking stitch until the sleeve measures 7-7-9-9-11-11 cm from the knitted-up stitches. Decrease 2 stitches under the sleeve – read DECREASE TIP. Decrease like this every 5½-4½-3½-3½-2½-2 cm a total of 6-7-8-8-9-10 times = 52-54-56-58-60-62 stitches. Continue working until the sleeve measures 38-37-38-37-37-35 cm. There is approx. 10 cm left; try the jacket on and work to desired length before the rib. Knit 1 round and increase 16-18-16-18-20-18 stitches evenly spaced = 68-72-72-76-80-80 stitches. Change to double pointed needles size 4 mm and work rib (knit 2, purl 2) for 10 cm. Cast off a little loosely. The sleeve measures approx. 48-47-48-47-47-45 cm. RIGHT SLEEVE: Work the same way as the left sleeve, but first knit up 24-26-27-29-29-31 stitches from the bottom of the armhole up the back piece to the shoulder, then 40-42-45-45-49-51 stitches from the shoulder down the front piece. Sew the bottom of the armholes. NECK Knit up 1 stitch in each of the 7 garter stitches at the top of the right front piece, work garter stitch back and forth for 8-9-9-10-10-10 cm; check that the band reaches approx. midway at the back of the neck when stretched slightly. Cast off. Work in the same way from the band on the left front piece. Sew the bands together mid-back and sew the neck to the neckline. ASSEMBLY: Sew the buttons onto the left band. |
||||||||||
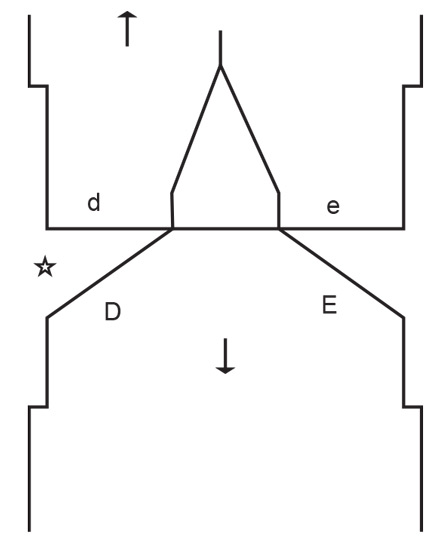
Diagram explanations |
||||||||||
|
||||||||||
 |
||||||||||
 |
||||||||||
 |
||||||||||
Have you finished this pattern?Tag your pictures with #dropspattern #elodiecardigan or submit them to the #dropsfan gallery. Do you need help with this pattern?You'll find 33 tutorial videos, a Comments/Questions area and more by visiting the pattern on garnstudio.com. © 1982-2026 DROPS Design A/S. We reserve all rights. This document, including all its sub-sections, has copyrights. Read more about what you can do with our patterns at the bottom of each pattern on our site. |
||||||||||


With over 40 years in knitting and crochet design, DROPS Design offers one of the most extensive collections of free patterns on the internet - translated to 17 languages. As of today we count 324 catalogues and 12290 patterns translated into English (UK/cm). 12290
We work hard to bring you the best knitting and crochet have to offer, inspiration and advice as well as great quality yarns at incredible prices! Would you like to use our patterns for other than personal use? You can read what you are allowed to do in the Copyright text at the bottom of all our patterns. Happy crafting!
Post a comment to pattern DROPS 240-29
We would love to hear what you have to say about this pattern!
If you want to leave a question, please make sure you select the correct category in the form below, to speed up the answering process. Required fields are marked *.