
Popular categories
Looking for a yarn?


Comments / Questions (20)
![]() De Man wrote:
De Man wrote:
Ik be met die trui bezig moet je ook aan de averechtekant het patroon aanhouden of alleen aan de voorkant
18.12.2022 - 11:17DROPS Design answered:
Dag De Man,
Je breit zowel op de goede als op de verkeerde kant het patroon. Aan de goede kant lees je het telpatroon van rechts naar links en aan de verkeerde kant lees je het telpatroon van links naar rechts.
18.12.2022 - 15:09
![]() Laura wrote:
Laura wrote:
Hola, ellos diagramad A.1 y A.2 muestran las filas de ida y vuelta (derecho y revés) o sólo las filas de derecho, y el revés se teje tal como se presenta el tejido? Gracias
15.12.2021 - 19:28DROPS Design answered:
Hola Laura, los diagramas muestran todos los puntos de todas las filas (las de derecho y las de revés) vistas por el lado derecho.
18.12.2021 - 22:41
![]() Tonje wrote:
Tonje wrote:
Det hadde vært fint med bilde av genseren med reinsdyr bakfra også.
05.12.2021 - 01:08
![]() Nora wrote:
Nora wrote:
Los puntos centrales escote delantero no se rematan solo se separan?
19.09.2021 - 18:13DROPS Design answered:
Hola Nora, si, los puntos centrales no se cierran, sino que se ponen en espera en un gancho auxiliar, para que el cuello quede después más bonito.
19.09.2021 - 22:22
![]() Sabine Tröger wrote:
Sabine Tröger wrote:
Ich bin sehr enttäuscht. Ich habe den Pullover gemäß Anleitung mit Drops Nepal (im Shop bestellt) für mein 2-jähriges Enkeltöchterchen gestrickt. Sie hat sich sehr gefreut, kann den Pullover aber nicht anziehen, weil er "piekst". Schon beim Stricken hatte ich Bedenken, das Garn ist sehr rau. Alle Nachbehandlung hat nichts genutzt der Pullover blieb kratzig. Somit war alle Liebe umsonst, da der (optisch wunderschöne) Pullover nun niemals getragen werden kann 😢
27.12.2020 - 15:04
![]() Marimar wrote:
Marimar wrote:
Bonjour, Je ne parviens plus à imprimer les grilles pour le motif devant et derrière. On m'indique que "l'image est cryptée". Seules les explications écrites peuvent être imprimées. Plutôt embêtant lorsqu'il y a des grilles jacquards. Pouvez vous y remédier ? Merci
11.10.2020 - 20:49DROPS Design answered:
Bonjour Mme Marimar, c'est effectivement ennuyeux, mais nous avons pu imprimer un test de ce modèle sans souci, avez-vous essayer de regarder du côté des paramètres de votre imprimante? Bon tricot!
12.10.2020 - 09:09
![]() Elena wrote:
Elena wrote:
Salve, sono una principiante e vorrei sapere se questo modello si può eseguire con i ferri diritti, poichè con quelli circolari non sono molto pratica e quelli a doppia punta non li ho mai usati. Se si possono usare i ferri diritti c'è qualche variazione che si deve fare? GRAZIE
26.09.2020 - 18:29DROPS Design answered:
Buongiorno Elena. Può lavorare con i ferri dritti seguendo le stesse istruzioni. Solo per la manica, se vuole lavorarla in ferri di andata e ritorno, può avviare il numero di maglie indicato aggiungendo una maglia da ciascun lato per la cucitura. Buon lavoro!
27.09.2020 - 12:55
![]() Marta wrote:
Marta wrote:
Como se haría con dos agujas en vez de agujas circulares ME PODEIS AYUDAR patrón 18 meses Jersei del reno
03.12.2019 - 20:18DROPS Design answered:
Hola Marta. Puedes leer nuestra lección sobre cómo adaptar un modelo trabajado con agujas circulares a agujas rectas: https://www.garnstudio.com/lesson.php?id=13&cid=23
10.12.2019 - 00:16
![]() Martine Degryse wrote:
Martine Degryse wrote:
Is het ook mogelijk om patronen te bekomen voor het breien met de machine ?
02.11.2019 - 18:01DROPS Design answered:
Dag Martine,
Helaas hebben we alleen patronen voor breien met de hand.
05.11.2019 - 10:19
![]() Michele wrote:
Michele wrote:
I bought 2 different yarns for two jumpers following the suggestions given earlier in the year. You have only given the instructions for using Nepal and I would like to check the needle size for using Air and also hope the instructions remain the same.
16.09.2019 - 14:33DROPS Design answered:
Dear Michele, both Nepal and Air belong to yarn group C so that you should get the same knitting tension with both yarns - you'll find all yarn alternatives suggested in the DROPS-Along here. Happy knitting!
16.09.2019 - 15:25
|
|||||||||||||||||||
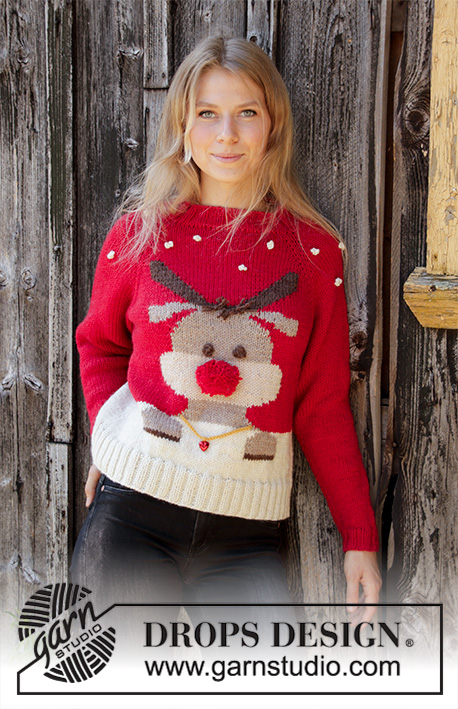
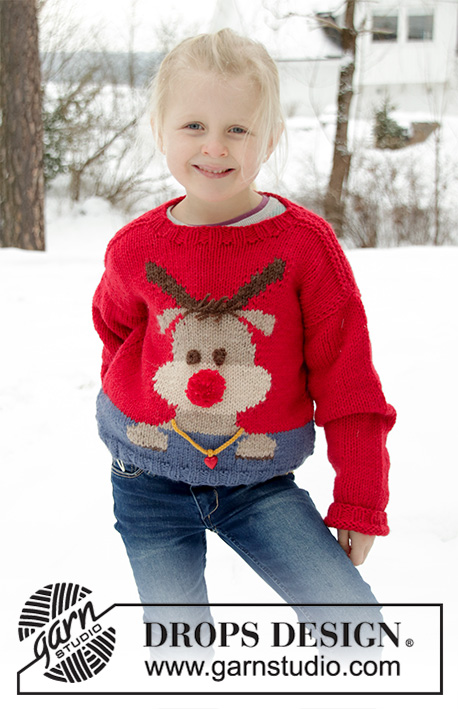
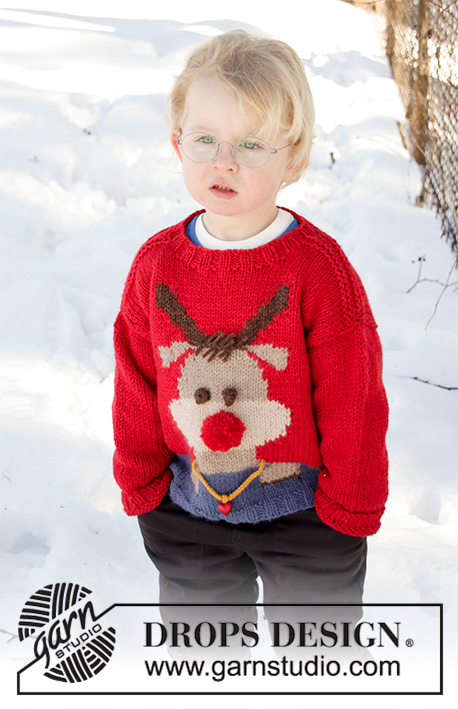
Red Nose Jumper Kids#rednosejumperkids |
|||||||||||||||||||
 |
 |
||||||||||||||||||
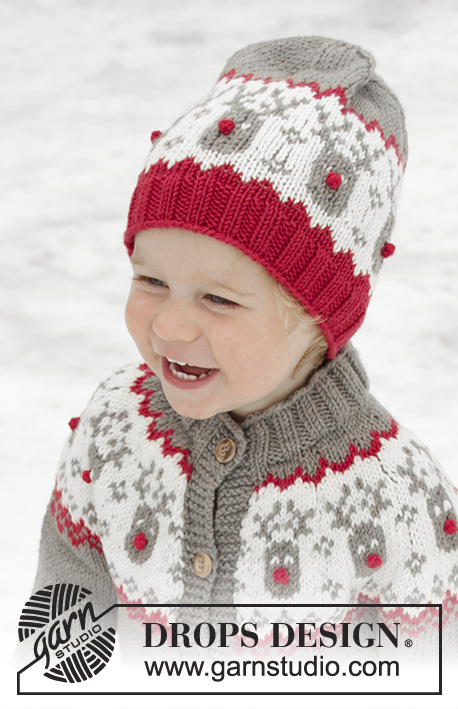
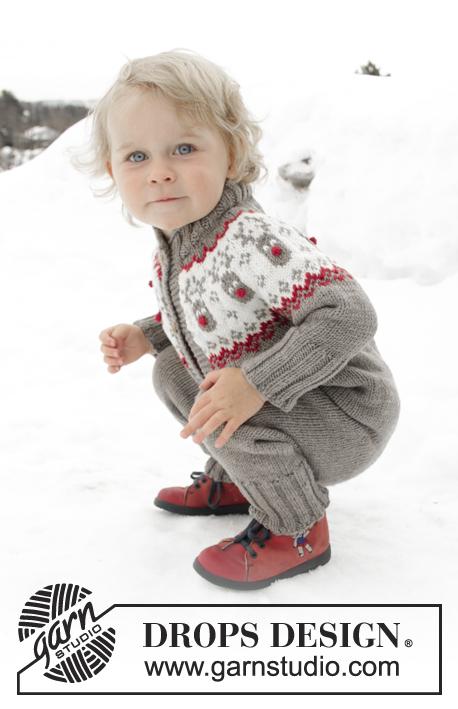
Knitted Christmas jumper for children in DROPS Nepal. The piece is worked with a reindeer motif. Sizes 2 - 12 years. Theme: Christmas.
DROPS Children 32-18 |
|||||||||||||||||||
|
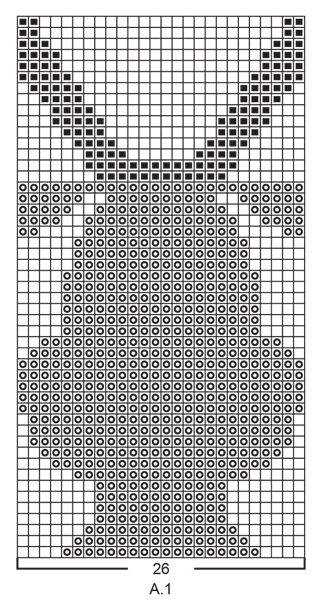
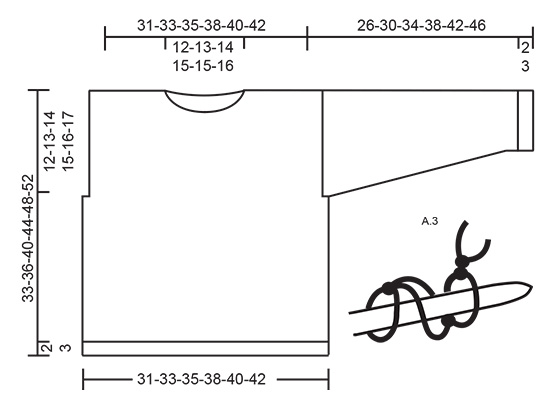
EXPLANATIONS FOR THE PATTERN: ------------------------------------------------------- RIDGE/GARTER STITCH (worked back and forth): 1 ridge = Knit 2 rows. 1 edge stitch in garter stitch = knit the stitch from both the right and wrong side PATTERN: See diagrams A.1 and A.2. The reindeer is worked in stocking stitch. To avoid long strands at the back of the piece when working pattern, you can work with 3/5 balls. In other words, work with 1 ball of denim blue/red on each side of the reindeer and with 1 ball of medium brown/beige/light beige in the middle of the jumper (i.e. A.1/A.2). To avoid holes when changing colour, twist the strands together when changing colour. INCREASE TIP (for mid under sleeve): Start 1 stitch before the marker thread, make 1 yarn over, knit 2 (the marker thread sits between these 2 stitches), make 1 yarn over. On the next round knit the yarn overs twisted to avoid holes. Then work the new stitches in stocking stitch. ------------------------------------------------------- START THE PIECE HERE: ------------------------------------------------------- JUMPER - SHORT OVERVIEW OF THE PIECE: Front and back pieces are worked back and forth with circular needle (with or without a reindeer on back piece). The parts are worked separately, bottom up. The sleeves are worked in the round with double pointed needles / short circular needle, bottom up. BACK PIECE WITH REINDEER: Cast on 54-58-62-66-70-74 stitches (including 1 edge stitch in each side) with circular needle size 4 mm and denim blue. Purl 1 row (= wrong side). The next row is worked as follows from the right side: 1 edge stitch in GARTER STITCH – read description above, * knit 2, purl 2 * work from *-* until there is 1 stitch left on the row, finish with 1 edge stitch in garter stitch. Continue this rib for 2-2-2-3-3-3 cm – adjust so that the next row is from the right side. Change to circular needle size 5 mm. Work 10-12-14-16-20-24 rows stocking stitch with 1 edge stitch in garter stitch on each side. REMEMBER THE KNITTING TENSION! Change to red and work the next row as follows from the right side: Work 1 edge stitch in garter stitch, 13-15-17-19-21-23 stitches in stocking stitch, work A.1 (= 26 stitches) – read PATTERN, work 13-15-17-19-21-23 stitches in stocking stitch and finish with 1 edge stitch in garter stitch. Continue this pattern. When the piece measures 21-23-26-29-32-35 cm cast off 1 stitch at the beginning of the next 2 rows for the armholes = 52-56-60-64-68-72 stitches. Continue with stocking stitch and A.1. When A.1 has been completed, continue with red over all stitches. When the piece measures 31-34-38-42-46-50 cm cast off the middle 18-20-22-24-24-26 stitches for neck and each shoulder is finished separately. Then cast off 1 stitch on the next row from the neck = 16-17-18-19-21-22 stitches left on shoulder. Continue working until the piece measures 32-35-39-43-47-51 cm – adjust so that the next row is worked from the wrong side. Knit 1 row from the wrong side, knit 1 row from the right side and knit 1 row from the wrong side. Cast off with knit from the right side. Work the other shoulder in the same way. The jumper measures approx. 33-36-40-44-48-52 cm from the shoulder down. BACKPIECE WITHOUT REINDEER: Cast on 54-58-62-66-70-74 stitches (including 1 edge stitch on each side) with circular needle size 4 mm and denim blue. Purl 1 row (= wrong side). The next row is worked as follows from the right side: 1 edge stitch in GARTER STITCH – read description above, * knit 2, purl 2 * work from *-* until there is 1 stitch left on the row and finish with 1 edge stitch in garter stitch. Continue this rib for 2-2-2-3-3-3 cm – adjust so that the next row is from the right side. Change to circular needle size 5 mm. Work 10-12-14-16-20-24 rows stocking stitch with 1 edge stitch in garter stitch on each side. REMEMBER THE KNITTING TENSION! Change to red and continue with stocking stitch and 1 edge stitch in garter stitch in each side. When the piece measures 21-23-26-29-32-35 cm cast off 1 stitch at the beginning of the next 2 rows for armholes = 52-56-60-64-68-72 stitches. Continue with stocking stitch and 1 edge stitch in garter stitch on each side. When the piece measures 31-34-38-42-46-50 cm cast off the middle 18-20-22-24-24-26 stitches for neck and each shoulder is finished separately. Then cast off 1 stitch on the next row from the neck = 16-17-18-19-21-22 stitches left on shoulder. Continue working until the piece measures 32-35-39-43-47-51 cm – adjust so that the next row is worked from the wrong side. Knit 1 row from the wrong side, knit 1 row from the right side and knit 1 row from the wrong side. Cast off with knit from the right side. Work the other shoulder in the same way. The jumper measures approx. 33-36-40-44-48-52 cm from the shoulder down. FRONT PIECE: Cast on 54-58-62-66-70-74 stitches (including 1 edge stitch on each side) with circular needle size 4 mm and denim blue. Purl 1 row (= wrong side). The next row is worked as follows from the right side: 1 edge stitch in GARTER STITCH – read description above, * knit 2, purl 2 * work from *-* until there is 1 stitch left on the row and finish with 1 edge stitch in garter stitch. Continue this rib for 2-2-2-3-3-3 cm – adjust so that the next row is from the right side. Change to circular needle size 5 mm. Work 2-4-6-8-12-16 rows stocking stitch with 1 edge stitch in garter stitch in each side. REMEMBER THE KNITTING TENSION! The next row is worked with denim blue as follows from the right side: Work 1 edge stitch in garter stitch, 11-13-15-17-19-21 stitches in stocking stitch, work A.2 (= 30 stitches) – read PATTERN, work 11-13-15-17-19-21 stitches in stocking stitch and finish with 1 edge stitch in garter stitch. Continue this pattern. When the row with an arrow in A.2 has been worked change the background colour from denim blue to red. Continue the pattern in the same way with 1 edge stitch in garter stitch in each side. When the piece measures 21-23-26-29-32-35 cm cast off 1 stitch at the beginning of the next 2 rows for the armholes = 52-56-60-64-68-72 stitches. Continue with stocking stitch and A.2. When A.2 has been completed, continue with red over all stitches. AT THE SAME TIME when the piece measures 30-31-35-38-42-45 cm place the middle 14-16-16-18-18-18 stitches on 1 thread for the neck and each shoulder is finished separately. Then cast off for the neck at the beginning of each row from the neck as follows: Cast off 2 stitches 1 time and 1 stitch 1-1-2-2-2-3 times = 16-17-18-19-21-22 stitches left on the shoulder. Continue until the piece measures 32-35-39-43-47-51 cm – adjust so that the next row is worked from the wrong side. Knit 1 row from the wrong side, knit 1 row from the right side and knit 1 row from the wrong side. Cast off with knit from the right side. Work the other shoulder in the same way. The jumper measures approx. 33-36-40-44-48-52 cm from the shoulder down. SLEEVE: Cast on 28-28-32-32-32-36 stitches with double pointed needles size 4 mm and red. Knit 1 round. Then work rib in the round (= knit 2 / purl 2) for 2-2-2-3-3-3 cm. Change to double pointed needles size 5 mm. Insert 1 marker thread at the beginning of the round (= mid under sleeve). The marker thread will be used a little later when increasing under the sleeve. Work stocking stitch in the round. When the piece measures 6-6-6-6-8-8 cm increase 2 stitches mid under sleeve – read INCREASE TIP. Increase like this every 3½-3-3½-3½-3-3½ cm a total of 6-8-8-9-11-11 times = 40-44-48-50-54-58 stitches. Continue working until the piece measures 26-30-34-38-42-46 cm (or to desired length). Loosely cast off. Work the other sleeve in the same way. ASSEMBLY: Sew the shoulder seams inside the cast-off edge. Sew the side seams inside the 1 edge stitch on each side. Sew in sleeves. NECK: Knit up from the right side approx. 46 to 66 stitches around the neck (including the stitches on the thread at the front) with short circular needle size 4 mm and red. Knit 1 round where you increase evenly on the round to 56-60-64-72-72-76 stitches. Work rib in the round (= knit 2 / purl 2) for approx. 3-3-3-3-4-4 cm. Loosely cast off with knit over knit and purl over purl. HAIR: Fasten 3 fringes both on the front and the back of the head. 1 fringe = cut 2 strands of medium brown, each approx. 8-9 cm. Lay the strands together and pull them around a stitch at the top of the reindeer’s head, between the beige on the head and the brown on the antlers - middle of head. Tie a double knot. Fasten another fringe on each side of the middle-fringe – see photo. EYES: Make 2 eyes with medium brown as follows: 1 eye: Cut 3 strand of approx. 40 cm. Make 4 knots around a needle size 5 mm - see diagram A.3 (i.e. make 3 LOOSE knots, make 1 more knot and tighten the strand on this knot = 1 knot). Make 1 more eye. Place the eyes on the front of the reindeer’s head, just above the light beige section - see photo. Pull the strand-ends through the garment on each side of one stitch and tie them at the back. NOSE: Make a pom pom with red, approx. 5-6 cm in diameter, remember to leave 2 strands to fasten the pom pom with. Fasten the pom pom to the front of the reindeer’s head in the middle of the light beige section. Thread the strand ends through the garment on each side of one stitch and tie together on the wrong side. NECKLACE BACK (for back piece with reindeer): Work a row of chain stitches of approx. 14 cm with hook size 4 mm and goldenrod. Place the necklace across the reindeer’s neck on the back piece. Fasten the strand-ends on the wrong side of the garment. NECKLACE FRONT: Work a row of chain stitches of approx. 16-18 cm with hook size 4 mm and goldenrod. Thread a red heart, or something similar, onto the row of chain stitches and tie a knot so that the heart stays in the middle of the row. Place the necklace across the reindeer’s neck on the front piece. Fasten the strand-ends on the wrong side of the garment. |
|||||||||||||||||||
Diagram explanations |
|||||||||||||||||||
|
|||||||||||||||||||
 |
|||||||||||||||||||
 |
|||||||||||||||||||
 |
|||||||||||||||||||
Have you finished this pattern?Tag your pictures with #dropspattern #rednosejumperkids or submit them to the #dropsfan gallery. Do you need help with this pattern?You'll find 35 tutorial videos, a Comments/Questions area and more by visiting the pattern on garnstudio.com. © 1982-2026 DROPS Design A/S. We reserve all rights. This document, including all its sub-sections, has copyrights. Read more about what you can do with our patterns at the bottom of each pattern on our site. |
|||||||||||||||||||


With over 40 years in knitting and crochet design, DROPS Design offers one of the most extensive collections of free patterns on the internet - translated to 17 languages. As of today we count 324 catalogues and 12290 patterns translated into English (UK/cm). 12290
We work hard to bring you the best knitting and crochet have to offer, inspiration and advice as well as great quality yarns at incredible prices! Would you like to use our patterns for other than personal use? You can read what you are allowed to do in the Copyright text at the bottom of all our patterns. Happy crafting!
Post a comment to pattern DROPS Children 32-18
We would love to hear what you have to say about this pattern!
If you want to leave a question, please make sure you select the correct category in the form below, to speed up the answering process. Required fields are marked *.