
Popular categories
Looking for a yarn?


Comments / Questions (72)
![]() Saara wrote:
Saara wrote:
Hei! Millä puikoilla pääntien reuna pitäisi tehdä? Alussa sanotaan, että työhön tarvitaan pyöröpuikot nro 5 tai käsialan mukaan: Pituus 40 cm ja 80 cm sekä pyöröpuikot nro 4: Pituus 80 cm. Pääntien reunan ohjeissa kuitenkin neuvotaan ottamaan lyhyt pyöröpuikko nro 4.
11.11.2025 - 11:43DROPS Design answered:
Hei, pääntien reunus neulotaan lyhyellä pyöröpuikolla nro 4, eli 40 cm:n pituisella pyöröpuikolla. Lisäämme pian oikeat tiedot ohjeeseen.
11.11.2025 - 16:37
![]() Iris Bittlinsky wrote:
Iris Bittlinsky wrote:
Sind bei den Diagramm der Muster nur die hin Reihen beschrieben
25.08.2025 - 15:02DROPS Design answered:
Liebe Frau Bittlinsky, alle Reihen sind im Diagram gezeigt, dh die Hin- sowie die Rückreihen; hier lesen Sie mehr. Viel Spaß beim Stricken!
27.08.2025 - 07:31
![]() Sylvie wrote:
Sylvie wrote:
Bonjour Augmente t'on des mailles tous les rangs en faisant le A5 pour arriver a 12 mailles comme dans le diagramme. Merci pour votre aide
30.10.2024 - 06:18DROPS Design answered:
Bonjour Sylvie, A.5 se tricote sur 6 mailles (2 motifs de A.5 = 12 mailles); au 1er rang tricotez (1 m env, 4 m end, 1 m env) et répétez de (à). À l'avant-dernier rang de A.5 (= 7ème symbole au début du rang, puis 4ème symbole dans chaque A.5 suivant jusqu'à la fin du rang et 8ème symbole au dernier A.5), on va augmenter 1 maille qui sera diminuée au rang suivant (= 5ème symbole). Bon tricot!
30.10.2024 - 08:42
![]() Sylvie wrote:
Sylvie wrote:
Bonjour. Je suis sur le diagramme A5. Dois t'on travailler sur 6 mailles ou 12 mailles. Merci de bien vouloir m'aider. Je bloque a ce niveau
29.10.2024 - 06:32DROPS Design answered:
cf réponse ci-dessous.
29.10.2024 - 09:49
![]() Sylvie wrote:
Sylvie wrote:
Bonjour. Le diagramme A5 comporte t'il 6 mailles ou 12 mailles. Merci de m'aider je suis coincée a cette étape
29.10.2024 - 06:30DROPS Design answered:
Bonjour Sylvie, le motif A.5 se tricote sur 6 mailles, on montre 2 motifs dans le diagramme pour montrer comment commencer et terminer ce même motif à l'avant-dernier rang notamment. Bon tricot!
29.10.2024 - 09:48
![]() Silvia wrote:
Silvia wrote:
Buenos días, me gustaría saber que talla lleva puesta la modelo en las fotos. Muchas gracias
17.07.2024 - 13:20DROPS Design answered:
Hola Silvia, la modelo normalmente lleva una talla M.
21.07.2024 - 18:50
![]() Eleonora wrote:
Eleonora wrote:
Buonasera, avrei necessità di un chiarimento in merito allo schema A.5: nel quinto ferro dice di inserire il ferro tra le maglie 4 e 5 e di prendere il filo. In che senso? Come si procede? Esiste un tutorial che spieghi questo passaggio? Nell' undicesimo ferro, poi, non ho capito a quale procedimento fa riferimento il simbolo della stella. Grazie per i chiarimenti che potrete darmi. Saluti
22.02.2024 - 16:14DROPS Design answered:
Buonasera Eleonora, sul quinto ferro deve sollevare il filo tra la 4° e la 5° maglia, ottenendo ora una nuova maglia. Per il simbolo della stella deve procedere come indicato nella legenda. Buon lavoro!
25.02.2024 - 22:01
![]() Eleonora wrote:
Eleonora wrote:
Buonasera, vorrei sapere se posso usare solo una tipologia di filato per il progetto, ovvero lavorare tutto il progetto dall'inizio alla fine con lo stesso filato con cui lavoro la parte a coste. Grazie
19.02.2024 - 21:37DROPS Design answered:
Buonasera Eleonora, questo modello è particolsre perchè richiede l'uso di filafi di spessore diverso durante la lavorazione. Se cambiano i filati il risultato sarà diverso da quello riportato nella foto. Buon lavoro!
20.02.2024 - 16:13
![]() Angèle wrote:
Angèle wrote:
Bonjour, Concernant la rayure A1, je termine le rang avec 2 mailles envers et une lisière. Comment je procède pour le rang 2, comment tricoter ces 3 mailles avant de commencer A1. Merci pour votre aide. Cordialement
16.11.2023 - 17:39DROPS Design answered:
Bonjour Angèle, A.1 commence sur l'endroit par 2 mailles envers, donc à la fin du rang sur l'endroit, on termine par 2 mailles envers pour que le motif soit symétrique. Sur l'envers, tricotez ces 2 mailles à l'endroit (et les mailles de la torsade à l'envers, cf légende). Bon tricot!
17.11.2023 - 08:17
![]() Angèle wrote:
Angèle wrote:
Bonjour. Merci pour votre réponse. Toutefois ma question portait sur les mailles centrales. Qu'en est-il pour ces 38 mailles ? Merci d'avance. Bonne journée
13.10.2023 - 08:53DROPS Design answered:
Bonjour Angèle, les mailles centrales pour l'encolure sont généralement rabattues ou mises en attente sur un rang sur l'endroit. Bon tricot!
13.10.2023 - 15:16
|
|||||||||||||||||||||||||||||||
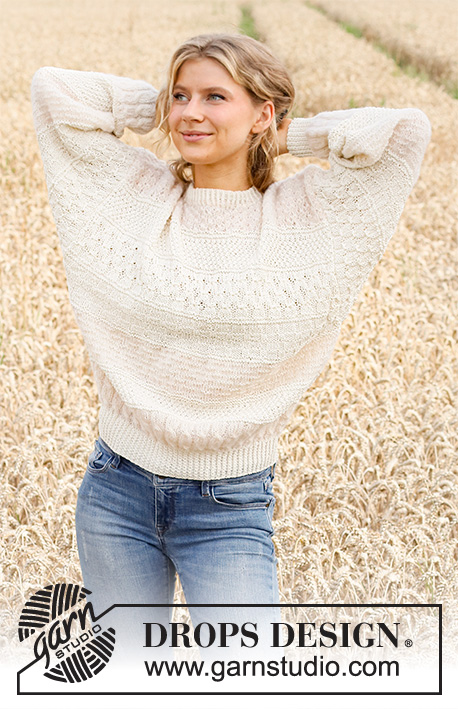
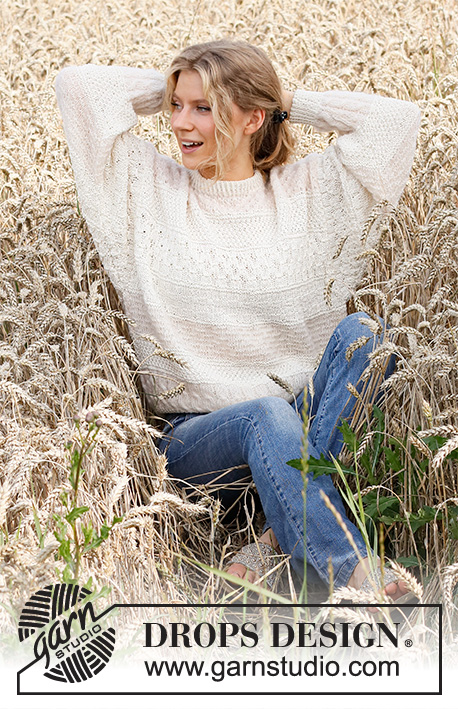
Timeless Textures#timelesstexturessweater |
|||||||||||||||||||||||||||||||
 |
 |
||||||||||||||||||||||||||||||
Knitted jumper in DROPS Merino Extra Fine and DROPS Brushed Alpaca Silk. The piece is worked with cables and textured pattern. Sizes S - XXXL.
DROPS 220-18 |
|||||||||||||||||||||||||||||||
|
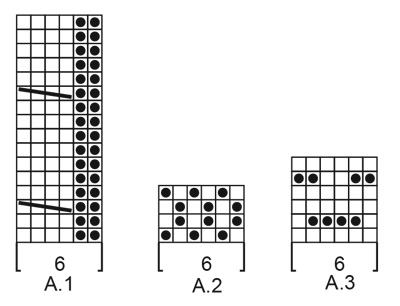
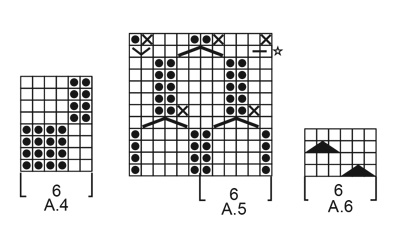
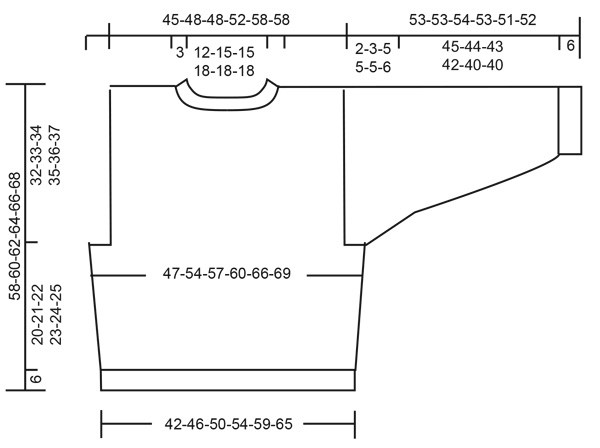
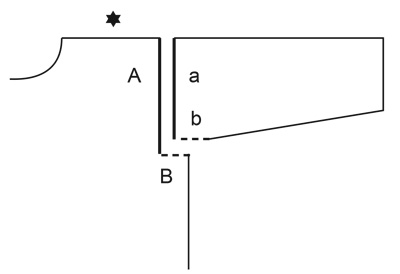
------------------------------------------------------- EXPLANATIONS FOR THE PATTERN: ------------------------------------------------------- RIDGE/GARTER STITCH (worked back and forth): Knit all rows. 1 ridge in height = Knit 2 rows. PATTERN: See diagrams A.1 to A.6. The diagrams show all rows in the pattern from the right side. STRIPES BODY: The stripes are worked with 1 edge stitch in garter stitch on each side. STRIPE 1: Already worked (= A.1) STRIPE 2: (with Merino Extra Fine), work A.2 until the piece measures 18-18-18-19-19-20 cm – adjust so you finish after row 2 or 4 in the diagram. Knit 4 rows (= 2 ridges). STRIPE 3: Change to Brushed Alpaca Silk. Work A.3 until the piece measures 26-27-27-28-28-30 cm – adjust so you finish after a row from the wrong side. STRIPE 4: Change to Merino Extra Fine. Knit 4 rows (= 2 ridges). Work A.4 two times in height, knit 4 rows (= 2 ridges). STRIPE 5: Work A.5 one time in height, then work the first 8 rows in the diagram. Knit 4 rows (= 2 ridges). STRIPE 6: Work A.2 until the piece measures 48-50-50-52-52-55 cm – adjust so you finish after row 2 or 4 in the diagram. Knit 4 rows (= 2 ridges). STRIPE 7: Change to Brushed Alpaca Silk. Work A.6 to finished length. STRIPES SLEEVES: The stripes are worked with 1 edge stitch in garter stitch on each side. STRIPE 1: Work A.1 one time in height, then work the first 8 rows in the diagram. STRIPE 2: Change to Merino Extra Fine. Knit 4 rows (= 2 ridges). Work A.2 until the piece measures 25-25-26-25-24-25 cm – adjust so you finish after row 2 or 4 in the diagram, knit 4 rows (= 2 ridges). STRIPE 3: Change to Brushed Alpaca Silk. Work A.3 until the piece measures 36-36-37-36-34-35 cm – adjust so you finish after a row from the wrong side. STRIPE 4: Change to Merino Extra Fine. Knit 4 rows (= 2 ridges). Work A.4 two times in height. Knit 4 rows (= 2 ridges). STRIPE 5: Work A.5 one time in height, then work the first 8 rows in the diagram. INCREASE/DECREASE TIP (evenly spaced): To work out how to increase/decrease evenly, count the total number of stitches on needle (e.g. 87 stitches), minus the edge stitches (i.e. 2 stitches) and divide the remaining stitches by the number of increases/decreases to be made (e.g. 19) = 4.5. In this example, increase by making 1 yarn over after alternately each 4th and 5th stitch. Do not increase over the edge stitches. On the next row work the yarn overs twisted to avoid holes. When decreasing, knit together alternately each 3rd and 4th stitch and each 4th and 5th stitch. INCREASE TIP (for sleeves): Increase by making 1 yarn over inside the 1 edge stitch on each side. All increase are made from RS! On the next row work the yarn overs twisted to avoid holes. Then work the new stitches in pattern as described in the text. ------------------------------------------------------- START THE PIECE HERE: ------------------------------------------------------- JUMPER – SHORT OVERVIEW OF THE PIECE: The front and back pieces and the sleeves are worked separately back and forth, then sewn together to finish. The neck is worked in the round with short circular needle. BACK PIECE: Cast on 87-95-103-111-121-135 stitches with circular needle size 4 mm and Merino Extra Fine. Purl 1 row (= wrong side). Then work rib as follows: ROW 1 (right side): 1 edge stitch in GARTER STITCH – read description above, * knit 1 twisted, purl 1 *, work from *-* until there are 2 stitches left, knit 1 twisted and work 1 edge stitch in garter stitch. ROW 2 (wrong side): 1 edge stitch in garter stitch * purl 1 twisted, knit 1 *, work from *-* until there are 2 stitches left, purl 1 twisted and 1 edge stitch in garter stitch. Repeat rows 1 and 2 until the rib measures 6 cm – adjust so the last row is worked from the right side. Change to circular needle size 5 mm and Brushed Alpaca Silk. Purl 1 row from the wrong side where you increase 19-23-21-25-21-19 stitches evenly spaced – read INCREASE/DECREASE TIP = 106-118-124-136-142-154 stitches. Now work pattern as follows: 1 edge stitch in garter stitch, A.1 until there are 3 stitches left (= 17-19-20-22-23-25 repeats of 6 stitches), purl 2 and 1 edge stitch in garter stitch. Continue this pattern back and forth until A.1 has been completed in height. REMEMBER THE KNITTING TENSION! Change to Merino Extra Fine. Knit 1 row from the right side where you decrease 14-14-14-20-14-20 stitches evenly spaced = 92-104-110-116-128-134 stitches. Knit 3 more rows (= 2 ridges). Start with stripe 2 in STRIPES BODY – read description above and continue with stripes. AT THE SAME TIME when the piece measures 26-27-28-29-30-31 cm, cast off 3-6-9-9-9-12 stitches at the beginning of the next 2 rows for the armholes = 86-92-92-98-110-110 stitches. When the piece measures 56-58-60-62-64-66 cm cast off the middle 32-38-38-44-44-44 stitches for the neck and each shoulder is finished separately. Then cast off 1 stitch from the neck = 26-26-26-26-32-32 stitches. Continue with pattern and 1 edge stitch in garter stitch on each side until the piece measures 58-60-62-64-66-68 cm from the shoulder down. Cast off. Work the other shoulder in the same way. FRONT PIECE: Cast on 87-95-103-111-121-135 stitches with circular needle size 4 mm and Merino Extra Fine. Purl 1 row (= wrong side). Then work rib as follows: ROW 1 (right side): 1 edge stitch in garter stitch, * knit 1 twisted, purl 1 *, work from *-* until there are 2 stitches left, knit 1 twisted and 1 edge stitch in garter stitch. ROW 2 (wrong side): 1 edge stitch in garter stitch * purl 1 twisted, knit 1 *, work from *-* until there are 2 stitches left, purl 1 twisted and 1 edge stitch in garter stitch. Repeat rows 1 and 2 until the rib measures 6 cm – adjust so the last row is worked from the right side. Change to circular needle size 5 mm and Brushed Alpaca Silk. Purl 1 row from the wrong side where you increase 19-23-21-25-21-19 stitches evenly spaced = 106-118-124-136-142-154 stitches. Work pattern and decrease stitches in the same way as on the back piece = 92-104-110-116-128-134 stitches (when you reach the armholes). When the piece measures 26-27-28-29-30-31 cm, cast off 3-6-9-9-9-12 stitches at the beginning of the next 2 rows for the armholes = 86-92-92-98-110-110 stitches. When the piece measures 51-53-55-56-58-59 cm, place the middle 26-32-32-38-38-38 stitches on a thread for the neck and finish each shoulder separately. Continue by casting off on each row from the neck as follows: Cast off 2 stitches 1 time and 1 stitch 2 times – the stitches which do not fit into the pattern after decreasing, are worked in stocking stitch = 26-26-26-26-32-32 stitches. Continue with this pattern and 1 edge stitch in garter stitch on each side until the piece measures 58-60-62-64-66-68 cm from the shoulder down. Cast off. Work the other shoulder in the same way. SLEEVES: Cast on 44-48-50-52-54-56 stitches (including 1 edge stitch on each side) with circular needle size 4 mm and Merino Extra Fine. Purl 1 row (= wrong side). Then work rib as follows: ROW 1 (right side): 1 edge stitch in garter stitch, * knit 1 twisted, purl 1 *, work from *-* until there is 1 stitch left, knit 1 twisted and 1 edge stitch in garter stitch. ROW 2 (wrong side): 1 edge stitch in garter stitch * purl 1 twisted, knit 1 *, work from *-* until there is 1 stitch left, purl 1 twisted and 1 edge stitch in garter stitch. Repeat rows 1 and 2 until the rib measures 6 cm – adjust so the last row is worked from the right side. Change to circular needle size 5 mm and Brushed Alpaca Silk. Purl 1 row from the wrong side where you increase 18-20-18-22-20-24 stitches evenly spaced = 62-68-68-74-74-80 stitches. Now work STRIPE SLEEVES – read description above, and when the piece measures 13 cm, start to increase on both sides – read INCREASE TIP. Increase like this every 2-2-1½-2-1½- 1½ cm a total of 9-8-10-8-10-9 times = 80-84-88-90-94-98 stitches. Work pattern as far as possible out to each side, the remaining stitches are worked in stocking stitch. When the sleeve measures 33-32-31-30-28-28 cm, continue the increases, but now on each row from the right side, a total of 22 times = 124-128-132-134-138-142 stitches. When the stripes are finished, the sleeve measures 53-53-54-53-51-52 cm. Cast off. Insert a marker in each side 2-3-5-5-5-6 cm from the top. These are used when sewing the sleeves to the body. Work the other sleeve in the same way. ASSEMBLY: Sew the shoulder seams with grafting stitches, inside the cast-off edge. Sew the sleeves to the body – see illustration. Sew the sleeve seams and the side seams in one go, inside the 1 edge stitch. NECK: Start with Brushed Alpaca Silk and short circular needle size 4 mm. Knit up from the right side 92 to 120 stitches inside 1 stitch around the neck (stitch count includes the stitches from the thread in front and should be divisible by 2). Change to Merino Extra Fine and work rib (knit 1 twisted, purl 1) in the round for 7 cm. Cast off with knit over knit and purl over purl. Make sure the cast-off edge is not tight. Fold the neck to the inside and sew down; to avoid the neck being tight and rolling outwards, it is important the seam is elastic. |
|||||||||||||||||||||||||||||||
Diagram explanations |
|||||||||||||||||||||||||||||||
|
|||||||||||||||||||||||||||||||
 |
|||||||||||||||||||||||||||||||
 |
|||||||||||||||||||||||||||||||
 |
|||||||||||||||||||||||||||||||
 |
|||||||||||||||||||||||||||||||
Have you finished this pattern?Tag your pictures with #dropspattern #timelesstexturessweater or submit them to the #dropsfan gallery. Do you need help with this pattern?You'll find 36 tutorial videos, a Comments/Questions area and more by visiting the pattern on garnstudio.com. © 1982-2026 DROPS Design A/S. We reserve all rights. This document, including all its sub-sections, has copyrights. Read more about what you can do with our patterns at the bottom of each pattern on our site. |
|||||||||||||||||||||||||||||||


With over 40 years in knitting and crochet design, DROPS Design offers one of the most extensive collections of free patterns on the internet - translated to 17 languages. As of today we count 324 catalogues and 12290 patterns translated into English (UK/cm). 12290
We work hard to bring you the best knitting and crochet have to offer, inspiration and advice as well as great quality yarns at incredible prices! Would you like to use our patterns for other than personal use? You can read what you are allowed to do in the Copyright text at the bottom of all our patterns. Happy crafting!
Post a comment to pattern DROPS 220-18
We would love to hear what you have to say about this pattern!
If you want to leave a question, please make sure you select the correct category in the form below, to speed up the answering process. Required fields are marked *.