
Popular categories
Looking for a yarn?


Comments / Questions (132)
![]() Giulia wrote:
Giulia wrote:
Salve, il primo giro con i primi 8 aumenti è il primo giro del motivo? Per cui il giro successivo è quello che alterna diritto/rovescio? Se è corretto, questo giro con la sequenza diritto/rovescio coincide con la necessità di lavorare a diritto la maglia del gettato oppure posso avere due diritti di seguito e poi all'aumento successivo il motivo torna corretto? Come mai l'inizio del giro viene posto a tre maglie dall'inizio della manica sul retro?
17.05.2026 - 18:57
![]() Tamara wrote:
Tamara wrote:
Hallo, kann ich den Pullover auch glatt rechts stricken?
09.05.2026 - 00:00DROPS Design answered:
Liebe Tamara, solange Ihre Maschenprobe in der Breite wie in der Höhe stimmt, das kann wahrscheinlich passen, sonnst finden Sie alle unsere Pullover (von oben nach unten mit Raglan) glatt rechts hier. Viel Spaß beim Stricken!
11.05.2026 - 07:36
![]() Michelle wrote:
Michelle wrote:
Peut-on avoir les explications en aller retour
03.05.2026 - 08:18DROPS Design answered:
Bonjour Michelle, les explications ne sont disponibles que pour tricoter en rond, mais vous trouverez ici quelques pistes pour faire les ajustements nécessaires. Bon tricot!
04.05.2026 - 13:59
![]() May-Brit wrote:
May-Brit wrote:
Takk for svar, men du svarte ikke på mitt spørsmål. Det jeg lurer på er HVORDAN strikke inn nye masker i mønsteret når mønsteret ikke går opp etter økningene. Jeg har lest hele oppskriften, og den forklarer ikke dette. Mønsteret går altså ikke opp etter raglandsomgangene, skal jeg da strikke f.eks to rette eller to vrange masker etter hverandre rett etter en økning for å få mønsteret til å stemme videre?
06.02.2026 - 12:44DROPS Design answered:
Hei May-Brit. I oppskriften står det under STRIPER OG MØNSTER, at når det økes til raglan strikkes de økte maskene inn i mønsteret etter hvert. Da vil du noen steder få 2 rett eller 2 vrang masker etter hverandre, inntil det er økt nok masker til å strikke etter mønster/diagram. mvh DROPS Design
09.02.2026 - 08:01
![]() May-Brit wrote:
May-Brit wrote:
Mønsteret går ikke opp etter første raglandsomgang, det forskyver seg. Jeg ser at flere her har spurt om dette. Stemmer det at det må strikkes to rette etter hverandre etter noen økninger? Og kan dere forklare dette litt mer detaljert, og evt legge forklaring inn i oppskriften? For jeg finner ingenting i oppskriften som forklarer hvordan dette gjøres.
05.02.2026 - 15:31DROPS Design answered:
Hei May-Brit, Hvis du leser "Raglan" i forklaringene på toppen av oppskriften, får du mer informasjon om hvordan man øker til raglan: Øk 4 masker i hver overgang mellom bol og ermer slik: Strikk til det gjenstår 4 masker før merketråden, 1 kast, strikk 1 rett, 1 kast, strikk 6 masker mønster (merketråden sitter midt mellom disse maskene), 1 kast, 1 rett, 1 kast. På neste omgang strikkes kastene rett slik at det blir hull. Videre strikkes de nye maskene i Striper og Mønster. Hilsen Drops Team.
06.02.2026 - 07:02
![]() Agnes wrote:
Agnes wrote:
Hallo, ich stricke das Modell 199-1. die erste Reihe nach der Halsblende stricke ich glatt rechts und setze die Markierungen. In der nächsten Reihe stricke ich im Muster und beginne mit den Raglanzunahmen. dann eine Runde rechts. die nächste Runde wird im Muster gestrickt. Über den Umschlägen ist eine re Masche, dazwischen eine li. Danach müsste wieder re und dann li gestrickt werden. Das stimmt dann aber nicht mehr mit dem Muster überein. Wo liegt mein Fehler?
02.01.2026 - 08:50
![]() Giovanna wrote:
Giovanna wrote:
Hola. A este diseño no se le pueden hacer vueltas acordadas? Porque intente hacer 3 filas de vueltas acordadas pero me parece que se me ha descentrado las partes del jersey. O no necesita vueltas acordadas?
25.08.2025 - 01:19DROPS Design answered:
Hola Giovanna, este jersey no tiene una elevación en la parte posterior del cuello por lo que no trabajamos filas acortadas en el cuello. En el caso de necesitarlas, estas se especificarían en el patrón.
26.08.2025 - 22:32
![]() Wanda wrote:
Wanda wrote:
I am knitting size small, and have completed the round of 8 increases, resulting in 272 total stitches. Continuing from here, the A1 pattern no longer lines up (K1P1). Is there an error, or are there times when the stitch needs to be repeated? Thank you.
24.02.2025 - 04:41DROPS Design answered:
Hi Wanda, The increases on each side of the 6 stitches are knitted on the next round to leave holes, then worked into the ribbed pattern after that (see Raglan explanation at the top of the page). And, yes, on some rounds there will be 2 knitted stitches side by side before the yarn overs are worked into the pattern. Happy knitting!
24.02.2025 - 06:46
![]() Diane De Martin wrote:
Diane De Martin wrote:
Bonjour, mon échantillon donne 10cm pour la largeur donc correcte pour le nombre de maille, mais donne 8cm pour la hauteur. Que dois-je faire pour avoir mon échantillon de 10cm par 1ocm?
24.07.2024 - 15:37DROPS Design answered:
Bonjour Diane, essayez de laver votre echantillon et verifiez les mesures apres le blocage. Bon tricot!
24.07.2024 - 16:39
![]() Anoniem wrote:
Anoniem wrote:
Hallo! Is het mogelijk deze trui in gewone 'stockinette stitch' te maken?
22.07.2024 - 17:40DROPS Design answered:
Dag Anoniem,
Ja, dat kan! Maak altijd wel even een proeflapje om te kijken of de stekenverhouding klopt.
22.07.2024 - 21:20
|
|||||||
Sjøbris#sjoebrissweater |
|||||||
 |
 |
||||||
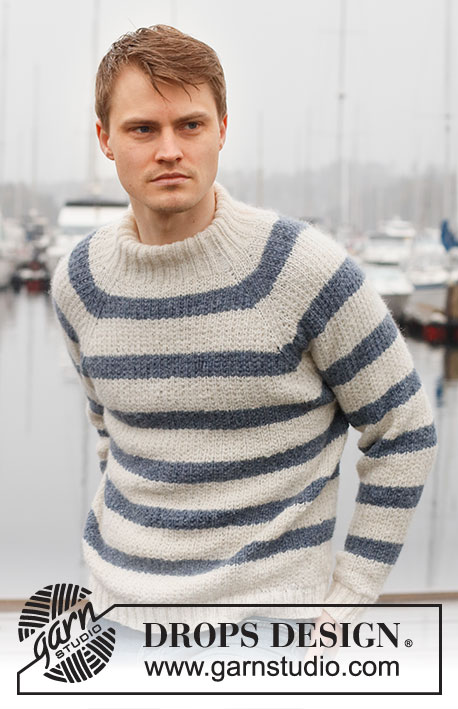
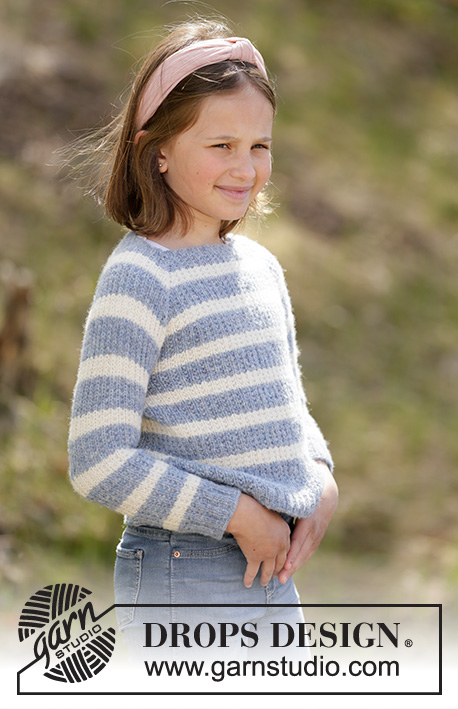
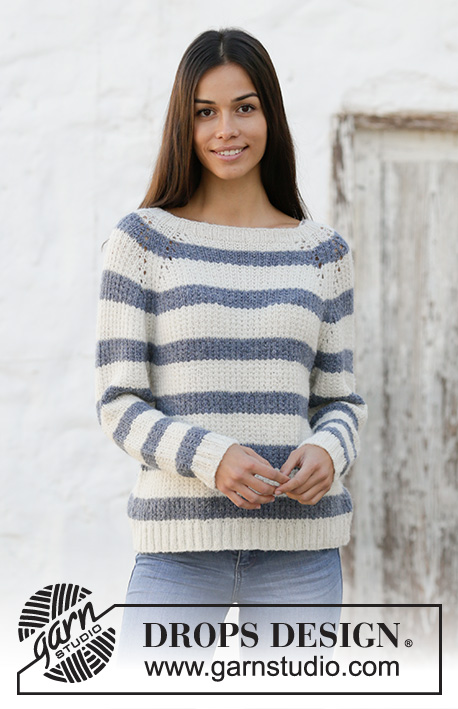
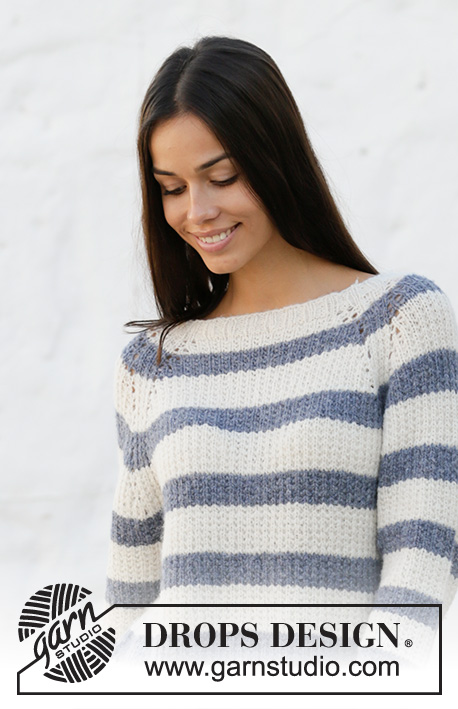
Knitted jumper with raglan and stripes in DROPS Sky. The piece is worked top down. Sizes S - XXXL.
DROPS 199-1 |
|||||||
|
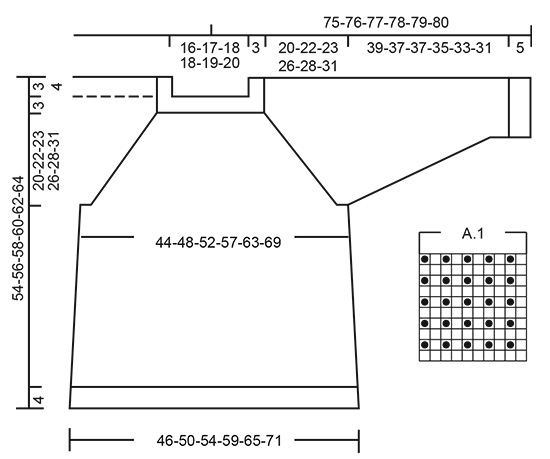
------------------------------------------------------- EXPLANATIONS FOR THE PATTERN: ------------------------------------------------------- DECREASE/INCREASE TIP (evenly spaced): To work out how to decrease/increase evenly, count the total number of stitches to be decreased/increased over (e.g. 96 stitches), and divide by the number of decreases/increases to be made (e.g. 8) = 12. In this example, decrease by knitting each 11th and 12th stitch together. When increasing make 1 yarn over after each 12th stitch. On the next round, knit the yarn overs twisted to avoid holes. RAGLAN: Increase 4 stitches in each transition between body and sleeves as follows: Work until there are 4 stitches left before the marker thread, 1 yarn over, knit 1, 1 yarn over, work 6 stitches in pattern (the marker thread sits in the middle of these 6 stitches), 1 yarn over, knit 1, 1 yarn over. On the next round knit the yarn overs to leave holes. Then work the new stitches in stripes and pattern. INCREASE TIP (for sides of body): Work until there are 2 stitches left before the marker thread, 1 yarn over, knit 4 (marker thread sits in the middle of these 4 stitches), 1 yarn over. On the next round knit the yarn overs twisted to avoid holes. Then work the new stitches in stripes and pattern. DECREASE TIP (for sleeves): Decrease 1 stitch on each side of the marker thread as follows: Work until there are 3 stitches left before the marker thread, knit 2 together, knit 2 (marker thread sits between these 2 stitches), slip 1 stitch as if to knit, knit 1 and pass the slipped stitch over the knitted stitch. STRIPES AND PATTERN: * Work 5 cm in white (including neck) and then 3 cm jeans blue * – repeat these stripes at the same time as the whole piece is worked in pattern – see diagram A.1; when increasing to raglan work the new stitches into the pattern as you go. ------------------------------------------------------- START THE PIECE HERE: ------------------------------------------------------- JUMPER - SHORT OVERVIEW OF THE PIECE: The piece is worked in the round with circular needle, top down. After the yoke the body is continued in the round with circular needle. The sleeves are worked in the round with short circular needle/double pointed needles. NECK: Cast on 96-100-104-112-120-124 stitches with circular needle size 3.5 mm and white. Knit 1 round. Then work rib (= knit 2 / purl 2) for 3 cm. Knit 1 round where you decrease 8-8-8-12-12-12 stitches evenly spaced – read DECREASE/INCREASE TIP = 88-92-96-100-108-112 stitches. Change to circular needle size 4.5 mm. Now continue with STRIPES AND PATTERN - see description above. YOKE: Insert 1 marker - THE PIECE IS NOW MEASURED FROM HERE! Insert 4 marker threads in the piece at the same time as you work stripes and pattern in the round as follows: Knit 3 stitches (= 3 stitches on back piece), insert 1 marker thread, work the next 12-12-14-14-16-16 stitches (= sleeve), insert 1 marker thread, work the next 32-34-34-36-38-40 stitches (= front piece), insert 1 marker thread, work 12-12-14-14-16-16 stitches (= sleeve), insert 1 marker thread, work the last 29-31-31-33-35-37 stitches (= back piece) after the last marker thread (there are 3 stitches left to the first marker thread). The next round is worked as follows: 6 stitches in pattern (marker thread sits in the middle of these 6 stitches), make 1 yarn over, knit 1, make 1 yarn over, 4-4-6-6-8-8 stitches in pattern (= sleeve), 1 yarn over, knit 1, make 1 yarn over, 6 stitches in pattern (marker thread sits in the middle of these 6 stitches), 1 yarn over, knit 1, make 1 yarn over, 24-26-26-28-30-32 stitches in pattern (= front piece), 1 yarn over, knit 1, make 1 yarn over, 6 stitches in pattern (marker thread sits in the middle of these 6 stitches), 1 yarn over, knit 1, make 1 yarn over, 4-4-6-6-8-8 stitches in pattern (= sleeve), 1 yarn over, knit 1, make 1 yarn over, 6 stitches pattern (marker thread sits in the middle of these 6 stitches), 1 yarn over, knit 1, make 1 yarn over, work 24-26-26-28-30-32 stitches in pattern (= back piece), 1 yarn over, knit 1, make 1 yarn over. The first increase to RAGLAN – read description above, is now finished (= 16 stitches increased on the round). Continue to increase to raglan every 4th round a total of 11-13-14-16-17-19 times (including the first increase described above) = 264-300-320-356-380-416 stitches on needle Size XL and XXL: The increase for raglan is complete. Size S, M, L and XXXL: The next round is worked as follows: 6 stitches in pattern (marker thread sits in the middle of these 6 stitches), make 1 yarn over, work pattern until 3 sts remain before the next marker thread (= sleeve), 1 yarn over, 6 stitches in pattern (marker thread sits in the middle of these 6 stitches), 1 yarn over, work pattern until 3 sts remain before the next marker thread (= front piece), 1 yarn over, 6 stitches in pattern (marker thread sits in the middle of these 6 stitches), 1 yarn over, work pattern until 3 sts remain before the next marker thread (= sleeve), 1 yarn over, 6 stitches in pattern (marker thread sits in the middle of these 6 stitches), 1 yarn over, work pattern until 3 sts remain before the next marker thread (= back piece), 1 yarn over = 8 stitches increased. All sizes: After the last increase to raglan there are 272-308-328-356-380-424 stitches on the needle. Continue with stripes and pattern without increasing until the piece measures 20-22-23-26-28-31 cm from the marker at the beginning of the yoke. The next round is worked as follows: Work 4-3-4-5-7-7 stitches (= on back piece), place the next 56-66-70-74-76-86 stitches on 1 thread for sleeve, cast on 8-8-10-10-12-12 new stitches on needle (= in side under sleeve), work the next 80-88-94-104-114-126 stitches (= front piece), place the next 56-66-70-74-76-86 stitches on 1 thread for sleeve, cast on 8-8-10-10-12-12 new stitches on needle (= in side under sleeve) and work the last 76-85-90-99-107-119 stitches (= back piece). Body and sleeves are finished separately. THE PIECE IS NOW MEASURED FROM HERE! BODY: = 176-192-208-228-252-276 stitches. Insert 1 marker thread in the middle of the 8-8-10-10-12-12 new stitches cast on under each sleeve. Start the round by one of these marker threads and allow the marker threads to follow your work onwards; continue with stripes and pattern. When the piece measures 8 cm from the division, increase 1 stitch on each side of both marker threads – read INCREASE TIP (= 4 stitches increased). Repeat this increase when the piece measures 17 cm from the division = 184-200-216-236-260-284 stitches. When the piece measures 27-27-28-26-26-25 cm from the division (approx. 50-52-54-56-58-60 cm from shoulder) knit 1 round where you increase 36-40-44-48-52-56 stitches evenly spaced = 220-240-260-284-312-340 stitches. Change to circular needle size 3.5 mm and work rib (= knit 2 / purl 2) for 4 cm. Loosely cast off with knit over knit and purl over purl - to avoid the cast-off edge being tight you can cast off with needle size 4.5 mm. The jumper measures approx. 54-56-58-60-62-64 cm from the shoulder. SLEEVE: Place the 56-66-70-74-76-86 stitches from the thread on the one side of the piece on short circular needle/double pointed needles size 4.5.mm and knit up 1 stitch in each of the 8-8-10-10-12-12 stitches cast on under the sleeve = 64-74-80-84-88-98 stitches. Insert 1 marker thread in the middle of the 8-8-10-10-12-12 stitches. Work stripes and pattern in the round. When the piece measures 2 cm from the division decrease 2 stitches mid under sleeve – read DECREASE TIP. Decrease like this every 7th-5th-4th-4th-3rd-3rd round a total of 13-17-19-20-21-25 times = 38-40-42-44-46-48 stitches. Continue working until the sleeve measures 39-37-37-35-33-31 cm from the division (shorter measurements in larger sizes due to longer yoke). Knit 1 round where you increase 6-4-6-8-6-8 stitches evenly spaced = 44-44-48-52-52-56 stitches. Change to double pointed needles size 3.5 mm and work rib (= knit 2 / purl 2) for 5 cm. The sleeve measures approx. 44-42-42-40-38-36 cm from the division. Loosely cast off with knit over knit and purl over purl - to avoid the cast-off edge being tight you can cast off with needle size 4.5 mm. Work the other sleeve in the same way. |
|||||||
Diagram explanations |
|||||||
|
|||||||
 |
|||||||
Have you finished this pattern?Tag your pictures with #dropspattern #sjoebrissweater or submit them to the #dropsfan gallery. Do you need help with this pattern?You'll find 25 tutorial videos, a Comments/Questions area and more by visiting the pattern on garnstudio.com. © 1982-2026 DROPS Design A/S. We reserve all rights. This document, including all its sub-sections, has copyrights. Read more about what you can do with our patterns at the bottom of each pattern on our site. |
|||||||


With over 40 years in knitting and crochet design, DROPS Design offers one of the most extensive collections of free patterns on the internet - translated to 17 languages. As of today we count 325 catalogues and 12298 patterns translated into English (UK/cm).
We work hard to bring you the best knitting and crochet have to offer, inspiration and advice as well as great quality yarns at incredible prices! Would you like to use our patterns for other than personal use? You can read what you are allowed to do in the Copyright text at the bottom of all our patterns. Happy crafting!
Post a comment to pattern DROPS 199-1
We would love to hear what you have to say about this pattern!
If you want to leave a question, please make sure you select the correct category in the form below, to speed up the answering process. Required fields are marked *.