DROPS Sky
DROPS Sky
74% Alpaca, 18% Polyamide, 8% Wool
from 5.10 £ /50g
Get the yarn to make this pattern from 15.30£.

The yarn cost is calculated from the pattern’s smallest size and the yarn’s cheapest product type. Looking for an even better price? You might find it on the DROPS Deals!

DROPS Super Sale

Sky Stripes Jacket

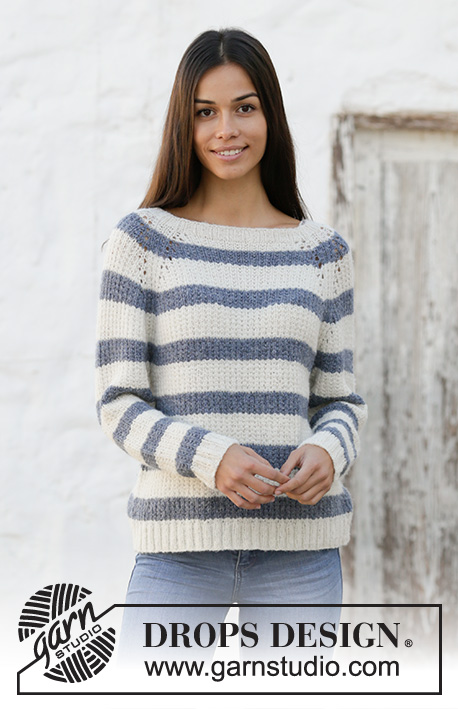
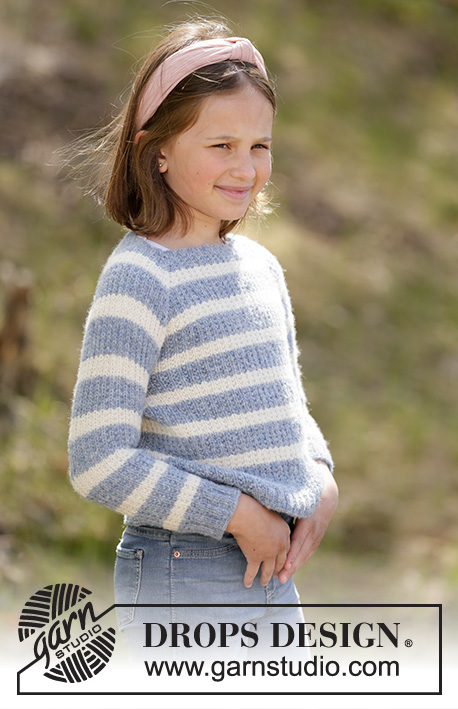
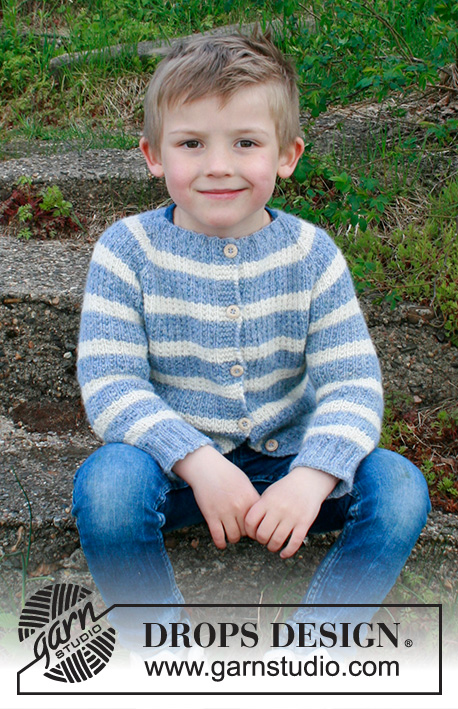
Knitted jacket with stripes for kids in DROPS Sky. Piece is knitted top down with raglan and textured pattern. Size 2-12 years

DROPS Children 34-20
DROPS design: Pattern sk-009-bn
Yarn group B
----------------------------------------------------------

SIZE: 2 - 3/4 - 5/6 - 7/8 - 9/10 - 11/12 years
Size equals approx. child’s height in cm: 
92 - 98/104 - 110/116 - 122/128 - 134/140 - 146/152 

MATERIALS:
DROPS SKY from Garnstudio (belongs to yarn group B)
100-100-100-100-100-150 g colour 13, light jeans blue
50-50-50-100-100-100 g colour 01, white

KNITTING TENSION:
21 stitches in width and 28 rows vertically in stocking stitch = 10 x 10 cm.

NEEDLES:
DROPS DOUBLE POINTED NEEDLES SIZE 4 mm for stocking stitch.
DROPS CIRCULAR NEEDLE SIZE 4 mm: Length 40 and 60 or 80 cm for stocking stitch.
DROPS DOUBLE POINTED NEEDLES SIZE 3 mm for rib
DROPS CIRCULAR NEEDLE SIZE 3 mm: Length 40 and 60 or 80 cm for rib.
Needle size is only a suggestion! If you have too many stitches on 10 cm switch to larger needles. If you have too few stitches on 10 cm switch to smaller needles.

DROPS WOOD BUTTONS (Oak) NO 503: 5-5-6-6-7-7 pieces
----------------------------------------------------------

-------------------------------------------------------

Alternative Yarn – See how to change yarns here
Yarn Groups A to F – Use the same pattern and change the yarn here
Yarn usage using an alternative yarn – Use our yarn converter here

-------------------------------------------------------

DROPS Sky
DROPS Sky
74% Alpaca, 18% Polyamide, 8% Wool
from 5.10 £ /50g
Get the yarn to make this pattern from 15.30£.

The yarn cost is calculated from the pattern’s smallest size and the yarn’s cheapest product type. Looking for an even better price? You might find it on the DROPS Deals!

DROPS Super Sale

SAVE 30% on 6 cotton favourites!
Valid until 12.04.2024

Pattern instructions

NOTE: This pattern is written in British English. All measurements in charts are in cm. For conversion from cm to inches - click here. There are different terms for crocheting in British and American English. If this pattern includes crochet, click for "crochet terms" here. For this pattern in American English, please click here.
----------------------------------------------------------

EXPLANATION FOR THE PATTERN:

----------------------------------------------------------

GARTER STITCH (back and forth):
1 ridge = knit 2 rows.

STRIPES AND PATTERN:
Work piece in pattern A.1, A.2 and A.3 – AT THE SAME TIME work stripes as follows:
* Work 3 cm light jeans blue (including neck edge), and then 2 cm white * – repeat these colour stripes until 5-5-6-7-8-9 stripes with white have been worked on yoke/body and 6-7-8-9-10-10 stripes white on yoke/sleeve. Then work with light jeans blue until finished measurements.

INCREASE TIP (evenly spaced):
To calculate how to increase evenly, use the total number of stitches on row (e.g. 141 stitches), minus bands (= 131 stitches) and divide the stitches by number of increases to be done (e.g. 27) = 4.8. In this example increase after approx. every 5th stitch by making 1 yarn over and do not increase over bands. On next row work yarn overs twisted to avoid holes.

RAGLAN:
Increase on each side of the 4 stitches with markers on every row from right side as follows: Make 1 yarn over, work 1 stitch in stocking stitch (= stitch with marker), make 1 yarn over. On next row purl yarn over twisted to avoid holes. Work the increased stitches in pattern when increasing.

DECREASE TIP (applies to sleeves):
Decrease 1 stitch on each side of stitch with marker as follows: Work until 2 stitches remain before stitch with marker , slip 1 stitch knitwise, knit 1, pass slipped stitch over stitch worked, knit 1 (marker is in this stitch), knit the next 2 stitches together.

BUTTONHOLES:
Decrease for buttonholes on right band (when garment is worn). Decrease from right side when 3 stitches remain on row as follows: Make 1 yarn over, knit the next 2 stitches together, knit last stitch. On next row knit yarn over to make holes. Decrease first buttonhole when piece measures approx. 1 cm. Then decrease the next 4-4-5-5-6-6 buttonholes approx. every 6-7-6½-7-7-7½ cm.

----------------------------------------------------------

START THE PIECE HERE:

----------------------------------------------------------

JACKET - SHORT OVERVIEW OF THE PIECE:
Yoke and body are worked back and forth, top down. Work sleeves in the round on double pointed needles.

YOKE:
Cast on 88-92-96-100-104-108 stitches (including 5 band stitches in each side of piece) on circular needle size 3 mm with light jeans blue. Work 5 band stitches in GARTER STITCH – read explanation above, work rib (= knit 2 / purl 2) until 7 stitches remain, knit 2 and 5 band stitches in garter stitch. When piece measures approx. 1 cm, switch to circular needle size 4 mm and decrease for BUTTONHOLES – read explanation above.
Knit 1 row from right side while increasing evenly 7-5-7-5-7-5 stitches = 95-97-103-105-111-113 stitches. Knit 1 row from wrong side.

Now insert 4 markers for RAGLAN in the piece without working as follows: Insert 1st marker in the 18th-18th-20th-20th-22nd-22nd stitch, insert 2nd marker in the 32nd-32nd-34th-34th-36th-36th stitch, insert 3rd marker in the 64th-66th-70th-72nd-76th-78th stitch, insert 4th marker in the 78th-80th-84th-86th-90th-92nd stitch.
then work STRIPES AND PATTERN with 5 band stitches in garter stitch in each side - read explanation above, and read the entire section before continuing.

Work as follows from right side: Work 5 band stitches in garter stitch, work A.1 over 1 stitch, work A.2 over the next 10-10-12-12-14-14 stitches, work A.3 over 1 stitch, make 1 yarn over, 1 stitch in stocking stitch, make 1 yarn over (= increase for raglan). Work A.2 over the next 12 stitches, work A.3 over 1 stitch, make 1 yarn over, 1 stitch in stocking stitch, make 1 yarn over (= increase for raglan). Work A.2 over the next 30-32-34-36-38-40 stitches, work A.3 over 1 stitch, make 1 yarn over, 1 stitch in stocking stitch, make 1 yarn over (= increase for raglan). Work A.2 over the next 12 stitches, work A.3 over 1 stitch, make 1 yarn over, 1 stitch in stocking stitch, make 1 yarn over (= increase for raglan). Work A.2 over the next 12-12-14-14-16-16 stitches and 5 band stitches in garter stitch. First increase for raglan is now done (= 8 stitches increased).
Work from wrong side as follows: Work 5 band stitches in garter stitch, work pattern according to A.1/A.2/A.3 (purl all rows from wrong side in diagram) until 5 stitches remain, and work 5 band stitches in garter stitch. REMEMBER THE KNITTING TENSION! Continue with stripes and pattern and increases for raglan until you have increased a total of 15-16-17-18-19-20 times = 215-225-239-249-263-273 stitches.
Continue with pattern and stripes until piece measures 13-14-15-16-17-18 cm from cast-on edge.
On next row divide piece for body and sleeves as follows:
Work 5 band stitches in garter stitch, 28-29-32-33-36-37 stitches in pattern as before (= front piece), slip the next 43-45-47-49-51-53 stitches on a stitch holder for sleeve and cast on 6 stitches in the side under sleeve, work 63-67-71-75-79-83 stitches in pattern as before (= back piece), slip the next 43-45-47-49-51-53 stitches on a stitch holder for sleeve and cast on 6 stitches under sleeve, work 28-29-32-33-36-37 stitches in pattern as before and finish with 5 band stitches in garter stitch (= front piece) = 141-147-157-163-173-179 stitches. 

BODY:
Continue with pattern, stripes and band stitches as before. NOTE: When 5-5-6-7-8-9 stripes with white have been worked in total, work the rest of the piece in light jeans blue. When piece measures 17-19-22-25-28-31 cm from division, knit 1 row from right side while increasing 27-33-31-37-39-41 stitches evenly - read INCREASE TIP = 168-180-188-200-212-220 stitches. Switch to circular needle size 3 mm. Work next row from wrong side as follows: Work 5 band stitches in garter stitch, work rib (= knit 2 / purl 2) until 7 stitches remain, purl 2 and 5 band stitches in garter stitch. Cast off by knitting from right side when piece measures 19-21-24-27-30-33 cm from division – use if needed a thicker needle to cast off to avoid a tight edge. Jacket measures approx. 33-36-40-44-48-52 cm, measured from shoulder and down.

SLEEVE:
Slip the 43-45-47-49-51-53 stitches from stitch holder in one side of piece on double pointed needles size 4 mm and pick up 1 new stitch in each of the 6 stitches cast on under sleeve = 49-51-53-55-57-59 stitches. Insert a marker in the first stitch of the round (mid under sleeve). Work in the round and continue pattern A.1 and stripes as before (the stitch with marker is knitted on every round).
When sleeve measures 2 cm from where sleeve was divided from body, decrease 1 stitch on each side of marker (= 2 stitches decreased) - read DECREASE TIP. Decrease like this every 4-4-5-5-7-6 cm 5-6-5-6-5-6 times in total = 39-39-43-43-47-47 stitches. NOTE: When 6-7-8-9-10-10 stripes with white have been worked in total, work the rest of the piece in light jeans blue. Work until piece measures 19-23-27-31-35-38 cm from division. Knit 1 round and decrease 3-3-3-3-3-3 stitches evenly = 36-36-40-40-44-44 stitches. Switch to double pointed needles size 3 mm and work rib with knit 2/purl 2. Cast off by knitting when sleeve measures 23-27-31-35-39-42 cm from division – use if needed a thicker needle to cast off to avoid a tight edge.

Work the other sleeve the same way.

ASSEMBLY:
Sew the buttons on to the left band.

This pattern has been corrected.

Updated online: 25.08.2023
Correction DECREASE TIP (applies to sleeves) + SLEEVE

Diagram

symbols = knit from the right side, purl from the wrong side
symbols = purl from right side
diagram

Each of our patterns has specific tutorial videos to help you.

Do you have a question? See a list of frequently asked questions (FAQ)

Knitting tension is what determines the final measurements of your work, and is usually measured per 10 x 10 cm. It is provided like so: number of stitches in width x number of rows in height - eg: 19 stitches x 26 rows = 10 x 10 cm.

The knitting tension is very individual; some people knit/crochet loosely while others work tightly. You adjust the knitting tension with the needle size, which is why the suggested needle size is only meant as a guide! You need to adjust this (up or down) to ensure that YOUR knitting tension matches the knitting tension provided in the pattern. If you work with a different knitting tension than provided you will have a different yarn consumption, and your work will have different measurements than what the pattern suggests.

The knitting tension also determines which yarns can replace each other. As long as you achieve the same knitting tension you can replace one yarn with another.

See DROPS lesson: How to measure your tension/gauge

See DROPS video: How to make a gauge tension swatch

The required amount of yarn is provided in grams, eg: 450 g. To calculate how many balls you’ll need you first need to know how many grams are in 1 ball (25g, 50g or 100g). This information is available if you click on the individual yarn quality on our pages. Divide the amount required with the amount of each ball. For example, if each ball is 50g (the most common amount), the calculation will be as follows: 450 / 50 = 9 balls.

The important thing when changing from one yarn to another is that the knitting/crochet tension remains the same. This is so that the measurements of the finished piece will be the same as on the sketch provided. It is easier to achieve the same knitting tension using yarns from the same yarn group. It is also possible to work with multiple strands of a thinner yarn to achieve the knitting tension of a thicker one. Please try our yarn converter. We recommend you to always work a test swatch.

Please NOTE: when changing yarn the garment might have a different look and feel to the garment in the photo, due to individual properties and qualities of each yarn.

See DROPS lesson: Can I use a different yarn than the one mentioned in the pattern?

All our yarns are categorised into yarn groups (from A to F) according to thickness and knitting tension – group A contains the thinnest yarns and group F the thickest. This makes it easier for you to find alternative yarns to our patterns, should you wish to switch yarn. All yarns within the same group have a similar knitting tension and can easily replace each other. However, different yarn qualities have different structures and properties which will give the finished work a unique look and feel.

Click here for an overview of the yarns in each yarn group

At the top of all our patterns you’ll find a link to our yarn calculator, which is a helpful tool should you wish to use a different yarn than suggested. By filling in the yarn quality you wish to replace, the amount (in your size) and number of strands, the calculator will present good alternative yarns with the same knitting tension. Additionally it will tell you how much you’ll require in the new qualities and whether you’ll need to work with multiple strands. Most skeins are 50g (some are 25g or 100g).

If the pattern is worked with multiple colours, every colour will have to be calculated separately. Similarly, if the pattern is worked with several strands of different yarns (for example 1 strand Alpaca and 1 strand Kid-Silk) you will have to find alternatives for each, individually.

Click here to see our yarn calculator

Since different yarns have different qualities and textures we have chosen to keep the original yarn in our patterns. However, you can easily find options among our available qualities by using our yarn calculator, or simply pick a yarn from the same yarn group.

It is possible that some retailers still have discontinued yarns in stock, or that someone has a few skeins at home that they would like to find patterns for.

The yarn calculator will provide both alternative yarn as well as required amount in the new quality.

If you think it's hard to decide what size to make, it can be a good idea to measure a garment you own already and like the size of. Then you can pick the size by comparing those measures with the ones available in the pattern's size chart.

You'll find the size chart at the bottom of the pattern.

See DROPS lesson: How to read size chart

The needle size provided in the pattern serves only as a guide, the important thing is to follow the knitting tension. And since knitting tension is very individual, you will have to adjust the needle size to ensure that YOUR tension is the same as in the pattern – maybe you’ll have to adjust 1, or even 2 needle sizes, up or down to achieve the correct tension. For this, we recommend that you work test swatches.

Should you work with a different knitting tension than the one provided, the measurements of the finished garment might deviate from the measurement sketch.

See DROPS lesson: How to measure your tension/gauge

See DROPS video: How to make a tension/gauge swatch

Working a garment top-down provides more flexibility and room for personal adjustment. For example it is easier to try the garment on while working, as well as making adjustments to length of yoke and shoulder caps.

The instructions are carefully explaining every step, in the correct order. Diagrams are adjusted to the knitting direction and are worked as usual.

The diagram depicts all rows/rounds, and every stitch seen from the right side. It is read from bottom to top, from right to left. 1 square = 1 stitch.

When working back and forth, every other row is worked from the right side and every other row is worked from the wrong side. When working from the wrong side, the diagram will have to be worked reversed: from left to right, knit stitches are purled, purl stitches are knit etc.

When working in the round every round is worked from the right side and the diagram are worked from right to left on all rounds.

See DROPS lesson: How to read knitting diagrams

The diagram depicts all rows/rounds, and every stitch seen from the right side. It is worked from bottom to top, from right to left.

When working back and forth every other row is worked from the right side: from right to left and every other row is worked from the wrong side: from left to right.

When working in the round, every row in the diagram are worked from the right side, from right to left.

When working a circular diagram you start in the middle and work your way outwards, counter clockwise, row by row.

The rows usually start with a given number of chain stitches (equivalent to the height of the following stitch), this will either be depicted in the diagram or explained in the pattern.

See DROPS lesson: How to read crochet diagrams

Instructions for working several diagrams after each other on the same row/round, will often be written like so: “work A.1, A.2, A.3 a total of 0-0-2-3-4 times". This means you work A.1 once, then A.2 is worked once, and A.3 is repeated (in width) the number of times provided for your size – in this case like so: S = 0 times, M = 0 times, L=2 times, XL= 3 times and XXL = 4 times.

The diagrams are worked as usual: begin with the first row in A.1, then work the first row in A.2 etc.

See DROPS lesson: How to read knitting diagrams

See DROPS lesson: How to read crochet diagrams

The total width of the garment (from wrist-to-wrist) will be larger in the larger sizes, despite the actual sleeves being shorter. The larger sizes have longer sleeve caps and wider shoulders, so there will be a good fit in all sizes.

The measurement sketch/schematic drawing provides information regarding the full length of the garment. If it’s a jumper or a jacket the length is measured from the highest point on the shoulder closest to the neckline, and straight down to the bottom of the garment. It is NOT measured from the tip of shoulder. Similarly, the length of yoke is measured from the highest point on the shoulder and down to where yoke is split into body and sleeves.

On a jacket measures are never taken along bands, unless specifically stated. Always measure inside band stitches when measuring the length.

See DROPS lesson: How to read a schematic drawing

Diagrams are often repeated on the round or in height. 1 repeat is the diagram the way it appears in the pattern. If it says to work 5 repeats of A.1 in the round, then you work A.1 a total of 5 times after/next to each other in the round. If it says to work 2 repeats of A.1 vertically/in height you work the entire diagram once, then begin again at the start and work the entire diagram one more time.

Chain stitches are slightly narrower than other stitches and to avoid working the cast-on edge too tight, we simply chain more stitches to begin with. The stitch count will be adjusted on the following row to fit the pattern and measurement sketch.

The rib edge is more elastic and will contract slightly compared to, for example, stocking stitch. By increasing before the rib edge, you avoid a visible difference in width between the rib edge and the rest of the body.

It’s very easy to cast off too tightly, and by making yarn overs while casting off (and simultaneously casting these off) you avoid a too tight cast off edge.

See DROPS video: How to bind off with yarn overs (yo)

To achieve an even increase (or decrease) you can increase on, for example: every 3rd and 4th row alternately, like so: work 2 rows and increase on the 3rd row, work 3 rows and increase on the 4th. Repeat this until the increase is complete.

See DROPS lesson: Increase or decrease 1 st on every 3rd and 4th row alternately

Should you prefer to work in the round instead of back and forth, you may of course adjust the pattern. You’ll need to add steeks mid-front (usually 5 stitches), and follow the instructions. When you would normally turn and work from the wrong side, simply work across the steek and continue in the round. At the end you’ll cut the piece open, pick up stitches to work bands, and cover the cut edges.

See DROPS video: How to knit steeks and cut open

Should you prefer to work back and forth instead of in the round, you may of course adjust the pattern so you work the pieces separately and then assemble them at the end. Divide the stitches for the body in 2, add 1 edge stitch in each side (for sewing) and work the front and back pieces separately.

See DROPS lesson: Can I adapt a pattern for circular needles into straight needles?

Pattern repeats can vary slightly in the different sizes, in order to get the correct proportions. If you’re not working the exact same size as the garment in the photo, yours might deviate slightly. This has been carefully developed and adjusted so that the complete impression of the garment is the same in all sizes.

Make sure to follow instructions and diagrams for your size!

If you have found a pattern you like which is available in women’s size it’s not very difficult to convert it to men’s size. The biggest difference will be the length of sleeves and body. Start working on the women size that you think would fit across the chest. The additional length will be worked right before you cast off for the armhole/sleeve cap. If the pattern is worked top-down you can add the length right after the armhole or before the first decrease on sleeve.

Regarding additional yarn amount, this will depend on how much length you add, but it is better with a skein too many than too few.

All yarns will have excess fibres (from production) that might come off as lint or shedding. Brushed yarns (ie hairier yarns) have more of these loose, excess fibres, causing more shedding.

Shedding also depends on what is worn under or over the garment, and whether this pulls at the yarn fibres. It’s therefore not possible to guarantee that there will be no shedding

Below are some tips on how to get the best result when working with hairier yarns:

1. When the garment is finished (before you wash it) shake it vigorously so the looser hairs come off. NOTE: do NOT use a lint roller, brush or any method that pulls at the yarn.

2. Place the garment in a plastic bag and put it in your freezer - the temperature will cause the fibres to become less attached to each other, and excess fibres will come off easier.

3. Leave in the freezer for a few hours before taking it out and shaking it again.

4. Wash the garment according to the instructions on the yarn label.

Pilling is a natural process that happens to even the most exclusive of fibers. It's a natural sign of wear and tear that is hard to avoid, and that is most visible in high friction areas of your garment like a sweater's arms and cuffs.

You can make your garment look as new by removing the pilling, using a fabric comb or a pill/lint remover.

Still can't find the answer you need? Then scroll down and leave your question so one of our experts can try to help you. This will be done normally within 5 to 10 working days.
In the meantime, you can read the questions and answers that others have left to this pattern or join the DROPS Workshop on Facebook to get help from fellow knitters/crocheters!

You might also like...

Post a comment to pattern DROPS Children 34-20

We would love to hear what you have to say about this pattern!

If you want to leave a question, please make sure you select the correct category in the form below, to speed up the answering process. Required fields are marked *.

Comments / Questions (44)

country flag Sylvie Macias wrote:

Bonjour J'ai commencé le point fantaisie du Sky Stripes Jacket et j'obtiens tout simplement des côtes 1/ 1 . Est-ce que je n'ai pas compris le diagramme? Merci

05.03.2024 - 19:43

DROPS Design answered:

Bonjour Mme Macias, les côtes que vous devez avoir doivent être des côtes 1 maille jersey, 1 maille point mousse; A.1 = 1 maille jersey endroit; A.2 = 1 maille point mousse, 1 maille jersey endroit; A.3 = 1 maille point mousse. Notez que le point noir se tricote' à l'envers sur l'endroit et à l'envers sur l'envers, on obtient ainsi un point mousse (un peu plus serré que lorsque l'on tricote toujours à l'endroit). Bon tricot!

06.03.2024 - 08:07

country flag Hannah wrote:

Hello! I am knitting the first RS row following division of the sleeves. I’m having a problem around the first underarm section where I have cast on 6 new stitches for the side. Here are what my stitches look like - K (raglan stitch), p, k, p, k, p, k, K (raglan stitch) Is this correct to have 2 K sts side by side? I have checked my stitch count and it is correct (163, size 4) Thank you. Apologies for the repost, wasn’t sure I had posted under the right category!

06.07.2023 - 12:46

DROPS Design answered:

Dear Hannah, your question has been forwarded to our Design team, but due to summer holiday, it might take time - if you want to continue, I would then recommand pick up one extra stitch under each sleeve to let the pattern working over all stitches on body. Happy knitting!

06.07.2023 - 15:09

country flag Hannah wrote:

Hello! I am knitting the first RS row following division of the sleeves. I’m having a problem around the first underarm section where I have cast on 6 new stitches for the side. Here are what my stitches look like - K (raglan stitch), p, k, p, k, p, k, K (raglan stitch) Is this correct to have 2 K sts side by side? I have checked my stitch count and it is correct (163, size 4) Any help with this would be very much appreciated. Thank you.

29.06.2023 - 14:42

country flag Josephine wrote:

And where, exactly am I placing the markers? Is that after 19 stitches including the 5 garter stitches? Then 36 stitches after that marker or 36 stitches from the beginning? Similarly with the other 2 markers, where do I place them? Something is lost on the translation here.

12.11.2022 - 00:27

DROPS Design answered:

Dear Josephine, you insert the markers inside a stitch, not between them. The first one is in the 18....22nd stitch (depending on the size), 32....36th stitch (counting from the beginning of the row, not the previous one) and the other 2 are inserted similarly. These stitches with markers form the raglan stitches and are always knitted. The increases for the raglan are worked on each side of these stitches with markers. Happy knitting!

13.11.2022 - 23:42

country flag Josephine wrote:

What does this mean: work A.1 over 1 stitch, work A.2 over the next 10-10-12-12-14-14 stitches, work A.3 over 1 stitch, make 1 yarn over, 1 stitch in stockinette stitch, make 1 yarn over (= increase for raglan). Work A.2 over the next 12 stitches, work A.3 over 1 stitch, make 1 yarn over, 1 stitch in stockinette stitch, make 1 yarn over (= increase for raglan). Work A.2 over the next 30-32-34-36-38-40 stitches, work A.3 over 1 stitch, make 1 yarn over, 1 stitch in stockinette stitch, make 1 yarn

12.11.2022 - 00:12

DROPS Design answered:

Dear Josephine, work as follows: 5 sts in garter stitch (knitted), A.1 over 1 stitch ( knit from the RS and purl from the WS), A.2 (= 2 sts which are repeated 5...7 times depending on the size), A,3 (= 1 st, purl from the RS and purl from the WS), 1 yarn over, 1 st in stocking stitch, 1 yarn over, A.2 (worked as before), A.3 (as before), yarn over, 1 st in stocking stitch), yarn over, A.2 (as before), A.3 (as before), yarn over, 1 stitch in stocking stitch, yarn over. You can see the charts A.1, A.2 and A.3 under the sleeve in the measurements schematic. Happy knitting!

13.11.2022 - 23:48

country flag Christine wrote:

Zu meiner vorherigen Frage noch vollgende Anmerkung. In Summe geht es zwar mit dem Muster auf, unter dem ersten Ärmel gibt es für das Rückenteil jedoch eine Verschiebung des Muster, welches sich erst unter dem zweiten Ärmel wieder ausgleicht.

13.06.2022 - 08:58

DROPS Design answered:

Liebe Christine, die Raglanmasche wird jetzt im Muster gestrickt (und nicht mehr glatt rechts), so wird das Muster wie zuvor passen. Viel Spaß beim stricken!

13.06.2022 - 11:45

country flag Christine wrote:

Hallo, Wie verfahren ich im Muster nach Stillleben der Maschen für Ärmel fort, wenn die Stillgelegten Zahl ungerade ist, für den Ärmel jedoch 6 Maschen (gerade Anzahl) aufgenommen werden müssen. Da geht das Muster nicht auf?

10.06.2022 - 14:05

DROPS Design answered:

Liebe Christine, das Muster stricken Sie genau so wie zuvor, die Maschenanzahl ist jezt ungerade und muss zwischen den Blenden-Maschen passen. Viel Spaß beim stricken!

13.06.2022 - 08:14

country flag Amy wrote:

How can a 1x1 rib be worked correctly over an odd number of stitches in the sleeves? And to maintain the same pattern as the body of the sweater, now that I am knitting in the round, shouldn’t every other round be to knit every stitch? That is not mentioned in the pattern.

12.05.2022 - 16:16

DROPS Design answered:

Dear Amy, do you mean when working sleeve separately? adjust the beg/end of the round so that all sts in pattern are worked as before; when working A.2 /A.3 in the round repeat on row 1 (P1, K1) and on row 2 knit all stitches. The pattern may just not fit mid under sleeve. Happy knitting!

12.05.2022 - 16:44

country flag Eva-Marie Wulff wrote:

När jag ökar för raglan och får fler maskor ska jag tex vid andra ökningen börja med en rät maska vid A2 istället för en avig?

03.05.2022 - 14:12

DROPS Design answered:

Hej Eva-Marie, hvis du tænker på det mønster som du allerede danner, så skal den nye maske være en fortsættelse til det (og altså IKKE passe som mønster i/mod raglan overgangen) :)

04.05.2022 - 10:17

country flag Marianne LIMANTOUR wrote:

Bonjour, Où puis-je trouver les explications des points fantaisies A1, A2, A3 ? Je ne les trouves pas dans le modèle. Merci d'avance Marianne

05.03.2022 - 11:57

DROPS Design answered:

Bonjour Marianne, vous trouverez les diagrammes A.1 (= 1 m)=, A.2 (= 2 m) et A.3 (= 1 m) à côté du schéma des mesures, sous la manche; la légende des symboles se trouve juste au-dessus du schéma. Bon tricot!

07.03.2022 - 08:32