
Popular categories
Looking for a yarn?


Comments / Questions (20)
![]() Deirdre wrote:
Deirdre wrote:
Do you have a video on how to do the neck and shoulders on the front part of the Red Nose Jumper Kids, I am a little bit stuck with the instruction from the pattern, really appreciate, thank you
18.03.2026 - 23:52DROPS Design answered:
Dear Deirdre, to shape the neck on front piece you will slip the middle 14-18 sts (see size) on a thread and finish each shoulder separately casting off at the beg of each row from neck (from RS on right shoulder / from WS on left shoulder): 2 sts 1 time and 1 st 1,2or 3 times. Work the remaining 16-22 sts until piece measures 32-51 cm and cast off. Take the stitches of 2nd shoulder back on needle and work the same way. Happy knitting!
19.03.2026 - 08:58
![]() Zorica Ferhatovic wrote:
Zorica Ferhatovic wrote:
Var finns diagram A.3, gäller ögonen? Tack på förhand? Mvh Zorica Ferhatovic
02.10.2025 - 21:32DROPS Design answered:
Hi Zorica, A.3 is at the bottom of the pattern, next to the schematic drawing, on its right side. Happy knitting!
03.10.2025 - 09:29
![]() Aranka wrote:
Aranka wrote:
Vraagje over het afkanten voor de hals: Ik heb nu 2x 27 steken op de naald staan (en daartussen 18 steken op een aparte rondbreinaald.) Moet ik élke naald afkanten of elke 2e naald? Want als ik elke naald moet afkanten, weet ik niet hoe dat moet.
06.12.2024 - 14:54DROPS Design answered:
Dag Aranka,
Ben je bij het afkanten voor de schouder? Dit doe je steeds aan het begin van de naald, dus niet elke naald.
12.12.2024 - 15:25
![]() Anne Marieke Panneman wrote:
Anne Marieke Panneman wrote:
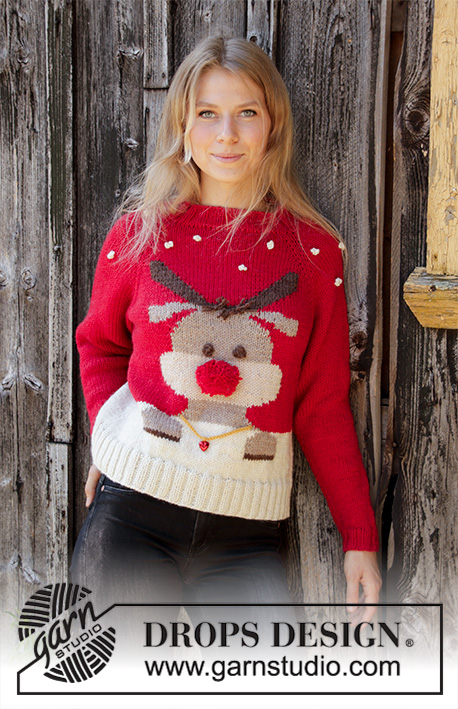
Geachte, is deze kersttrui met het rendier ook in een herenversie, maat L? Vader en dochter kersttrui☺️ Met vriendelijke groet, Anne Marieke Panneman
09.08.2024 - 22:09DROPS Design answered:
Dag Anne Marieke,
Nee, niet voor heren, helaas. (Wel voor dames). Je zou wel het telpatroon met rendier kunnen gebruiken in combinatie met een ander (basis)patroon voor een herentrui in garencategorie C.
12.08.2024 - 16:38
![]() Helen Chappell wrote:
Helen Chappell wrote:
Thank you for answering my questions (3 questions)so quickly and so clearly. Now I have the confidence to start the Red Nose Christmas jumper for my grandson. Really excited and looking forward to it. I am happy to have found Drops, the beautiful yarns and stylish patterns. Will definitely be buying again.
11.09.2023 - 15:41
![]() Helen Chappell wrote:
Helen Chappell wrote:
The pattern for Red Nose jumper says , "cast on 70 stitches (including 1 edge stitch on each side). Does this mean add another 2 stitches making it 72 stitches to cast on or are the edge stitches included in the 70 stitches? Thank you.
09.09.2023 - 20:29DROPS Design answered:
Dear Helen, no, the 70 stitches already include these 2 edge stitches. Happy knitting!
10.09.2023 - 20:18
![]() Helen Chappell wrote:
Helen Chappell wrote:
For the knitting tension for this pattern should I knit on size 4mm or 5mm needles? Thank you.
29.08.2023 - 13:26DROPS Design answered:
Hi Helen, The guage is for 5 mm needles. Happy knitting!
30.08.2023 - 06:48
![]() Helen Chappell wrote:
Helen Chappell wrote:
Can you knit this pattern on straight needles? What is the advantage of using circular needles? I haven't used them before. Thank you.
11.08.2023 - 12:39DROPS Design answered:
Dear Mrs Chappell, sure you can, front and back pieces are worked back and forth on circular needle to have enough room for all stitches; only sleeves are worked in the round - in this lesson we explain how to adapt them into straight needle. Happy knitting!
11.08.2023 - 15:31
![]() Nisha wrote:
Nisha wrote:
I have made this jumper and would like to put it on sale. I was a little confused about you copyr policy. When I sell a product made using your patterns do I have to mention your name, even if its just 1 item?
01.01.2023 - 17:28
![]() Monika Henrich wrote:
Monika Henrich wrote:
Wenn in dem Diagramm Hin- und Rückreihen angezeigt werden, müssen die Zu- und Abnahmen/Farbwechsel auch in den Rückreihen ausgeführt werden? Ergibt bei mir zuviele Löcher bei den Farbwechsel. Was mache ich falsch oder lese ich das Diagramm 32-18 falsch.
20.12.2022 - 19:33DROPS Design answered:
Liebe Frau Henrich, ja genau die Diagramme zeigen alle Reihen, wenn bei der nächsten Reihe mehr Maschen in de 2. Farbe gestrickt werden soll, können Sie diese Farbe bei der letzte Reihe einige Maschen folgen lassen, damit die Farbe an der richtigen Stellen für die nächste Reihe wird. Viel Spaß beim stricken!
21.12.2022 - 08:05
|
|||||||||||||||||||
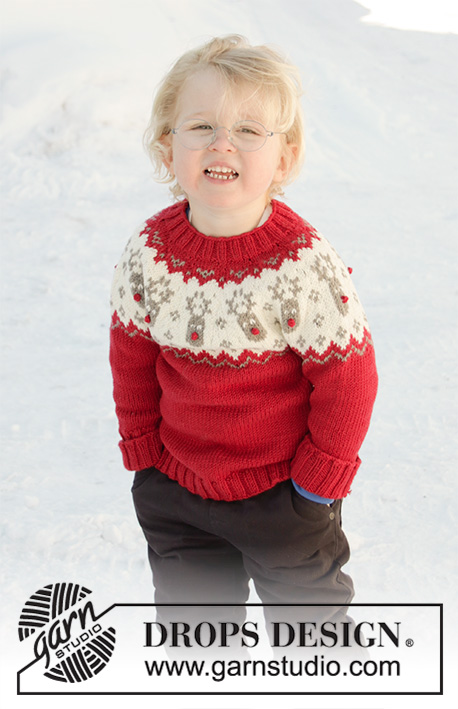
Red Nose Jumper Kids#rednosejumperkids |
|||||||||||||||||||
 |
 |
||||||||||||||||||
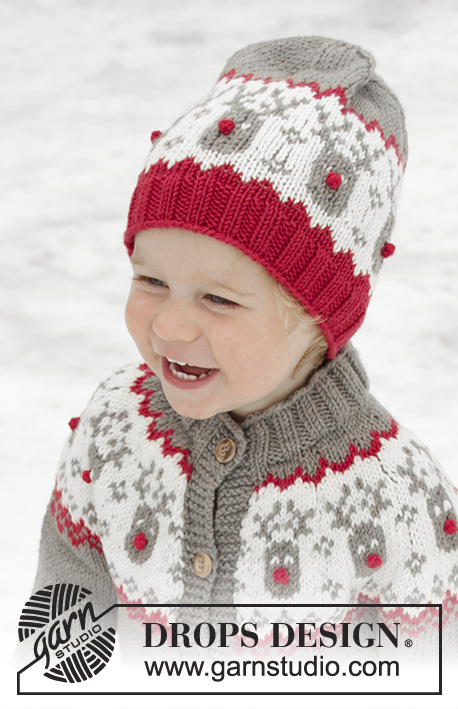
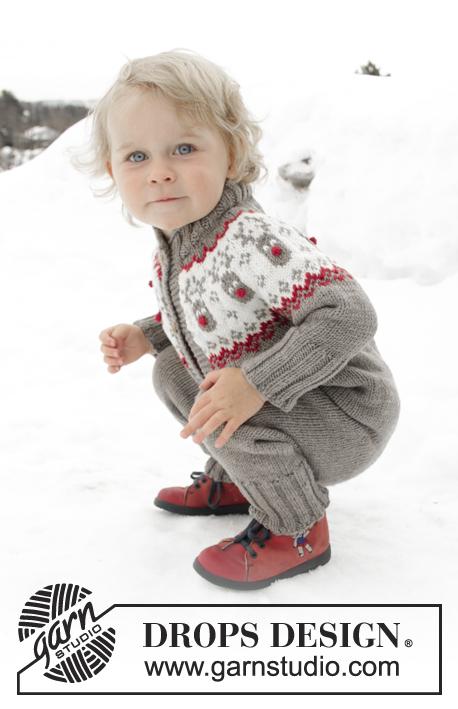
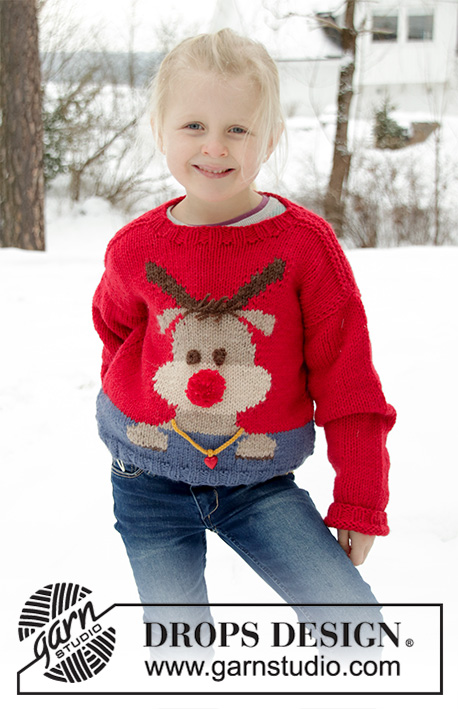
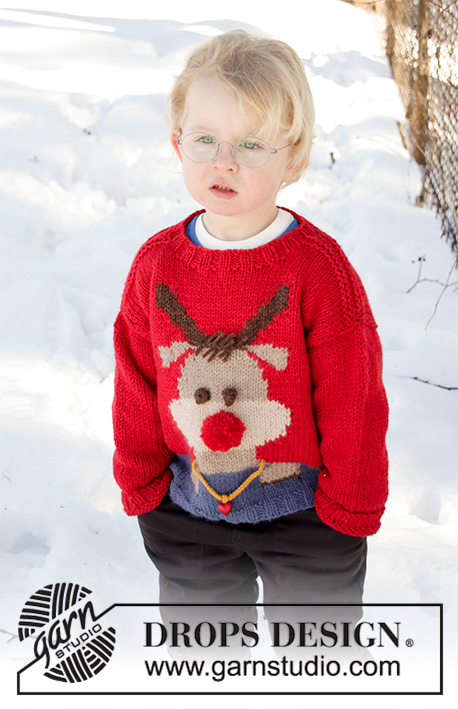
Knitted Christmas jumper for children in DROPS Nepal. The piece is worked with a reindeer motif. Sizes 2 - 12 years. Theme: Christmas.
DROPS Children 32-18 |
|||||||||||||||||||
|
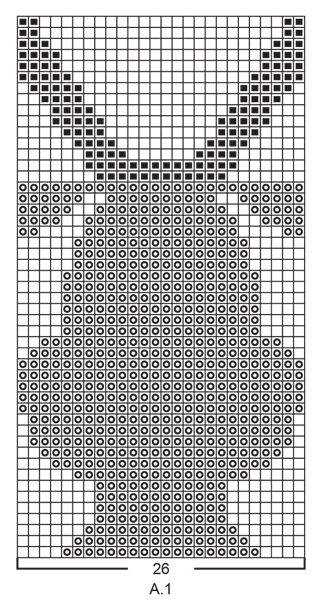
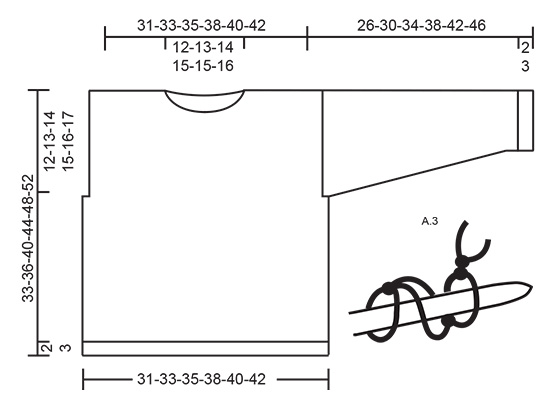
EXPLANATIONS FOR THE PATTERN: ------------------------------------------------------- RIDGE/GARTER STITCH (worked back and forth): 1 ridge = Knit 2 rows. 1 edge stitch in garter stitch = knit the stitch from both the right and wrong side PATTERN: See diagrams A.1 and A.2. The reindeer is worked in stocking stitch. To avoid long strands at the back of the piece when working pattern, you can work with 3/5 balls. In other words, work with 1 ball of denim blue/red on each side of the reindeer and with 1 ball of medium brown/beige/light beige in the middle of the jumper (i.e. A.1/A.2). To avoid holes when changing colour, twist the strands together when changing colour. INCREASE TIP (for mid under sleeve): Start 1 stitch before the marker thread, make 1 yarn over, knit 2 (the marker thread sits between these 2 stitches), make 1 yarn over. On the next round knit the yarn overs twisted to avoid holes. Then work the new stitches in stocking stitch. ------------------------------------------------------- START THE PIECE HERE: ------------------------------------------------------- JUMPER - SHORT OVERVIEW OF THE PIECE: Front and back pieces are worked back and forth with circular needle (with or without a reindeer on back piece). The parts are worked separately, bottom up. The sleeves are worked in the round with double pointed needles / short circular needle, bottom up. BACK PIECE WITH REINDEER: Cast on 54-58-62-66-70-74 stitches (including 1 edge stitch in each side) with circular needle size 4 mm and denim blue. Purl 1 row (= wrong side). The next row is worked as follows from the right side: 1 edge stitch in GARTER STITCH – read description above, * knit 2, purl 2 * work from *-* until there is 1 stitch left on the row, finish with 1 edge stitch in garter stitch. Continue this rib for 2-2-2-3-3-3 cm – adjust so that the next row is from the right side. Change to circular needle size 5 mm. Work 10-12-14-16-20-24 rows stocking stitch with 1 edge stitch in garter stitch on each side. REMEMBER THE KNITTING TENSION! Change to red and work the next row as follows from the right side: Work 1 edge stitch in garter stitch, 13-15-17-19-21-23 stitches in stocking stitch, work A.1 (= 26 stitches) – read PATTERN, work 13-15-17-19-21-23 stitches in stocking stitch and finish with 1 edge stitch in garter stitch. Continue this pattern. When the piece measures 21-23-26-29-32-35 cm cast off 1 stitch at the beginning of the next 2 rows for the armholes = 52-56-60-64-68-72 stitches. Continue with stocking stitch and A.1. When A.1 has been completed, continue with red over all stitches. When the piece measures 31-34-38-42-46-50 cm cast off the middle 18-20-22-24-24-26 stitches for neck and each shoulder is finished separately. Then cast off 1 stitch on the next row from the neck = 16-17-18-19-21-22 stitches left on shoulder. Continue working until the piece measures 32-35-39-43-47-51 cm – adjust so that the next row is worked from the wrong side. Knit 1 row from the wrong side, knit 1 row from the right side and knit 1 row from the wrong side. Cast off with knit from the right side. Work the other shoulder in the same way. The jumper measures approx. 33-36-40-44-48-52 cm from the shoulder down. BACKPIECE WITHOUT REINDEER: Cast on 54-58-62-66-70-74 stitches (including 1 edge stitch on each side) with circular needle size 4 mm and denim blue. Purl 1 row (= wrong side). The next row is worked as follows from the right side: 1 edge stitch in GARTER STITCH – read description above, * knit 2, purl 2 * work from *-* until there is 1 stitch left on the row and finish with 1 edge stitch in garter stitch. Continue this rib for 2-2-2-3-3-3 cm – adjust so that the next row is from the right side. Change to circular needle size 5 mm. Work 10-12-14-16-20-24 rows stocking stitch with 1 edge stitch in garter stitch on each side. REMEMBER THE KNITTING TENSION! Change to red and continue with stocking stitch and 1 edge stitch in garter stitch in each side. When the piece measures 21-23-26-29-32-35 cm cast off 1 stitch at the beginning of the next 2 rows for armholes = 52-56-60-64-68-72 stitches. Continue with stocking stitch and 1 edge stitch in garter stitch on each side. When the piece measures 31-34-38-42-46-50 cm cast off the middle 18-20-22-24-24-26 stitches for neck and each shoulder is finished separately. Then cast off 1 stitch on the next row from the neck = 16-17-18-19-21-22 stitches left on shoulder. Continue working until the piece measures 32-35-39-43-47-51 cm – adjust so that the next row is worked from the wrong side. Knit 1 row from the wrong side, knit 1 row from the right side and knit 1 row from the wrong side. Cast off with knit from the right side. Work the other shoulder in the same way. The jumper measures approx. 33-36-40-44-48-52 cm from the shoulder down. FRONT PIECE: Cast on 54-58-62-66-70-74 stitches (including 1 edge stitch on each side) with circular needle size 4 mm and denim blue. Purl 1 row (= wrong side). The next row is worked as follows from the right side: 1 edge stitch in GARTER STITCH – read description above, * knit 2, purl 2 * work from *-* until there is 1 stitch left on the row and finish with 1 edge stitch in garter stitch. Continue this rib for 2-2-2-3-3-3 cm – adjust so that the next row is from the right side. Change to circular needle size 5 mm. Work 2-4-6-8-12-16 rows stocking stitch with 1 edge stitch in garter stitch in each side. REMEMBER THE KNITTING TENSION! The next row is worked with denim blue as follows from the right side: Work 1 edge stitch in garter stitch, 11-13-15-17-19-21 stitches in stocking stitch, work A.2 (= 30 stitches) – read PATTERN, work 11-13-15-17-19-21 stitches in stocking stitch and finish with 1 edge stitch in garter stitch. Continue this pattern. When the row with an arrow in A.2 has been worked change the background colour from denim blue to red. Continue the pattern in the same way with 1 edge stitch in garter stitch in each side. When the piece measures 21-23-26-29-32-35 cm cast off 1 stitch at the beginning of the next 2 rows for the armholes = 52-56-60-64-68-72 stitches. Continue with stocking stitch and A.2. When A.2 has been completed, continue with red over all stitches. AT THE SAME TIME when the piece measures 30-31-35-38-42-45 cm place the middle 14-16-16-18-18-18 stitches on 1 thread for the neck and each shoulder is finished separately. Then cast off for the neck at the beginning of each row from the neck as follows: Cast off 2 stitches 1 time and 1 stitch 1-1-2-2-2-3 times = 16-17-18-19-21-22 stitches left on the shoulder. Continue until the piece measures 32-35-39-43-47-51 cm – adjust so that the next row is worked from the wrong side. Knit 1 row from the wrong side, knit 1 row from the right side and knit 1 row from the wrong side. Cast off with knit from the right side. Work the other shoulder in the same way. The jumper measures approx. 33-36-40-44-48-52 cm from the shoulder down. SLEEVE: Cast on 28-28-32-32-32-36 stitches with double pointed needles size 4 mm and red. Knit 1 round. Then work rib in the round (= knit 2 / purl 2) for 2-2-2-3-3-3 cm. Change to double pointed needles size 5 mm. Insert 1 marker thread at the beginning of the round (= mid under sleeve). The marker thread will be used a little later when increasing under the sleeve. Work stocking stitch in the round. When the piece measures 6-6-6-6-8-8 cm increase 2 stitches mid under sleeve – read INCREASE TIP. Increase like this every 3½-3-3½-3½-3-3½ cm a total of 6-8-8-9-11-11 times = 40-44-48-50-54-58 stitches. Continue working until the piece measures 26-30-34-38-42-46 cm (or to desired length). Loosely cast off. Work the other sleeve in the same way. ASSEMBLY: Sew the shoulder seams inside the cast-off edge. Sew the side seams inside the 1 edge stitch on each side. Sew in sleeves. NECK: Knit up from the right side approx. 46 to 66 stitches around the neck (including the stitches on the thread at the front) with short circular needle size 4 mm and red. Knit 1 round where you increase evenly on the round to 56-60-64-72-72-76 stitches. Work rib in the round (= knit 2 / purl 2) for approx. 3-3-3-3-4-4 cm. Loosely cast off with knit over knit and purl over purl. HAIR: Fasten 3 fringes both on the front and the back of the head. 1 fringe = cut 2 strands of medium brown, each approx. 8-9 cm. Lay the strands together and pull them around a stitch at the top of the reindeer’s head, between the beige on the head and the brown on the antlers - middle of head. Tie a double knot. Fasten another fringe on each side of the middle-fringe – see photo. EYES: Make 2 eyes with medium brown as follows: 1 eye: Cut 3 strand of approx. 40 cm. Make 4 knots around a needle size 5 mm - see diagram A.3 (i.e. make 3 LOOSE knots, make 1 more knot and tighten the strand on this knot = 1 knot). Make 1 more eye. Place the eyes on the front of the reindeer’s head, just above the light beige section - see photo. Pull the strand-ends through the garment on each side of one stitch and tie them at the back. NOSE: Make a pom pom with red, approx. 5-6 cm in diameter, remember to leave 2 strands to fasten the pom pom with. Fasten the pom pom to the front of the reindeer’s head in the middle of the light beige section. Thread the strand ends through the garment on each side of one stitch and tie together on the wrong side. NECKLACE BACK (for back piece with reindeer): Work a row of chain stitches of approx. 14 cm with hook size 4 mm and goldenrod. Place the necklace across the reindeer’s neck on the back piece. Fasten the strand-ends on the wrong side of the garment. NECKLACE FRONT: Work a row of chain stitches of approx. 16-18 cm with hook size 4 mm and goldenrod. Thread a red heart, or something similar, onto the row of chain stitches and tie a knot so that the heart stays in the middle of the row. Place the necklace across the reindeer’s neck on the front piece. Fasten the strand-ends on the wrong side of the garment. |
|||||||||||||||||||
Diagram explanations |
|||||||||||||||||||
|
|||||||||||||||||||
 |
|||||||||||||||||||
 |
|||||||||||||||||||
 |
|||||||||||||||||||
Have you finished this pattern?Tag your pictures with #dropspattern #rednosejumperkids or submit them to the #dropsfan gallery. Do you need help with this pattern?You'll find 35 tutorial videos, a Comments/Questions area and more by visiting the pattern on garnstudio.com. © 1982-2026 DROPS Design A/S. We reserve all rights. This document, including all its sub-sections, has copyrights. Read more about what you can do with our patterns at the bottom of each pattern on our site. |
|||||||||||||||||||


With over 40 years in knitting and crochet design, DROPS Design offers one of the most extensive collections of free patterns on the internet - translated to 17 languages. As of today we count 325 catalogues and 12291 patterns translated into English (UK/cm).
We work hard to bring you the best knitting and crochet have to offer, inspiration and advice as well as great quality yarns at incredible prices! Would you like to use our patterns for other than personal use? You can read what you are allowed to do in the Copyright text at the bottom of all our patterns. Happy crafting!
Post a comment to pattern DROPS Children 32-18
We would love to hear what you have to say about this pattern!
If you want to leave a question, please make sure you select the correct category in the form below, to speed up the answering process. Required fields are marked *.