
Popular categories
Looking for a yarn?


Comments / Questions (161)
![]() Ineke wrote:
Ineke wrote:
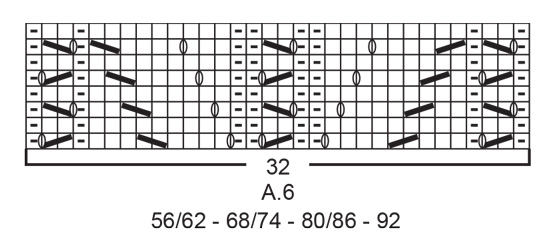
Brei ik bij telpatroon A.6 de middelste 14 steken (bij maat 1/3 maanden), dus de steken tussen het telpatroon in, zowel aan de goede als aan de verkeerde (achter) kant averechts?
08.08.2019 - 00:57DROPS Design answered:
Dag Ineke,
Het werk wordt heen en weer gebreid, dus je breit afwisselend op de goede en dan op de verkeerde kant. In het telpatroon zijn zowel de heengaande als de teruggaande naalden aagegeven. De teruggaande naalden zijn steeds de even naalden in het telpatroon. Een leeg hokje brei je op de goede kant (= heengaande naald) recht en op de teruggaande naald (= verkeerde kant) averecht). Bij een hokje met een liggend streepje is dit andersom. (Zie symboolverklaring.)
08.08.2019 - 13:35
![]() Olivia Tickles wrote:
Olivia Tickles wrote:
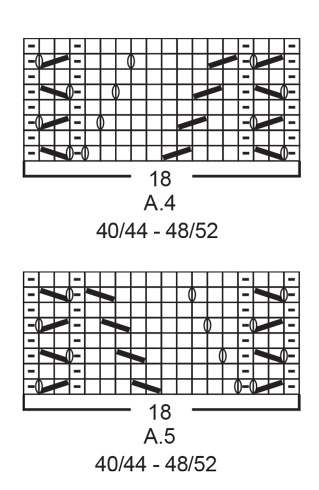
I'm confused, * When your working the separte sizes for the front, when you began working the "All Sizes" are we still doing the pattern as follow... *Knit 1, A.3 over 6 stitches, A.4 over 18 st, purl 14, A.5 over 18 st, A.3 over 6, knit 1 Repeat from * and do the opposite stitch on the wrong side until the piece measurements are correct then work on the right side?
04.08.2019 - 00:18DROPS Design answered:
Dear Mrs Tickles, that's right, in size 0/1 month you will work like this, then frm WS, read diagram from the left towards the right - 06.08.2019 - 16:25
![]() Marion wrote:
Marion wrote:
Bonjour, avec une amie nous avons choisi votre site pour le modèle du nid d'ange (taille 2 ans) que nous comptons offrir à une amie. Les modèles proposés sont très sympa. En ce moment je vais entamer l'encolure milieu droit et je voulais vous demander pourquoi mettre sur un fil ? Et également comment répartir les 6 m restantes du milieu devant. Je vous remercie par avance
31.07.2019 - 10:39DROPS Design answered:
Bonjour Marion! Les 11 mailles seront ensuite relevees autour de l'encolure pour le capuche (on releve au total 52 à 72 mailles, y compris les mailles des devants en attente). Comment diminuer 6 mailles à intervalles réguliers vous troverez ICI. Bon tricot!
31.07.2019 - 16:54
![]() Laetitia Bracq wrote:
Laetitia Bracq wrote:
Bonjour, Pour la première partie du devant il faut faire 26 Cm. C'est 26 cm son mesurer depuis la bordure ou du début du dessin a6? Merci de votre réponse
09.07.2019 - 12:40DROPS Design answered:
Bonjour Mme Bracq, les 26 cm (4ème taille) se mesurent depuis le rang de montage, et séparez les 2 devants au rang suivant sur l'endroit. Bon tricot!
09.07.2019 - 13:44
![]() Elisa wrote:
Elisa wrote:
Jeg strikker køredragten i størrelse 0/1md. Når man er næsten færdig med højre og venstre forstykke skriver I at der skal sættes 8 masker på 1 tråd. Bagefter fortsætter man med at lukke af til halsen. Hvad gør jeg med disse masker som er på 1 tråd, hvornår lukker jeg dem af? Jeg kan ikke finde noget i opskriften.
14.06.2019 - 21:49DROPS Design answered:
Hej. De använder du sedan till hetten. "HETTE: Strikk opp fra retten ca 52 til 72 masker rundt halsen (inkludert maskene fra trådene foran) ". Lycka till!
17.06.2019 - 12:13
![]() Barb wrote:
Barb wrote:
Thanks for clarifying. I should have trusted the pattern and read ahead!
07.06.2019 - 17:45
![]() Barb wrote:
Barb wrote:
Hello! Love your pattern for baby cable sleeping bag but am stuck on the neck section. What am I to do with the 9 stitches held on the thread? As I begin the bind off for the neck, are these the stitches that are bound off ? Why are they held separate if not picked up later? Thanks for your help!
06.06.2019 - 18:30DROPS Design answered:
Dear Barb, work these 9 stitches at the beg of the row then slip them on a thread so that you don't need to cut the yarn, work row to the end, work row back then start to cast off for the neck at the beg of every row from RS (right front piece). These 9 sts will be then knit up when you will pick up the stitches for hood around neck. Happy knitting!
07.06.2019 - 08:28
![]() Noellie D'Ile De France wrote:
Noellie D'Ile De France wrote:
Bonjour, Je viens de découvrir votre site. Les modèles sont magnifiques : ils sortent vraiment de l'ordinaire. Je vais bientôt être grand-mère et espère pouvoir réaliser plusieurs de vos modèles. J'ai regardé également quelques tutoriels et les trouve bien filmés.
30.04.2019 - 12:48
![]() Elly De Bruijn wrote:
Elly De Bruijn wrote:
Hallo Ik ben begonnen met dit patroon, volgens patroon zet ik 56 steken op.na 4 cm als volgt:1 kantsteek,2 av.26 st.in a2,16 st. av.26 st. a22 av, 1 kantst.= volgens mij 74 st. ipv de 56 die ik volgens het patroon ( 6-9 mnd) heb opgezet wat heb ik Fout ?? Met vriendelijke groet, elly
10.04.2019 - 13:22DROPS Design answered:
Dag Elly,
Voor maat 6-9 maand heb je steeds het derde getal in de reeks getallen nodig, dus je moet 68 steken opzetten ipv 56 (het eerste getal is voor 0/1 en het tweede voor 1/3 maand.
11.04.2019 - 15:22
![]() Birgitta Eriksson wrote:
Birgitta Eriksson wrote:
Har lagt upp 68 maskor ökat till 32 maskor på vår sida om de 16 aviga maskorna. Får inte mönstret att stämma . Vad gör jag för fel.
12.03.2019 - 00:38DROPS Design answered:
Hej. Om du stickar strl 1/3 mån ska du ha 14 aviga maskor i mitten, inte 16. Lycka till!
13.03.2019 - 09:53
|
|||||||||||||||||||
Cable Snooze#cablesnoozebuntingbag |
|||||||||||||||||||
 |
 |
||||||||||||||||||
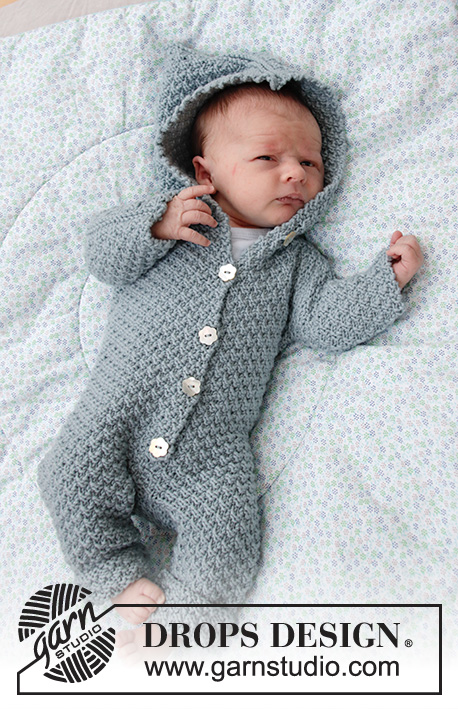
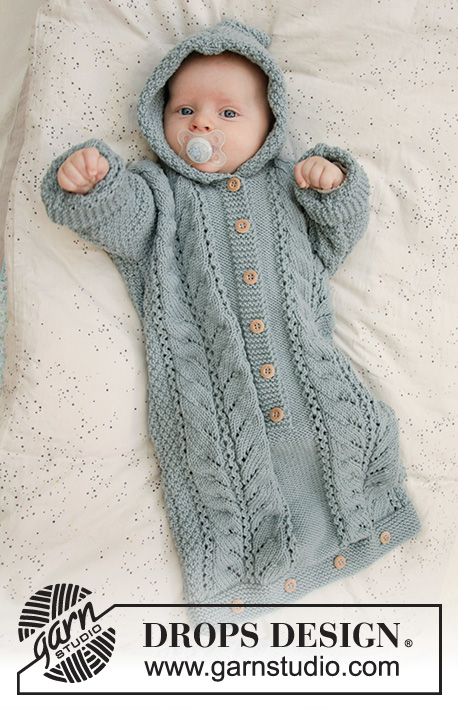
Knitted bag for babies in DROPS Merino Extra Fine. The piece is worked with lace pattern, double moss stitch and hood. Sizes premature – 2 years.
DROPS Baby 33-7 |
|||||||||||||||||||
|
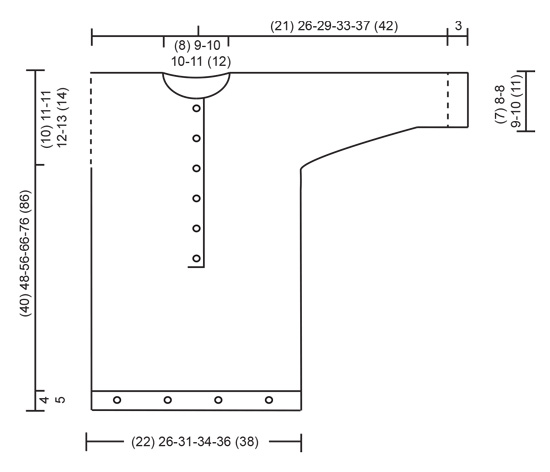
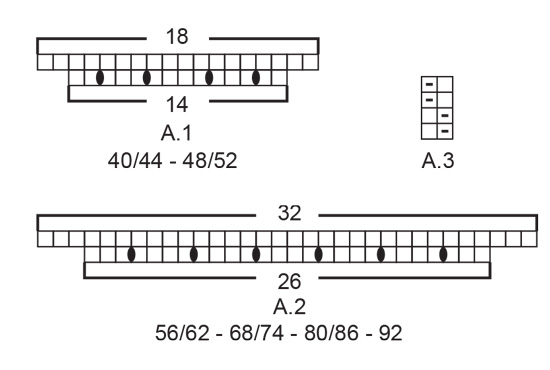
EXPLANATIONS FOR THE PATTERN: ------------------------------------------------------- RIDGE/GARTER STITCH (worked back and forth): 1 ridge = Knit 2 rows. PATTERN: Sizes (<0) 0/1 month: See diagrams A.1, A.3, A.4 and A.5. Sizes 1/3 - 6/9 - 12/18 months (2) years: See diagrams A.2, A.3 and A.6. The diagrams show all the rows in the pattern seen from the right side. BUTTONHOLE-1 (for bottom of bag): 1 BUTTONHOLE = knit 2 together, make 1 yarn over. On the next round knit the yarn over to leave a hole. The other (4) 4-4-5-5 (5) buttonholes are worked evenly spaced with approx. (4½) 5-6-5½-6 (6) cm between each. BUTTONHOLE-2 (for band mid front): Work buttonholes on the right band working from the right side. 1 BUTTONHOLE = knit together the 3rd and 4th stitch from the edge, make 1 yarn over. On the next row (wrong side) knit the yarn over to leave a hole. Work buttonholes when the band measures (measured from the marker): (<0) months: 2, 8, 14 and 20 cm 0/1 month: 2, 8, 14, 20 and 26 cm 1/3 months: 2, 7, 13, 18, 24 and 29 cm 6/9 months: 2, 9, 16, 23, 29 and 35 cm 12/18 months: 2, 8, 14, 20, 26, 32 and 38 cm (2) years: 2, 8, 15, 21, 28, 34 and 41 cm ------------------------------------------------------- START THE PIECE HERE: ------------------------------------------------------- BAG - SHORT OVERVIEW OF THE PIECE: The piece is worked back and forth with circular needle in 2 parts. You cast on stitches in each side for the sleeves. The piece is sewn together on the shoulders/mid top of sleeves and under sleeves. You work a hood to finish. FRONT PIECE: Cast on (48) 56-68-74-78 (82) stitches (including 1 edge stitch in each side) with circular needle size 4 mm and Merino Extra Fine. Work GARTER STITCH – read description above. When the piece measures (2) 2-2-2½-2½ (2½) cm work (4) 4-4-5-5 (5) buttonholes evenly spaced – read BUTTONHOLE-1. Continue with garter stitch until the piece measures (4) 4-4-5-5 (5) cm. The next row is worked as follows from the right side: SIZES (<0) 0/1 MONTH: 1 edge stitch in garter stitch, purl (2) 6 stitches, A.1 (= 14 stitches which increase to 18 stitches), purl (14) 14 stitches, A.1 (= 14 stitches which increase to 18 stitches), purl (2) 6 stitches and finish with 1 edge stitch in garter stitch = (56) 64 stitches on the row. Purl 1 row from the wrong side (edge stitches worked in garter stitch). The next row is worked as follows from the right side: 1 edge stitch in garter stitch, A.3 over the first (2) 6 stitches, A.4 (= 18 stitches), purl (14) 14, A.5 (= 18 stitches), A.3 over the next (2) 6 stitches and finish with 1 edge stitch in garter stitch. Then work as described under ALL SIZES! SIZES 1/3 - 6/9 - 12/18 MONTHS (2) YEARS: 1 edge stitch in garter stitch, purl 0-2-4 (6) stitches, work A.2 (= 26 stitches which increase to 32 stitches), purl 14-16-16 (16) stitches, A.2 (= 26 stitches which increase to 32 stitches), purl 0-2-4 (6) and finish with 1 edge stitch in garter stitch = 80-86-90 (94) stitches. Purl 1 row from the wrong side (edge stitches worked in garter stitch). The next row is worked as follows from the right side: 1 edge stitch in garter stitch, work A.3 over the first 0-2-4 (6) stitches, A.6 (= 32 stitches), purl 14-16-16 (16) stitches, A.6 (= 32 stitches), A.3 over the next 0-2-4 (6) stitches and finish with 1 edge stitch in garter stitch. Then work as described under ALL SIZES! ALL SIZES: Continue this pattern. REMEMBER THE KNITTING TENSION! When the piece measures (16) 18-22-26-32 (38) cm – adjust so that the next row is worked from the right side, divide the piece mid front and each side is finished separately. Cut the strand. Place the first (25) 29-37-40-42 (44) stitches, seen from the right side, on 1 thread (= left front piece). There are now (31) 35-43-46-48 (50) stitches left on needle for right front piece. RIGHT FRONT PIECE: = (31) 35-43-46-48 (50) stitches. Insert 1 marker in the piece - will be used to measure the positions of the buttonholes. Start from the right side and continue pattern as before, but the outermost 6 stitches towards mid front are worked in garter stitch (= band). Work buttonholes on the right band – read BUTTONHOLE-2. AT THE SAME TIME when the piece measures (30) 37-45-54-63 (72) cm from the cast-on edge cast on stitches for the sleeve at the end of each row from the right side (i.e. towards the side) as follows: Cast on (4) 6-6-7-9 (12) stitches a total of 3 times and then (14) 15-16-17-18 (18) stitches 1 time = (57) 68-77-84-93 (104) stitches on the needle (the new stitches are worked into A.3 as you go). When all stitches are cast on continue with pattern as before, but the outermost 12 stitches on the sleeve are worked in garter stitch (= turn-up). Continue working until the piece measures (37) 45-52-62-71 (81) cm. You should now have worked approx. 1 cm after the last buttonhole on the band, but adjust so that the next row is worked from the right side. On the next row (right side) place the outermost (7) 8-9-10-10 (11) stitches towards mid front on 1 thread for neck, but to avoid having to cut the strand, work the stitches before placing them on the thread. Continue the pattern as before. Then cast off for the neck at the beginning of each row from the neck as follows: Cast off 2 stitches 1 time and then 1 stitch (2) 2-2-2-3 (3) times = (46) 56-64-70-78 (88) stitches left on needle for shoulder/sleeve. Continue the pattern as before until the piece measures (39) 47-55-65-75 (85) cm, but adjust so that the next row is worked from the right side. Knit 1 row from the right side and at the same time decrease (4) 4-6-6-6 (6) stitches evenly over A.5/A.6 = (42) 52-58-64-72 (82) stitches on the row. Knit 1 row from the wrong side. Cast off with knit from the right side, but make sure that the cast-off edge is not tight. The piece measures approx. (40) 48-56-66-76 (86) cm from the cast-on edge. Work the left front piece as described below. LEFT FRONT PIECE: Place the (25) 29-37-40-42 (44) stitches from the strand back on the circular needle. Start from the right side and continue pattern as before. AT THE SAME TIME, at the end of the first row, knit up 6 new stitches behind the right band, i.e. knit up 1 stitch in each of the 6 band stitches = (31) 35-43-46-48 (50) stitches on needle. Continue pattern as before, but the outermost 6 stitches towards mid front are worked in garter stitch (= band – NOTE: do not work buttonholes on left band). AT THE SAME TIME when the piece measures (30) 37-45-54-63 (72) cm cast on new stitches for the sleeve at the end of each row from the wrong side (i.e. towards the side) as follows: Cast on (4) 6-6-7-9 (12) stitches a total of 3 times and then (14) 15-16-17-18 (18) stitches 1 time = (57) 68-77-84-93 (104) stitches on the needle (the new stitches are worked into A.3 as you go). When all stitches are cast on continue pattern as before, but the outermost 12 stitches on the sleeve are worked in garter stitch = turn up). Continue until the piece measures approx. (37) 45-52-62-71 (81) cm - adjust to match the right front piece and so that the next row is worked from the wrong side. On the next row (wrong side) place the outermost (7) 8-9-10-10 (11) stitches towards mid front on a thread for the neck, but to avoid having to cut the strand, work the stitches before placing them on the thread. Continue the pattern as before. Then cast off for the neck at the beginning of each row from the neck as follows: Cast off 2 stitches 1 time and then 1 stitch (2) 2-2-2-3 (3) times = (46) 56-64-70-78 (88) stitches left on shoulder/sleeve. Continue pattern as before until the piece measures (39) 47-55-65-75 (85) cm, but adjust so that the next row is from the right side. Knit 1 row from the right side and decrease at the same time (4) 4-6-6-6 (6) stitches evenly over A.4/A.6 = (42) 52-58-64-72 (82) stitches on needle. Knit 1 row from the wrong side. Cast off with knit from the right side, but make sure that the cast-off edge is not tight. The piece measures approx. (40) 48-56-66-76 (86) cm. Work the back piece as described below. BACK PIECE: Cast on (48) 56-68-74-78 (82) stitches and work garter stitch for (4) 4-4-5-5 (5) cm. Work 2 rows stocking stitch with 1 edge stitch in garter stitch in each side. The next row is worked as follows from the right side: 1 edge stitch in garter stitch, work A.3 until there is 1 stitch left on the row and finish with 1 edge stitch in garter stitch. Continue this pattern. When the piece measures (30) 37-45-54-63 (72) cm cast on new stitches for the sleeves at the end of each row on each side as follows: Cast on (4) 6-6-7-9 (12) stitches a total of 3 times on each side and then (14) 15-16-17-18 (18) stitches 1 time on each side = (100) 122-136-150-168 (190) stitches on the row (the new stitches are worked into A.3 as you go). When all stitches are cast on continue with A.3 as before, but the outermost 12 stitches on both sleeves are worked in garter stitch (= turn up). When the piece measures (38) 46-54-64-74 (84) cm cast off the middle (12) 14-16-18-20 (22) stitches for neck. Then cast off 2 stitches on the next row from the neck = (42) 52-58-64-72 (82) stitches left on needle for shoulder/sleeve. Continue pattern as before until there is 1 cm left before the piece measures (40) 48-56-66-76 (86) cm, but adjust so that the next row is worked from the right side. Knit 1 row from the right side and knit 1 row from the wrong side. Cast off with knit from the right side, but make sure that the cast-off edge is not tight. Work the other shoulder in the same way. ASSEMBLY: Sew shoulder/top of sleeve seams inside the cast-off edge. Sew under-sleeve seams and side seams inside the 1 edge stitch. Turn up the bottom 3 cm on each sleeve and fasten with a couple of small stitches on each side. Sew buttons onto bottom of bag (the buttons are sewn along the middle of the garter stitch edge on the back piece but on the wrong side so that they are buttoned through the buttonholes on the front piece). Sew the remaining buttons to the left band. HOOD: Knit up from the right side approx. 52 to 72 stitches around the neck (including the stitches from the threads in front) with circular needle size 4 mm and Merino Extra Fine. Knit 1 row from the wrong side. Then knit 1 row from the right side, where you increase evenly on row until you have a total of (68) 76-84-88-92 (96) stitches. Work A.3 back and forth over all stitches - AT THE SAME TIME cast on 6 new stitches at the end of the next 2 rows for the folding edge = (80) 88-96-100-104 (108) stitches. Continue with A.3 over all stitches until the hood measures approx. (18) 19-20-21-22 (23) cm. Knit 1 row from the right side and knit 1 row from the wrong side. Cast off with knit from the right side. Fold the hood double and sew together at the top, inside the cast-off edge. Fold the 6 outermost stitches on each side to the right side and sew down to the neck with small, neat stitches. |
|||||||||||||||||||
Diagram explanations |
|||||||||||||||||||
|
|||||||||||||||||||
 |
|||||||||||||||||||
 |
|||||||||||||||||||
 |
|||||||||||||||||||
 |
|||||||||||||||||||
Have you finished this pattern?Tag your pictures with #dropspattern #cablesnoozebuntingbag or submit them to the #dropsfan gallery. Do you need help with this pattern?You'll find 27 tutorial videos, a Comments/Questions area and more by visiting the pattern on garnstudio.com. © 1982-2026 DROPS Design A/S. We reserve all rights. This document, including all its sub-sections, has copyrights. Read more about what you can do with our patterns at the bottom of each pattern on our site. |
|||||||||||||||||||


With over 40 years in knitting and crochet design, DROPS Design offers one of the most extensive collections of free patterns on the internet - translated to 17 languages. As of today we count 324 catalogues and 12285 patterns translated into English (UK/cm).
We work hard to bring you the best knitting and crochet have to offer, inspiration and advice as well as great quality yarns at incredible prices! Would you like to use our patterns for other than personal use? You can read what you are allowed to do in the Copyright text at the bottom of all our patterns. Happy crafting!
Post a comment to pattern DROPS Baby 33-7
We would love to hear what you have to say about this pattern!
If you want to leave a question, please make sure you select the correct category in the form below, to speed up the answering process. Required fields are marked *.