
Popular categories
Looking for a yarn?


Comments / Questions (45)
![]() Blanca wrote:
Blanca wrote:
Buenas tardes, no entiendo dónde tengo que aplicar el diagrama A.6a y A.6b. Gracias
25.11.2019 - 20:29DROPS Design answered:
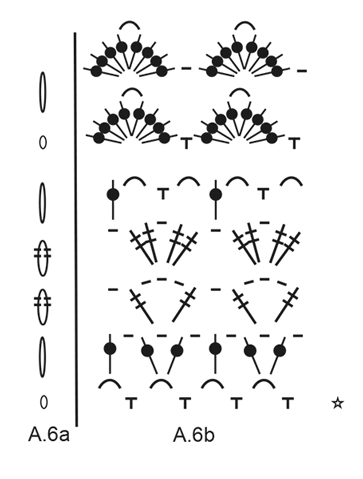
Hola Blanca. Los diagramas A.6a y A.6b se trabajan alrededor de la anteúltima fila de A.5 (por el lado revés). De modo que la última fila de A.5 estará sobre la primera fila de A.6.
30.11.2019 - 19:55
![]() Adelaide Marino wrote:
Adelaide Marino wrote:
Buonasera. Modello stupendo, ma non mi è chiara una cosa. Nella prima riga di A. 5b si finisce facendo tre catenelle prima dell'ultima maglia alta? Grazie
10.11.2019 - 18:46DROPS Design answered:
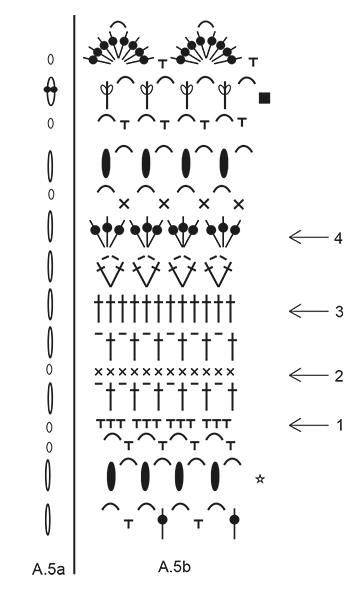
Buongiorno Adelaide. Inizia a lavorare il diagramma A.5b dalla riga con la stella sulla destra, quindi dalla seconda riga che trova nel diagramma. La prima riga del diagramma indica come si presentano le maglie della riga precedente ed è già stata lavorata. Buon lavoro!
11.11.2019 - 09:51
![]() Claire wrote:
Claire wrote:
Bonjour, J’arrive à la fin du diagramme où je suis sensée avoir 84 arceaux, seul hic, je crois que j’en ai beaucoup plus. Ou alors je compte mal les arceaux, à quoi correspond un arceau pour ce modèle s’il vous plaît ? Combien y aurait-il d’arceau après avoir crocheter les 4 derniers rangs deux fois ? (J’ai défait les 4 derniers rangs de la troisième répétition et j’aimerais vérifier que je ne me suis pas trompée jusque là). Merci pour votre reponse
05.11.2019 - 10:32DROPS Design answered:
Bonjour Claire, dans A.4, 1 arceau = 3 mailles en l'air dans le diagramme, on doit avoir un total de 84 fois ces 3 mailles en l'air (avec soit 1 maille serrée, soit 1 bride), soit 7 dans A.4d, 2 dans chaque A.4b, 6 dans chaque A.4c et 7 dan,s A.4a. Bon crochet!
05.11.2019 - 15:02
![]() Laurence wrote:
Laurence wrote:
Je me suis mal exprimée, je ne comprends pas comment faire le premier rang de a6 : crocheter 1 arceau supplémentaire dans chacun des 2 arceaux avant et après tous chaque fil marqueur (= on augmente 48 arceaux) = 180 arceaux. Or on ne pique pas dans des arceaux mais on entoure la demi bride. Je ne vois donc pas comment faire des arceaux complémentaires. Merci
07.10.2019 - 14:31DROPS Design answered:
Bonjour Laurence, vous augmentez dans A.6b comme vous avez fait auparavant dans A.5b aux flèches: crochetez 3 ml, 1 ms autour de la demi-bride, 3 ml, 1 ms autour de la même demi-bride pour augmenter 1 arceau. Bon crochet!
07.10.2019 - 15:04
![]() Laurence wrote:
Laurence wrote:
Bonjour, pouvez-vous expliquer comment on augmente le nombre d’arceaux en passant de a5b à a6b, je ne vois pas où piquer mon crochet pour faire les arceaux complémentaires. Merci
06.10.2019 - 22:48DROPS Design answered:
Bonjour Laurence, on augmente aux flèches 1 à 4 dans A.5b: 48 m au rang avec la flèche-1, 24 m aux rangs avec la flèche-2 et -3 et 48 m au rang avec la flèche-4. Augmentez aux fils marqueurs placés juste au début de A.5b. Bon crochet!
07.10.2019 - 10:12
![]() Menalys wrote:
Menalys wrote:
Bonjour, merci pour votre réponse rapide. Cependant je n'y arrive toujours pas. Même quand je lis le diagramme après 4 arceaux le premier point sur lequel on tombe c'est une maille serrée et non une bride donc ça coince. Pouvez-vous de nouveau m'expliquer? Merci bien.
23.09.2019 - 19:20DROPS Design answered:
Bonjour Mme Menalys, il se peut effectivement que vous ayez une maille serrée, mettez alors le marqueur dans cette maille serrée, ce qui compte ici, c'est bien le nombre d'arceaux entre les fils marqueurs. Bon crochet!
24.09.2019 - 10:22
![]() Menalys wrote:
Menalys wrote:
Bonjour, j'en suis à l'étape des 84 arceaux que je viens de finir. Je dois maintenant placer les 12 fils marqueurs mais impossible de comprendre les explications pour les placer correctement.... voulez-vous bien me ré expliquer autrement peut-être, s'il vous plaît ? Je vous remercie d'avance de votre aide.
22.09.2019 - 21:58DROPS Design answered:
Bonjour Mme Menalys, vous placez votre 1er fil marqueur dans la 1ère bride après les 4 premiers arceaux, puis vous allez espacer les 11 autres ainsi: comptez 7 arceaux, placez le marqueur dans la bride suivante (entre 2 arceaux), quand votre dernier fil marqueur est placé, il y a 3 arceaux entre ce marqueur et la fin du rang. Bon crochet!
23.09.2019 - 09:52
![]() Marijke wrote:
Marijke wrote:
Dag, ik begrijp dat u me er op weg kunt helpen, ik loop namelijk vast op de overgang van A3 naar A4. Ontstaan op dat punt verschillende lagen in de omslagdoek oid? "Haak nu een toer met lossenlussen op de verkeerde kant als volgt: Haak A4a over A3a, A4b over A3b, A4c over A3c, A4d over A3d." Alvast bedankt!
01.04.2019 - 16:20DROPS Design answered:
Dag Marijke,
Nee, het patroon bestaat niet uit verschillende lagen, maar uit 1 laag. Je moet het zo lezen, dat je A.4 boven A.3 haakt. Dus je haakt gewoon verder met de volgende toer met A.4.
04.04.2019 - 08:58
![]() Pauline wrote:
Pauline wrote:
Bonjour, j'arrive à la fin du diagramme A.3, si j'ajoute le diagramme A.4 j'obtiens bien 48 arceaux comme dans le majic summer. Or si je suis la description ci-dessus je dois encore répéter les 4 derniers rangs de A3 trois fois pour obtenir 84 arceaux. J'ai du me tromper quelque part ! Merci d'avance pour votre réponse !
04.03.2019 - 23:41DROPS Design answered:
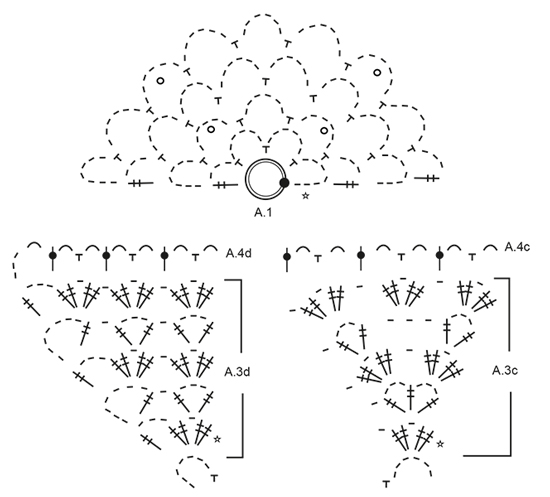
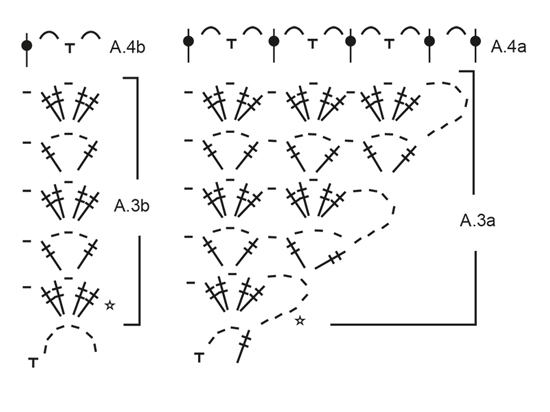
Bonjour Pauline, on répète effectivement les 4 derniers rangs de A.3 encore 3 fois (4 tois au total, soit d'abord 7 fois A.3b, puis 10 x A.3b, 13x A.3b et enfin 16x A.3b entre A.3a et A.3 c et A.3c et A.3c), puis on crochète A.4 = 84 arceaux. Bon crochet!
11.03.2019 - 08:50
![]() Kathi wrote:
Kathi wrote:
Hallo, das Tuch ist wirklich sehr schön. Ich möchte es gerne nach arbeiten aber verstehe leider nicht wie ich die Markierungsfäden anbringen muss. In das nächste Stäbchen nach vier Luftmaschenbögen also nach fünf Luftmaschenbögen? Und zähle ich trotzdem ab dem vierten Bogen oder ab der Markierung? Entschuldigung Sie bitte die dummen Fragen. Vielen Dank vorab! Liebe Grüße
15.02.2019 - 22:28DROPS Design answered:
Liebe Kathi, hier finden Sie Schritt-für-Schritt-Fotos sowie Video, wie dieses Tuch gehäkelt wird. Viel Spaß beim häkeln!
18.02.2019 - 09:02
|
|||||||||||||||||||||||||||||||||||||||||||||||||||||||
Alberta Autumn#albertaautumnshawl |
|||||||||||||||||||||||||||||||||||||||||||||||||||||||
 |
 |
||||||||||||||||||||||||||||||||||||||||||||||||||||||
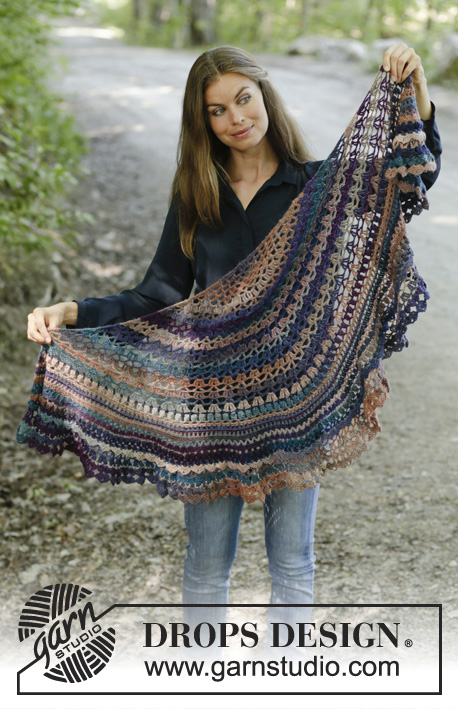
Crocheted shawl in DROPS Delight. Piece is crocheted top down with lace pattern and fans.
DROPS 197-30 |
|||||||||||||||||||||||||||||||||||||||||||||||||||||||
|
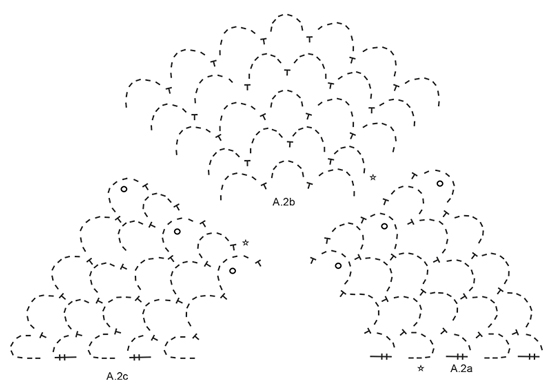
---------------------------------------------------------- EXPLANATION FOR THE PATTERN: ---------------------------------------------------------- PATTERN: See diagrams A.1 to A.6. A.5a and A.6a show how row begins. NOTE: Begin on rows drawn over each other in the same diagram even though they are worked alternately in right and left side of shawl and not over each other. ---------------------------------------------------------- START THE PIECE HERE: ---------------------------------------------------------- SHAWL - SHORT OVERVIEW OF THE PIECE: Piece is worked back and forth, top down. Work 5 chain stitches on hook size 3.5 mm with Delight and form a ring with 1 slip stitch in first chain stitch made. Start on row with star and work pattern according to diagram A.1 back and forth. When diagram has been worked, continue as follows: A.2a, A.2b and A.2c. When diagrams have been worked vertically, there are 17 chain spaces on row. Piece measures approx. 8 cm from the first chain stitch ring and down the middle of shawl. REMEMBER THE CROCHET TENSION! Now work pattern from right side as follows: Work A.3a around first chain space, A.3b around each of the next 7 chain spaces, A.3c around next chain space (= the middle chain space on shawl), A.3b around each of the next 7 chain spaces, A.3d around the last chain space. When A.3a to A.3d have been worked vertically, repeat the last 4 rows in diagrams 3 more times vertically. Piece measures approx. 37 cm from beginning and down the middle of shawl. Now work a row with chain spaces from wrong side as follows: Work A.4a over A.3a, A.4b over A.3b, A.4c over A.3c, A.4d over A.3d. There are now 84 chain spaces on row. Now insert 12 marker threads in the piece. This is done to make it easier to increase stitches evenly. Insert the markers in the piece as follows: Insert first marker thread in the stitch after 4 chain spaces, * skip 7 chain spaces and insert next marker thread in the next stitch *, repeat from *-* 11 times in total, 3 chain spaces remain on row. Then work pattern A.5b (A.5a shows how every row begins and is worked in addition to stitches in A.5b), AT THE SAME TIME on rows with arrow increase stitches evenly as follows: ARROW-1: Increase 2 double crochets on each side of marker threads by working 1 extra double crochet around each of the 2 chain spaces before and after marker threads (= 48 stitches increased) = 300 double crochets. ARROW-2: Increase 1 double crochet on each side of marker threads by working 2 double crochets in a stitch (= 24 stitches increased) = 324 double crochets. ARROW-3: Increase 1 treble crochet on each side of marker threads by working 2 treble crochets in a stitch (= 24 stitches increased) = 348 treble crochets. ARROW-4: Increase 2 treble crochets on each side of marker threads by working 1 extra treble crochet around each of the 2 chain spaces before and after marker threads (= 48 stitches increased) = 396 treble crochets. Work the remaining rows in diagrams. Piece measures approx. 51 cm from beginning and down the middle of shawl. There are now 66 fans (= 33 repetitions of A.5b) on row. Fold last row in A.5a/A.5b down so that right side is against right side and work from wrong side around row with black square in A.5b (= row with: 1 half treble crochet, 3 chain stitches, etc.) as follows: Work first row in A.6b as follows (A.6a shows how row begins and is worked in addition to A.6b): 4 chain stitches, 1 double crochet around first half treble crochet, work (3 chain stitches, 1 double crochet around next half treble crochet), work like this along the entire shawl AT THE SAME TIME increase 2 chain spaces on each side of marker threads by working 1 extra chain space in each of the 2 chain spaces before and after every marker thread (= 48 chain spaces increased) = 180 chain spaces. Continue back and forth with A.6a and A.6b until entire diagram has been worked vertically and finish with 1 treble crochet in edge stitch on previous row. When entire A.6a and A.6b have been worked vertically, there are 90 fans on row. Shawl measures approx. 60 cm from beginning and down the middle of shawl. Fasten off. |
|||||||||||||||||||||||||||||||||||||||||||||||||||||||
Diagram explanations |
|||||||||||||||||||||||||||||||||||||||||||||||||||||||
|
|||||||||||||||||||||||||||||||||||||||||||||||||||||||
 |
|||||||||||||||||||||||||||||||||||||||||||||||||||||||
 |
|||||||||||||||||||||||||||||||||||||||||||||||||||||||
 |
|||||||||||||||||||||||||||||||||||||||||||||||||||||||
 |
|||||||||||||||||||||||||||||||||||||||||||||||||||||||
 |
|||||||||||||||||||||||||||||||||||||||||||||||||||||||
Have you finished this pattern?Tag your pictures with #dropspattern #albertaautumnshawl or submit them to the #dropsfan gallery. Do you need help with this pattern?You'll find 12 tutorial videos, a Comments/Questions area and more by visiting the pattern on garnstudio.com. © 1982-2026 DROPS Design A/S. We reserve all rights. This document, including all its sub-sections, has copyrights. Read more about what you can do with our patterns at the bottom of each pattern on our site. |
|||||||||||||||||||||||||||||||||||||||||||||||||||||||


With over 40 years in knitting and crochet design, DROPS Design offers one of the most extensive collections of free patterns on the internet - translated to 17 languages. As of today we count 324 catalogues and 12291 patterns translated into English (UK/cm).
We work hard to bring you the best knitting and crochet have to offer, inspiration and advice as well as great quality yarns at incredible prices! Would you like to use our patterns for other than personal use? You can read what you are allowed to do in the Copyright text at the bottom of all our patterns. Happy crafting!
Post a comment to pattern DROPS 197-30
We would love to hear what you have to say about this pattern!
If you want to leave a question, please make sure you select the correct category in the form below, to speed up the answering process. Required fields are marked *.