
Popular categories
Looking for a yarn?


Comments / Questions (36)
![]() Monique wrote:
Monique wrote:
Is er een video van het stukje; plaats 70 steken op een hulpdraad voor de mouw, zet 10 steken op onder de mouw....ik kom er niet uir hoe dit moet. Dank alvast.
18.02.2019 - 16:35DROPS Design answered:
Dag Monique,
Deze video laat zien hoe je dat kunt doen. (Zelf vind ik het handig om een ongebruikte korte rondbreinaald, in plaats van een draad, te gebruiken om de steken op te parkeren.)
22.02.2019 - 14:36
![]() Juliette wrote:
Juliette wrote:
Et quand il s'agit d'un fil Drops que l'on veut tricoter en double voire en triple ? Comment convertir ?
09.02.2019 - 15:42DROPS Design answered:
Bonjour Juliette, vous trouverez ici les alternatives possibles entre les différentes groupes ainsi que le mode de calcul des nouvelles quantités. Bon tricot!
11.02.2019 - 12:24
![]() Juliette wrote:
Juliette wrote:
Bonjour. J'aimerais savoir le métrage nécessaire pour les différentes tailles. J'en ai besoin pour convertir le tricot dans une autre laine. Merci beaucoup :-)
07.02.2019 - 21:33DROPS Design answered:
Bonjour Juliette, Nous sommes en mesure de pouvoir proposer des modèles gratuits grâce à nos fils à tricoter et à crocheter vendus dans le monde entier. Vous comprendrez ainsi que nous ne pouvons que vous recommander d’utiliser l’une de nos qualités, à cet effet, vous pouvez utiliser notre convertisseur. N’hésitez pas à contacter votre magasin DROPS en France pour toute assistance. Merci pour votre compréhension.
08.02.2019 - 09:03
![]() Sonja wrote:
Sonja wrote:
Eine Frage wird der Zopf bereits ab unten jeweils um die eine Masche versetzt oder nur im letzten oberen Bereich ?
10.01.2019 - 11:19DROPS Design answered:
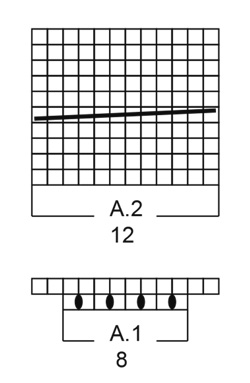
Liebe Sonja, der Pullover wird oben nach unten gestrickt, der Zopf wird in der 5. Runde von A.2 um eine Masche um links verschoben, bis die Arbeit 22-29 cm ab der Markierung misst. Dann A.2 "normal" stricken (die Zöpfen werden dann immer übereinander über die selben 12 Maschen gestrickt). Viel Spaß beim stricken!
10.01.2019 - 13:05
![]() Michelle Bertrand wrote:
Michelle Bertrand wrote:
Bonjour,Ou commence t\'on la torsade dans le col montant. Merci beaucoup
15.12.2018 - 18:23DROPS Design answered:
Bonjour Michelle! Oui, le diagramme A.2 (torsade) est fait sur le col montant. Bon tricot!
15.12.2018 - 20:00
![]() Hilde Balliere wrote:
Hilde Balliere wrote:
Artig genser! Jeg tror at jeg skjønner av en spørsmål/svar-runde på nederlandsk at man strikker A1 kun en gang. Det er A2 som utgjør fletten, og det er den som gjentas. Men gjentar man A2 på hver runde? Blir kke det enormt tett? Takk for svar!
01.12.2018 - 16:54DROPS Design answered:
Hei Hilde. Det stemmer: du strikker A.1 kun 1 gang, også strikker du A.2 over A.1 og gjentar A.2 oppover til ferdige mål. A.2 går over 10 omganger/runder og selve flettingen skjer på omgang 5. Du strikker altså 4 omganger rett, 1 omgang med fletting, 5 omganger rett = 1 rapport av A.2 i høyden. Så begynner du på nytt med 4 omganger rett osv. Det vil si at det er totalt 9 omganger glattstrikk mellom hver omgang med fletting. God fornøyelse.
05.12.2018 - 09:28Lisa wrote:
The cable is both diagrams A1 and A2 everytime we make it? Or we make A1 only once and then we make only A2? Thank u !
11.11.2018 - 15:01DROPS Design answered:
Hi Lisa, You work A.1 once and then continue with A.2 repeated in height over A.1. Happy knitting!
12.11.2018 - 08:02
![]() Deborah wrote:
Deborah wrote:
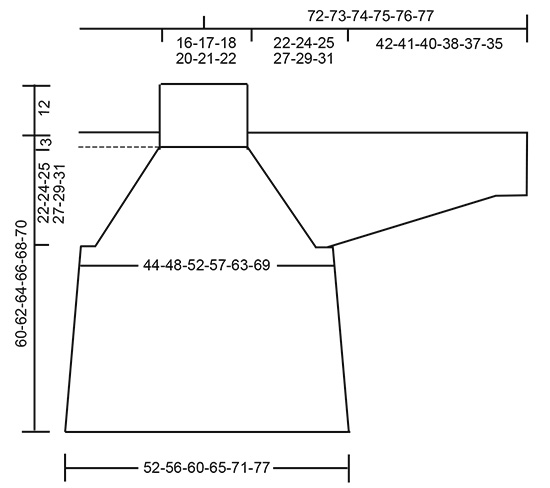
I understand the measurements in the pictures are in cm. Are they for the front only, or all the way around. For example, the smallest measurement on the front bottom edge is 52cm. Is that 52cm across the FRONT bottom edge, or both the front AND back together? Thank you in advance for your response. Love your patterns!!
30.10.2018 - 06:00DROPS Design answered:
Dear Deborah, measurements are taken flat from side to side, ie the bottom edge measures 52 cm = 104 cm circumference. Read more about sizing and measurements here. Happy knitting!
30.10.2018 - 08:50
![]() Karin wrote:
Karin wrote:
Mooie trui! Ik ben enthousiast begonnen en heb nu zo'n 20 cm gebreid. Maar nu valt op dat de vier raglanlijnen alle vier naar links buigen. Gaat dat wel goed? Moeten er niet twee naar links en twee naar rechts buigen?Ik durf bijna niet verder te breien...
22.10.2018 - 19:02DROPS Design answered:
Dag Karin,
Als je meerdert voor de raglan, meerder je aan beide kanten van de 4 markeerdraden. De meerderingen zijn voor het lijf en de mouwen hetzelfde, dus ze zouden in een rechte diagnale lijn moeten lopen, zonder kromming. Lees anders ook nog even TIP VOOR HET MEERDEREN-1
23.10.2018 - 19:17
![]() Valérie HOCHET wrote:
Valérie HOCHET wrote:
Bonjour à toute l'équipe. Ma question concerne la torsade. Je ne suis pas sûre de comprendre le décalage d'une maille gauche. Disons que ça cela va, mais que se passe t'il au niveau du reste du tricot? Cela décale t il aussi les endroits où on fait les augmentations au niveau des marqueurs, tout du moins ceux qui entourent la torsades. Merci pour votre réponse, j'en suis justement à cet endroit du tricot et je suis impatiente de continuer. D'avance merci
14.10.2018 - 23:47DROPS Design answered:
Bonjour Mme Hochet, le décalage de la torsade ne va pas modifier les augmentations du raglan = augmentez comme avant pour le raglan, et en même temps, décalez la torsade comme indiqué à chaque fois qu'il faut croiser les mailles (pas entre ces rangs). Bon tricot!
15.10.2018 - 10:44
|
||||||||||
Malmö#malmosweater |
||||||||||
 |
 |
|||||||||
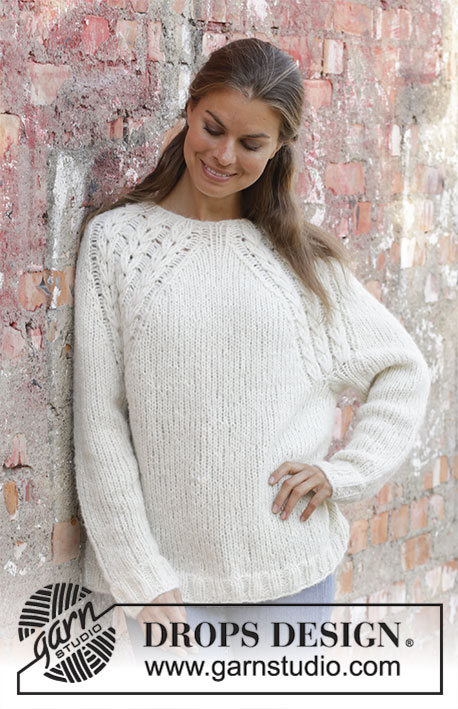
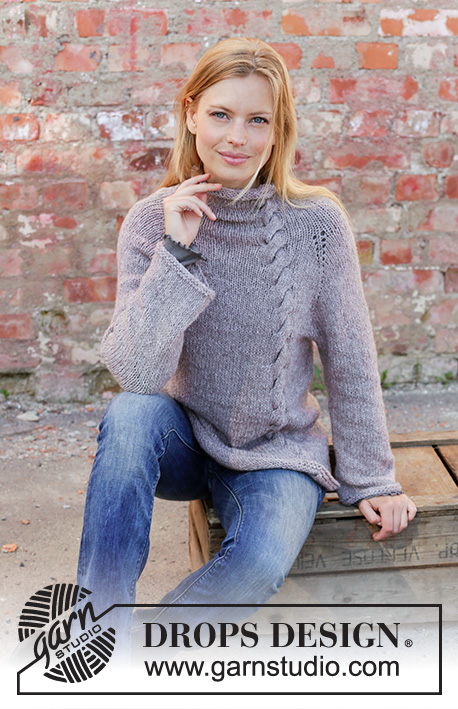
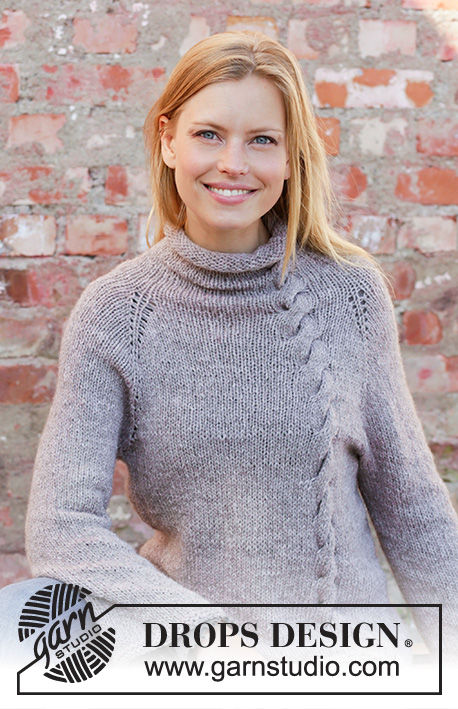
Knitted jumper with raglan in DROPS Sky. The piece is worked top down with cable, high neck and rolled edge. Sizes S - XXXL.
DROPS 194-8 |
||||||||||
|
EXPLANATIONS FOR THE PATTERN: ------------------------------------------------------- RIDGE/GARTER STITCH (worked in the round): 1 ridge = 2 rounds. Knit 1 round and purl 1 round. PATTERN: See diagrams A.1 and A.2. CABLE: The next time you work the cable (i.e. on round 5 in A.2), it is displaced by 1 stitch to the left as follows: Work as before as far as A.2, knit 1, place the next 6 stitches on cable needle behind the piece, knit 6, knit 6 from the cable needle. Displace the cable like this (i.e. 1 stitch to the left) each time you work it until the piece measures 22-24-25-27-29-31 cm from the marker thread (i.e. to end of yoke). INCREASE TIP-1 (for raglan): Work until there is 1 stitch left before the marker, make 1 yarn over (= 1 stitch increased), knit 1, 1 yarn over (= 1 stitch increased). Increase like this by each of the 4 marker threads (= a total of 8 stitches increased). The yarn overs are not worked twisted on the next round so you will have holes! INCREASE TIP-2 (for sides of body): Work until there are 2 stitches left before the marker thread, 1 yarn over, knit 4 (the marker thread sits in the middle of these 4 stitches) 1 yarn over (= a total of 4 stitches increased on the round as there are 2 marker threads). On the next round knit the yarn overs twisted to avoid holes. Then knit the new stitches. DECREASE TIP (for sleeves): Decrease 1 stitch on each side of the marker thread as follows: Work until there are 3 stitches left before the marker thread, knit 2 together, knit 2 (the marker thread sits in the middle of these 2 stitches), slip 1 stitch as if to knit, knit 1, pass the slipped stitch over the knitted stitch. ------------------------------------------------------- START THE PIECE HERE: ------------------------------------------------------- JUMPER - SHORT OVERVIEW OF THE PIECE: The piece is worked in the round with circular needle, top down. First you work a high neck, then the yoke. The yoke is divided for body and sleeves. The body is worked in the round with circular needle and the sleeves in the round with double pointed needles HIGH NECK: Cast on 84-88-92-96-104-112 stitches with circular needle size 5 mm and Sky. Work stocking stitch for 3 cm (= rolled edge). Then work rib (= knit 1 / purl 1) over all stitches. Work a total of 3 rounds of rib. Then continue as follows (the round starts mid back): Knit 44-47-50-53-59-65 stitches, A.1 (= 8 stitches) and finish with knit 32-33-34-35-37-39 stitches. When A.1 has been worked 1 time in height there are 88-92-96-100-108-116 stitches on the needle. Work A.2 (= 12 stitches) over A.1. REMEMBER THE KNITTING TENSION! When the piece measures 12 cm, insert 1 marker thread in the piece; THE PIECE IS NOW MEASURED FROM HERE! YOKE: On the next round insert 4 markers for raglan as follows: Knit 15-16-17-18-20-22 stitches (= half back piece), insert 1 marker, knit 12 stitches (= right sleeve), insert 1 marker, knit 17-19-21-23-27-31 stitches, A.2 as before (= 12 stitches), knit 5 stitches (= front piece), insert 1 marker, knit 12 stitches (= left sleeve), insert 1 marker and finish with knit 15-16-17-18-20-22 stitches (= half back piece). Now increase to raglan and displace the cable in A.2 by 1 stitch to the left each time it is worked – read CABLE. On the next round increase 1 stitch on each side of each marker – read INCREASE TIP-1! Increase like this every 2nd round a total of 23-26-28-31-33-36 times = 272-300-320-348-372-404 stitches. Continue working knit and A.2 as before until the piece measures 22-24-25-27-29-31 cm from the marker thread. Now divide the piece for body and sleeves as follows: Knit 38-42-44-49-54-60 stitches (= half back piece), place the next 58-64-70-74-76-80 stitches on a thread for sleeve, cast on 8-8-10-10-12-12 stitches under the sleeve, knit and work A.2 over the next 80-88-92-102-112-124 stitches as before (= front piece), place the next 58-64-70-74-76-80 stitches on a thread for sleeve, cast on 8-8-10-10-12-12 stitches under the sleeve and finish with knit 38-42-44-49-54-60 stitches (= half back piece) = 172-188-200-220-244-268 stitches. BODY: Insert 1 marker thread in the middle of the 8-8-10-10-12-12 stitches under each sleeve. Continue in the round with knit and A.2 (A.2 is now worked over the same stitches to finished length, i.e. displacing is now finished). When the piece measures 3 cm from where the body was divided from the sleeves, increase 1 stitch on each side of each marker thread – read INCREASE TIP-2! Increase like this every 4th row a total of 7-7-8-8-7-7 times = 200-216-232-252-272-296 stitches. Continue with knit until the piece measures 34-34-35-35-35-35 cm from where the body was divided from the sleeves. Change to circular needle size 4 mm. Work 2 RIDGES – read description above. Cast off with knit. The piece measures approx. 60-62-64-66-68-70 cm from the shoulder down. SLEEVE: Place the 58-64-70-74-76-80 stitches from the thread on the one side of the piece on double pointed needles size 5 mm and knit up 1 stitch in each of the 8-8-10-10-12-12 stitches cast on under the sleeve = 66-72-80-84-88-92 stitches. Insert 1 marker thread in the middle of the 8-8-10-10-12-12 stitches under the sleeve. Knit. When the piece measures 3 cm from where the sleeve was divided from the body, decrease 1 stitch on each side of the marker thread – read DECREASE TIP! Decrease like this every 6-3½-2½-2-2-1½ cm a total of 6-9-12-13-14-16 times = 54-54-56-58-60-60 stitches. When the piece measures 41-40-39-37-36-34 cm from where the sleeve was divided from the body, change to double pointed needles size 4 mm and work 2 ridges. Cast off with knit. The sleeve measures approx. 64-65-65-65-66-67 cm from the cast-on edge. Work the other sleeve in the same way. |
||||||||||
Diagram explanations |
||||||||||
|
||||||||||
 |
||||||||||
 |
||||||||||
Have you finished this pattern?Tag your pictures with #dropspattern #malmosweater or submit them to the #dropsfan gallery. Do you need help with this pattern?You'll find 28 tutorial videos, a Comments/Questions area and more by visiting the pattern on garnstudio.com. © 1982-2026 DROPS Design A/S. We reserve all rights. This document, including all its sub-sections, has copyrights. Read more about what you can do with our patterns at the bottom of each pattern on our site. |
||||||||||


With over 40 years in knitting and crochet design, DROPS Design offers one of the most extensive collections of free patterns on the internet - translated to 17 languages. As of today we count 324 catalogues and 12239 patterns translated into English (UK/cm).
We work hard to bring you the best knitting and crochet have to offer, inspiration and advice as well as great quality yarns at incredible prices! Would you like to use our patterns for other than personal use? You can read what you are allowed to do in the Copyright text at the bottom of all our patterns. Happy crafting!
Post a comment to pattern DROPS 194-8
We would love to hear what you have to say about this pattern!
If you want to leave a question, please make sure you select the correct category in the form below, to speed up the answering process. Required fields are marked *.